/**
   Jcrop version: 0.9.12
  jQuery version: 1.9.0
   Author: 小dee
   Date: 2014.10.30
*/
先看看他山之石:博客园的头像模块也是使用的 Jcrop 插件,处理方式如图
博客园图1:

高度大于宽度时
博客园图2:

再看看新浪微博( http://account.weibo.com/set/photo ),它使用的是 flash,如图:

最后看豆瓣( http://www.douban.com/accounts/user_icon/ ),它使用的是 imgAreaSelect 插件:
豆瓣图1:

豆瓣图2:

我觉得新浪微博的处理方式更利于布局,也就是说不论上传多大尺寸的图片,都会把图片放在一个宽高固定的外围框中,页面的布局是固定不变的,不太会由于用户上传意想不到尺寸的图片( 其实... 这种几率比较小吧) 而影响布局的效果。
===================华丽的分割线=====================
本模块基于 jQuery 的插件 Jcrop,部分功能是直接使用 API 实现,部分功能使用 jQuery 实现,处理的方式类似新浪微博。
效果图:

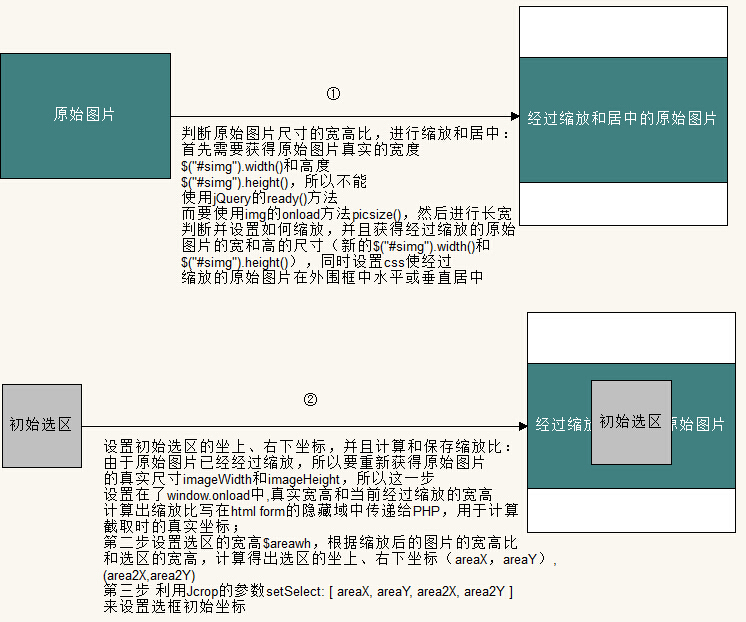
流程图:

坐标信息图:

功能一. 原图不论尺寸多大,都居中显示在固定尺寸的外围框中,如图:
①原图宽高相等时,把原图的宽高设置为何外围框相同尺寸:

②原图宽 > 高 时,原图在外围框中垂直居中显示:

③原图宽 < 高 时,原图在外围框中水平居中显示:
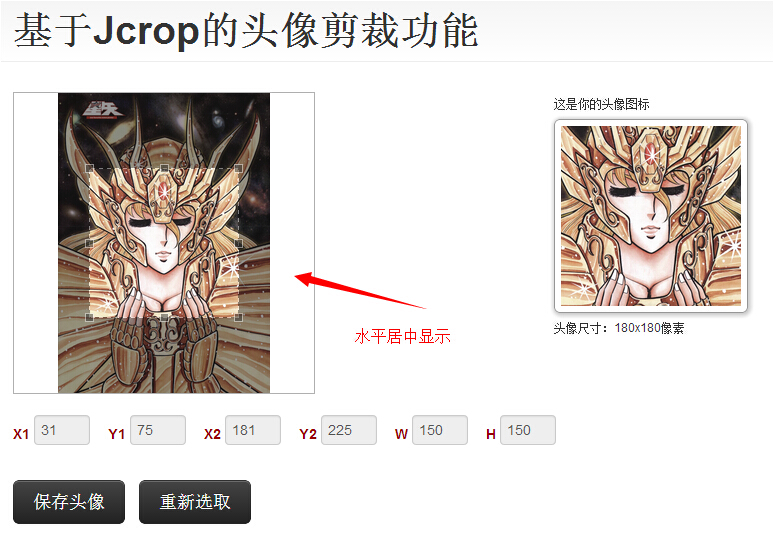
功能二. 初始时加载居中的默认选区,同时预览图与选区的位置相对应
功能三. 显示/隐藏 选区的左上、右下坐标值以及宽度和高度
功能四. 保存头像,保存剪裁后的图片至服务器
功能五.重新选取选区
功能六.移动和缩放选区
使用到的参数和 API 接口:
参数 -
| aspectRatio | 0 | 选框宽高比。说明:width/height |
| boxWidth | 0 | 画布宽度 |
| boxHeight | 0 | 画布高度 |
| boundary | 2 | 边界。说明:可以从边界开始拖动鼠标选择裁剪区域 |
| onChange | function(){} | 选框改变时的事件 |
| onSelect | function(){} | 选框选定时的事件 |
| onDblClick | function(){} | 在选框内双击时的事件 |
| onRelease | function(){} | 取消选框时的事件 |
接口 -
| release() | 取消选框 |
| setSelect(array) | 创建选框,参数格式为:[x, y, x2, y2] |
代码:
一. 原始图片缩放居中
设置原始图片缩放并在外围框中居中:
//原图加载完之后调用
    function picsize(){

        //在原图外围框中,如果原图宽高比为1,则缩放至和外围框一样的尺寸
        if( $("#simg").width() == $("#simg").height() ){

            $("#simg").width($("#piccon").width());
            $("#simg").height($("#piccon").height());

        }else if( $("#simg").width() > $("#simg").height() ){ //当原图宽 > 高

            $("#simg").width($("#piccon").width());

            //jquery.Jcrop.js line:1654 baseClass: 'jcrop',
            //line:332
            $(".jcrop-holder").css({
                "position":"absolute",
                    "top":"50%",
                    "left":0,
                    "margin-top":-($("#simg").height()/2)
            });

        }else{ //当原图宽 < 高

            $("#simg").height($("#piccon").height());

            $(".jcrop-holder").css({
                "position":"absolute",
                    "top":0,
                    "left":"50%",
                    "margin-left":-($("#simg").width()/2)
            });
        }
    }
说明:在设置原图居中时,js 给原图设置 css 时,不能按照 HTML 中原图的 ID 来设置,原图在 HTML 中的代码为:
<div id="piccon">
        <!-- 原图 -->
        <img src="demo_files/pic3.jpg" id="simg" onload="picsize()" />
</div>
本来这里原图 img 的 id 为"simg",但是在 jquery.Jcrop.js 文件的 line:314 中有如下的设置:
var $img = $origimg.clone().removeAttr('id').css(img_css).show();
$img.width($origimg.width());
$img.height($origimg.height());
$origimg.after($img).hide();

...

 var boundx = $img.width(),
 boundy = $img.height(),


$div = $('<div />').width(boundx).height(boundy).addClass(cssClass('holder')).css({
    position: 'relative',
    backgroundColor: options.bgColor
}).insertAfter($origimg).append($img);
line:1644 有如下设置:
$.Jcrop.defaults = {
  ...
  // Styling Options
    baseClass: 'jcrop',
  ...
所以在设置原图 css 的时候 不能使用原来的 id ,要使用 addClass 的 .jcrop-holder .
二. 选区居中:
    function wonload(){

        //设置初始选框的宽高,可根据外围框的大小来设置,此案例外围框宽高设置为300,初始选区宽高可以设置为150
        $areawh = 150;

        //获取图片的原始尺寸
        var screenImage = $("#simg");

        var theImage = new Image();
        theImage.src = screenImage.attr("src");

        var imageWidth = theImage.width;
        var imageHeight = theImage.height;

        //设置初始选框左上坐标
        if( $("#simg").width() == $("#simg").height() ){

            areaX = ($("#piccon").width() - $areawh)/2;
            areaY = ($("#piccon").height() - $areawh)/2;

            area2X = ($("#piccon").width() - $areawh)/2 + $areawh;
            area2Y = ($("#piccon").height() - $areawh)/2 + $areawh;

            //进行缩放后要把图片原始尺寸的缩放值传递给PHP
            $scalls = imageWidth / $("#simg").width();
            $("#scalls").val($scalls);

        }else if( $("#simg").width() > $("#simg").height() ){ //当原图宽 > 高

            //如果外围框中原图高(经过缩放)小于150,就给一个更小的选区高
            $areawh > $("#simg").height()?$areawh = 100:$areawh;


            areaX = ($("#piccon").width() - $areawh)/2;
            areaY = ($("#simg").height() - $areawh)/2;

            area2X = ($("#piccon").width() - $areawh)/2 + $areawh;
            area2Y = ($("#simg").height() - $areawh)/2 + $areawh;

            $scalls = theImage.height / $("#simg").height();
            $("#scalls").val($scalls);

        }else{ //当原图宽 < 高

            $areawh > $("#simg").width()?$areawh = 100:$areawh;

            areaX = ($("#simg").width() - $areawh)/2;
            areaY = ($("#piccon").height() - $areawh)/2;

            area2X = ($("#simg").width() - $areawh)/2 + $areawh;
            area2Y = ($("#piccon").height() - $areawh)/2 + $areawh;

            $scalls =  imageWidth / $("#simg").width();
            $("#scalls").val($scalls);
        }
三. 把原始图片的原始尺寸和经过缩放后的尺寸相除,得出缩放比,放入表单的隐藏域传给 PHP 文件:
<!-- 缩放比传递给PHP -->
<input type="hidden" id="scalls" name="scalls"/>
在 PHP 文件中接受参数并截图:
//缩放值
$scalls = $_POST['scalls'];

$img_r = imagecreatefromjpeg($src);
$dst_r = ImageCreateTrueColor( $targ_w, $targ_h ); //建立黑色背景的预览窗口

imagecopyresampled($dst_r,$img_r,0,0,$scalls*$_POST['x1'],$scalls*$_POST['y1'],$targ_w,$targ_h,$scalls*$_POST['w'],$scalls*$_POST['h']); //重采样拷贝部分图像并调整大小
代码下载地址:https://github.com/dee0912/imgCrop_Jcrop
如需转载,请在文章页面保留此说明并且给出原文链接。谢谢!