背景
[作者:DeepLearningStack,阿里巴巴算法工程师,开源TensorFlow Contributor]
欢迎大家关注我的公众号,“互联网西门二少”,我将继续输出我的技术干货~

在TensorFlow源码中我们经常能看到一个奇怪的词——Rendezvous。如果从仔细统计该单词出现的频率和模块,你会发现无论在单机还是分布式,无论在core目录还是contrib目录都存在它的身影,所涉及的模块非常多。Rendezvous是一个法语单词,发音也比较特殊,一般直译为“约会、相会、会和”,而在TensorFlow中,Rendezvous是用来完成消息传输的通信组件。大部分源码读者在起初阅读时通信部分的代码时可能会觉得有点懵圈,为什么不使用Communicator这样简单明了的单词来表明通信过程,反而使用这样一个晦涩的法语词作为抽象呢?其实在了解TensorFlow消息通信的原理后就会发现,使用Rendezvous作为这一过程的抽象是非常贴切的。
因为Rendezvous所涉及的模块组件较多,为了让读者循序渐进地理解TensorFlow中的通信机制,决定将Rendezvous分成多个系列,由浅入深分开梳理。这样做的目的不但能让读者阅读时对整体层次结构有较好的把握,而且简短的篇幅也便于阅读,所以建议读者按顺序阅读本系列。 本文是TensorFlow通信机制系列的第一篇文章,侧重整体结构和本地传输通信的梳理。
消息传输的唯一标识符——ParsedKey
在TensorFlow中无论是单机还是分布式都涉及到消息传输,并且消息传输总是从发送端Send,接收端Recv。那么这里就存在一个消息的对应问题:在多组消息同时发送接收时,需要对每一对Send和Recv梳理一个对应关系,即Send端发送的消息与Recv端接收的消息不能有错位。如果Recv端本打算接收的消息是A,但由于消息对应错误导致接收到了B,那么整个训练过程就会出现错误。其实解决这个问题也非常简单,因为每一对Send和Recv所处理消息都是同一个,所以只要让某个消息在被Send前加上一个唯一标识符,而Recv在接收消息前也能够按照某种规则拼出一样的唯一标识符,这个对应关系就完美解决了。在TensorFlow中确实定义了这样一种标识符,它就是结构体ParsedKey。
ParsedKey结构体
在tensorflow/core/framework/rendezvous.h的Rendezvous类内定义了结构体ParsedKey,它内容非常简短却又十分全面,不但包含了消息传输的所有必须的内容,还具备唯一性,在我们直接分析其源代码结构。
 1 // Parses the key constructed by CreateKey and parse src/dst device
 2 // names into structures respectively.
 3 struct ParsedKey {
 4   StringPiece src_device;
 5   DeviceNameUtils::ParsedName src;
 6   uint64 src_incarnation = 0;
 7   StringPiece dst_device;
 8   DeviceNameUtils::ParsedName dst;
 9   StringPiece edge_name;
10
11   ParsedKey() {}
12   ParsedKey(const ParsedKey& b) { *this = b; }
13
14   ParsedKey& operator=(const ParsedKey& b);
15   StringPiece FullKey() const { return buf_; }
16
17  private:
18   friend class Rendezvous;
19   friend class SendOp;
20   friend class RecvOp;
21   string buf_;
22 };
可以看到其结构非常简单,一个完备的ParsedKey要包括六个部分。
src_device:消息发送源的字符串信息,形如/job:localhost/replica:0/task_id:0/device:GPU:0
src:和src_device的信息量相同,只不过是结构体的表示方法
src_incarnation:一般来说这个字段没有什么作用,但是当某个worker重启后,该值会发生变化,用来和之前挂掉的worker做区分,这便于debug
dst_device:消息发送的接收方字符串信息,格式和src_device相同
dst:和dst_device的信息量相同,只不过是结构体的表示方法
edge_name:这个字段是该Key最特殊的地方,它可以灵活指定为任何字符串,实现不同Key的区分。比如它可以是Tensor的名字,也可以是具有某种特殊意义的固定字符串
CreateKey过程与ParseKey过程
一般情况下,在TensorFlow中应该优先使用CreateKey函数来构造可以解析的Key字符串,然后经过ParseKey过程将该字符串的每个信息解析到ParsedKey结构体中,之所以使用CreateKey函数构造Key字符串是因为这是最安全保险的方式,下面是CreateKey函数构造Key字符串的过程展现。
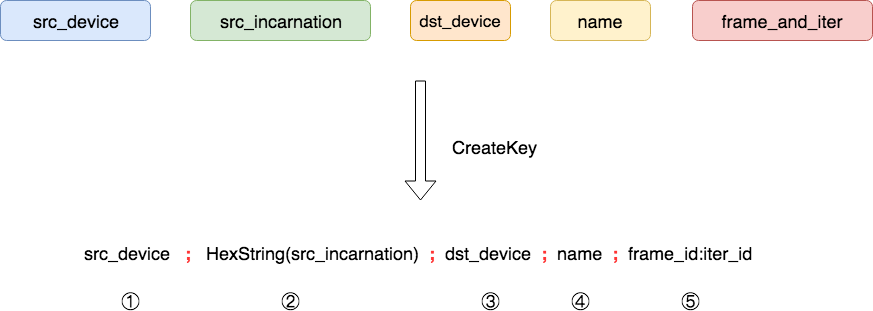
CreateKey只要接受五个参数即可安全构造字符串形式的Key,这里面特殊之处有两个,a. 参数中frame_and_iter一般直接取自OpKernelContext中的FrameAndIter对象;b. src_incarnation要做一个十六进制的字符串转换。CreateKey函数的输出是以分号(";")为分隔符的字符串,该字符串同样包含五个域。CreateKey是一个static函数,代码比较简单,就不在这里列出。随后我们这个字符串传入ParseKey函数即可完成结构体ParsedKey的解析,解析过程如下。
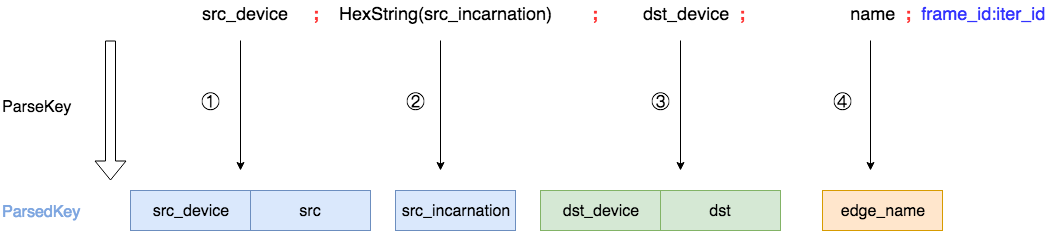
ParseKey对输入字符串的前四个域做了映射,抛弃了第五个域,但是在提供Key字符串时需要提供完整的五个域,否则会检查报错。和CreateKey相同,ParseKey过程也是一个static函数,代码如下所示。
 1 /* static */
 2 Status Rendezvous::ParseKey(StringPiece key, ParsedKey* out) {
 3   if (key.data() == out->buf_.data()) {
 4     // Caller used our buf_ string directly, so we don't need to copy.  (The
 5     // SendOp and RecvOp implementations do this, for example).
 6     DCHECK_EQ(key.size(), out->buf_.size());
 7   } else {
 8     // Make a copy that our StringPieces can point at a copy that will persist
 9     // for the lifetime of the ParsedKey object.
10     out->buf_.assign(key.data(), key.size());
11   }
12   StringPiece s(out->buf_);
13   StringPiece parts[5];
14   for (int i = 0; i < 5; i++) {
15     parts[i] = ConsumeNextPart(&s, ';');
16   }
17   if (s.empty() &&          // Consumed the whole string
18       !parts[4].empty() &&  // Exactly five parts
19       DeviceNameUtils::ParseFullName(parts[0], &out->src) &&
20       strings::HexStringToUint64(parts[1], &out->src_incarnation) &&
21       DeviceNameUtils::ParseFullName(parts[2], &out->dst) &&
22       !parts[3].empty()) {
23     out->src_device = StringPiece(parts[0].data(), parts[0].size());
24     out->dst_device = StringPiece(parts[2].data(), parts[2].size());
25     out->edge_name = StringPiece(parts[3].data(), parts[3].size());
26     return Status::OK();
27   }
28   return errors::InvalidArgument("Invalid  rendezvous key: ", key);
29 }
Rendezvous
在了解ParsedKey之后,我们就可以窥探Rendezvous这个类的内部结构和实现了。最基本的Rendezvous类被定义在了tensorflow/core/framework/rendezvous.h文件中,它对外提供了最基本的Send、Recv和RecvAsync接口和实现。总体来说这个类还是比较抽象的,在不同的通信场景下需要提供不同的实现。比如对于本地传输来说,TensorFlow提供了LocalRendezvous和IntraProcessRendezvous实现类,对于使用跨进程通信场景来说,TensorFlow提供了RemouteRendezvous实现系列。不同通信场景的实现细节差别相当大,所以本系列将对这些做逐个梳理,本文只关注本地传输部分。如果对跨进程传输感兴趣,那么请关注该系列的下一篇文章。Rendezvous类中最重要的函数是Send和Recv系列,它们的签名和注释如下代码所示。
 1 // The caller is a tensor producer and it sends a message (a tensor
 2 // "val" and a bool "is_dead") under the given "key".
 3 //
 4 // {val, is_dead} is bundled as a message sent and received.
 5 // Typically, is_dead is set by some control flow nodes
 6 // (e.g., a not-taken branch).  args is passed by Send to the
 7 // Recv function to communicate any information that the Recv
 8 // function might need.  This is typically only necessary for
 9 // Send/Recv on the same worker.
10 //
11 // Send() never blocks.
12 virtual Status Send(const ParsedKey& key, const Args& args, const Tensor& val, const bool is_dead) = 0;
13
14 virtual void RecvAsync(const ParsedKey& key, const Args& args, DoneCallback done) = 0;
15
16 // Synchronous wrapper for RecvAsync.
17 Status Recv(const ParsedKey& key, const Args& args, Tensor* val, bool* is_dead, int64 timeout_ms);
18 Status Recv(const ParsedKey& key, const Args& args, Tensor* val, bool* is_dead);
TensorFlow中的Recv有两种,一种是同步版本,换一种是异步版本。通常情况下为了计算和通信的overlap,TensorFlow广泛使用了RecvAsync函数。并且在后面一节中我们可以知道,Send过程并不是真的参与数据通信,所有的通信过程均由RecvAsync完成。
Rendezvous相关类结构
在了解通信过程之前,应该先熟悉下Rendezvous相关的类结构。下面的类图展示了当期TensorFlow系统中所有的Rendezvous相关类图结构。
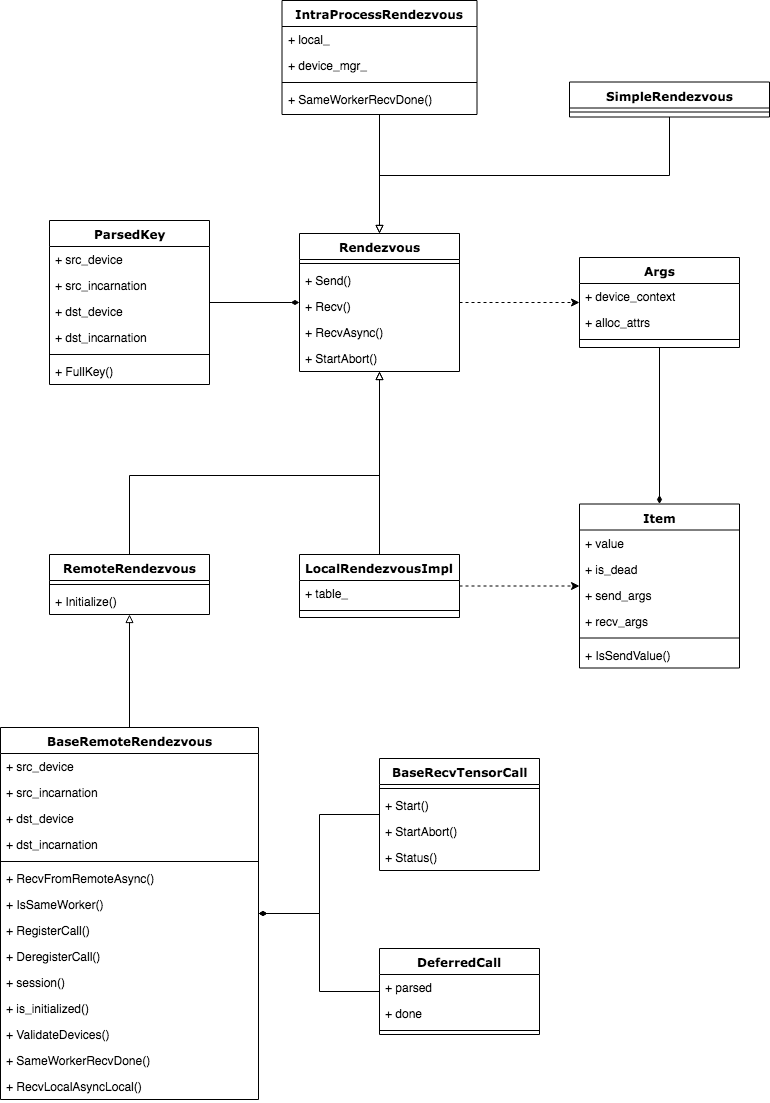
所有的Rendezvous相关类都以Rendezvous基类为核心,LocalRendezvous和IntraProcessRendezvous是我们本文分析的重点,SimpleRendezvous实现非常简单,读者可以在熟悉前两个实现之后自行分析该类。而BaseRemoteRendezvous类以及相关类是跨进程通信相关的组件,这部分内容将在下一篇文章中分析。
Rendezvous基类中的Recv函数
因为Recv函数只是RecvAsync函数的同步版本封装,因此在每个实现类继承重新函数时,只需要提供Send函数的实现和RecvAsync函数实现即可,下面的代码是Rendezvous基类中同步版本实现。
 1 Status Rendezvous::Recv(const ParsedKey& key, const Args& recv_args,
 2                         Tensor* val, bool* is_dead, int64 timeout_ms) {
 3   Status ret;
 4   Notification n;
 5   RecvAsync(key, recv_args,
 6             [&ret, &n, val, is_dead](const Status& s, const Args& send_args,
 7                                      const Args& recv_args, const Tensor& v,
 8                                      const bool dead) {
 9               ret = s;
10               *val = v;
11               *is_dead = dead;
12               n.Notify();
13             });
14   if (timeout_ms > 0) {
15     int64 timeout_us = timeout_ms * 1000;
16     bool notified = WaitForNotificationWithTimeout(&n, timeout_us);
17     if (!notified) {
18       return Status(error::DEADLINE_EXCEEDED,
19                     "Timed out waiting for notification");
20     }
21   } else {
22     n.WaitForNotification();
23   }
24   return ret;
25 }
可以看出,无论RecvAsync的实现内容是什么,Recv函数都可以将RecvAsync视为黑盒,在其上层封装成为与RecvAsync相同实现的同步函数版本。
本地传输过程
使用本地传输过程包括LocalRendezous和IntraProcessRendezvous两个实现类,但是后者是前者的封装,因此本文分析的重点在于LocalRendezvous实现类。
消息队列的缓存——Table
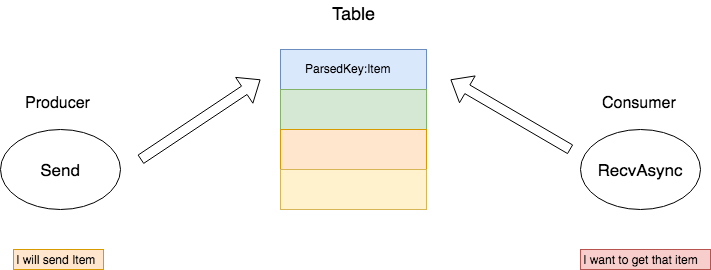
在TensorFlow中,几乎每个Rendezvous实现类都有自己的消息队列缓存,而几乎每种消息队列缓存都是依靠Table实现的。Rendezvous的发送(Send)和接收(Recv)都将通过Table完成,这完美地阐释了“约会、相会、会和”的释义,这也是为什么TensorFlow使用这样一个法语词来抽象通信过程。下图形象化的表示了Table以及Table中的每个Item。
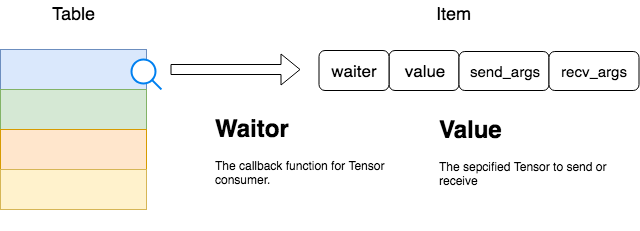
在LocalRendezvous实现类中,Send端和Recv端使用的是同一个Rendezvous对象,所以他们共享同一个Table,所以Table属于临界资源,应该加锁形成互斥访问。Item这个结构中其实有很多内容,在上图中只解释两个比较重要的部分。
Value:这就是参与通信Tensor本体
Waitor:这是在确认Tensor被接收端完成接收后的处理函数,也就是consumer处理该Tensor的函数过程
传输过程分析
无论是Send过程还是Recv过程,它们都将借助Table完成Tensor的转发。Send过程作为Tensor的生产者,它负责将待发送的Tensor送入Table中,并将ParsedKey作为该Item的键。而Recv过程作为消费者,它也会根据自己所需拼出相同的ParsedKey,然后从Table中查看是否已经存在该项。
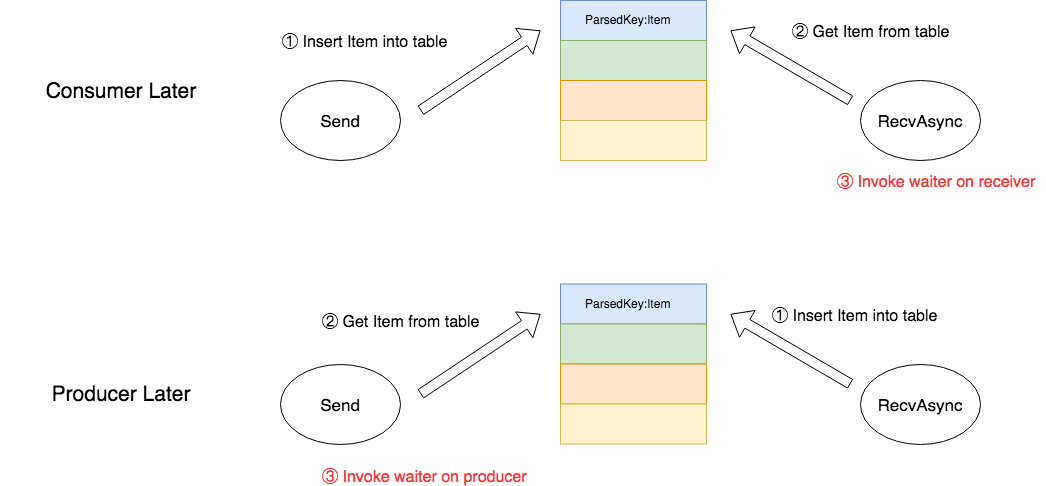
应该注意的是,Tensor虽然由Send端生产,但是Table中的Item却不一定是由Send端插入。因为在TensorFlow中,Send和RecvAsync二者的相对顺序是不能保证先后的,经常出现需求比供给在时间片上先到的情况,那么这时就会出现RecvAsync先拼出了ParsedKey然后立即查表的情况。应对这种情况的一种方案是,RecvAsync放弃此次查询,开启另一个线程轮询该表直到Send端产生为止,然后执行consumer的waiter函数,但这是一个非常消耗资源的实现方式。TensorFlow为了保证异步性,使用另一种无需CPU轮询消耗资源的实现方式。
我们知道,在Send和RecvAsync顺序相对异步的情况下,waitor函数的执行时机只有两种情况,它取决于Send的供给和RecvAsync的需求哪一个先到达。若生产者先到达,那么waiter函数的调用由RecvAsync执行。若消费者的需求先到达,那么waiter函数的调用由Send执行。简而言之,总是迟到的一方执行waiter函数。那么可以这样设计:和Send端相同,允许RecvAsync将所需的Item插入到Table中,并连同waiter函数一起发送到该表里。如果Send端后到达,那么Send函数将从表中取出该Item,并执行waiter函数,反之,则由RecvAsync函数取出自己所需要的Item,然后执行waiter函数,下面的图展示了这个过程。
Send过程源码
了解上述的过程后,我们可以直接看Send函数的源码了。下面是LocalRendezvous的Send函数源码展示。
 1 Status Send(const ParsedKey& key, const Args& send_args, const Tensor& val,
 2               const bool is_dead) override {
 3     uint64 key_hash = KeyHash(key.FullKey());
 4     VLOG(2) << "Send " << this << " " << key_hash << " " << key.FullKey();
 5
 6     mu_.lock();
 7     if (!status_.ok()) {
 8       // Rendezvous has been aborted.
 9       Status s = status_;
10       mu_.unlock();
11       return s;
12     }
13
14     ItemQueue* queue = &table_[key_hash];
15     if (queue->empty() || queue->front()->IsSendValue()) {
16       // There is no waiter for this message. Append the message
17       // into the queue. The waiter will pick it up when arrives.
18       // Only send-related fields need to be filled.
19       Item* item = new Item;
20       item->value = val;
21       item->is_dead = is_dead;
22       item->send_args = send_args;
23       if (item->send_args.device_context) {
24         item->send_args.device_context->Ref();
25       }
26       queue->push_back(item);
27       mu_.unlock();
28       return Status::OK();
29     }
30
31     // There is an earliest waiter to consume this message.
32     Item* item = queue->front();
33     queue->pop_front();
34     mu_.unlock();
35
36     // Notify the waiter by invoking its done closure, outside the
37     // lock.
38     DCHECK(!item->IsSendValue());
39     item->waiter(Status::OK(), send_args, item->recv_args, val, is_dead);
40     delete item;
41     return Status::OK();
42   }
RecvAsync过程源码
下面是LocalRendezvous的RecvAsync函数源码展示。
 1   void RecvAsync(const ParsedKey& key, const Args& recv_args,
 2                  DoneCallback done) override {
 3     uint64 key_hash = KeyHash(key.FullKey());
 4     VLOG(2) << "Recv " << this << " " << key_hash << " " << key.FullKey();
 5
 6     mu_.lock();
 7     if (!status_.ok()) {
 8       // Rendezvous has been aborted.
 9       Status s = status_;
10       mu_.unlock();
11       done(s, Args(), recv_args, Tensor(), false);
12       return;
13     }
14
15     ItemQueue* queue = &table_[key_hash];
16     if (queue->empty() || !queue->front()->IsSendValue()) {
17       // There is no message to pick up.
18       // Only recv-related fields need to be filled.
19       Item* item = new Item;
20       item->waiter = std::move(done);
21       item->recv_args = recv_args;
22       if (item->recv_args.device_context) {
23         item->recv_args.device_context->Ref();
24       }
25       queue->push_back(item);
26       mu_.unlock();
27       return;
28     }
29
30     // A message has already arrived and is queued in the table under
31     // this key.  Consumes the message and invokes the done closure.
32     Item* item = queue->front();
33     queue->pop_front();
34     mu_.unlock();
35
36     // Invokes the done() by invoking its done closure, outside scope
37     // of the table lock.
38     DCHECK(item->IsSendValue());
39     done(Status::OK(), item->send_args, recv_args, item->value, item->is_dead);
40     delete item;
41   }
关于IntraProcessRendezvous的Send和RecvAsync函数
其实本质上IntraProcessRendezvous和LocalRendezvous是同一个函数实现,只是前者对后者做了一层封装。我们从源码中看到,LocalRendezvous是IntraProcessRendezvous的成员之一,只是在回调函数中多了一些简单的处理而已,比如它会仔细考量Tensor的生产方和消费方是存在于CPU还是GPU,是否可以通过P2P直接拷贝,还是需要通过Host做中转,关于拷贝过程使用的是下面的函数,其他地方大同小异,因此不再赘述。有兴趣的读者可以到tensorflow/core/common_runtime/目录下参考rendezvous_mgr.h、rendezvous_mgr.cc和copy_tensor.h与copy_tensor.cc这几个文件。
 1 // Copies "input" to "output" between devices accessible to the
 2   // local process via some DMA-like method.  "edge_name" is the name
 3   // of the tensor being copied, for debugging purposes. Depending on
 4   // the type of devices and memory in use, the copy may be performed
 5   // synchronously or asynchronously.  'done' will be invoked only
 6   // after the copy is actually complete.
 7   static void ViaDMA(StringPiece edge_name, DeviceContext* send_dev_context,
 8                      DeviceContext* recv_dev_context, Device* src, Device* dst,
 9                      const AllocatorAttributes src_alloc_attr,
10                      const AllocatorAttributes dst_alloc_attr,
11                      const Tensor* input, Tensor* output,
12                      int dev_to_dev_stream_index, StatusCallback done);
总结
本文是TensorFlow通信机制系列的第一篇文章,先通过抛出高并发情况下消息通信两端的对应问题引出TensorFlow中的ParsedKey结构设计的必要性,然后给出了Rendezvous全局类图,最后详细的分析了LocalRendezvous的消息传输实现过程。TensorFlow的通信机制的完美的阐释了Rendezvous一词的含义——无论是Send端还是Recv端都需要在临界资源Table中“约会”,进行消息的传输。随后还着重分析了异步情况下,本属于consumer的waiter函数调用时机设计问题——为了保证waiter函数的执行不被阻塞,从设计上采取Late invoke的方案。IntraProcessRendezous本质是LocalRendezvous的一层封装,它在数据拷贝上面做了更多的工作,借助LocalRendezvous实现了Send和Recv处于不同或相同种类Device情况下,对上层完全透明的拷贝过程。由于篇幅原因,特意将TensorFlow通信机制分为多个系列分析,作为第一篇文章,本篇介绍了Rendezvous的基本框架。在该系列之后的文章中,还会对跨进程的通信进行详细地分析。