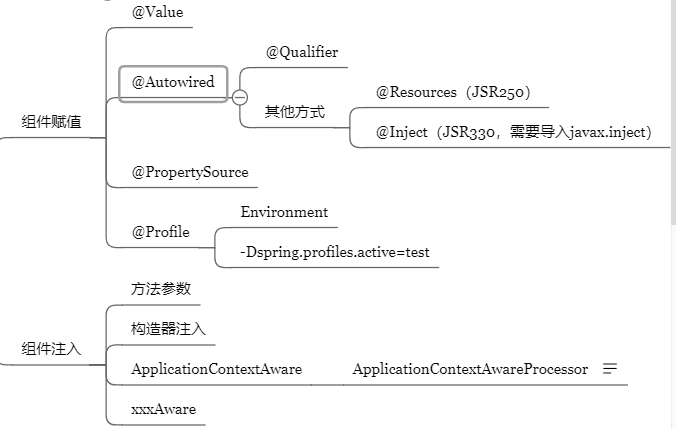
1、@Value
使用@Value赋值;
- 基本数值
- 可以写SpEL; #{}
- 可以写${};取出配置文件【properties】中的值(在运行环境变量里面的值)
 1 public class Person {
 2
 3
 4     @Value("张三")
 5     private String name;
 6     @Value("#{20-2}")
 7     private Integer age;
 8
 9     @Value("${person.nickName}")
10     private String nickName;
11
12     /**
13     * 设置默认值
14     */
15     @Value("${person.sex:man}")
16     private String sex;
17
18     /**
19     * 构造函数上使用
20     */
21     public Person(@Value("${Person.area:jianhu}")String area){
22      ...
23     }
24 }
2、@Autowired、@Resource、@Inject
@Autowired:自动注入:
- 默认优先按照类型去容器中找对应的组件:applicationContext.getBean(BookDao.class);找到就赋值
- 如果找到多个相同类型的组件,再将属性的名称作为组件的id去容器中查找 applicationContext.getBean("bookDao")
- @Qualifier("bookDao"):使用@Qualifier指定需要装配的组件的id,而不是使用属性名
- 自动装配默认一定要将属性赋值好,没有就会报错;可以使用@Autowired(required=false);
- @Primary:让Spring进行自动装配的时候,默认使用首选的bean;也可以继续使用@Qualifier指定需要装配的bean的名字
Spring还支持使用@Resource(JSR250)和@Inject(JSR330)[java规范的注解]
@Resource:
可以和@Autowired一样实现自动装配功能;默认是按照组件名称进行装配的;
没有能支持@Primary功能没有支持@Autowired(reqiured=false);
@Inject:
需要导入javax.inject的包,和Autowired的功能一样。没有required=false的功能;
@Autowired:Spring定义的; @Resource、@Inject都是java规范
AutowiredAnnotationBeanPostProcessor:解析完成自动装配功能; 可以看到 xxxBeanPostProcessor 一般是 BeanPostProcessor(Bean的后置处理器)的实现类


 1 public interface BeanPostProcessor {
 2
 3     /**
 4      * Apply this {@code BeanPostProcessor} to the given new bean instance <i>before</i> any bean
 5      * initialization callbacks (like InitializingBean's {@code afterPropertiesSet}
 6      * or a custom init-method). The bean will already be populated with property values.
 7      * The returned bean instance may be a wrapper around the original.
 8      * <p>The default implementation returns the given {@code bean} as-is.
 9      * @param bean the new bean instance
10      * @param beanName the name of the bean
11      * @return the bean instance to use, either the original or a wrapped one;
12      * if {@code null}, no subsequent BeanPostProcessors will be invoked
13      * @throws org.springframework.beans.BeansException in case of errors
14      * @see org.springframework.beans.factory.InitializingBean#afterPropertiesSet
15      */
16     @Nullable
17     default Object postProcessBeforeInitialization(Object bean, String beanName) throws BeansException {
18         return bean;
19     }
20
21     /**
22      * Apply this {@code BeanPostProcessor} to the given new bean instance <i>after</i> any bean
23      * initialization callbacks (like InitializingBean's {@code afterPropertiesSet}
24      * or a custom init-method). The bean will already be populated with property values.
25      * The returned bean instance may be a wrapper around the original.
26      * <p>In case of a FactoryBean, this callback will be invoked for both the FactoryBean
27      * instance and the objects created by the FactoryBean (as of Spring 2.0). The
28      * post-processor can decide whether to apply to either the FactoryBean or created
29      * objects or both through corresponding {@code bean instanceof FactoryBean} checks.
30      * <p>This callback will also be invoked after a short-circuiting triggered by a
31      * {@link InstantiationAwareBeanPostProcessor#postProcessBeforeInstantiation} method,
32      * in contrast to all other {@code BeanPostProcessor} callbacks.
33      * <p>The default implementation returns the given {@code bean} as-is.
34      * @param bean the new bean instance
35      * @param beanName the name of the bean
36      * @return the bean instance to use, either the original or a wrapped one;
37      * if {@code null}, no subsequent BeanPostProcessors will be invoked
38      * @throws org.springframework.beans.BeansException in case of errors
39      * @see org.springframework.beans.factory.InitializingBean#afterPropertiesSet
40      * @see org.springframework.beans.factory.FactoryBean
41      */
42     @Nullable
43     default Object postProcessAfterInitialization(Object bean, String beanName) throws BeansException {
44         return bean;
45     }
46
47 }
@Autowired:构造器,参数,方法,属性;都是从容器中获取参数组件的值
- [标注在方法位置]:@Bean+方法参数;参数从容器中获取;默认不写@Autowired效果是一样的;都能自动装配
- [标在构造器上]:如果组件只有一个有参构造器,这个有参构造器的@Autowired可以省略,参数位置的组件还是可以自动从容器中获取
- 放在参数位置
3、@PropertySource
使用@PropertySource读取外部配置文件中的k/v保存到运行的环境变量中;加载完外部的配置文件以后使用${}取出配置文件的值
 1 @PropertySource(value={"classpath:/person.properties"})
 2 @Configuration
 3 public class MainConfigOfPropertyValues {
 4
 5     @Bean
 6     public Person person(){
 7         return new Person();
 8     }
 9
10 }
@PropertySource 默认无法加载yml文件
如果需要实现加载yml文件,参考: https://juejin.im/post/5c4aea2e51882522c03ea475
4、@Profile
Profile:Spring为我们提供的可以根据当前环境,动态的激活和切换一系列组件的功能;
@Profile:指定组件在哪个环境的情况下才能被注册到容器中,不指定,任何环境下都能注册这个组件
- 加了环境标识的bean,只有这个环境被激活的时候才能注册到容器中。默认是default环境
- 写在配置类上,只有是指定的环境的时候,整个配置类里面的所有配置才能开始生效
- 没有标注环境标识的bean在,任何环境下都是加载的;
 1 @PropertySource("classpath:/dbconfig.properties")
 2 @Configuration
 3 public class MainConfigOfProfile implements EmbeddedValueResolverAware{
 4
 5     @Value("${db.user}")
 6     private String user;
 7
 8     private StringValueResolver valueResolver;
 9
10     private String  driverClass;
11
12
13     @Bean
14     public Yellow yellow(){
15         return new Yellow();
16     }
17
18     @Profile("test")
19     @Bean("testDataSource")
20     public DataSource dataSourceTest(@Value("${db.password}")String pwd) throws Exception{
21         ComboPooledDataSource dataSource = new ComboPooledDataSource();
22         dataSource.setUser(user);
23         dataSource.setPassword(pwd);
24         dataSource.setJdbcUrl("jdbc:mysql://localhost:3306/test");
25         dataSource.setDriverClass(driverClass);
26         return dataSource;
27     }
28
29
30     @Profile("dev")
31     @Bean("devDataSource")
32     public DataSource dataSourceDev(@Value("${db.password}")String pwd) throws Exception{
33         ComboPooledDataSource dataSource = new ComboPooledDataSource();
34         dataSource.setUser(user);
35         dataSource.setPassword(pwd);
36         dataSource.setJdbcUrl("jdbc:mysql://localhost:3306/ssm_crud");
37         dataSource.setDriverClass(driverClass);
38         return dataSource;
39     }
40
41     @Profile("prod")
42     @Bean("prodDataSource")
43     public DataSource dataSourceProd(@Value("${db.password}")String pwd) throws Exception{
44         ComboPooledDataSource dataSource = new ComboPooledDataSource();
45         dataSource.setUser(user);
46         dataSource.setPassword(pwd);
47         dataSource.setJdbcUrl("jdbc:mysql://localhost:3306/scw_0515");
48
49         dataSource.setDriverClass(driverClass);
50         return dataSource;
51     }
52
53     @Override
54     public void setEmbeddedValueResolver(StringValueResolver resolver) {
55         // TODO Auto-generated method stub
56         this.valueResolver = resolver;
57         driverClass = valueResolver.resolveStringValue("${db.driverClass}");
58     }
59
60 }
如何指定对应环境:
- 使用命令行动态参数: 在虚拟机参数位置加载 -Dspring.profiles.active=test
- 代码的方式激活某种环境;
 1 @Test
 2     public void test01(){
 3         AnnotationConfigApplicationContext applicationContext =
 4                 new AnnotationConfigApplicationContext();
 5         //1、创建一个applicationContext
 6         //2、设置需要激活的环境
 7         applicationContext.getEnvironment().setActiveProfiles("dev");
 8         //3、注册主配置类
 9         applicationContext.register(MainConfigOfProfile.class);
10         //4、启动刷新容器
11         applicationContext.refresh();
12
13
14         String[] namesForType = applicationContext.getBeanNamesForType(DataSource.class);
15         for (String string : namesForType) {
16             System.out.println(string);
17         }
18
19         Yellow bean = applicationContext.getBean(Yellow.class);
20         System.out.println(bean);
21         applicationContext.close();
22     }