概述
详细
概述
demo了介绍支付宝中当面付下属的条码支付、扫码支付、订单查询、退款申请等接口的集成开发过程。
详细
在移动支付行业中,支付宝一直占据龙头行业,市场占有率也遥遥领先。在聚合支付系统中,移动支付服务商一定将支付宝的支付接口接入。条码支付是支付宝在线下移动支付的一种收款方式。一般流程为消费者通过打开支付宝APP上的付款码,然后商家使用扫码枪或是扫码盒子等条码识别社保扫描消费者的条码/二维码,完成收款。消费者仅需要出示付款码,所有收款操作是有商户端完成。
业务的流程图为:
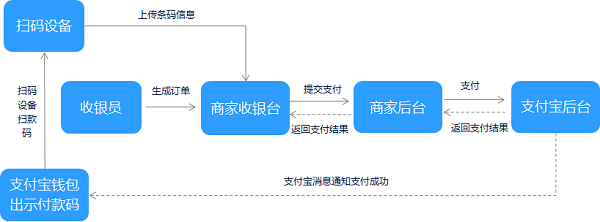
消费者端流程:

本例子主要基于支付宝的沙箱环境对怎么接入支付宝当面付的一个流程及使用springboot对支付宝sdk的下单、查询、退款等接口进行了一个封装。
一.准备工作
首先登录到支付宝蚂蚁金服的开发平台https://open.alipay.com/platform/home.htm,使用支付宝手机APP即可授权登录。登录进去效果如下:

我们进入开发服务下面的研发服务,可以看到支付宝已经帮我们建好了沙箱应用,我们可以通过沙箱应用来模拟测试支付及查询、退款等接口,可以看到:

应用公钥可以使用SHA2生成,也可以使用SHA1生成,SHA2是支付宝推荐的方式,本例也采取SHA2生成应用公钥,支付宝为我们提供了一个生成RSA密钥的工具,地址为https://docs.open.alipay.com/291/105971/,里面有介绍签名及验签的东西,如下图所示:

接下来介绍一下支付提供的沙箱账号,我们可以在里面进行任意金额的充值进行模拟测试。

我们可以使用安卓下载支付宝提供的沙箱支付宝应用进行账号登录。

二、程序实现
1.首先创建springboot项目在pom.xml文件里面引入相关的依赖
 <dependency>
      <groupId>junit</groupId>
      <artifactId>junit</artifactId>
      <scope>test</scope>
    </dependency>

      <dependency>
            <groupId>org.springframework.boot</groupId>
            <artifactId>spring-boot-starter-web</artifactId>
        </dependency>

        <dependency>
            <groupId>org.springframework.boot</groupId>
            <artifactId>spring-boot-starter-test</artifactId>
        </dependency>

        <dependency>
            <groupId>com.alipay.sdk</groupId>
            <artifactId>alipay-sdk-java</artifactId>
            <version>3.0.0</version>
        </dependency>

        <dependency>
            <groupId>com.alibaba</groupId>
            <artifactId>fastjson</artifactId>
            <version>1.2.15</version>
       </dependency>
2.在application.yml文件添加如下配置:
server:
  port: 8080


alipay:
  app_id: xxxxx
  merchant_private_key: xxxxx
  alipay_public_key: xxxx
  notify_url: http://yourdomain:8080/notify_url
  return_url: http://yourdomain:8080/return_url
  sign_type: RSA2
  charset: utf-8
  gatewayUrl: https://openapi.alipaydev.com/gateway.do
  log_path: /tmp/
其中app_id为支付宝沙箱应用对应的app_id,merchant_private_key为商户私钥,alipay_public_key为支付宝公钥,主要用来验签
3.主要代码如下:
1)支付宝参数配置类:
public class AlipayConfig {

    @Value("${alipay.app_id}")
    public  String app_id;

    @Value("${alipay.merchant_private_key}")
    public String merchant_private_key;

    @Value("${alipay.alipay_public_key}")
    public String alipay_public_key;

    @Value("${alipay.notify_url}")
    public  String notify_url;

    @Value("${alipay.return_url}")
    public  String return_url;

    @Value("${alipay.sign_type}")
    public  String sign_type;

    @Value("${alipay.charset}")
    public  String charset;

    @Value("${alipay.gatewayUrl}")
    public String gatewayUrl;

    @Value("${alipay.log_path}")
    public String log_path;
2)生成二维码主要逻辑:
 QrCodeResponse qrCodeResponse = new QrCodeResponse();

    	 AlipayClient alipayClient =
                 new DefaultAlipayClient(alipayConfig.getGatewayUrl(), alipayConfig.getApp_id(), alipayConfig.getMerchant_private_key(),
                         "JSON", alipayConfig.getCharset(), alipayConfig.getAlipay_public_key(), alipayConfig.getSign_type());

        AlipayTradePrecreateRequest request = new AlipayTradePrecreateRequest();
        request.setBizContent("{" +
                ""out_trade_no":""+model.getOutTradeNo()+""," +
                ""total_amount":""+model.getTotalAmount()+""," +
                ""subject":""+model.getSubject()+""," +
                ""timeout_express":"90m"}");

        request.setNotifyUrl(alipayConfig.getNotify_url());
        AlipayTradePrecreateResponse alipayTradePrecreateResponse = null;

        try {
            alipayTradePrecreateResponse = alipayClient.execute(request);
        } catch (AlipayApiException e) {
            e.printStackTrace();
            qrCodeResponse.setCode("500");
            qrCodeResponse.setMsg("服务器内部错误");
            return qrCodeResponse;
        }

        QrResponse qrResponse = JSON.parseObject(alipayTradePrecreateResponse.getBody(),QrResponse.class);

        qrCodeResponse = qrResponse.getAlipay_trade_precreate_response();
        return qrCodeResponse;
3)回调通知
 Map<String, String> map = HttpRequestUtil.ParamstoMap(request);
        QrServiceModel qrServiceEntity = new QrServiceModel();
        qrServiceEntity.setIsreceive(false);
        for (String key :map.keySet()) {
            System.out.println("[ "+key + " = "+map.get(key)+" ]");
        }
        try {
            boolean flag = AlipaySignature.rsaCheckV1(map,alipayConfig.getAlipay_public_key() ,alipayConfig.getCharset(),
                    alipayConfig.getSign_type());
            String json = JSON.toJSONString(map);
            logger.info("Alipay notify===>"+json);
            if (flag) {
                qrServiceEntity.setTran_starus(map.get("trade_status"));
                return qrServiceEntity;
            }
            else {
                return qrServiceEntity;
            }
        } catch (AlipayApiException e) {
            e.printStackTrace();
            return qrServiceEntity;
        }
4)查询订单
 AlipayClient alipayClient =
                 new DefaultAlipayClient(alipayConfig.getGatewayUrl(), alipayConfig.getApp_id(), alipayConfig.getMerchant_private_key(),
                         "JSON", alipayConfig.getCharset(), alipayConfig.getAlipay_public_key(), alipayConfig.getSign_type());

		 	AlipayTradeQueryRequest aliqueryRequest = new AlipayTradeQueryRequest();
			AlipayTradeQueryModel bizModel = new AlipayTradeQueryModel();
			bizModel.setOutTradeNo(queryRequest.getOutTradeNo());
			aliqueryRequest.setBizModel(bizModel);

			/*alipayTradeQueryRequest.setBizContent("{" +
					""out_trade_no":""+queryRequest.getOutTradeNo()+""" +

					"}");*/
			AlipayTradeQueryResponse response = new AlipayTradeQueryResponse();
				try {
					response = alipayClient.execute(aliqueryRequest);
					if(response.getCode().equals("10000")){
						System.out.println("业务处理成功!");
						switch (response.getTradeStatus()) {
						case "WAIT_BUYER_PAY":
							logger.info("交易创建,等待买家付款");
							break;
						case "TRADE_CLOSED":
							logger.info("未付款交易超时关闭,或支付完成后全额退款");
							break;
						case "TRADE_SUCCESS":
							logger.info("交易支付成功");
							break;
						case "TRADE_FINISHED":
							logger.info("交易结束,不可退款");
							break;
						default:
							break;
						}

					}else if(response.getCode().equals("40004")){
						logger.info("业务处理失败!");
					}else if(response.getCode().equals("20000")){
						logger.info("系统异常!");
					}
					logger.info(response.getBody());
				} catch (AlipayApiException e) {
					e.printStackTrace();
				}

		QueryResponse queryResponse	 =	JSON.parseObject(response.getBody(),QueryResponse.class);
		return queryResponse.getAlipay_trade_query_response();
5)退款
AlipayClient alipayClient =
                new DefaultAlipayClient(alipayConfig.getGatewayUrl(), alipayConfig.getApp_id(), alipayConfig.getMerchant_private_key(),
                        "JSON", alipayConfig.getCharset(), alipayConfig.getAlipay_public_key(), alipayConfig.getSign_type());


	        AlipayTradeRefundRequest request = new AlipayTradeRefundRequest();

	        request.setBizContent(JSON.toJSONString(requestRequest));

	        AlipayTradeRefundResponse response = null;

	        try {
	            response = alipayClient.execute(request);
	        } catch (AlipayApiException e) {
	            e.printStackTrace();
	        }

	        if(response.isSuccess()){
	            RefundResponseSign refundResponseSign = JSON.parseObject(response.getBody(),RefundResponseSign.class);
	            return refundResponseSign.getAlipay_trade_refund_response();
	        }

	        return null;
三、项目结构图

四、运行效果图
本例子使用postman工具进行模拟测试。
1.生成二维码效果图:


2.退款接口效果图:

3.退款查询效果图:

4.订单查询结果效果图:

五、补充
本例子使用支付宝的沙箱环境展示了如何从零开始,使用蚂蚁金服开放平台服务端SDK快速接入当面付产品,完成与支付宝对接的部分。测试回调可以使用花生壳工具进行一个内网穿透进行测试。在实际应用中,只要配置好appId,商户私钥以及支付宝公钥即可完成本例子上述的功能。关于RSA密钥工具可以从支付宝里下载,本例子demo里面也附带了。