前言:
最近又是公司项目上线一段时间了,又是到了程序汪整理代码的节奏了。刚好也用到了ofo主页菜单的效果,于是自己把这部分给整理出来,供小伙伴们一起学习学习。还是和往常一样,先来个效果图再说:

下面进入主题,看看如何搭建这样的效果,还没看看自己做出来的效果呢,下面也来看看自己的效果图吧:

后加的:

后加的:

使用:
布局:
<?xml version="1.0" encoding="utf-8"?>
<RelativeLayout xmlns:android="http://schemas.android.com/apk/res/android"
    android:layout_width="match_parent"
    android:layout_height="match_parent">

    <!--模拟的一个启动按钮,这个没什么好说的-->
    <Button
        android:id="@+id/start_ofo"
        android:layout_width="wrap_content"
        android:layout_height="wrap_content"
        android:text="启动ofo菜单页面" />

    <!--这个就是我们草图中看到的OfoMenuLayout,
        用来管理title和content两部分的动画以及事件处理-->
    <com.single.ofomenu.view.OfoMenuLayout
        android:id="@+id/ofo_menu"
        android:layout_width="match_parent"
        android:layout_height="match_parent"
        android:orientation="vertical"
        android:visibility="invisible">

        <!--title部分-->
        <RelativeLayout
            android:layout_width="match_parent"
            android:layout_height="140dp"
            android:background="#fff143">

            <ImageView
                android:id="@+id/close"
                android:layout_width="wrap_content"
                android:layout_height="wrap_content"
                android:layout_alignParentRight="true"
                android:layout_marginRight="10dp"
                android:layout_marginTop="20dp"
                android:src="@drawable/close" />
        </RelativeLayout>

        <!--content部分-->
        <FrameLayout
            android:id="@+id/menu_content"
            android:layout_width="match_parent"
            android:layout_height="match_parent"
            android:layout_marginTop="60dp">
            <!--content中列表view,用来处理自己的动画-->
            <com.single.ofomenu.view.OfoContentLayout
                android:id="@+id/ofo_content"
                android:layout_width="match_parent"
                android:layout_height="match_parent"
                android:layout_marginTop="100dp"
                android:orientation="vertical"
                android:paddingLeft="60dp">

                <LinearLayout
                    android:layout_width="match_parent"
                    android:layout_height="wrap_content"
                    android:layout_marginTop="20dp"
                    android:gravity="center_vertical">

                    <ImageView
                        android:layout_width="wrap_content"
                        android:layout_height="wrap_content"
                        android:src="@drawable/folder" />

                    <TextView
                        android:layout_width="wrap_content"
                        android:layout_height="wrap_content"
                        android:layout_marginLeft="10dp"
                        android:text="我的资料"
                        android:textSize="16sp" />

                </LinearLayout>

                <LinearLayout
                    android:layout_width="match_parent"
                    android:layout_height="wrap_content"
                    android:layout_marginTop="20dp"
                    android:gravity="center_vertical">

                    <ImageView
                        android:layout_width="wrap_content"
                        android:layout_height="wrap_content"
                        android:src="@drawable/member" />

                    <TextView
                        android:layout_width="wrap_content"
                        android:layout_height="wrap_content"
                        android:layout_marginLeft="10dp"
                        android:text="我的会员"
                        android:textSize="16sp" />

                </LinearLayout>

                <LinearLayout
                    android:layout_width="match_parent"
                    android:layout_height="wrap_content"
                    android:layout_marginTop="20dp"
                    android:gravity="center_vertical">

                    <ImageView
                        android:layout_width="wrap_content"
                        android:layout_height="wrap_content"
                        android:src="@drawable/wallet" />

                    <TextView
                        android:layout_width="wrap_content"
                        android:layout_height="wrap_content"
                        android:layout_marginLeft="10dp"
                        android:text="我的钱包"
                        android:textSize="16sp" />

                </LinearLayout>

                <LinearLayout
                    android:layout_width="match_parent"
                    android:layout_height="wrap_content"
                    android:layout_marginTop="20dp"
                    android:gravity="center_vertical">

                    <ImageView
                        android:layout_width="wrap_content"
                        android:layout_height="wrap_content"
                        android:src="@drawable/travel" />

                    <TextView
                        android:layout_width="wrap_content"
                        android:layout_height="wrap_content"
                        android:layout_marginLeft="10dp"
                        android:text="我的行程"
                        android:textSize="16sp" />

                </LinearLayout>

                <LinearLayout
                    android:layout_width="match_parent"
                    android:layout_height="wrap_content"
                    android:layout_marginTop="20dp"
                    android:gravity="center_vertical">

                    <ImageView
                        android:layout_width="wrap_content"
                        android:layout_height="wrap_content"
                        android:src="@drawable/remind" />

                    <TextView
                        android:layout_width="wrap_content"
                        android:layout_height="wrap_content"
                        android:layout_marginLeft="10dp"
                        android:text="我的消息"
                        android:textSize="16sp" />

                </LinearLayout>

            </com.single.ofomenu.view.OfoContentLayout>

        </FrameLayout>

    </com.single.ofomenu.view.OfoMenuLayout>

</RelativeLayout>
启动menu:
//启动menu
//ofoMenuLayout是最外层的view,用来管理title和content的动画
ofoMenuLayout.open();
关闭menu:
ofoMenuLayout.close();
menu的监听:
//menu的监听
ofoMenuLayout.setOfoMenuStatusListener(new OfoMenuLayout.OfoMenuStatusListener() {
    @Override
    public void onOpen() {
    }
    @Override
    public void onClose() {
        //to do something,隐藏启动按钮
    }
});
给menu设置content部分:
//给menu设置content部分
ofoMenuLayout.setOfoContentLayout(ofoContentLayout);
讲解:
为了更好地理解代码,在上代码之前可以看看自己画的图:

从草图整体来看,最外层是包裹了OfoMenuLayout,它是专门来管理我们的title和content部分,不难理解它里面就两个直接的孩子:

上面的title部分就没什么好说的了,就是一个相对布局,右上角放了一个关闭按钮,咱们主要是看下Content部分,静态感受下Content的背景是如何生成的,可以见OfoMenuActivity设置了这么一句代码:
Content背景设置:
FrameLayout menu = (FrameLayout) findViewById(R.id.menu_content);
menu.setBackground(new MenuBrawable(BitmapFactory.decodeResource(getResources(), R.mipmap.bitmap), OfoMenuActivity.this));
可以看到这里new了一个MenuBrawable,没错!!!这里是自定义了一个Drawable,那就去看下MenuBrawable构造器吧:
MenuBrawable构造器:
//外层弧形path
private Path mPath;
//图片对象
private Bitmap bitmap;
private Paint paint;
//绘制图片时要用的画笔,主要为setXfermode做准备
private Paint mBitmapPaint;
//峰值常亮(80dp)
private static final int HEIGHTEST_Y = 80;
//图片宽度(80dp)
private static final int BITMAP_XY = 80;
//弧度的峰值,为后面绘制贝塞尔曲线做准备
private int arcY;
//图片边长
private int bitmapXY;
//图片的中心坐标
private float[] bitmapCneter;
//图片离左边的距离
private int bitmapOffset;
public MenuBrawable(Bitmap bitmap, Context context) {
    this.bitmap = bitmap;
    arcY = (int) TypedValue.applyDimension(TypedValue.COMPLEX_UNIT_DIP, HEIGHTEST_Y, context.getResources().getDisplayMetrics());
    bitmapXY = (int) TypedValue.applyDimension(TypedValue.COMPLEX_UNIT_DIP, BITMAP_XY, context.getResources().getDisplayMetrics());
    bitmapOffset = (int) TypedValue.applyDimension(TypedValue.COMPLEX_UNIT_DIP, 100, context.getResources().getDisplayMetrics());
    mPath = new Path();
    paint = new Paint(Paint.ANTI_ALIAS_FLAG);
    paint.setColor(Color.WHITE);
    paint.setStyle(Paint.Style.FILL);
}
这里什么也没有干,就初始化了一些常量
下面就是初始化背景path以及图片部分,具体在onBoundsChange方法进行处理:
//bounds对象就是view占据的空间
@Override
protected void onBoundsChange(Rect bounds) {
    super.onBoundsChange(bounds);
    mPath.reset();
    mPath.moveTo(bounds.left, bounds.top + arcY);
    mPath.quadTo(bounds.centerX(), 0, bounds.right, bounds.top + arcY);
    mPath.lineTo(bounds.right, bounds.bottom);
    mPath.lineTo(bounds.left, bounds.bottom);
    mPath.lineTo(bounds.left, bounds.top + arcY);
    if (bitmap != null) {
        mBitmapPaint = new Paint(Paint.ANTI_ALIAS_FLAG);
        //图片的尺寸以小边为主
        int size = Math.min(bitmap.getWidth(), bitmap.getHeight());
        //图片的所放比例
        float scale = (float) (bitmapXY * 1.0 / size);
        Matrix matrix = new Matrix();
        //需要对图片进行缩放
        matrix.setScale(scale, scale);
        //传入上面的matrix裁剪出新的bitmap对象
        bitmap = Bitmap.createBitmap(bitmap, 0, 0, bitmap.getWidth(), bitmap.getHeight(), matrix, true);
        //生成path的测量工具,主要是获取到path上某一个点,给path上的图片使用
        PathMeasure pathMeasure = new PathMeasure();
        pathMeasure.setPath(mPath, false);
        bitmapCneter = new float[2];
        //通过path的测量工具获取到bitmap的中心位置
        pathMeasure.getPosTan(bitmapOffset, bitmapCneter, null);
    }
}
处理好path轨迹以及bitmap缩放和中心位置确定后,下面就剩下绘制了,Drawable跟我们的View很像,也有自己的绘制。
Drawable绘制:
@Override
public void draw(Canvas canvas) {
    //在初始的图层上绘制path,也就是我们的弧形背景
    canvas.drawPath(mPath, paint);
    //启动一个新的图层
    int layer = canvas.saveLayer(getBounds().left, getBounds().top, getBounds().right, getBounds().bottom, null, Canvas.ALL_SAVE_FLAG);
    //在新的图层上绘制Dst层
    canvas.drawCircle(bitmapCneter[0], bitmapCneter[1], bitmapXY / 2, mBitmapPaint);
    //该mode下取两部分的交集部分
    mBitmapPaint.setXfermode(new PorterDuffXfermode(PorterDuff.Mode.SRC_IN));
    //绘制Src层,也就是我们的目标层
    canvas.drawBitmap(bitmap, bitmapCneter[0] - bitmapXY / 2, bitmapCneter[1] - bitmapXY / 2, mBitmapPaint);
    mBitmapPaint.setXfermode(null);
    canvas.restoreToCount(layer);
}
在绘制的时候用到了paint.setXfermode(new PorterDuffXfermode(PorterDuff.Mode.SRC_IN)),关于PorterDuffXfermode传的mode网上有对应的图:
简单吧,这就是我们Content部分的背景绘制了,关于Drawable的绘制可以见:
洪洋大神:http://blog.csdn.net/lmj623565791/article/details/43752383/
最后给张我们Content部分绘制出来的效果图:

下面就是动态部分的处理了,其实是对三部分在y轴的平移。下面继续回到我们的草图中,去看下外层的OfoMenuLayout
获取title和content:
private View titleView;
private View contentView;
@Override
protected void onSizeChanged(int w, int h, int oldw, int oldh) {
    super.onSizeChanged(w, h, oldw, old);
    titleView = getChildAt(0);
    contentView = getChildAt(1);
}
菜单打开的动画:
//动画对象
private ObjectAnimator titleAnimator, contentAnimator;

//title起始和终止坐标,主要为动画做准备
private int titleStartY, titleEndY;
//content起始和终止坐标,主要为动画做准备
private int contentStartY, contentEndY;

//菜单打开的动画
public void open() {
    int titleHeight = titleView.getLayoutParams().height;
    //打开菜单的时候title起始坐标正好是y轴负半轴上,也是自己高度的负值
    titleStartY = -titleHeight;
    //打开菜单的时候title终点坐标正好是y轴起点位置
    titleEndY = 0;
    //content起点坐标是在屏幕下面+自身的高度
    contentStartY = getHeight() + contentView.getHeight();
    //终点位置在y轴平移为0
    contentEndY = 0;
    definitAnimation();
    titleAnimator.start();
    contentAnimator.start();
}
定义动画:
//title动画标志,为事件分发做准备
private boolean titleAnimationing;
//content动画标志,为事件分发做准备
private boolean contentAnimationing;

//定义动画部分
private void definitAnimation() {
    PropertyValuesHolder titlePropertyValuesHolder = PropertyValuesHolder.ofFloat("translationY", titleStartY, titleEndY);
    titleAnimator = ObjectAnimator.ofPropertyValuesHolder(titleView, titlePropertyValuesHolder);
    titleAnimator.setDuration(300);

    contentAnimator = ObjectAnimator.ofFloat(contentView, "translationY", contentStartY, contentEndY);
    //这里设置的时间比title要长一点
    contentAnimator.setDuration(500);
    titleAnimator.addListener(new AnimatorListenerAdapter() {
        @Override
        public void onAnimationStart(Animator animation) {
            super.onAnimationStart(animation);
            titleAnimationing = true;
        }
        @Override
        public void onAnimationEnd(Animator animation) {
            super.onAnimationEnd(animation);
            titleAnimationing = false;
        }
    });
    contentAnimator.addListener(new AnimatorListenerAdapter() {
        @Override
        public void onAnimationStart(Animator animation) {
            super.onAnimationStart(animation);
            contentAnimationing = true;
        }
        @Override
        public void onAnimationEnd(Animator animation) {
            super.onAnimationEnd(animation);
            contentAnimationing = false;
            isOpen = !isOpen;
            setVisibility(isOpen ? VISIBLE : INVISIBLE);
            if (isOpen) {
                if (ofoMenuStatusListener != null) {
                    ofoMenuStatusListener.onOpen();
                }
            } else {
                if (ofoMenuStatusListener != null) {
                    ofoMenuStatusListener.onClose();
                }
            }
        }
    });
}
菜单关闭的动画:
//菜单关闭的动画
//content中列表内容布局,它里面也有自己的动画
private OfoContentLayout ofoContentLayout;
public void close() {
    int titleHeight = titleView.getLayoutParams().height;
    titleStartY = 0;
    titleEndY = -titleHeight;
    contentStartY = 0;
    contentEndY = getHeight() + contentView.getHeight();
    definitAnimation();
    titleAnimator.start();
    contentAnimator.start();
    ofoContentLayout.open();
}
上面的打开和关闭的动画,其实就是调换了起始坐标,好了动画就是这么简单啊,需要主要在动画期间是不允许事件分发的,需要处理事件分发部分。
事件处理:
//content中列表内容布局,它里面也有自己的动画
private OfoContentLayout ofoContentLayout;
@Override
public boolean onInterceptTouchEvent(MotionEvent ev) {
    return titleAnimationing || contentAnimationing || ofoContentLayout.isAnimationing();
}
两处的动画已经说完了,还就剩下OfoContentLayout中的动画了。下面也来一起看看吧:
初始化所有的child:
//存储每个child的终点坐标
List<Float> endOffset = new ArrayList<>();

@Override
protected void onSizeChanged(int w, int h, int oldw, int oldh) {
    super.onSizeChanged(w, h, oldw, old);
    for (int i = 0; i < getChildCount(); i++) {
        final View child = getChildAt(i);
        child.setTag(i);
        child.getViewTreeObserver().addOnGlobalLayoutListener(new ViewTreeObserver.OnGlobalLayoutListener() {
            @Override
            public void onGlobalLayout() {
                child.getViewTreeObserver().removeGlobalOnLayoutListener(this);
                //终点坐标按照每个child的起点坐标+递增15dp
                endOffset.add(child.getTop() + ((int) child.getTag()) *
                        TypedValue.applyDimension(TypedValue.COMPLEX_UNIT_DIP, 15, getContext().getResources().getDisplayMetrics()));
            }
        });
    }
}
启动OfoContentLayout中动画:
//是否在动画中的标志,为事件分发做准备
private boolean isAnimationing;
//是否添加监听的标志,因为所有的child时间都是一样的,所以监听第一个child就行
private boolean hasListener;

public void open() {
    for (int i = 0; i < getChildCount(); i++) {
        ObjectAnimator oa = ObjectAnimator.ofFloat(getChildAt(i), "translationY", endOffset.get(i), 0);
        oa.setDuration(700);
        if (!hasListener) {
            hasListener = true;
            oa.addListener(new AnimatorListenerAdapter() {
                @Override
                public void onAnimationStart(Animator animation) {
                    super.onAnimationStart(animation);
                    isAnimationing = true;
                }
                @Override
                public void onAnimationEnd(Animator animation) {
                    super.onAnimationEnd(animation);
                    isAnimationing = false;
                    hasListener = false;
                }
            });
        }
        oa.start();
    }
}
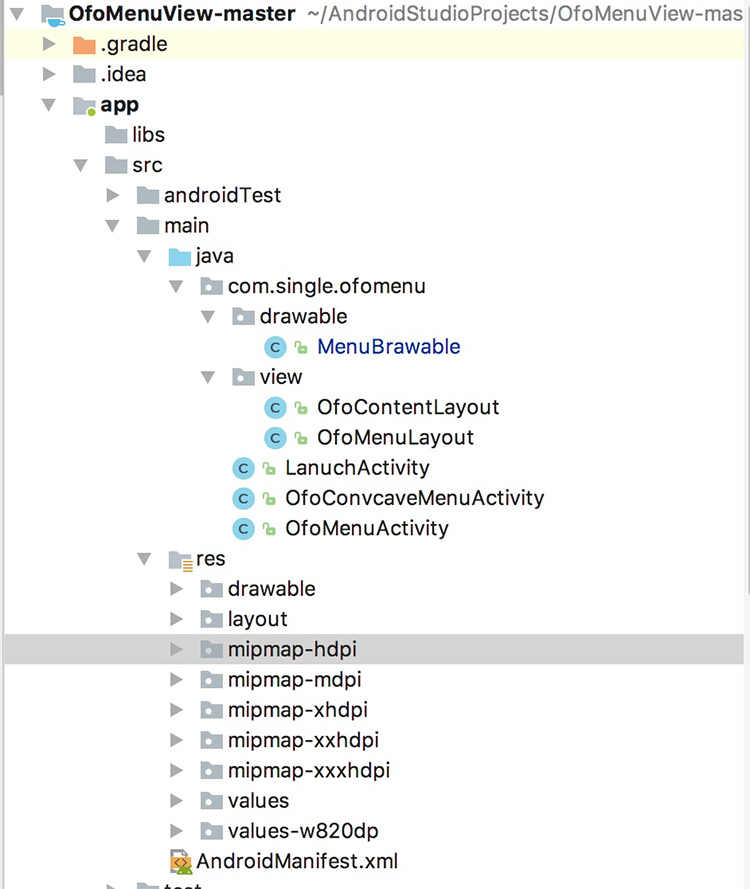
项目文件目录截图:

总结:

(1)初始化好content和title两部分的位置
(2)自定义好content部分的Drawable(MenuBrawable)
(3)在OfoMenuLayout中处理content和title的打开和关闭动画
(4)在OfoContentLayout中处理打开的动画,它是不需要关闭动画的
欢迎客官到本店光临:184793647(qq群)
苹果版小黄车(ofo)app主页菜单效果
注:本文著作权归作者,由demo大师代发,拒绝转载,转载需要作者授权