前言:
这几天也是闲来无事,看看有什么和Scroller相关的控件需要巩固下,原因很简单,前几天看到相关的控件:不错的一个卷尺view,于是乎自己也不能光看别人的demo啊,所以自己也就撸了一个带有滑动的地址选择器的view了。
view的来源gif图:

看到这的时候,我就大致有点思路了,所以自己的地址选择器view也是能登场了。
自己撸的view:

由于这个地址的数据量太大了,我就随便弄了几个城市的数据。后续可以继续添加其他的数据。
使用:
布局:
<?xml version="1.0" encoding="utf-8"?>
<LinearLayout xmlns:android="http://schemas.android.com/apk/res/android"
    android:layout_width="match_parent"
    android:layout_height="wrap_content">

    <com.library.multiselct.MultiSelectView
        android:id="@+id/select_view"
        android:layout_width="match_parent"
        android:layout_height="200dp"
        android:background="@android:color/white" />

</LinearLayout>
对MultiSelectView选中内容的监听
MultiSelectView multiSelectView = (MultiSelectView) conentView.findViewById(R.id.select_view);
multiSelectView.setOnAllSelect(new MultiSelectView.OnAllSelect() {
    @Override
    public void select(String text) {
        //回调的处理
        ((MainActivity) context).setAddress(text);
    }
});
数据源的处理:
multiSelectView.validateList(Constant.initData());
讲解:
在讲解之前还是来一个整个view的布局情况草图:

从这里不难发现外层是一个ViewGroup,里面是三个我们需要滑动处理的View了。
添加3个MultiSelectItem的view
private void initItem() {
    for (int i = 0; i < 3; i++) {
        MultiSelectItem multiSelectItem = new MultiSelectItem(getContext());
        //滑动的索引位置监听
        multiSelectItem.setScrollListener(this);
        addView(multiSelectItem);
    }
}
对3个MultiSelectItem的view测量
@Override
protected void onMeasure(int widthMeasureSpec, int heightMeasureSpec) {
    super.onMeasure(widthMeasureSpec, heightMeasureSpec);
    int width = MeasureSpec.getSize(widthMeasureSpec);
    //这里子view的宽度按照父view的宽度平分
    int childWidth = (int) (width * 1.0f / getChildCount());
    for (int i = 0; i < getChildCount(); i++) {
        measureChild(getChildAt(i), MeasureSpec.makeMeasureSpec(childWidth, MeasureSpec.EXACTLY), heightMeasureSpec);
    }
}
对3个MultiSelectItem的view进行layout
@Override
protected void onLayout(boolean changed, int l, int t, int r, int b) {
    for (int i = 0; i < getChildCount(); i++) {
        View item = getChildAt(i);
        //子view的横坐标起点根据(总宽度*i)/getChildCount())
        item.layout((int) (getWidth() * i * 1.0f / getChildCount()), 0, (int) (getWidth() * i * 1.0f / getChildCount()) + item.getMeasuredWidth(), item.getMeasuredHeight())
    }
}
MultiSelectView代码也太简单了点吧,没错,这就是Viewgroup三步曲代码。
对于父Viewgroup 的三步曲代码已经搞定了,下面要进入到子View(MultiSelectItem)的代码中去看看了,首先完成下静态的分行处理,分行处理其实就是画行数-1条横线了。
画横线:
private void drawLine(Canvas canvas) {
    int lineCount = DEFRAULT_DISPLAY_COUNT - 1;
    for (int i = 0; i < lineCount; i++) {
        //每条横线的y轴起点是(总高度 * (i + 1) / DEFRAULT_DISPLAY_COUNT)
        canvas.drawLine(0, getHeight() * 1.0f * (i + 1) / DEFRAULT_DISPLAY_COUNT, getWidth(), getHeight() * 1.0f * (i + 1) / DEFRAULT_DISPLAY_COUNT, linePaint);
    }
}
绘制内容:
private void drawItem(Canvas canvas) {
    for (int i = 0; i < selectBeanList.size(); i++) {
        SelectBean selectBean = selectBeanList.get(i);
        String name = selectBean.name;
        if (offset + i * diffY >= height || (offset + i * diffY) + diffY <= 0) {
            continue;
        } else {
            //这个是缩放和透明度的代码,先不用看
            if (i == currentIndex) {
                textPaint.setTextSize(currentTextSize);
                textPaint.setAlpha((int) (255 * currentAlpha));
            } else {
                textPaint.setTextSize(otherTextSize);
                textPaint.setAlpha((int) (255 * otherAlpha));
            }
            Paint.FontMetrics fontMetrics = textPaint.getFontMetrics();
            float allHeight = fontMetrics.descent - fontMetrics.ascent;
            canvas.drawText(name, width * 1.0f / 2, offset + i * diffY + diffY / 2 - allHeight / 2 - fontMetrics.ascent, textPaint);
        }
    }
}
上面的绘制代码中,有两个变量offset 、diffY ,offset是当前view滑动到的位置,也即是我们第一个item的起点坐标,diffY是每一行需要的高度,可以看下他们的初始化的值。
offset和diffY初始化:
@Override
protected void onSizeChanged(int w, int h, int oldw, int oldh) {
    super.onSizeChanged(w, h, oldw, oldh);
    height = h;
    width = w;
    //offset起点坐标也即是我们第二行的坐标
    offset = (float) (h * 1.0 / DEFRAULT_DISPLAY_COUNT);
    //每一个间隔的y轴距离是(总高度/DEFRAULT_DISPLAY_COUNT)
    diffY = (float) (h * 1.0 / DEFRAULT_DISPLAY_COUNT);
    //省略代码
}
知道了这两个变量后,咋们再来看下绘制内容的代码,首先在遍历数据源的时候,有越界的判断,分别是有四种情况是在绘制区域外的:
offset + i * diffY > height:item的上边缘在height之下
(offset + i * diffY) + diffY < 0:item的下边缘在0之上
(offset + i * diffY == height):item的上边缘在height位置
(offset + i * diffY) + diffY == 0:item的下边缘在0这个位置
这里给一个offset初始状态下(offset=h * 1.0 / DEFRAULT_DISPLAY_COUNT)的草图出来,这里只画一个MultiSelectItem的情况:

滑动处理:
@Override
public boolean onTouchEvent(MotionEvent event) {
    if (velocityTracker == null) {
        velocityTracker = VelocityTracker.obtain();
    }
    velocityTracker.addMovement(event);
    float y = event.getY();
    switch (event.getAction()) {
        case MotionEvent.ACTION_DOWN:
            mScroller.forceFinished(true);
            lastY = y;
            dy = 0;
            break;
        case MotionEvent.ACTION_MOVE:
            dy = y - lastY;
            //滑动过程中,改变值的过程
            validateValue();
            break;
        case MotionEvent.ACTION_UP:
            //抬起的时候对速度进行处理
            calculateVelocity();
            break;
    }
    lastY = y;
    return true;
}
滑动过程中对offset的处理:
private void validateValue() {
    offset += dy;
    if (offset <= maxOffset) {
        offset = maxOffset;
    }
    if (offset >= minOffset) {
        offset = minOffset;
    }
    scrollTochangeChilds();
    postInvalidate();
}

//滑动的位置到了需要改变childs数据的时候了
private void scrollTochangeChilds() {
    if (Math.abs(offset) % diffY <= maxDeviation) {
        if (offset > 0) {
            //如果offset在view的起点下面,计算的时候需要-diffY
            currentIndex = Math.round(Math.abs(offset - diffY) * 1.0f / diffY);
        } else {
            //如果offset在view的起点上面,计算的时候需要+diffY
            currentIndex = Math.round((Math.abs(offset) + diffY) * 1.0f / diffY);
        }
        //当前被选中的放大
        currentTextSize = maxTextSize;
        //当前被选中的alpha值最大
        currentAlpha = maxAlpha;
        //接口回调,给MultiSelectView刷新数据
        if (mScrollListener != null) {
            mScrollListener.end(this, currentIndex);
        }
    }
}
上面代码就是onMove的操作处理,其中上面有offset临界值处理:
maxOffset:滑动的最大的位置
minOffset:滑动的最小的位置
这两个值是哪来的呢:
@Override
protected void onSizeChanged(int w, int h, int oldw, int oldh) {
    super.onSizeChanged(w, h, oldw, oldh);
    //省略代码
    minOffset = diffY;
    maxOffset = -diffY * (this.selectBeanList.size() - 2);
}
这里我画两张草图大家就知道这两个临界值是怎么回事了:


相信看图能知道是怎么回事了吧,临界值就是这么来的。
上面的move操作里面还进行了一个currentIndex的处理,当认为Math.abs(offset) % diffY <= maxDeviation的时候,则需要重新获取新的被选中的index了。
抬起过程中对offset的处理:
private void calculateVelocity() {
    velocityTracker.computeCurrentVelocity(1000);
    float yVelocity = velocityTracker.getYVelocity();
    //大于这个值才会被认为是fling
    if (Math.abs(yVelocity) > minFlingVelocity) {
        //如果是当前位置在maxOffset处了,并且继续往上滑动则不处理或者 当前位置在minOffset处了,并且继续往下滑动则不处理
        if ((offset == maxOffset && yVelocity < 0) || (offset == minOffset && yVelocity
            return;
        }
        int startY = Math.round(offset);
        //结束位置通过速度来判断了
        endY = Math.round(yVelocity / 10) + startY;
        //结束位置也是需要进行限制的
        if (endY <= maxOffset) {
            endY = maxOffset;
        }
        if (endY >= minOffset) {
            endY = minOffset;
        }
        //和move的时候计算currentIndex是一样的
        if (endY > 0) {
            currentIndex = Math.round(Math.abs(endY - diffY) * 1.0f / diffY);
        } else {
            currentIndex = Math.round((Math.abs(endY) + diffY) * 1.0f / diffY);
        }
        //endY的位置是需要diffY成整数倍的,并且是与currentIndex成反比的
        endY = diffY - currentIndex * diffY;
        mScroller.startScroll(0, startY, 0, (int) (endY - startY));
        invalidate();
    } else {
        //如果滑动速度不是很大,不需要fling的
        releaseMoveTo();
    }
}
//松手的时候,移动到最近的一个index上
private void releaseMoveTo() {
    if (offset > 0) {
        currentIndex = Math.round(Math.abs(offset - diffY) * 1.0f / diffY);
    } else {
        currentIndex = Math.round((Math.abs(offset) + diffY) * 1.0f / diffY);
    }
    int startY = Math.round(offset);
    endY = diffY - currentIndex * diffY;
    mScroller.startScroll(0, startY, 0, (int) (endY - startY));
    invalidate();
}

@Override
public void computeScroll() {
    super.computeScroll();
    //返回true表示滑动还没有结束
    if (mScroller.computeScrollOffset()) {
        offset = mScroller.getCurrY();
        scrollTochangeChilds();
        postInvalidate();
    }
}
对于MultiSelectItem整个代码基本就是这些了,可能还就是一些数据源的初始化和变量的一些初始化没说了,重点都已经介绍完了。
剩下还有MultiSelectView中被选中时的数据回调了,这里我就直接贴代码了:
@Override
public void end(MultiSelectItem multiSelectItem, int index) {
    //如果是第1个MultiSelectItem中的某一个item被选中的话
    if (multiSelectItem == getChildAt(0)) {
        Log.d("MultiSelectView", "end:" + index);
        this.selectBeanList2 = this.selectBeanList1.get(index).childs;
        this.selectBeanList3 = this.selectBeanList2.get(0).childs;
        ((MultiSelectItem) getChildAt(1)).resetList(this.selectBeanList2);
        ((MultiSelectItem) getChildAt(2)).resetList(this.selectBeanList3);
        if (onAllSelect != null) {
            onAllSelect.select(this.selectBeanList1.get(index).name + " " + this.selectBeanList2.get(0).name + " " + this.selectBeanList3.get(0).name);
        }
    } else if (multiSelectItem == getChildAt(1)) {//如果是第2个MultiSelectItem中的某一个item被选中的话
        this.selectBeanList3 = this.selectBeanList2.get(index).childs;
        ((MultiSelectItem) getChildAt(2)).resetList(this.selectBeanList3);
        if (onAllSelect != null) {
            onAllSelect.select(this.selectBeanList1.get(((MultiSelectItem) getChildAt(0)).getCurrentIndex()).name + " " + this.selectBeanList2.get(index).name + " " + this.selectBeanList3.get(0).name);
        }
    } else {
        //如果是第3个MultiSelectItem中的某一个item被选中的话
        if (onAllSelect != null) {
            onAllSelect.select(this.selectBeanList1.get(((MultiSelectItem) getChildAt(0)).getCurrentIndex()).name + " " + this.selectBeanList2.get(((MultiSelectItem) getChildAt(1)).getCurrentIndex()).name + " " + this.selectBeanList3.get(index).name);
        }
    }
}
private OnAllSelect onAllSelect;
public void setOnAllSelect(OnAllSelect onAllSelect) {
    this.onAllSelect = onAllSelect;
}
//选中内容回调
public interface OnAllSelect {
    void select(String text);
}
总结:
MultiSelectView中添加3个MultiSelectItemMultiSelectView中对3个MultiSelectItem进行测量MultiSelectView中对3个MultiSelectItem进行layoutMultiSelectItem首先把静态的行分割线画出来MultiSelectItem中onTouch的处理,边界、索引等MultiSelectView中完成被选中的item的内容回调
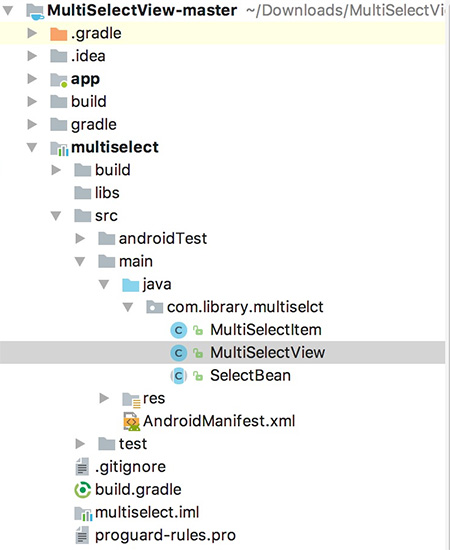
项目文件目录截图:
项目结构
 定制一个类似地址选择器的view
注:本文著作权归作者,由demo大师代发,拒绝转载,转载需要作者授权