标签与内容页联动
上一节(React Native : 自定义视图)做到了点击标签自动移动,还差跟下面的视图进行联动。
首先创建 NewsList.js :
import React from 'react'
import {
    View,
    Text,
    ListView,
    Image,
    StyleSheet,
    Dimensions
} from 'react-native'
const {width, height} = Dimensions.get('window')

export default class NewsList extends React.Component {
    render() {
        const {style} = this.props
        return (
            <View style={[styles.view,style]}>

            </View>
        )
    }
}

const styles = StyleSheet.create({
    view: {
        flex: 1,
        backgroundColor:'red'
    }
})
然后在 Home.js 引入,再加入 ScrollView ,现在 Home.js 的 redner() 是这样子的,这里加入的 ScrollView 我们在后文中称为 NewsScrollView
render() {
        return (
            <View style={styles.view}>
                <NavigationBar
                    title="首页"
                    unLeftImage={true}
                />

                <SegmentedView
                    ref="SegmentedView"
                    list={this.state.list}
                    style={{height: 30}}
                />

                <ScrollView
                    style={styles.view}
                    ref="ScrollView"
                    horizontal={true}
                    showsHorizontalScrollIndicator={false}
                    pagingEnabled={true}
                >
                    { this._getNewsLists()}
                </ScrollView>
           </View>
        )
    }
_getNewsLists() 方法:
_getNewsLists() {
    let lists = []
    if (this.state.list) {
        for (let index in this.state.list) {
            let dic = this.state.list[index]
            lists.push(
                <NewsList
                    key={index}
                    style={{backgroundColor:'#' + this._getColor('',0),  width, height: height - 49 - 64 - 30}}
                    dic={dic}
                />
            )
        }
    }

    return lists
}

_getColor(color, index) {

    index ++

    if (index == 7) {
        return color
    }

    color = color + '0123456789abcdef'[Math.floor(Math.random()*16)]
    return  this._getColor(color, index)
}
根据返回的数据创建对应数量的视图,给随机颜色方便看效果。
先设置滑动 NewsScrollView 让标签跟着移动。
我们把 SegmentedView 中 items.push 中的 onPress 方法的实现单独写到一个方法里,然后在这里调用:
_moveTo(index) {
    const { list } = this.props  //获取到 传入的数组

    this.state.selectItem && this.state.selectItem._unSelect()
    this.state.selectItem = this.refs[index]


    if (list.length > maxItem) {
        let meiosis = parseInt(maxItem / 2)
        this.refs.ScrollView.scrollTo({x: (index - meiosis < 0 ? 0 : index - meiosis > list.length - maxItem ? list.length - maxItem : index - meiosis ) * this.state.itemWidth, y: 0, animated: true})
    }
}
这里会发现我们给 this.state 加了一个 itemWidth ,原来我们获取 itemWidth 是在 _getItems() 中计算的,但是在渲染的过程中无法调用 setState() ,我们把计算 itemWidth 的方法移动到 :
componentWillReceiveProps(props) {
    const { list } = props  //获取到 传入的数组
    if (!list || list.length == 0) return

    // 计算每个标签的宽度
    let itemWidth = width / list.length

    if (list.length > maxItem) {
        itemWidth = width / maxItem
    }

    this.setState({
        itemWidth
    })
}
componentWillReceiveProps(props) 方法会在属性更新后调用,参数 props 是新的属性。
现在运行会发现点击标签可以正常改变标签的状态,然而拖动 NewsScrollView 只会让上一个选中的变为未选中,新的标签并没有变为选中,这是因为选中状态只在标签被点击的时候进行了设置,我们需要给 Item 添加一个选中的方法 :
 _select() {
    this.setState({
        isSelect: true
    })
}
然后在 _moveTo(index) 进行调用:
this.state.selectItem && this.state.selectItem._unSelect()
this.state.selectItem = this.refs[index]
this.state.selectItem._select()
现在运行滑动 NewsScrollView 上面的 SegmentedView 可以正常运行了。
最后设置点击标签可以让 NewsScrollView 滑动到对应的位置,我们需要给 SegmentedView 加入一个回调函数,在标签被点击的时候调用返回点击的 index
<SegmentedView
    ref="SegmentedView"
    list={this.state.list}
    style={{height: 30}}
    selectItem={(index) => {
        this.refs.ScrollView.scrollTo({x: width * index, y: 0, animated: true})
    }}
/>
在 SegmentedView 进行调用:
_getItems() {
    const { list, selectItem } = this.props  //获取到 传入的数组

    if (!list || list.length == 0) return []

    let items = []
    for (let index in list) {
        let dic = list[index]
        items.push(
            <Item
                ref={index}
                key={index}
                isSelect={index == 0}
                itemHeight={this.state.itemHeight}
                itemWidth={this.state.itemWidth}
                dic={dic}
                onPress={() => {
                    this._moveTo(index)
                    selectItem && selectItem(index)
                }}
            />
        )
    }


    return items
}
加载新闻列表第一页数据 加载新闻列表第一页数据
在 Home.js 中已经给 NewsList 传入了数据,我们再给传入一个参数识别是否是第一页,初始只加载第一页的数据,也方便调试:
_getNewsLists() {
    let lists = []
    if (this.state.list) {
        for (let index in this.state.list) {
            let dic = this.state.list[index]
            lists.push(
                <NewsList
                    key={index}
                    style={{backgroundColor:'white'}}
                    dic={dic}
                    isRequest={index == 0}
                />
            )
        }
    }

    return lists
}
然后去 NewsList.js 进行请求数据:
 // 构造
constructor(props) {
    super(props);
    // 初始状态
    this.state = {
        page: 1,
        rn: 1,
    };
}


componentDidMount() {
    if (!this.props.isRequest) return
    this._onRefresh()
}

 _onRefresh(page) {
    if (this.props.dic) {
        let url = 'http://api.iapple123.com/newspush/list/index.html?clientid=1114283782&v=1.1&type='
            + this.props.dic.NameEN
            + '&startkey=&newkey=&index='
            + (page ? page : this.state.page)
            + '&size=20&ime=6271F554-7B2F-45DE-887E-4A336F64DEE6&apptypeid=ZJZYIOS1114283782&rn='
            + this.state.rn

        LOG('url=》', url)
        fetch(url, {
            method: 'GET',
            headers: {
                'Accept': 'application/json',
                'Content-Type': 'application/json',
            },
        })
            .then((res) => {

                res.json()
                    .then((json) => {
                        LOG('GET SUCCESSED then =>', url, json)

                        })
                    })
                    .catch((e) => {
                        LOG('GET ERROR then =>', url, e)

                    })
            })
            .catch((error) => {

                LOG('GET ERROR=>', url, '==>', error)
            })
    }
}
请求到数据后我们需要用 ListView (官方文档) 来显示, 所以导入 ListView ,然后去 render() 加入:
render() {
    const {style} = this.props
    return (
        <View style={[styles.view,style]}>
            <ListView
                style={{flex:1}}
                dataSource={this.state.dataSource} //设置数据源
                renderRow={this.renderRow} //设置cell
            />
        </View>
    )
}
然后加入 dataSource 和 renderRow:
// 构造
constructor(props) {
    super(props);

    var getRowData = (dataBlob, sectionID, rowID) => {

        return dataBlob[sectionID][rowID]
    };
    // 初始状态
    this.state = {

        page: 1,
        rn: 1,
        dataSource: new ListView.DataSource({
            getRowData: getRowData,
            rowHasChanged: (r1, r2) => r1 !== r2,
        }),
    };

    this.renderRow = this.renderRow.bind(this)

}


renderRow(rowData, rowID, highlightRow) {
	return (
		<View />
	)
}
运行效果
我们要做的界面是这个样子

从上图可以看出来新闻分为 3 种样式,轮播图、有一张图片的和二、三张图片的。
接下来开始解析数据,解析完 json 数据发现只有一个数组,轮播图是取了前四个,剩下的根据 ImagesList 里图片的个数来判断,
去 .then((json) => { 加入
let list = json.NewsList

let swipers = []
let news = []

for (let index in list) {
    let dic = list[index]
    index < 4 ? swipers.push(dic) : news.push(dic)
}

news.splice(0, 0, swipers)


this.setState({
    dataSource: this.state.dataSource.cloneWithRows(news)
})
现在 news 的数据结构为:
[
	[
		{},
		{}
	],

	{},
	{}
}
然后去 renderRow 处理数据
如果是数组,那么返回轮播图:
if (Object.prototype.toString.call(rowData) === '[object Array]') {
    return (
        <CarousePicture
            index={2}
            ref="ScrollView"
            rowData={rowData}
            style={{width, height: 200}}
            touchIn={this.props.touchIn}
        >
        </CarousePicture>
    )
}
这里的轮播图本来用的 Swiper,但是在 Android 上有很多 BUG,我只好自己写了一个,但是在 Android 上的体验差强人意,源码在这里,把文件导入项目即可。
具体的可以看这里
touchIn 是由于在 Andoird 上两个 ScrollView 重叠时,处于顶部的 ScrollView 滑动事件不会响应,因为底部的 ScrollView 进行了响应并拦截了事件,我们需要在手指接触到轮播图的时候禁用底部 ScrollView 的滑动属性,再手指离开的时候再进行恢复,所以还需要去 Home.js 加入:
 _getNewsLists() {
    let lists = []
    if (this.state.list) {
        for (let index in this.state.list) {
            let dic = this.state.list[index]
            lists.push(
                <NewsList
                    key={index}
                    style={{backgroundColor:'white',  width, height: height - 64 - 49 - 30}}
                    dic={dic}
                    isRequest={index == 0}
                    touchIn={(scrollEnabled) => {
                        this.refs.ScrollView.setNativeProps({scrollEnabled: !scrollEnabled})
                    }}
                />
            )
        }
    }
  return lists
}
然后根据 ImagesList 的个数来区分:
let imagesList = rowData.ImagesList

if (imagesList && imagesList.length == 1) {
    return (
        <TouchableOpacity style={{width,  backgroundColor:'white'}}>
            <View
                style={{width, backgroundColor:'white', flexDirection:'row', justifyContent:'space-between', flex:1}}>
                <Image
                    resizeMode="cover"
                    style={{marginTop: 10, marginBottom:10, marginLeft: 10,  80, height: 80, backgroundColor:'#EEEEEE'}}
                    source={{uri:imagesList[0].ImgPath}}
                />

                <View
                    style={{ marginRight: 10,backgroundColor:'white', marginTop: 10, height: 80,  width - 110}}
                >
                    <Text>{rowData.Title}</Text>
                    <View style={{flex:1, flexDirection: 'row', justifyContent: 'space-between'}}>
                        <Text style={{marginTop:10, fontSize: 13, color: '#999999'}}>{rowData.Source}</Text>
                        <Text style={{marginRight:0,marginTop:10,fontSize: 13, color: '#999999'}}>{rowData.PublishTime}</Text>
                    </View>
                </View>
            </View>
            <View style={{width, height:1, backgroundColor: '#EEEEEE'}}></View>
        </TouchableOpacity>
    )
}

let images = []

for (let index in imagesList) {
    let dic = imagesList[index]
    images.push(
        <Image
            resizeMode="cover"
            key={index}
            style={{marginRight: 10, marginLeft: index == 0 ? 10 : 0, marginTop:10, marginBottom: 10,flex:1, height: 90}}
            source={{uri:dic.ImgPath}}
        />
    )
}

return (
    <TouchableOpacity style={{width,  backgroundColor:'white'}}>

        <View style={{width,backgroundColor:'white'}}>
            <Text style={{marginLeft: 10, marginTop: 10}}>{rowData.Title}</Text>
        </View>
        <View style={{flexDirection:'row'}}>
            {images}
        </View>
        <View style={{flex:1, flexDirection: 'row', justifyContent: 'space-between'}}>
            <Text style={{marginLeft: 10, marginBottom: 10,fontSize: 13, color: '#999999'}}>{rowData.Source}</Text>
            <Text style={{marginRight:10,fontSize: 13, marginBottom: 10,color: '#999999'}}>{rowData.PublishTime}</Text>
        </View>
        <View style={{width, height:1, backgroundColor: '#EEEEEE'}}></View>
    </TouchableOpacity>
)
我这里的 style 没有进行整理,所以看着比较乱,正式开发中应该整理到 styles 里,看起来就简洁多了。
现在运行就可以显示第一页的数据了。
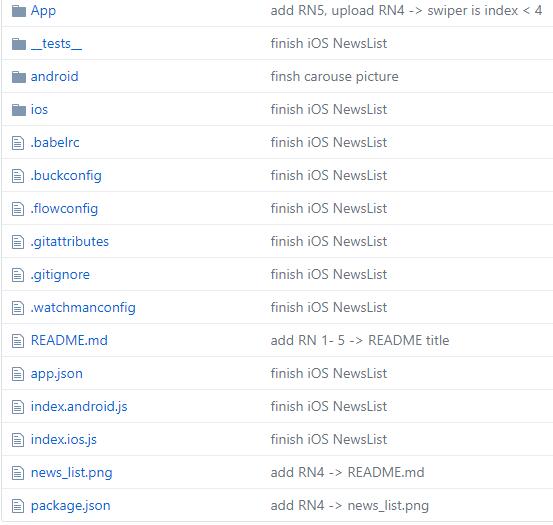
项目结构
项目结构如下:

React Native :加载新闻列表
注:本文著作权归作者,由demo大师代发,拒绝转载,转载需要作者授权