概述
详细
一、基础知识介绍
神经网络基础知识的介绍部分包含了大量公式及图,使用网站的在线编辑器,实现是力不从心。我写了13页的word文档,放在了解压包中,大家下载来看吧,我录了一个视频,大家可以大致浏览一下。
二、Python代码实现神经网络框架
如果大家之前对神经网络不了解的话,在看这部分内容之前,一定要掌握第一部分的基础内容,否则的话,你会看不懂源代码的,因为很多代码都是根根据公式才能写出来的。
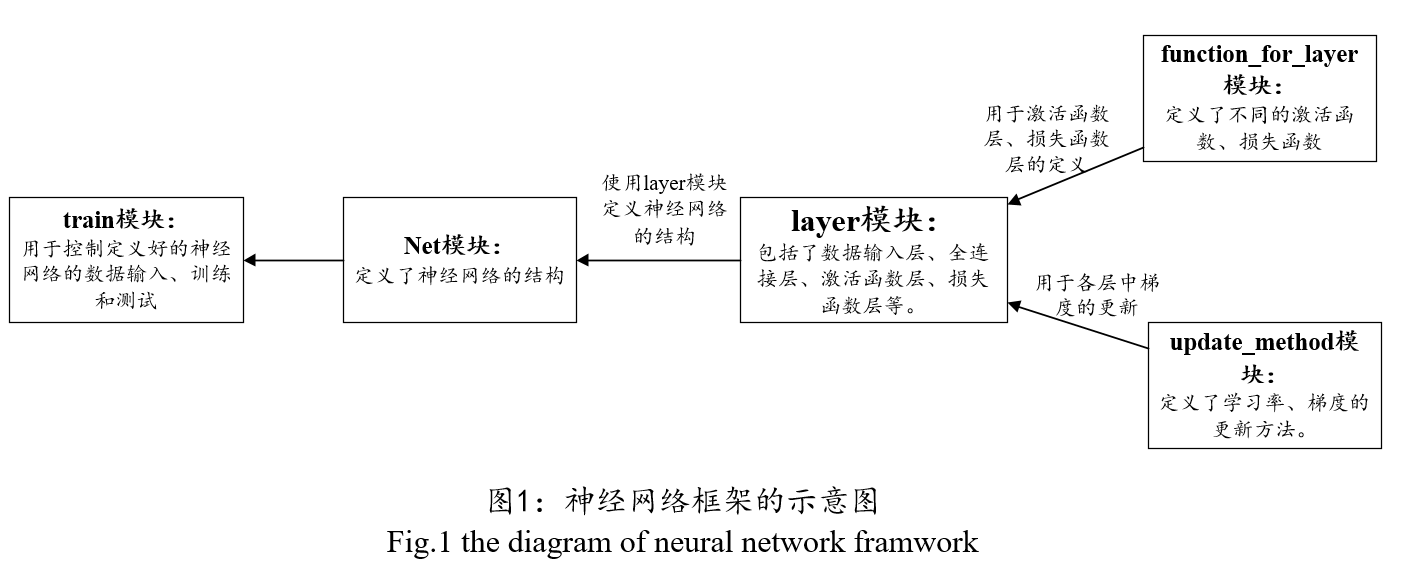
在此处,我们把一个深度神经网络可以分为许多层,包括数据的输入层、全连接层、激活函数层、损失函数层等,另外还可以加入dropout层。如果想构建卷积神经网络的话,还可以加入卷积层、池化层等。本demo实现的神经网络框架就是基于分层结构,把每一层实现之后,大家就可以根据自己的需要,搭建自己的神经网络了。
本框架包括的核心模块及作用:
layer模块:里面定义组成神经网络各层的作用,包括数据输入层、全连接层、激活函数层、损失函数层等。
function_for_layer模块:里面定义了激活函数、损失函数、权值初始化方法等。
update_method模块:学习率的更新机制、权值的更新机制(如批量随机梯度下降法)等。
net模块:大家可以根据自己的需要,在这里定义自己的神经网络。
图1给出了神经网络框架的示意图。

另外,在上传的压缩包里面,还有一份关于神经网络框架的说明文档,大家可以根据看着说明文档读源码。我录了一个小视频 ,大家可以浏览一下。
layer模块:
数据输入层:
class data:
    def __init__(self):
        self.data_sample = 0
        self.data_label = 0
        self.output_sample = 0
        self.output_label = 0
        self.point = 0           #用于记住下一次pull数据的地方;

    def get_data(self, sample, label):   # sample 每一行表示一个样本数据, label的每一行表示一个样本的标签.
        self.data_sample = sample
        self.data_label = label

    def shuffle(self):    # 用于打乱顺序;
        random_sequence = random.sample(np.arange(self.data_sample.shape[0]), self.data_sample.shape[0])
        self.data_sample = self.data_sample[random_sequence]
        self.data_label = self.data_label[random_sequence]

    def pull_data(self):     #把数据推向输出
        start = self.point
        end = start + batch_size
        output_index = np.arange(start, end)
        if end > self.data_sample.shape[0]:
            end = end - self.data_sample.shape[0]
            output_index = np.append(np.arange(start, self.data_sample.shape[0]), np.arange(0, end))
        self.output_sample = self.data_sample[output_index]
        self.output_label = self.data_label[output_index]
        self.point = end % self.data_sample.shape[0]
全连接层:
class fully_connected_layer:
    def __init__(self, num_neuron_inputs, num_neuron_outputs):
        self.num_neuron_inputs = num_neuron_inputs
        self.num_neuron_outputs = num_neuron_outputs
        self.inputs = np.zeros((batch_size, num_neuron_inputs))
        self.outputs = np.zeros((batch_size, num_neuron_outputs))
        self.weights = np.zeros((num_neuron_inputs, num_neuron_outputs))
        self.bias = np.zeros(num_neuron_outputs)
        self.weights_previous_direction = np.zeros((num_neuron_inputs, num_neuron_outputs))
        self.bias_previous_direction = np.zeros(num_neuron_outputs)
        self.grad_weights = np.zeros((batch_size, num_neuron_inputs, num_neuron_outputs))
        self.grad_bias = np.zeros((batch_size, num_neuron_outputs))
        self.grad_inputs = np.zeros((batch_size, num_neuron_inputs))
        self.grad_outputs = np.zeros((batch_size,num_neuron_outputs))

    def initialize_weights(self):
        self.weights = ffl.xavier(self.num_neuron_inputs, self.num_neuron_outputs)

    # 在正向传播过程中,用于获取输入;
    def get_inputs_for_forward(self, inputs):
        self.inputs = inputs


    def forward(self):
        self.outputs = self.inputs .dot(self.weights) + np.tile(self.bias, (batch_size, 1))

    # 在反向传播过程中,用于获取输入;
    def get_inputs_for_backward(self, grad_outputs):
        self.grad_outputs = grad_outputs

    def backward(self):
        #求权值的梯度,求得的结果是一个三维的数组,因为有多个样本;
        for i in np.arange(batch_size):
            self.grad_weights[i,:] = np.tile(self.inputs[i,:], (1, 1)).T
                                     .dot(np.tile(self.grad_outputs[i, :], (1, 1))) +
                                     self.weights * weights_decay
        #求求偏置的梯度;
        self.grad_bias = self.grad_outputs
        #求 输入的梯度;
        self.grad_inputs = self.grad_outputs .dot(self.weights.T)

    def update(self):
        #权值与偏置的更新;
        grad_weights_average = np.mean(self.grad_weights, 0)
        grad_bias_average = np.mean(self.grad_bias, 0)
        (self.weights, self.weights_previous_direction) = update_function(self.weights,
                                                                        grad_weights_average,
                                                                        self.weights_previous_direction)
        (self.bias, self.bias_previous_direction) = update_function(self.bias,
                                                                        grad_bias_average,
                                                                        self.bias_previous_direction)
激活函数层:
class activation_layer:
    def __init__(self, activation_function_name):
        if activation_function_name == 'sigmoid':
            self.activation_function = ffl.sigmoid
            self.der_activation_function = ffl.der_sigmoid
        elif activation_function_name == 'tanh':
            self.activation_function = ffl.tanh
            self.der_activation_function = ffl.der_tanh
        elif activation_function_name == 'relu':
            self.activation_function = ffl.relu
            self.der_activation_function = ffl.der_relu
        else:
            print '输入的激活函数不对啊'
        self.inputs = 0
        self.outputs = 0
        self.grad_inputs = 0
        self.grad_outputs = 0

    def get_inputs_for_forward(self, inputs):
        self.inputs = inputs

    def forward(self):
        #需要激活函数
        self.outputs = self.activation_function(self.inputs)

    def get_inputs_for_backward(self, grad_outputs):
        self.grad_outputs = grad_outputs

    def backward(self):
        #需要激活函数的导数
        self.grad_inputs = self.grad_outputs * self.der_activation_function(self.inputs)
损失函数层:
class loss_layer:
    def __init__(self, loss_function_name):
        self.inputs = 0
        self.loss = 0
        self.accuracy = 0
        self.label = 0
        self.grad_inputs = 0
        if loss_function_name == 'SoftmaxWithLoss':
            self.loss_function =ffl.softmaxwithloss
            self.der_loss_function =ffl.der_softmaxwithloss
        elif loss_function_name == 'LeastSquareError':
            self.loss_function =ffl.least_square_error
            self.der_loss_function =ffl.der_least_square_error
        else:
            print '输入的损失函数不对吧,别继续了,重新输入吧'

    def get_label_for_loss(self, label):
        self.label = label

    def get_inputs_for_loss(self, inputs):
        self.inputs = inputs

    def compute_loss_and_accuracy(self):
        #计算正确率
        if_equal = np.argmax(self.inputs, 1) == np.argmax(self.label, 1)
        self.accuracy = np.sum(if_equal) / batch_size
        #计算训练误差
        self.loss = self.loss_function(self.inputs, self.label)

    def compute_gradient(self):
        self.grad_inputs = self.der_loss_function(self.inputs, self.label)
function_for_layer模块:
激活函数的定义:
# sigmoid函数及其导数的定义
def sigmoid(x):
    return 1 / (1 + np.exp(-x))
def der_sigmoid(x):
    return sigmoid(x) * (1 - sigmoid(x))


# tanh函数及其导数的定义
def tanh(x):
    return (np.exp(x) - np.exp(-x)) / (np.exp(x) + np.exp(-x))
def der_tanh(x):
    return 1 - tanh(x) * tanh(x)

# ReLU函数及其导数的定义
def relu(x):
    temp = np.zeros_like(x)
    if_bigger_zero = (x > temp)
    return x * if_bigger_zero
def der_relu(x):
    temp = np.zeros_like(x)
    if_bigger_equal_zero = (x >= temp)          #在零处的导数设为1
    return if_bigger_equal_zero * np.ones_like(x)
损失函数的定义:
# SoftmaxWithLoss函数及其导数的定义
def softmaxwithloss(inputs, label):
    temp1 = np.exp(inputs)
    probability = temp1 / (np.tile(np.sum(temp1, 1), (inputs.shape[1], 1))).T
    temp3 = np.argmax(label, 1)   #纵坐标
    temp4 = [probability[i, j] for (i, j) in zip(np.arange(label.shape[0]), temp3)]
    loss = -1 * np.mean(np.log(temp4))
    return loss
def der_softmaxwithloss(inputs, label):
    temp1 = np.exp(inputs)
    temp2 = np.sum(temp1, 1)  #它得到的是一维的向量;
    probability = temp1 / (np.tile(temp2, (inputs.shape[1], 1))).T
    gradient = probability - label
    return gradient
权值初始化方法:
# xavier 初始化方法
def xavier(num_neuron_inputs, num_neuron_outputs):
    temp1 =  np.sqrt(6) / np.sqrt(num_neuron_inputs+ num_neuron_outputs + 1)
    weights = stats.uniform.rvs(-temp1, 2 * temp1, (num_neuron_inputs, num_neuron_outputs))
    return weights
update_method模块:
学习率的更新机制:
#定义一些需要的全局变量
momentum = 0.9
base_lr  = 0         # 在建造net是对它初始化;
iteration = -1       # 它常常需要在训练过程中修改


###########################      定义学习率的变化机制函数     ####################################

# inv方法
def inv(gamma = 0.0005, power = 0.75):
    if iteration == -1:
        assert False, '需要在训练过程中,改变update_method 模块里的 iteration 的值'
    return base_lr * np.power((1 + gamma * iteration), -power)

# 固定方法
def fixed():
    return base_lr
批量随机梯度下降法:
# 基于批量的随机梯度下降法
def batch_gradient_descent(weights, grad_weights, previous_direction):
    lr = inv()
    direction = momentum * previous_direction + lr * grad_weights
    weights_now = weights - direction
    return (weights_now, direction)
net模块:
例如定义一个四层的神经网络:
#搭建一个四层的神经网络;
        self.inputs_train = layer.data()                 # 训练样本的输入层
        self.inputs_test = layer.data()                  # 测试样本的输入层

        self.fc1 = layer.fully_connected_layer(784, 50)
        self.ac1 = layer.activation_layer('tanh')
        self.fc2 = layer.fully_connected_layer(50, 50)
        self.ac2 = layer.activation_layer('tanh')
        self.fc3 = layer.fully_connected_layer(50, 10)
        self.loss = layer.loss_layer('SoftmaxWithLoss')
定义网络的一些其它功能接口,例如载入训练样本与测试样本:
    def load_sample_and_label_train(self, sample, label):
        self.inputs_train.get_data(sample, label)
    def load_sample_and_label_test(self, sample, label):
        self.inputs_test.get_data(sample, label)
定义网络的初始化接口:
    def initial(self):
        self.fc1.initialize_weights()
        self.fc2.initialize_weights()
        self.fc3.initialize_weights()
定义在训练过程中网络的前向传播与反向传播:
    def forward_train(self):
        self.inputs_train.pull_data()

        self.fc1.get_inputs_for_forward(self.inputs_train.outputs)
        self.fc1.forward()
        self.ac1.get_inputs_for_forward(self.fc1.outputs)
        self.ac1.forward()

        self.fc2.get_inputs_for_forward(self.ac1.outputs)
        self.fc2.forward()
        self.ac2.get_inputs_for_forward(self.fc2.outputs)
        self.ac2.forward()

        self.fc3.get_inputs_for_forward(self.ac2.outputs)
        self.fc3.forward()

        self.loss.get_inputs_for_loss(self.fc3.outputs)
        self.loss.get_label_for_loss(self.inputs_train.output_label)
        self.loss.compute_loss_and_accuracy()


    def backward_train(self):
        self.loss.compute_gradient()
        self.fc3.get_inputs_for_backward(self.loss.grad_inputs)
        self.fc3.backward()
        self.ac2.get_inputs_for_backward(self.fc3.grad_inputs)
        self.ac2.backward()
        self.fc2.get_inputs_for_backward(self.ac2.grad_inputs)
        self.fc2.backward()
        self.ac1.get_inputs_for_backward(self.fc2.grad_inputs)
        self.ac1.backward()
        self.fc1.get_inputs_for_backward(self.ac1.grad_inputs)
        self.fc1.backward()
定义在测试过程中的网络正向传播:
    def forward_test(self):
        self.inputs_test.pull_data()

        self.fc1.get_inputs_for_forward(self.inputs_test.outputs)
        self.fc1.forward()
        self.ac1.get_inputs_for_forward(self.fc1.outputs)
        self.ac1.forward()

        self.fc2.get_inputs_for_forward(self.ac1.outputs)
        self.fc2.forward()
        self.ac2.get_inputs_for_forward(self.fc2.outputs)
        self.ac2.forward()

        self.fc3.get_inputs_for_forward(self.ac2.outputs)
        self.fc3.forward()

        self.loss.get_inputs_for_loss(self.fc3.outputs)
        self.loss.get_label_for_loss(self.inputs_test.output_label)
        self.loss.compute_loss_and_accuracy()
定义权值与梯度的更新:
    def update(self):
        self.fc1.update()
        self.fc2.update()
        self.fc3.update()
三、使用在net模块定义好的神经网络识别手写字体
在第二部分中的net模块中,我们定义了一个784*50*50*10的神经网络,训练该神经网络识别手写体数字。
手写体数字简介:来自Yann LeCun 等人维护一个手写数字集,训练样本包括60000个,测试样本为10000个,可以在官网http://yann.lecun.com/exdb/mnist/index.html下载。 但是官网的数据为二进制的数据,不方便用,不过大家不用但心,我已经把它转化为了matlab中常用的.mat格式的数据,下载压缩包/demo/data.mat中查看。 手写字体长这样子:

写一个train.py文件,使用它来训练神经网络并测试。
# 导入数据;
data = scipy.io.loadmat('data.mat')
train_label = data['train_label']
train_data = data['train_data']
test_label = data['test_label']
test_data = data['test_data']

#一些相关的重要参数
num_train = 800
lr = 0.1
weight_decay = 0.001
train_batch_size = 100
test_batch_size = 10000

# 创建网络并加载样本
solver = net.net(train_batch_size, lr, weight_decay)
solver.load_sample_and_label_train(train_data, train_label)
solver.load_sample_and_label_test(test_data, test_label)
# 初始化权值;
solver.initial()

# 用于存放训练误差
train_error = np.zeros(num_train)
# 训练
for i in range(num_train):
    print '第', i, '次迭代'
    net.layer.update_method.iteration  = i
    solver.forward_train()
    solver.backward_train()
    solver.update()
    train_error[i] = solver.loss.loss

plt.plot(train_error)
plt.show()
#测试
solver.turn_to_test(test_batch_size)
solver.forward_test()
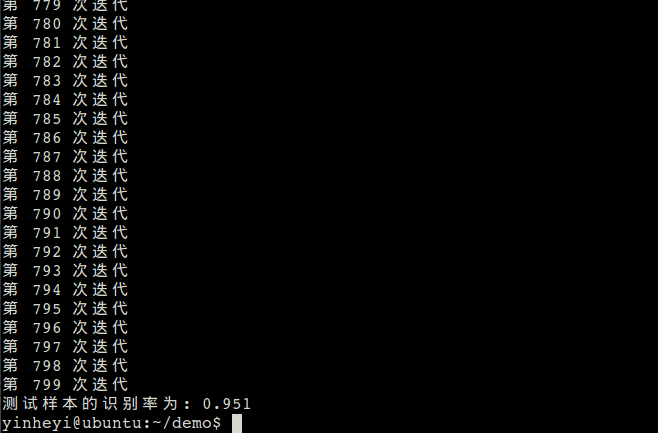
print '测试样本的识别率为:', solver.loss.accuracy
运行train.py程序,得到:
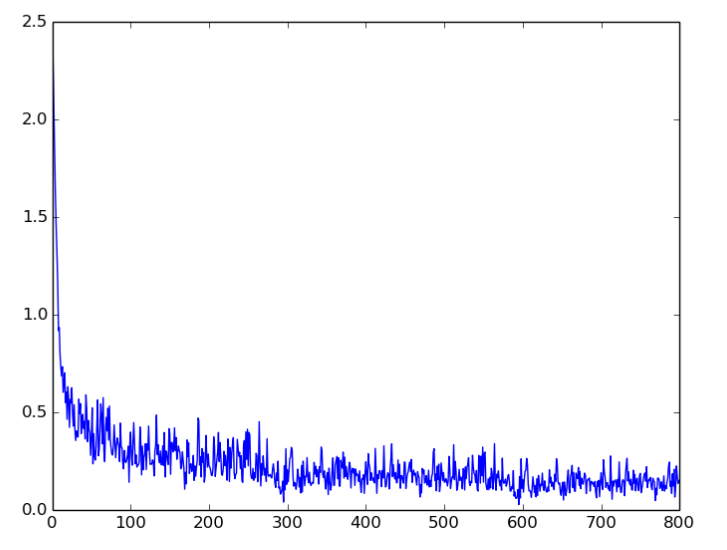
在网络训练过程中,训练误差的下降曲线为:

测试样本 的识别率为:

当然,大家可以通过调节参数来调高识别率。
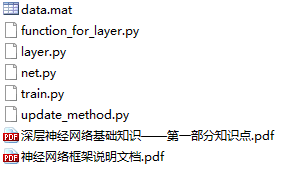
四、项目文件目录截图
