1、原型继承
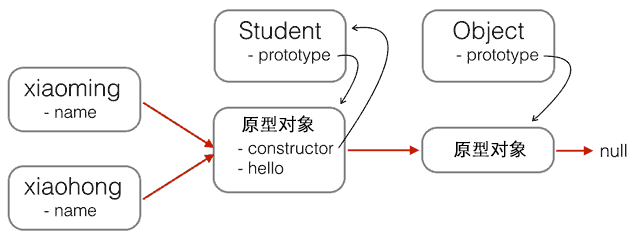
在上一篇中,我们提到,JS中原型继承的本质,实际上就是 “将构造函数的原型对象,指向由另一个构造函数创建的实例”。这里,我们就原型继承的概念,再进行详细的理解。首先回顾一下之前的一个示例,Student构造函数 和 原型链:
function Student(props) {
    this.name = props.name || 'Unnamed';
}

Student.prototype.hello = function () {
    alert('Hello, ' + this.name + '!');
}
7
1
function Student(props) { 2
this.name = props.name || 'Unnamed';3
}4
5
Student.prototype.hello = function () {6
alert('Hello, ' + this.name + '!');7
}
现在我们希望能由Student扩展出一个如 PrimaryStudent,要求这个新构造函数创建的对象能够调用自己原型对象的方法之外,还可以调用Student.prototype原型对象的方法,相当于实现继承:
function PrimaryStudent(props) {
    // 调用Student构造函数,绑定this变量
    Student.call(this, props);
    this.grade = props.grade || 1;
}
5
1
function PrimaryStudent(props) {2
// 调用Student构造函数,绑定this变量3
Student.call(this, props);4
this.grade = props.grade || 1;5
}然而我们的原型链目前是这样:
new PrimaryStudent() ----> PrimaryStudent.prototype ----> Object.prototype ----> null1
1
new PrimaryStudent() ----> PrimaryStudent.prototype ----> Object.prototype ----> null为了达到这个目的,我们的原型链必须变成这样:
new PrimaryStudent() ----> PrimaryStudent.prototype ----> Student.prototype ----> Object.prototype ----> null1
1
new PrimaryStudent() ----> PrimaryStudent.prototype ----> Student.prototype ----> Object.prototype ----> null你说,使用 PrimaryStudent.prototype = Student.prototype; 不就可以了?如果这样做,我们看看原型链变成了什么样:
new PrimaryStudent() ----> Student.prototype ----> Object.prototype ----> null1
1
new PrimaryStudent() ----> Student.prototype ----> Object.prototype ----> null之前我们形象地比喻过说,原型对象就像是对象的老爹,构造函数是老妈。这里只是换了个老爹而已,而我们希望的是,老爹的老爹(就是它的爷爷)是Student.prototype,所以,这样粗暴地直接定义是不行的。另外,在新构造函数中调用了Student的构造函数,也不等于继承,毕竟原型链摆在那,没变。
事实上,我们通过另一个对象来链接 PrimaryStudent 和 Student 就可以了:
var bridge = {};  //创建一个没有内容的对象
bridge.__proto__ = Student.prototype;  //让这个对象的原型对象是Student.prototype
bridge.constructor = PrimaryStudent;  //让这个对象的构造函数为PrimaryStudent
PrimaryStudent.prototype = bridge;  //让PrimaryStudent的原型对象指向bridge

这样一来,原型链就变成了:
new PrimaryStudent() ----> PrimaryStudent.prototype(bridge) ----> Student.prototype ----> Object.prototype ----> null

按照我们比喻的说法,就是:
- 让Student有个儿子bridge(bridge.__proto__ = Student.prototype;)
- 然后这个娃和PrimaryStudent结婚了(bridge.constructor = PrimaryStudent; PrimaryStudent.prototype = bridge;)
- 那么自然PrimaryStudent的子女(通过PrimaryStudent创建的对象),既会老爹bridge的技能,也会爷爷Student的技能”

//验证一下
bridge.do = function(){alert("hahaha")};
var xiaoming = new PrimaryStudent({name:'xiaoming', grade:2});
xiaoming.do(); // 弹框alert("hahaha");

//验证原型
xiaoming.__proto__ === PrimaryStudent.prototype; //true
xiaoming.__proto__.__proto__ === Student.prototype; //true

//验证继承关系
xiaoming instanceof PrimaryStudent; //true
xiaoming instanceof Student; //true
25
1
var bridge = {}; //创建一个没有内容的对象2
bridge.__proto__ = Student.prototype; //让这个对象的原型对象是Student.prototype3
bridge.constructor = PrimaryStudent; //让这个对象的构造函数为PrimaryStudent4
PrimaryStudent.prototype = bridge; //让PrimaryStudent的原型对象指向bridge5
6
这样一来,原型链就变成了:7
new PrimaryStudent() ----> PrimaryStudent.prototype(bridge) ----> Student.prototype ----> Object.prototype ----> null8
9
按照我们比喻的说法,就是:10
- 让Student有个儿子bridge(bridge.__proto__ = Student.prototype;)11
- 然后这个娃和PrimaryStudent结婚了(bridge.constructor = PrimaryStudent; PrimaryStudent.prototype = bridge;)12
- 那么自然PrimaryStudent的子女(通过PrimaryStudent创建的对象),既会老爹bridge的技能,也会爷爷Student的技能”13
14
//验证一下15
bridge.do = function(){alert("hahaha")};16
var xiaoming = new PrimaryStudent({name:'xiaoming', grade:2});17
xiaoming.do(); // 弹框alert("hahaha");18
19
//验证原型20
xiaoming.__proto__ === PrimaryStudent.prototype; //true21
xiaoming.__proto__.__proto__ === Student.prototype; //true22
23
//验证继承关系24
xiaoming instanceof PrimaryStudent; //true25
xiaoming instanceof Student; //true我们也可以参考发明JSON的大神道格拉斯的做法,中间对象用空函数F来实现:
// PrimaryStudent构造函数:
function PrimaryStudent(props) {
    Student.call(this, props);
    this.grade = props.grade || 1;
}

// 空函数F,用于后面起桥接作用
function F() {
}

// 把F的原型指向Student.prototype,这样通过F创建的对象,其__proto__属性就是Student.prototype
F.prototype = Student.prototype;

// 把PrimaryStudent的原型指向一个新的F对象,F对象的原型正好指向Student.prototype
PrimaryStudent.prototype = new F();

// 把PrimaryStudent原型的构造函数修复为PrimaryStudent
PrimaryStudent.prototype.constructor = PrimaryStudent;

// 继续在PrimaryStudent原型(就是new F()对象)上定义方法
PrimaryStudent.prototype.getGrade = function () {
    return this.grade;
};

// 创建xiaoming
var xiaoming = new PrimaryStudent({
    name: '小明',
    grade: 2
});
xiaoming.name; // '小明'
xiaoming.grade; // 2

// 验证原型
xiaoming.__proto__ === PrimaryStudent.prototype; // true
xiaoming.__proto__.__proto__ === Student.prototype; // true

// 验证继承关系
xiaoming instanceof PrimaryStudent; // true
xiaoming instanceof Student; // true
39
1
// PrimaryStudent构造函数:2
function PrimaryStudent(props) {3
Student.call(this, props);4
this.grade = props.grade || 1;5
}6
7
// 空函数F,用于后面起桥接作用8
function F() {9
}10
11
// 把F的原型指向Student.prototype,这样通过F创建的对象,其__proto__属性就是Student.prototype12
F.prototype = Student.prototype;13
14
// 把PrimaryStudent的原型指向一个新的F对象,F对象的原型正好指向Student.prototype15
PrimaryStudent.prototype = new F();16
17
// 把PrimaryStudent原型的构造函数修复为PrimaryStudent18
PrimaryStudent.prototype.constructor = PrimaryStudent;19
20
// 继续在PrimaryStudent原型(就是new F()对象)上定义方法21
PrimaryStudent.prototype.getGrade = function () {22
return this.grade;23
};24
25
// 创建xiaoming26
var xiaoming = new PrimaryStudent({27
name: '小明',28
grade: 229
});30
xiaoming.name; // '小明'31
xiaoming.grade; // 232
33
// 验证原型34
xiaoming.__proto__ === PrimaryStudent.prototype; // true35
xiaoming.__proto__.__proto__ === Student.prototype; // true36
37
// 验证继承关系38
xiaoming instanceof PrimaryStudent; // true39
xiaoming instanceof Student; // true
如果把继承的动作封装成一个函数,还可以隐藏F的定义,并简化代码:
function inherits(Child, Parent) {
    var F = function () {};
    F.prototype = Parent.prototype;
    Child.prototype = new F();
    Child.prototype.constructor = Child;
}
6
1
function inherits(Child, Parent) {2
var F = function () {};3
F.prototype = Parent.prototype;4
Child.prototype = new F();5
Child.prototype.constructor = Child;6
}这个inherits()函数可以复用:
function Student(props) {
    this.name = props.name || 'Unnamed';
}

Student.prototype.hello = function () {
    alert('Hello, ' + this.name + '!');
}

function PrimaryStudent(props) {
    Student.call(this, props);
    this.grade = props.grade || 1;
}

// 实现原型继承链:
inherits(PrimaryStudent, Student);

// 绑定其他方法到PrimaryStudent原型:
PrimaryStudent.prototype.getGrade = function () {
    return this.grade;
};
20
1
function Student(props) {2
this.name = props.name || 'Unnamed';3
}4
5
Student.prototype.hello = function () {6
alert('Hello, ' + this.name + '!');7
}8
9
function PrimaryStudent(props) {10
Student.call(this, props);11
this.grade = props.grade || 1;12
}13
14
// 实现原型继承链:15
inherits(PrimaryStudent, Student);16
17
// 绑定其他方法到PrimaryStudent原型:18
PrimaryStudent.prototype.getGrade = function () {19
return this.grade;20
};所以原型集成的实现方式就是:
- 定义新的构造函数,并在内部用call()调用希望“继承”的构造函数,并绑定this
- 借助中间函数F实现原型链继承,最好通过封装的inherits函数完成
- 继续在新的构造函数的原型上定义新方法
2、class继承(ES6)
class 这个新的关键字从ES6正式引入到JS中,目的就是为了让“类”的定义变得简单:
用 class 写“构造函数”(或者说类?)是这样:
class Student {
    // 定义构造函数
    constructor(name) {
        this.name = name;
    }

    //定义在原型上的函数,没有function关键字,相当于 Student.prototype.hello = function(){...}
    hello() {
        alert('Hello, ' + this.name + '!');
    }
}
11
1
class Student {2
// 定义构造函数3
constructor(name) {4
this.name = name;5
}6
7
//定义在原型上的函数,没有function关键字,相当于 Student.prototype.hello = function(){...}8
hello() {9
alert('Hello, ' + this.name + '!');10
}11
}然后创建一个Student对象的方式没有改变:
var xiaoming = new Student('小明');
xiaoming.hello();
2
1
var xiaoming = new Student('小明');2
xiaoming.hello();而 class 继承,也不需要像之前写原型继承的那种方式那么复杂了(当然,本质上和原来并没有区别),可以直接通过关键字 extends 实现:
class PrimaryStudent extends Student {
    constructor(name, grade) {
        super(name); // 记得用super调用父类的构造方法!
        this.grade = grade;
    }

    myGrade() {
        alert('I am at grade ' + this.grade);
    }
}
x
1
class PrimaryStudent extends Student {2
constructor(name, grade) {3
super(name); // 记得用super调用父类的构造方法!4
this.grade = grade;5
}6
7
myGrade() {8
alert('I am at grade ' + this.grade);9
}10
}好了,class 继承就到这里了,学过Java的同学再看这个,会觉得几乎就是类似的写法,用起来很简单,当然,本质上还是要去理解原型继承才是重点。