设计模式的目的
编写软件过程中,程序员面临着来自 耦合性,内聚性以及可维护性,可扩展性,重
用性,灵活性 等多方面的挑战,设计模式是为了让程序(软件),具有更好
- 代码重用性 (即:相同功能的代码,不用多次编写)
- 可读性 (即:编程规范性, 便于其他程序员的阅读和理解)
- 可扩展性 (即:当需要增加新的功能时,非常的方便,称为可维护)
- 可靠性 (即:当我们增加新的功能后,对原来的功能没有影响)
- 使程序呈现高内聚,低耦合的特性
分享金句:
设计模式包含了面向对象的精髓,“懂了设计模式,你就懂了面向对象分析和设计(OOA/D)的精要”
Scott Mayers 在其巨著《Effective C++》就曾经说过:C++老手和 C++新手的区别就是前者手背上有很多伤疤
设计模式七大原则
1) 单一职责原则
基本介绍
对类来说的,即一个类应该只负责一项职责。如类A负责两个不同职责:职责1,职责2。
当职责1需求变更而改变A时,可能造成职责2执行错误,所以需要将类A的粒度分解为A1,A2
应用实例


package com.atguigu.principle.singleresponsibility;

public class SingleResponsibility1 {

    public static void main(String[] args) {
        // TODO Auto-generated method stub
        Vehicle vehicle = new Vehicle();
        vehicle.run("摩托车");
        vehicle.run("汽车");
        vehicle.run("飞机");
    }

}

// 交通工具类
// 方式1
// 1. 在方式1 的run方法中,违反了单一职责原则
// 2. 解决的方案非常的简单,根据交通工具运行方法不同,分解成不同类即可
class Vehicle {
    public void run(String vehicle) {
        System.out.println(vehicle + " 在公路上运行....");
    }
}
package com.atguigu.principle.singleresponsibility;

public class SingleResponsibility2 {

    public static void main(String[] args) {
        // TODO Auto-generated method stub
        RoadVehicle roadVehicle = new RoadVehicle();
        roadVehicle.run("摩托车");
        roadVehicle.run("汽车");

        AirVehicle airVehicle = new AirVehicle();

        airVehicle.run("飞机");
    }

}

//方案2的分析
//1. 遵守单一职责原则
//2. 但是这样做的改动很大,即将类分解,同时修改客户端
//3. 改进:直接修改Vehicle 类,改动的代码会比较少=>方案3

class RoadVehicle {
    public void run(String vehicle) {
        System.out.println(vehicle + "公路运行");
    }
}

class AirVehicle {
    public void run(String vehicle) {
        System.out.println(vehicle + "天空运行");
    }
}

class WaterVehicle {
    public void run(String vehicle) {
        System.out.println(vehicle + "水中运行");
    }
}
package com.atguigu.principle.singleresponsibility;

public class SingleResponsibility3 {

    public static void main(String[] args) {
        // TODO Auto-generated method stub
        Vehicle2 vehicle2  = new Vehicle2();
        vehicle2.run("汽车");
        vehicle2.runWater("轮船");
        vehicle2.runAir("飞机");
    }

}


//方式3的分析
//1. 这种修改方法没有对原来的类做大的修改,只是增加方法
//2. 这里虽然没有在类这个级别上遵守单一职责原则,但是在方法级别上,仍然是遵守单一职责
class Vehicle2 {
    public void run(String vehicle) {
        //处理
        System.out.println(vehicle + " 在公路上运行....");
    }

    public void runAir(String vehicle) {
        System.out.println(vehicle + " 在天空上运行....");
    }

    public void runWater(String vehicle) {
        System.out.println(vehicle + " 在水中行....");
    }

    //方法2.
    //..
    //..

    //...
}
单一职责原则注意事项和细节
1) 降低类的复杂度,一个类只负责一项职责。
2) 提高类的可读性,可维护性
3) 降低变更引起的风险
4) 通常情况下,我们应当遵守单一职责原则,只有逻辑足够简单,才可以在代码级违
反单一职责原则;只有类中方法数量足够少,可以在方法级别保持单一职责原则
2) 接口隔离原则
基本介绍
1) 客户端不应该依赖它不需要的接口,即一个类对另一个类的依赖
应该建立在最小的接口上
2) 先看一张图:
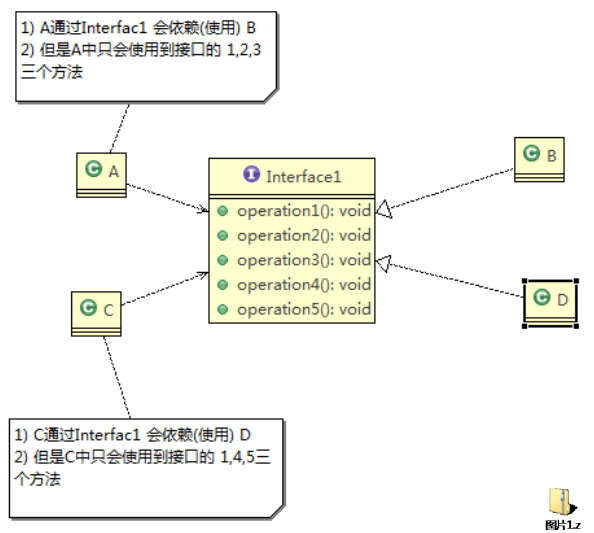
3)类A通过接口Interface1依赖类B,类C通过接口Interface1依赖类D,如果接口
Interface1对于类A和类C来说不是最小接口,那么类B和类D必须去实现他们不需要的方法。
4)按隔离原则应当这样处理:
将接口Interface1拆分为独立的几个接口,类A和类C分别与他们需要的接口建立依赖关系。也就是采用接口隔离原则
应用实例
package com.atguigu.principle.segregation;

public class Segregation1 {

    public static void main(String[] args) {
        // TODO Auto-generated method stub

    }

}

//接口
interface Interface1 {
    void operation1();
    void operation2();
    void operation3();
    void operation4();
    void operation5();
}

class B implements Interface1 {
    public void operation1() {
        System.out.println("B 实现了 operation1");
    }

    public void operation2() {
        System.out.println("B 实现了 operation2");
    }
    public void operation3() {
        System.out.println("B 实现了 operation3");
    }
    public void operation4() {
        System.out.println("B 实现了 operation4");
    }
    public void operation5() {
        System.out.println("B 实现了 operation5");
    }
}

class D implements Interface1 {
    public void operation1() {
        System.out.println("D 实现了 operation1");
    }

    public void operation2() {
        System.out.println("D 实现了 operation2");
    }
    public void operation3() {
        System.out.println("D 实现了 operation3");
    }
    public void operation4() {
        System.out.println("D 实现了 operation4");
    }
    public void operation5() {
        System.out.println("D 实现了 operation5");
    }
}

class A { //A 类通过接口Interface1 依赖(使用) B类,但是只会用到1,2,3方法
    public void depend1(Interface1 i) {
        i.operation1();
    }
    public void depend2(Interface1 i) {
        i.operation2();
    }
    public void depend3(Interface1 i) {
        i.operation3();
    }
}

class C { //C 类通过接口Interface1 依赖(使用) D类,但是只会用到1,4,5方法
    public void depend1(Interface1 i) {
        i.operation1();
    }
    public void depend4(Interface1 i) {
        i.operation4();
    }
    public void depend5(Interface1 i) {
        i.operation5();
    }
}
package com.atguigu.principle.segregation.improve;

public class Segregation1 {

    public static void main(String[] args) {
        // TODO Auto-generated method stub
        // 使用一把
        A a = new A();
        a.depend1(new B()); // A类通过接口去依赖B类
        a.depend2(new B());
        a.depend3(new B());

        C c = new C();

        c.depend1(new D()); // C类通过接口去依赖(使用)D类
        c.depend4(new D());
        c.depend5(new D());

    }

}

// 接口1
interface Interface1 {
    void operation1();

}

// 接口2
interface Interface2 {
    void operation2();

    void operation3();
}

// 接口3
interface Interface3 {
    void operation4();

    void operation5();
}

class B implements Interface1, Interface2 {
    public void operation1() {
        System.out.println("B 实现了 operation1");
    }

    public void operation2() {
        System.out.println("B 实现了 operation2");
    }

    public void operation3() {
        System.out.println("B 实现了 operation3");
    }

}

class D implements Interface1, Interface3 {
    public void operation1() {
        System.out.println("D 实现了 operation1");
    }

    public void operation4() {
        System.out.println("D 实现了 operation4");
    }

    public void operation5() {
        System.out.println("D 实现了 operation5");
    }
}

class A { // A 类通过接口Interface1,Interface2 依赖(使用) B类,但是只会用到1,2,3方法
    public void depend1(Interface1 i) {
        i.operation1();
    }

    public void depend2(Interface2 i) {
        i.operation2();
    }

    public void depend3(Interface2 i) {
        i.operation3();
    }
}

class C { // C 类通过接口Interface1,Interface3 依赖(使用) D类,但是只会用到1,4,5方法
    public void depend1(Interface1 i) {
        i.operation1();
    }

    public void depend4(Interface3 i) {
        i.operation4();
    }

    public void depend5(Interface3 i) {
        i.operation5();
    }
}
应传统方法的问题和使用接口隔离原则改进
1) 类A通过接口Interface1依赖类B,类C通过接口Interface1依赖类D,如果接口Interface1对于类A和类C来说不是最小接口,那么类B和类D必须去实现他们不
需要的方法
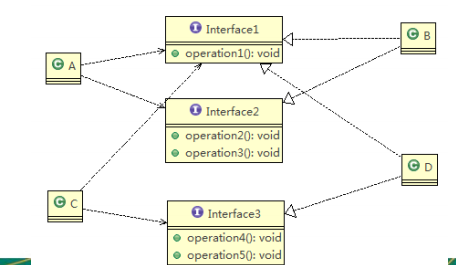
2) 将接口Interface1拆分为独立的几个接口,类A和类C分别与他们需要的接口建立依赖关系。也就是采用接口隔离原则
3) 接口Interface1中出现的方法,根据实际情况拆分为三个接口4) 代码实现
3) 依赖倒转(倒置)原则
基本介绍
依赖倒转原则(Dependence Inversion Principle)是指:
1) 高层模块不应该依赖低层模块,二者都应该依赖其抽象
2) 抽象不应该依赖细节,细节应该依赖抽象
3) 依赖倒转(倒置)的中心思想是面向接口编程
4) 依赖倒转原则是基于这样的设计理念:相对于细节的多变性,抽象的东西要稳定的
多。以抽象为基础搭建的架构比以细节为基础的架构要稳定的多。在java中,抽象
指的是接口或抽象类,细节就是具体的实现类
5) 使用接口或抽象类的目的是制定好规范,而不涉及任何具体的操作,把展现细节的
任务交给他们的实现类去完成
应用实例
package com.atguigu.principle.inversion;

public class DependecyInversion {

    public static void main(String[] args) {
        Person person = new Person();
        person.receive(new Email());
    }

}


class Email {
    public String getInfo() {
        return "电子邮件信息: hello,world";
    }
}

//完成Person接收消息的功能
//方式1分析
//1. 简单,比较容易想到
//2. 如果我们获取的对象是 微信,短信等等,则新增类,同时Perons也要增加相应的接收方法
//3. 解决思路:引入一个抽象的接口IReceiver, 表示接收者, 这样Person类与接口IReceiver发生依赖
//   因为Email, WeiXin 等等属于接收的范围,他们各自实现IReceiver 接口就ok, 这样我们就符号依赖倒转原则
class Person {
    public void receive(Email email ) {
        System.out.println(email.getInfo());
    }
}
package com.atguigu.principle.inversion.improve;

public class DependecyInversion {

    public static void main(String[] args) {
        //客户端无需改变
        Person person = new Person();
        person.receive(new Email());

        person.receive(new WeiXin());
    }

}

//定义接口
interface IReceiver {
    public String getInfo();
}

class Email implements IReceiver {
    public String getInfo() {
        return "电子邮件信息: hello,world";
    }
}

//增加微信
class WeiXin implements IReceiver {
    public String getInfo() {
        return "微信信息: hello,ok";
    }
}

//方式2
class Person {
    //这里我们是对接口的依赖
    public void receive(IReceiver receiver ) {
        System.out.println(receiver.getInfo());
    }
}
package com.atguigu.principle.inversion.improve;

public class DependencyPass {

    public static void main(String[] args) {
        // TODO Auto-generated method stub
        ChangHong changHong = new ChangHong();
//        OpenAndClose openAndClose = new OpenAndClose();
//        openAndClose.open(changHong);

        //通过构造器进行依赖传递
//        OpenAndClose openAndClose = new OpenAndClose(changHong);
//        openAndClose.open();
        //通过setter方法进行依赖传递
        OpenAndClose openAndClose = new OpenAndClose();
        openAndClose.setTv(changHong);
        openAndClose.open();

    }

}

// 方式1: 通过接口传递实现依赖
// 开关的接口
// interface IOpenAndClose {
// public void open(ITV tv); //抽象方法,接收接口
// }
//
// interface ITV { //ITV接口
// public void play();
// }
//
// class ChangHong implements ITV {
//
//    @Override
//    public void play() {
//        // TODO Auto-generated method stub
//        System.out.println("长虹电视机,打开");
//    }
//
// }
//// 实现接口
// class OpenAndClose implements IOpenAndClose{
// public void open(ITV tv){
// tv.play();
// }
// }

// 方式2: 通过构造方法依赖传递
// interface IOpenAndClose {
// public void open(); //抽象方法
// }
// interface ITV { //ITV接口
// public void play();
// }
// class OpenAndClose implements IOpenAndClose{
// public ITV tv; //成员
// public OpenAndClose(ITV tv){ //构造器
// this.tv = tv;
// }
// public void open(){
// this.tv.play();
// }
// }


// 方式3 , 通过setter方法传递
interface IOpenAndClose {
    public void open(); // 抽象方法

    public void setTv(ITV tv);
}

interface ITV { // ITV接口
    public void play();
}

class OpenAndClose implements IOpenAndClose {
    private ITV tv;

    public void setTv(ITV tv) {
        this.tv = tv;
    }

    public void open() {
        this.tv.play();
    }
}

class ChangHong implements ITV {

    @Override
    public void play() {
        // TODO Auto-generated method stub
        System.out.println("长虹电视机,打开");
    }

}
依赖关系传递的三种方式和应用案例
1) 接口传递
public class Dependency {
    public static void main(String[] args) {
        InterfaceBImpl inB = new InterfaceBImpl();
        InterfaceAImpl inA = new InterfaceAImpl();
        inA.methodA(inB);
    }
}

interface InterfaceA{
    public void methodA(InterfaceB b);
}

interface InterfaceB{
    public void methodB();
}

class  InterfaceBImpl implements InterfaceB{
    @Override
    public void methodB() {
        System.out.println("我是接口B的方法");

    }
}

class InterfaceAImpl implements InterfaceA{
    @Override
    public void methodA(InterfaceB b) {
        b.methodB();
    }
}
2) 构造方法传递
public class Dependency {
    public static void main(String[] args) {
        InterfaceBImpl inB = new InterfaceBImpl();
        InterfaceAImpl inA = new InterfaceAImpl(inB);
        inA.methodA();
    }
}

interface InterfaceA{
    public void methodA();
}

interface InterfaceB{
    public void methodB();
}

class  InterfaceBImpl implements InterfaceB{
    @Override
    public void methodB() {
        System.out.println("我是接口B的方法");

    }
}

class InterfaceAImpl implements InterfaceA{
    public InterfaceB b;
    public InterfaceAImpl(InterfaceB b){
        this.b = b;
    }
    @Override
    public void methodA() {
        this.b.methodB();
    }
}
3) setter方式传递
public class Dependency02 {
    public static void main(String[] args) {
        InterfaceAImpl inA = new InterfaceAImpl();
        InterfaceBImpl inB = new InterfaceBImpl();
        inA.setInterfaceB(inB);
        inA.methodA();
    }
}

interface InterfaceA{
    public void methodA();
    public void setInterfaceB(InterfaceB b);
}

interface InterfaceB{
    public void methodB();
}

class InterfaceAImpl implements InterfaceA{
    private InterfaceB b;

    @Override
    public void setInterfaceB(InterfaceB b) {
        this.b = b;
    }

    @Override
    public void methodA() {
        this.b.methodB();
    }

}

class InterfaceBImpl implements InterfaceB{
    @Override
    public void methodB() {
        System.out.println("我是接口B的方法");
    }
}
//使用框架的自动注入之后,是这个样子的:
public class InterfaceAImpl implements InterfaceA{
    @Autowired
    protected InterfaceB interfaceB;
        /*
        .
        .
        .
        */
}
依赖倒转原则的注意事项和细节
1) 低层模块尽量都要有抽象类或接口,或者两者都有,程序稳定性更好.
2) 变量的声明类型尽量是抽象类或接口, 这样我们的变量引用和实际对象间,就存在一个缓冲层,利于程序扩展和优化
3) 继承时遵循里氏替换原则
4) 里氏替换原则
OO中的继承性的思考和说明
1) 继承包含这样一层含义:父类中凡是已经实现好的方法,实际上是在设定规范和契约,虽然它不强制要求所有的子类必须遵循这些契约,但是如果子类对这些已经实现的方法任意修改,就会对整个继承体系造成破坏。
2) 继承在给程序设计带来便利的同时,也带来了弊端。比如使用继承会给程序带来侵入性,程序的可移植性降低,增加对象间的耦合性,如果一个类被其他的类所继承,则当这个类需要修改时,必须考虑到所有的子类,并且父类修改后,所有涉及到子
类的功能都有可能产生故障
3) 问题提出:在编程中,如何正确的使用继承? => 里氏替换原则
基本介绍
1) 里氏替换原则(Liskov Substitution Principle)在1988年,由麻省理工学院的以为姓里
的女士提出的。
2) 如果对每个类型为T1的对象o1,都有类型为T2的对象o2,使得以T1定义的所有程序P在所有的对象o1都代换成o2时,程序P的行为没有发生变化,那么类型T2是类型T1的子类型。
换句话说,所有引用基类的地方必须能透明地使用其子类的对象。
3) 在使用继承时,遵循里氏替换原则,在子类中尽量不要重写父类的方法
4) 里氏替换原则告诉我们,继承实际上让两个类耦合性增强了,在适当的情况下,可
以通过聚合,组合,依赖 来解决问题。.
一个程序引出的问题和思考
该看个程序, 思考下问题和解决思路
package com.atguigu.principle.liskov;

public class Liskov {

    public static void main(String[] args) {
        // TODO Auto-generated method stub
        A a = new A();
        System.out.println("11-3=" + a.func1(11, 3));
        System.out.println("1-8=" + a.func1(1, 8));

        System.out.println("-----------------------");
        B b = new B();
        System.out.println("11-3=" + b.func1(11, 3));//这里本意是求出11-3
        System.out.println("1-8=" + b.func1(1, 8));// 1-8
        System.out.println("11+3+9=" + b.func2(11, 3));


    }

}

// A类
class A {
    // 返回两个数的差
    public int func1(int num1, int num2) {
        return num1 - num2;
    }
}

// B类继承了A
// 增加了一个新功能:完成两个数相加,然后和9求和
class B extends A {
    //这里,重写了A类的方法, 可能是无意识
    public int func1(int a, int b) {
        return a + b;
    }

    public int func2(int a, int b) {
        return func1(a, b) + 9;
    }
}
重写的父类方法,遵循里氏替换原则,在子类中尽量不要重写父类的方法
package com.atguigu.principle.liskov.improve;

public class Liskov {

    public static void main(String[] args) {
        // TODO Auto-generated method stub
        A a = new A();
        System.out.println("11-3=" + a.func1(11, 3));
        System.out.println("1-8=" + a.func1(1, 8));

        System.out.println("-----------------------");
        B b = new B();
        //因为B类不再继承A类,因此调用者,不会再func1是求减法
        //调用完成的功能就会很明确
        System.out.println("11+3=" + b.func1(11, 3));//这里本意是求出11+3
        System.out.println("1+8=" + b.func1(1, 8));// 1+8
        System.out.println("11+3+9=" + b.func2(11, 3));


        //使用组合仍然可以使用到A类相关方法
        System.out.println("11-3=" + b.func3(11, 3));// 这里本意是求出11-3


    }

}

//创建一个更加基础的基类
class Base {
    //把更加基础的方法和成员写到Base类
}

// A类
class A extends Base {
    // 返回两个数的差
    public int func1(int num1, int num2) {
        return num1 - num2;
    }
}

// B类继承了A
// 增加了一个新功能:完成两个数相加,然后和9求和
class B extends Base {
    //如果B需要使用A类的方法,使用组合关系
    private A a = new A();

    //这里,重写了A类的方法, 可能是无意识
    public int func1(int a, int b) {
        return a + b;
    }

    public int func2(int a, int b) {
        return func1(a, b) + 9;
    }

    //我们仍然想使用A的方法
    public int func3(int a, int b) {
        return this.a.func1(a, b);
    }
}
解决方法
1) 我们发现原来运行正常的相减功能发生了错误。原因就是类B无意中重写了父类的方法,造成原有功能出现错误。在实际编程中,我们常常会通过重写父类的方法完成新的功能,这样写起来虽然简单,但整个继承体系的复用性会比较差。特别是运行多态比较频繁的时候
2) 通用的做法是:原来的父类和子类都继承一个更通俗的基类,原有的继承关系去掉,采用依赖,聚合,组合等关系代替.
5) 开闭原则
基本介绍
1) 开闭原则(Open Closed Principle)是编程中最基础、最重要的设计原则
2) 一个软件实体如类,模块和函数应该对扩展开放(对提供方),对修改关闭(对使用
方)。用抽象构建框架,用实现扩展细节。
3) 当软件需要变化时,尽量通过扩展软件实体的行为来实现变化,而不是通过修改已
有的代码来实现变化。
4) 编程中遵循其它原则,以及使用设计模式的目的就是遵循开闭原则。
看一个画图形的功能
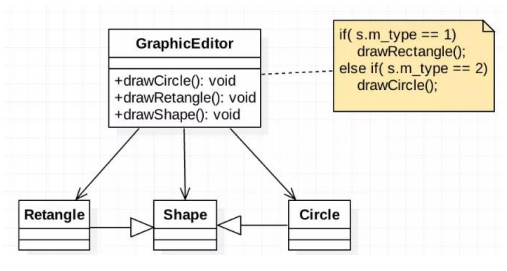
package com.atguigu.principle.ocp;

public class Ocp {

    public static void main(String[] args) {
        //使用看看存在的问题
        GraphicEditor graphicEditor = new GraphicEditor();
        graphicEditor.drawShape(new Rectangle());
        graphicEditor.drawShape(new Circle());
        graphicEditor.drawShape(new Triangle());
    }

}

//这是一个用于绘图的类 [使用方]
class GraphicEditor {
    //接收Shape对象,然后根据type,来绘制不同的图形
    public void drawShape(Shape s) {
        if (s.m_type == 1)
            drawRectangle(s);
        else if (s.m_type == 2)
            drawCircle(s);
        else if (s.m_type == 3)
            drawTriangle(s);
    }

    //绘制矩形
    public void drawRectangle(Shape r) {
        System.out.println(" 绘制矩形 ");
    }

    //绘制圆形
    public void drawCircle(Shape r) {
        System.out.println(" 绘制圆形 ");
    }

    //绘制三角形
    public void drawTriangle(Shape r) {
        System.out.println(" 绘制三角形 ");
    }
}

//Shape类,基类
class Shape {
    int m_type;
}

class Rectangle extends Shape {
    Rectangle() {
        super.m_type = 1;
    }
}

class Circle extends Shape {
    Circle() {
        super.m_type = 2;
    }
}

//新增画三角形
class Triangle extends Shape {
    Triangle() {
        super.m_type = 3;
    }
}
方式1的优缺点
1) 优点是比较好理解,简单易操作。
2) 缺点是违反了设计模式的ocp原则,即对扩展开放(提供方),对修改关闭(使用方)。
即当我们给类增加新功能的时候,尽量不修改代码,或者尽可能少修改代码.
3) 比如我们这时要新增加一个图形种类 三角形,我们需要做如下修改,修改的地方较多
4) 代码演示
方式1的改进的思路分析
改进的思路分析
思路:把创建Shape类做成抽象类,并提供一个抽象的draw方法,让子类去实现即可,
这样我们有新的图形种类时,只需要让新的图形类继承Shape,并实现draw方法即可,
使用方的代码就不需要修 -> 满足了开闭原则
方式2来解决
1) 方式2的设计方案: 定义一个Shape抽象类。
2) 看代码示例
package com.atguigu.principle.ocp.improve;

public class Ocp {

    public static void main(String[] args) {
        //使用看看存在的问题
        GraphicEditor graphicEditor = new GraphicEditor();
        graphicEditor.drawShape(new Rectangle());
        graphicEditor.drawShape(new Circle());
        graphicEditor.drawShape(new Triangle());
        graphicEditor.drawShape(new OtherGraphic());
    }

}

//这是一个用于绘图的类 [使用方]
class GraphicEditor {
    //接收Shape对象,调用draw方法
    public void drawShape(Shape s) {
        s.draw();
    }


}

//Shape类,基类
abstract class Shape {
    int m_type;

    public abstract void draw();//抽象方法
}

class Rectangle extends Shape {
    Rectangle() {
        super.m_type = 1;
    }

    @Override
    public void draw() {
        // TODO Auto-generated method stub
        System.out.println(" 绘制矩形 ");
    }
}

class Circle extends Shape {
    Circle() {
        super.m_type = 2;
    }
    @Override
    public void draw() {
        // TODO Auto-generated method stub
        System.out.println(" 绘制圆形 ");
    }
}

//新增画三角形
class Triangle extends Shape {
    Triangle() {
        super.m_type = 3;
    }
    @Override
    public void draw() {
        // TODO Auto-generated method stub
        System.out.println(" 绘制三角形 ");
    }
}

//新增一个图形
class OtherGraphic extends Shape {
    OtherGraphic() {
        super.m_type = 4;
    }

    @Override
    public void draw() {
        // TODO Auto-generated method stub
        System.out.println(" 绘制其它图形 ");
    }
}
3) 从方式2看,代码满足了ocp原则
6) 迪米特法则
基本介绍
1) 一个对象应该对其他对象保持最少的了解
2) 类与类关系越密切,耦合度越大
3) 迪米特法则(Demeter Principle)又叫最少知道原则,即一个类对自己依赖的类知道的越少越好。也就是说,对于被依赖的类不管多么复杂,都尽量将逻辑封装在类的内部。对外除了提供的public 方法,不对外泄露任何信息
4) 迪米特法则还有个更简单的定义:只与直接的朋友通信
5) 直接的朋友:每个对象都会与其他对象有耦合关系,只要两个对象之间有耦合关系,
我们就说这两个对象之间是朋友关系。耦合的方式很多,依赖,关联,组合,聚合
等。其中,我们称出现成员变量,方法参数,方法返回值中的类为直接的朋友,而出现在局部变量中的类不是直接的朋友。
也就是说,陌生的类最好不要以局部变量的形式出现在类的内部。
应用实例
1) 有一个学校,下属有各个学院和
总部,现要求打印出学校总部员
工ID和学院员工的id
2) 编程实现上面的功能, 看代码演示
应用实例改进
1) 前面设计的问题在于SchoolManager中,CollegeEmployee类并不是SchoolManager类的直接朋友 (分析)
2) 按照迪米特法则,应该避免类中出现这样非直接朋友关系的耦合
3) 对代码按照迪米特法则 进行改进
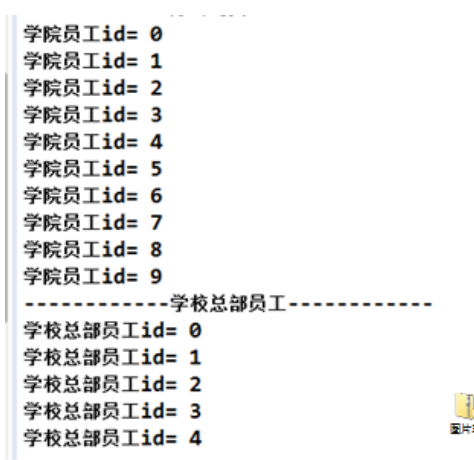
package com.atguigu.principle.demeter;

import java.util.ArrayList;
import java.util.List;

//客户端
public class Demeter1 {

    public static void main(String[] args) {
        //创建了一个 SchoolManager 对象
        SchoolManager schoolManager = new SchoolManager();
        //输出学院的员工id 和  学校总部的员工信息
        schoolManager.printAllEmployee(new CollegeManager());

    }

}


//学校总部员工类
class Employee {
    private String id;

    public void setId(String id) {
        this.id = id;
    }

    public String getId() {
        return id;
    }
}


//学院的员工类
class CollegeEmployee {
    private String id;

    public void setId(String id) {
        this.id = id;
    }

    public String getId() {
        return id;
    }
}


//管理学院员工的管理类
class CollegeManager {
    //返回学院的所有员工
    public List<CollegeEmployee> getAllEmployee() {
        List<CollegeEmployee> list = new ArrayList<CollegeEmployee>();
        for (int i = 0; i < 10; i++) { //这里我们增加了10个员工到 list
            CollegeEmployee emp = new CollegeEmployee();
            emp.setId("学院员工id= " + i);
            list.add(emp);
        }
        return list;
    }
}

//学校管理类

//分析 SchoolManager 类的直接朋友类有哪些 Employee、CollegeManager
//CollegeEmployee 不是 直接朋友 而是一个陌生类,这样违背了 迪米特法则
class SchoolManager {
    //返回学校总部的员工
    public List<Employee> getAllEmployee() {
        List<Employee> list = new ArrayList<Employee>();

        for (int i = 0; i < 5; i++) { //这里我们增加了5个员工到 list
            Employee emp = new Employee();
            emp.setId("学校总部员工id= " + i);
            list.add(emp);
        }
        return list;
    }

    //该方法完成输出学校总部和学院员工信息(id)
    void printAllEmployee(CollegeManager sub) {

        //分析问题
        //1. 这里的 CollegeEmployee 不是  SchoolManager的直接朋友
        //2. CollegeEmployee 是以局部变量方式出现在 SchoolManager
        //3. 违反了 迪米特法则

        //获取到学院员工
        List<CollegeEmployee> list1 = sub.getAllEmployee();
        System.out.println("------------学院员工------------");
        for (CollegeEmployee e : list1) {
            System.out.println(e.getId());
        }
        //获取到学校总部员工
        List<Employee> list2 = this.getAllEmployee();
        System.out.println("------------学校总部员工------------");
        for (Employee e : list2) {
            System.out.println(e.getId());
        }
    }
}
package com.atguigu.principle.demeter.improve;

import java.util.ArrayList;
import java.util.List;

//客户端
public class Demeter1 {

    public static void main(String[] args) {
        System.out.println("~~~使用迪米特法则的改进~~~");
        //创建了一个 SchoolManager 对象
        SchoolManager schoolManager = new SchoolManager();
        //输出学院的员工id 和  学校总部的员工信息
        schoolManager.printAllEmployee(new CollegeManager());

    }

}


//学校总部员工类
class Employee {
    private String id;

    public void setId(String id) {
        this.id = id;
    }

    public String getId() {
        return id;
    }
}


//学院的员工类
class CollegeEmployee {
    private String id;

    public void setId(String id) {
        this.id = id;
    }

    public String getId() {
        return id;
    }
}


//管理学院员工的管理类
class CollegeManager {
    //返回学院的所有员工
    public List<CollegeEmployee> getAllEmployee() {
        List<CollegeEmployee> list = new ArrayList<CollegeEmployee>();
        for (int i = 0; i < 10; i++) { //这里我们增加了10个员工到 list
            CollegeEmployee emp = new CollegeEmployee();
            emp.setId("学院员工id= " + i);
            list.add(emp);
        }
        return list;
    }

    //输出学院员工的信息
    public void printEmployee() {
        //获取到学院员工
        List<CollegeEmployee> list1 = getAllEmployee();
        System.out.println("------------学院员工------------");
        for (CollegeEmployee e : list1) {
            System.out.println(e.getId());
        }
    }
}

//学校管理类

//分析 SchoolManager 类的直接朋友类有哪些 Employee、CollegeManager
//CollegeEmployee 不是 直接朋友 而是一个陌生类,这样违背了 迪米特法则
class SchoolManager {
    //返回学校总部的员工
    public List<Employee> getAllEmployee() {
        List<Employee> list = new ArrayList<Employee>();

        for (int i = 0; i < 5; i++) { //这里我们增加了5个员工到 list
            Employee emp = new Employee();
            emp.setId("学校总部员工id= " + i);
            list.add(emp);
        }
        return list;
    }

    //该方法完成输出学校总部和学院员工信息(id)
    void printAllEmployee(CollegeManager sub) {

        //分析问题
        //1. 将输出学院的员工方法,封装到CollegeManager
        sub.printEmployee();

        //获取到学校总部员工
        List<Employee> list2 = this.getAllEmployee();
        System.out.println("------------学校总部员工------------");
        for (Employee e : list2) {
            System.out.println(e.getId());
        }
    }
}
迪米特法则注意事项和细节
1) 迪米特法则的核心是降低类之间的耦合
2) 但是注意:由于每个类都减少了不必要的依赖,因此迪米特法则只是要求降低
类间(对象间)耦合关系, 并不是要求完全没有依赖关系
7) 合成复用原则
基本介绍
原则是尽量使用合成/聚合的方式,而不是使用继承
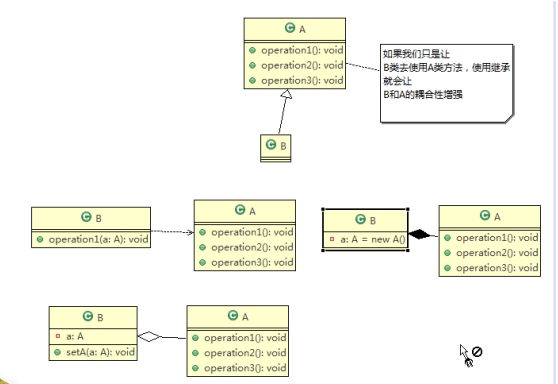
设计原则核心思想
1) 找出应用中可能需要变化之处,把它们独立出来,不要和那些不需要变化的代码混在一起。
2) 针对接口编程,而不是针对实现编程。
3) 为了交互对象之间的松耦合设计而努力