vue CLI 用起来的确很舒服,方便省事,但他经过层层封装很难明白,执行完那个npm run serve/build 后他都干了些什么,甚至不知道整个项目是怎么跑起来的,今天自己抽时间就去瞅瞅,为加深记录特此记录记录
【声明】纯属个人学习推敲,有不对的地方欢迎指正,我们一起讨论共同学习一起进步
文章目录
一、探寻npm run 背后的真实操作
1、看看 npm run serve
首选从npm run serve 开始,整个应该都很熟悉了,执行这命令后就是执行,package.json 的script 中key为serve后面的值
  "scripts": {
    "serve": "vue-cli-service serve",
    "build": "vue-cli-service build",
    "lint": "vue-cli-service lint"
  },
其实真实的执行命令是这一个 npm run vue-cli-service serve 命令,那这个是个啥意思我们做个测试,添加个test 进行测试
	  "scripts": {
	    "serve": "vue-cli-service serve",
	    "build": "vue-cli-service build",
	    "lint": "vue-cli-service lint",
	    "test":"echo hello vue "
	  },
再来执行下命令 run , 看如下打印
	D:YLKJProfgzs>npm run test

	> sdz@0.1.0 test D:YLKJProfgzs
	> echo hello vue

	hello vue
其实就是执行了test 后面的echo , 那么 npm run vue-cli-service serve 后面的serve 是干啥的呢?再来看看
	D:YLKJProfgzs>npm run test serve

	> sdz@0.1.0 test D:YLKJProfgzs
	> echo hello vue  "serve"

	hello vue  "serve"
其实就是将后面的当成了参数
2、仿造一个serve
如果不信,我们再来做一个测试看看(仿造一个 serve)
  "scripts": {
    "serve": "vue-cli-service serve",
    "build": "vue-cli-service build",
    "lint": "vue-cli-service lint",
    "test":"my-npm-test serve"
  },
执行npm run test 输出如下
D:YLKJProfgzs>npm run test

> sdz@0.1.0 test D:YLKJProfgzs
> my-npm-test serve

serve
咦,奇怪了 , serve 怎么打印出来的呢,我并没有使用echo ?其实我是模仿了原来的脚本,
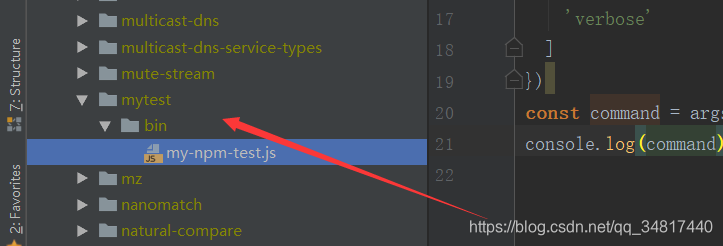
2-1. 创建测试文件夹
先在node_modules下创建一个mytest/bin目录,同时在该bin目录下创建一个测试的js,如下
这个测试的js 也很简单就是把那个接收的参数打印出来,如下:
#!/usr/bin/env node

const rawArgv = process.argv.slice(2)

console.log(rawArgv[0])
2-2. 在 node_modules/.bin下创建测试脚本
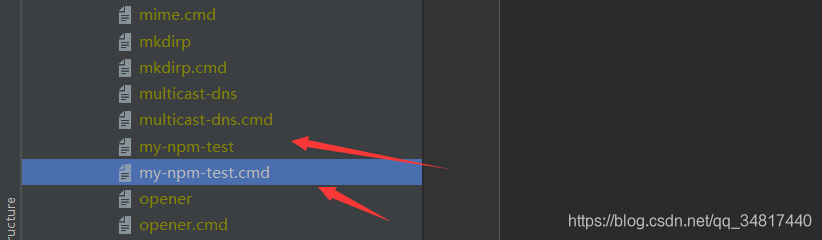
添加了一个 linux 和 windows 的shell 脚本(my-npm-test和my-npm-test.cmd)
其实里面就一些目标js的路径
2-3. 添加my-npm-test
my-npm-test
#!/bin/sh
basedir=$(dirname "$(echo "$0" | sed -e 's,\,/,g')")

case `uname` in
    *CYGWIN*) basedir=`cygpath -w "$basedir"`;;
esac

if [ -x "$basedir/node" ]; then
  "$basedir/node"  "$basedir/../mytest/bin/my-npm-test.js" "$@"
  ret=$?
else
  node  "$basedir/../mytest/bin/my-npm-test.js" "$@"
  ret=$?
fi
exit $ret
2-4. 添加my-npm-test.cmd
my-npm-test.cmd 用于windows 端
@IF EXIST "%~dp0
ode.exe" (
  "%~dp0
ode.exe"  "%~dp0..mytestinmy-npm-test.js" %*
) ELSE (
  @SETLOCAL
  @SET PATHEXT=%PATHEXT:;.JS;=;%
  node  "%~dp0..mytestinmy-npm-test.js" %*
)
到这里总算对npm run 有些了解了;
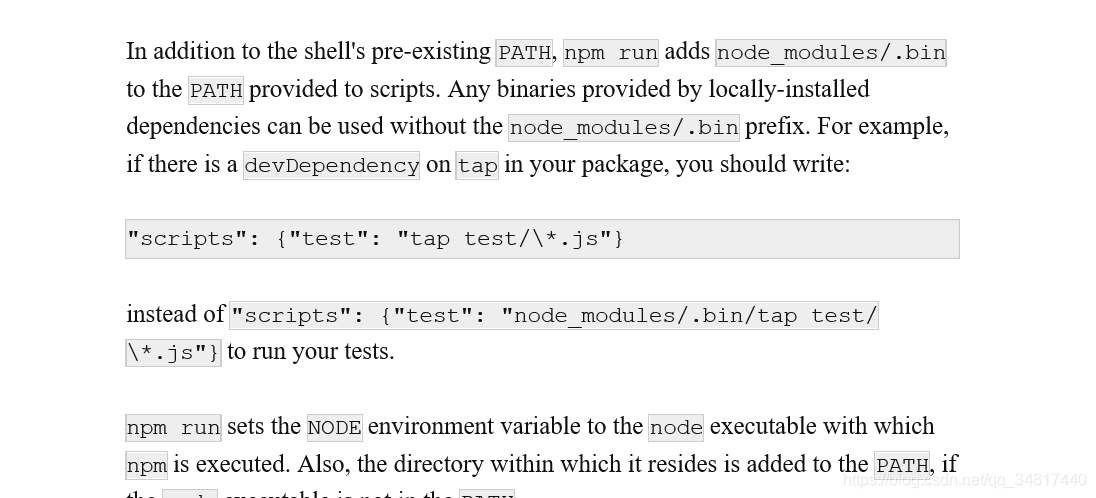
其实 执行 npm help run 官方也有想对应的解释 如
2-5. 执行原理
使用npm run script执行脚本的时候都会创建一个shell,然后在shell中执行指定的脚本。
这个shell会将当前项目的可执行依赖目录(即node_modules/.bin)添加到环境变量path中,当执行之后之后再恢复原样。就是说脚本命令中的依赖名会直接找到node_modules/.bin下面的对应脚本,而不需要加上路径。
2-6. 举一反三探寻npm run serve
好吧到这了总算知道npm run 并不是那么神秘了,咦 好像搞了半天还没说到,npm run serve 相关的东西,其实这已经讲完了,仔细一想,npm run serve === npm run vue-cli-service serve ,那么node_modules/.bin下面一定有两个vue-cli-service的文件,找找。。。
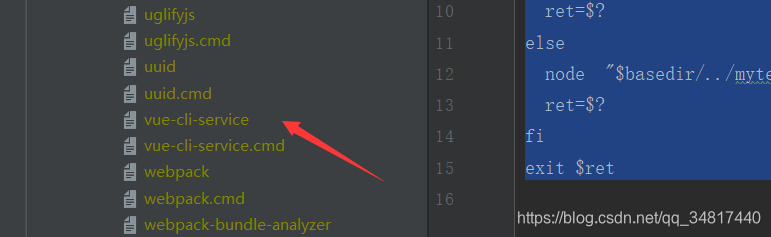
果不其然,再打开看看,他最终执行的js 是什么。打开文件

根据路径可以找到node_modules/@vue下对应的 js,
如下:
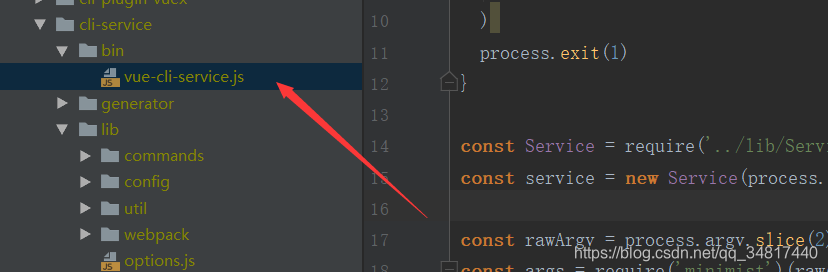
OK, 总算找到了真正的执行者,那这个文件又干了些什么呢,项目就这么启动了?
二、项目编译详解
我们打开这个vue-cli-service.js (代码就不行行详细讲解了,直接借助大佬博客https://segmentfault.com/a/1190000017876208)
1、关于vue-cli-service.js
	const semver = require('semver')
	const { error } = require('@vue/cli-shared-utils')
	const requiredVersion = require('../package.json').engines.node

	// 检测node版本是否符合vue-cli运行的需求。不符合则打印错误并退出。
	if (!semver.satisfies(process.version, requiredVersion)) {
	  error(
	    `You are using Node ${process.version}, but vue-cli-service ` +
	    `requires Node ${requiredVersion}.
Please upgrade your Node version.`
	  )
	  process.exit(1)
	}

	// cli-service的核心类。
	const Service = require('../lib/Service')
	// 新建一个service的实例。并将项目路径传入。一般我们在项目根路径下运行该cli命令。所以process.cwd()的结果一般是项目根路径
	const service = new Service(process.env.VUE_CLI_CONTEXT || process.cwd())

	// 参数处理。
	const rawArgv = process.argv.slice(2)
	const args = require('minimist')(rawArgv, {
	  boolean: [
	    // build
	    'modern',
	    'report',
	    'report-json',
	    'watch',
	    // serve
	    'open',
	    'copy',
	    'https',
	    // inspect
	    'verbose'
	  ]
	})
	const command = args._[0]

	// 将我们执行npm run serve 的serve参数传入service这个实例并启动后续工作。(如果我们运行的是npm run build。那么接收的参数即为build)。
	service.run(command, args, rawArgv).catch(err => {
	  error(err)
	  process.exit(1)
	})
上面js 最后调用了../lib/Service 中的run来进行项目的构建 ,那再去看看 Service.js 又做了些什么
2、关于Service.js
 // ...省略import

module.exports = class Service {
  constructor (context, { plugins, pkg, inlineOptions, useBuiltIn } = {}) {
    process.VUE_CLI_SERVICE = this
    this.initialized = false
    // 一般是项目根目录路径。
    this.context = context
    this.inlineOptions = inlineOptions
    // webpack相关收集。不是本文重点。所以未列出该方法实现
    this.webpackChainFns = []
    this.webpackRawConfigFns = []
    this.devServerConfigFns = []
    //存储的命令。
    this.commands = {}
    // Folder containing the target package.json for plugins
    this.pkgContext = context
    // 键值对存储的pakcage.json对象,不是本文重点。所以未列出该方法实现
    this.pkg = this.resolvePkg(pkg)
    // **这个方法下方需要重点阅读。**
    this.plugins = this.resolvePlugins(plugins, useBuiltIn)

    // 结果为{build: production, serve: development, ... }。大意是收集插件中的默认配置信息
    // 标注build命令主要用于生产环境。
    this.modes = this.plugins.reduce((modes, { apply: { defaultModes }}) => {
      return Object.assign(modes, defaultModes)
    }, {})
  }

  init (mode = process.env.VUE_CLI_MODE) {
    if (this.initialized) {
      return
    }
    this.initialized = true
    this.mode = mode

    // 加载.env文件中的配置
    if (mode) {
      this.loadEnv(mode)
    }
    // load base .env
    this.loadEnv()

    // 读取用户的配置信息.一般为vue.config.js
    const userOptions = this.loadUserOptions()
    // 读取项目的配置信息并与用户的配置合并(用户的优先级高)
    this.projectOptions = defaultsDeep(userOptions, defaults())

    debug('vue:project-config')(this.projectOptions)

    // 注册插件。
    this.plugins.forEach(({ id, apply }) => {
      apply(new PluginAPI(id, this), this.projectOptions)
    })

    // wepback相关配置收集
    if (this.projectOptions.chainWebpack) {
      this.webpackChainFns.push(this.projectOptions.chainWebpack)
    }
    if (this.projectOptions.configureWebpack) {
      this.webpackRawConfigFns.push(this.projectOptions.configureWebpack)
    }
  }


  resolvePlugins (inlinePlugins, useBuiltIn) {
    const idToPlugin = id => ({
      id: id.replace(/^.//, 'built-in:'),
      apply: require(id)
    })

    let plugins


    // 主要是这里。map得到的每个插件都是一个{id, apply的形式}
    // 其中require(id)将直接import每个插件的默认导出。
    // 每个插件的导出api为
    // module.exports = (PluginAPIInstance,projectOptions) => {
    //    PluginAPIInstance.registerCommand('cmdName(例如npm run serve中的serve)', args => {
    //        // 根据命令行收到的参数,执行该插件的业务逻辑
    //    })
    //    //  业务逻辑需要的其他函数
    //}
    // 注意着里是先在构造函数中resolve了插件。然后再run->init->方法中将命令,通过这里的的apply方法,
    // 将插件对应的命令注册到了service实例。
    const builtInPlugins = [
      './commands/serve',
      './commands/build',
      './commands/inspect',
      './commands/help',
      // config plugins are order sensitive
      './config/base',
      './config/css',
      './config/dev',
      './config/prod',
      './config/app'
    ].map(idToPlugin)

    // inlinePlugins与非inline得处理。默认生成的项目直接运行时候,除了上述数组的插件['./commands/serve'...]外,还会有
    // ['@vue/cli-plugin-babel','@vue/cli-plugin-eslint','@vue/cli-service']。
    // 处理结果是两者的合并,细节省略。
    if (inlinePlugins) {
        //...
    } else {
        //...默认走这条路线
      plugins = builtInPlugins.concat(projectPlugins)
    }

    // Local plugins 处理package.json中引入插件的形式,具体代码省略。

    return plugins
  }

  async run (name, args = {}, rawArgv = []) {
    // mode是dev还是prod?
    const mode = args.mode || (name === 'build' && args.watch ? 'development' : this.modes[name])

    // 收集环境变量、插件、用户配置
    this.init(mode)

    args._ = args._ || []
    let command = this.commands[name]
    if (!command && name) {
      error(`command "${name}" does not exist.`)
      process.exit(1)
    }
    if (!command || args.help) {
      command = this.commands.help
    } else {
      args._.shift() // remove command itself
      rawArgv.shift()
    }
    // 执行命令。例如vue-cli-service serve 则,执行serve命令。
    const { fn } = command
    return fn(args, rawArgv)
  }

  // 收集vue.config.js中的用户配置。并以对象形式返回。
  loadUserOptions () {
    // 此处代码省略,可以简单理解为
    // require(vue.config.js)
    return resolved
  }
}
2-1. command 中的fn
看到上面说的
    // 执行命令。例如vue-cli-service serve 则,执行serve命令。
    const { fn } = command
    return fn(args, rawArgv)
其实还是不明吧,command中他究竟执行了个什么操作,那不妨来个console
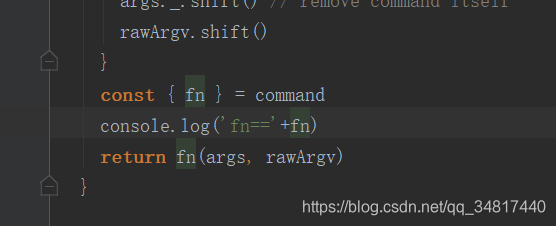
我们再运行下 run build 来看究竟,一执行屏幕就打印了一异步函数
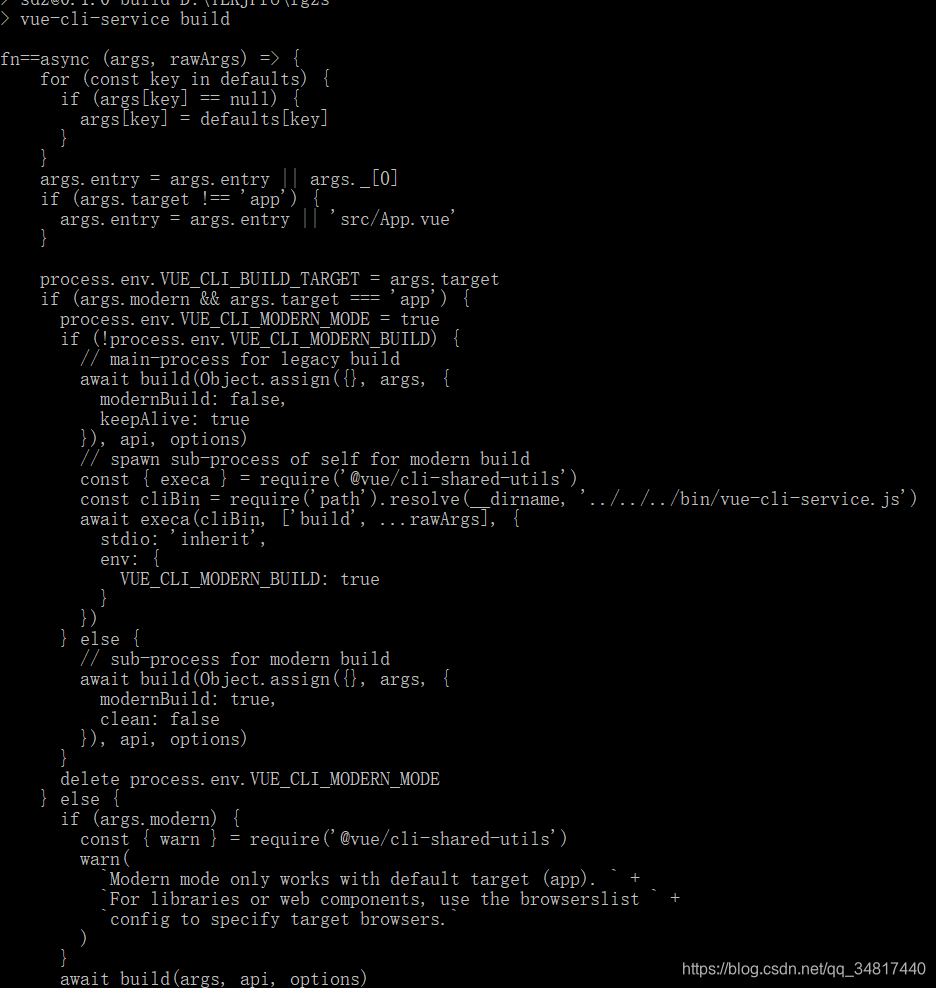
咦这是哪里的,不要忘记了,上面说的在运行npm run build 时我们给他传入了一个build的参数
而在代码的解析中我们知道,在constructor构造时就将其所需外部plugin编译到了command中
所以根据builtInPlugins这里的操作,我们就能找到这个异步函数是在commands/build/index.js中, 到该文件一看就都明白了
接下来还有一个是 PluginAPI 进行插件编译的js
3、关于PluginAPI
class PluginAPI {

  constructor (id, service) {
    this.id = id
    this.service = service
  }
  // 在service的init方法中
  // 该函数会被调用,调用处如下。
  // // apply plugins.
  // 这里的apply就是插件暴露出来的函数。该函数将PluginAPI实例和项目配置信息(例如vue.config.js)作为参数传入
  // 通过PluginAPIInstance.registerCommand方法,将命令注册到service实例。
  //  this.plugins.forEach(({ id, apply }) => {
  //    apply(new PluginAPI(id, this), this.projectOptions)
  //  })
  registerCommand (name, opts, fn) {
    if (typeof opts === 'function') {
      fn = opts
      opts = null
    }
    this.service.commands[name] = { fn, opts: opts || {}}
  }


}

module.exports = PluginAPI
这些文件所有的操作加起来就完成了我们vue项目的构建,直接浏览器输入地址就可以看见效果了(一步步操作看完,是否感觉还是蛮复杂的呢- -哪有什么岁月静好,不过是有人替你负重前行罢了)