Spring解决了什么问题
控制反转与依赖注入
IOC 是 Inversion of Control 的缩写,通常被翻译为“控制反转”。
为了解决对象之间的耦合度过高的问题,软件专家 Michael Mattson 提出了 IOC 理论,用来实现对象之间的解耦。
2004年,Martin Fowler探讨了同一个问题,既然IOC是控制反转,那么到底是“哪些方面的控制被反转了呢?”,经过详细地分析和论证后,他得出了答案:“获得依赖对象的过程被反转了”。控制被反转之后,获得依赖对象的过程由自身管理变为了由 IOC 容器主动注入。于是,他给“控制反转”取了一个更合适的名字叫做“依赖注入(Dependency Injection)”。他的这个答案,实际上给出了实现 IOC 的方法:注入。所谓依赖注入,就是由IOC容器在运行期间,动态地将某种依赖关系注入到对象之中。
依赖注入(DI)和控制反转(IOC)是从不同的角度的描述的同一件事情,就是指通过引入 IOC 容器,利用依赖关系注入的方式,实现对象之间的解耦。
为什么需要依赖注入
现实开发中,许多系统服务类是不需要创建多个实例的,该实例被其它服务依赖,而使用单例模式仍然需要调用getInst()静态方法。
如果这些实例在运行时自行创建,在需要时自动注入(字段注入、入参注入),那该多好?
@see https://docs.spring.io/spring-framework/docs/current/reference/html/core.html
此外,控制反转还有一个重要作用:面向接口编程。
在一个类中提出接口的注入请求,Spring会将符合的接口实现在运行时注入该类。表现出的是完全面向接口。
依赖注入
使用应用上下文
Spring自带了多种类型的应用上下文。下面罗列的几个是你最有可能遇到的。
AnnotationConfigApplicationContext:从一个或多个基于Java的配置类中加载Spring应用上下文。
AnnotationConfigWebApplicationContext:从一个或多个基于Java的配置类中加载Spring Web应用上下文。
ClassPathXmlApplicationContext:从类路径下的一个或多个XML配置文件中加载上下文定义,把应用上下文的定义文件作为类资源。
FileSystemXmlapplicationcontext:从文件系统下的一个或多个XML配置文件中加载上下文定义。
XmlWebApplicationContext:从Web应用下的一个或多个XML配置文件中加载上下文定义。
创建Spring应用程序上下文(注解方式)
import org.springframework.context.ApplicationContext
import org.springframework.context.annotation.AnnotationConfigApplicationContext

lateinit var ctx: ApplicationContext

fun main() {
    ctx = AnnotationConfigApplicationContext(App::class.java)   <-- 启动类
    val app = ctx.getBean(App::class.java)
    app.run()
}
Bean的生命周期
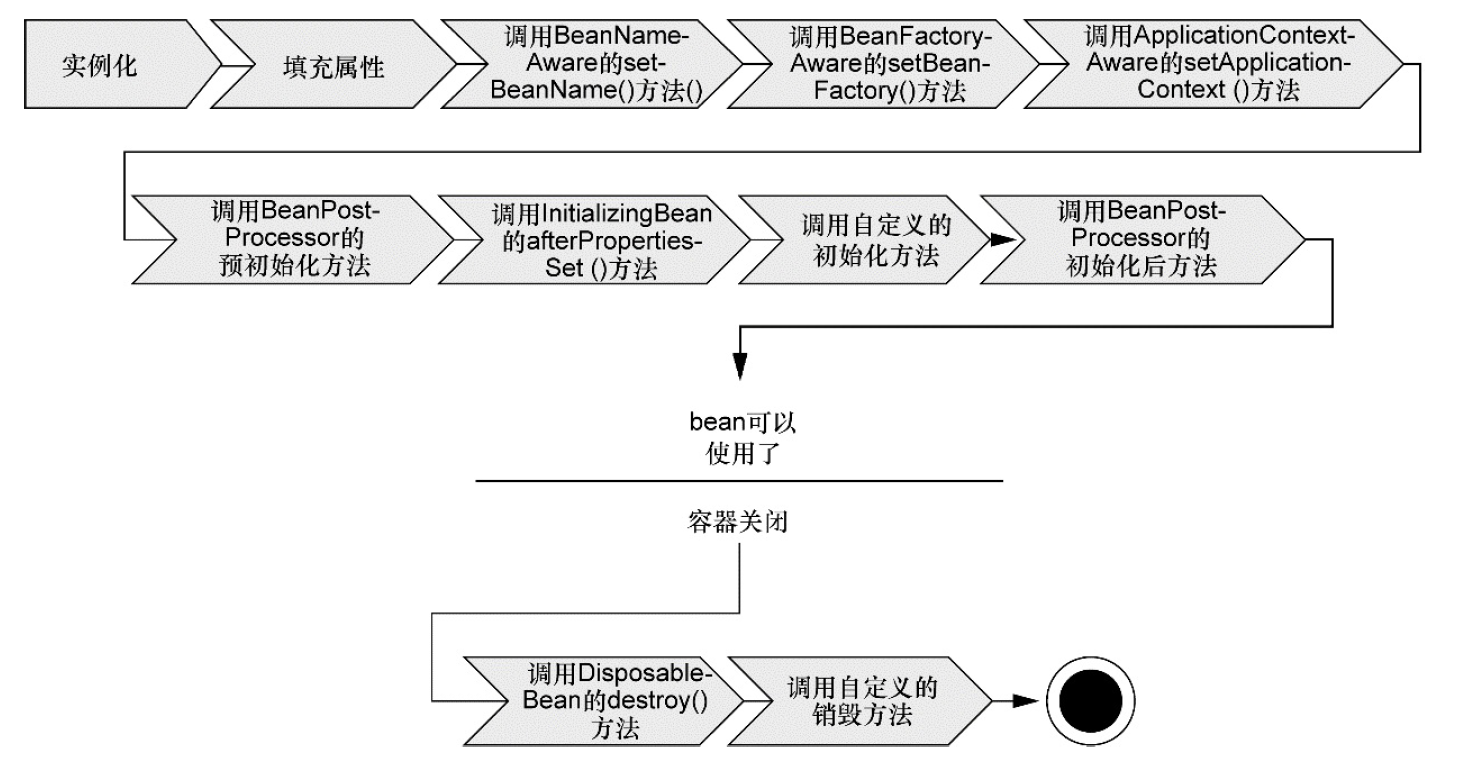
上面这些接口其实都是钩子函数,要使用该生命周期钩子函数,继承对应的Interface就可以了。
钩子:BeanNameAware
使用接口BeanNameAware即可知道实例的name:
/**
 * 意图在Bean工厂中知道其Bean名称的Bean将实现的接口。
 * 注意,通常不建议对象依赖于它的bean名称,因为这表示对外部配置的潜在脆弱依赖,以及对Spring API的不必要依赖。
 */
public interface BeanNameAware extends Aware {
	/**
	 * 在创建此bean的bean工厂中设置的bean的名称。
	 * 在填充常规bean属性之后但在初始化回调(例如InitializingBean.afterPropertiesSet()或自定义init-method)之前调用。
	 */
	void setBeanName(String name);
}
用例:
@Service
@ComponentScan(basePackageClasses = [App::class])
class App : BeanNameAware {

    override fun setBeanName(name: String) {
        println("实例化$name") ---> name equals "app"
    }
}
在配置类中使用@Bean注解配置Bean
import org.springframework.context.annotation.Bean
import org.springframework.context.annotation.Configuration

@Configuration
class JavaConfig {
  @Bean(initMethod = "init", destroyMethod = "close")    <----自定义的初始化、销毁方法
  fun configXXX() = XXX().apply {
    this.xxx()
  }
}
Profile
作用域
@Profile可以作用在@Configuation(或者@Component、@Service)注解的类上,也可以作用在@Bean方法上。
在Spring 3.1中,只能在类级别上使用@Profile注解。不过,从Spring 3.2开始,你也可以在方法级别上使用@Profile注解,与@Bean注解一同使用。
运行时激活Profile
Spring在确定哪个profile处于激活状态时,需要依赖两个独立的属性:spring.profiles.active和spring.profiles.default。
如果设置了spring.profiles.active属性的话,那么它的值就会用来确定哪个profile是激活的。
但如果没有设置spring.profiles.active属性的话,那Spring将会查找spring.profiles.default的值。
如果spring.profiles.active和spring.profiles.default均没有设置的话,那就没有激活的profile,因此只会创建那些没有定义在profile中的bean。
有多种方式来设置这两个属性:
- 作为DispatcherServlet的初始化参数;作为Web应用的上下文参数;
- 作为JNDI条目;
- 作为环境变量;
- 作为JVM的系统属性;
- 在集成测试类上,使用@ActiveProfiles注解设置。
System.setProperty("spring.profiles.active", "dev")
e.g.
package profile

import org.junit.Assert.assertEquals
import org.junit.Assert.assertNotNull
import org.junit.Test
import org.junit.runner.RunWith
import org.springframework.beans.factory.annotation.Autowired
import org.springframework.context.ApplicationContext
import org.springframework.context.annotation.ComponentScan
import org.springframework.context.annotation.Configuration
import org.springframework.context.annotation.Profile
import org.springframework.core.env.get
import org.springframework.stereotype.Component
import org.springframework.test.context.junit.jupiter.SpringJUnitConfig
import org.springframework.test.context.junit4.SpringJUnit4ClassRunner

@Profile("dev")
@Component
open class A {
    companion object {
        init {
            println("A class loaded")
        }
    }
    init {
        println("a init")
    }
}

@Configuration
@ComponentScan
open class JavaConfig

@RunWith(SpringJUnit4ClassRunner::class)
@SpringJUnitConfig(classes = [JavaConfig::class])
class Test {
    @Autowired lateinit var ctx: ApplicationContext

    init {
        System.setProperty("spring.profiles.active", "dev, another")
    }

    @Test fun `profile 'dev' should be active`() {
        val profiles = ctx.environment["spring.profiles.active"]?.split(Regex(""", *"""))
        assertNotNull(profiles)
        val profile = profiles?.find {
            it == "dev"
        }
        assertEquals("dev", profile)
    }

    @Test fun `autowired profile bean`() {
        val bean = ctx.getBean(A::class.java)
        assertNotNull(bean)
    }

    @Test fun springStartup() {
        assertNotNull(ctx)
    }
}
Bean 消歧义
@Primary 标记首选Bean
@Component
@Primary
class Implement : Interface
@Qualifier 限定符
限定id
如果Bean定义时没有指定限定符,可以使用Bean ID作为限定符。即一个Bean至少有一个限定符,那就是ID,默认ID为类名首字母小写。
@Component class BeanA
...
@Autowired
@Qualifier("beanA")
lateinit var bean: BeanA
自定义限定符号
@Qualifier("wft")
@Component class BeanA
...
@Autowired
@Qualifier("wft")
lateinit var bean: BeanA
使用自定义的限定符注解
由于注解不能重复,所以无法使用字符串多次限定,这时可以创建接口。
@Target(AnnotationTarget.CLASS, AnnotationTarget.FIELD)
@Retention(AnnotationRetention.RUNTIME)
@Qualifier
annotation class MyQualifierA
e.g.
package profile

import org.junit.jupiter.api.Assertions.*
import org.junit.jupiter.api.Test
import org.junit.jupiter.api.extension.ExtendWith
import org.springframework.beans.factory.NoUniqueBeanDefinitionException
import org.springframework.beans.factory.annotation.Autowired
import org.springframework.beans.factory.annotation.Qualifier
import org.springframework.context.ApplicationContext
import org.springframework.context.annotation.ComponentScan
import org.springframework.context.annotation.Configuration
import org.springframework.stereotype.Component
import org.springframework.test.context.junit.jupiter.SpringExtension
import org.springframework.test.context.junit.jupiter.SpringJUnitConfig

@Target(AnnotationTarget.CLASS, AnnotationTarget.FUNCTION, AnnotationTarget.FIELD)
@Retention(AnnotationRetention.RUNTIME)
@Qualifier
annotation class MyQualifier

interface Interface // 定义需要注入的接口

// 构建两个Bean实例,实现同一个接口
@Component
@MyQualifier
class A : Interface

@Component
class B : Interface

@Configuration
@ComponentScan
open class JavaConfig

@ExtendWith(SpringExtension::class)
@SpringJUnitConfig(classes = [JavaConfig::class])
class CustomQualifier {
    @Autowired
    lateinit var ctx: ApplicationContext
    @Test fun `ctx not null`() {
        assertNotNull(ctx)
    }

    @Test
    fun `should be throw a exception`() {
        assertThrows(NoUniqueBeanDefinitionException::class.java) {
            ctx.getBean(Interface::class.java)
        }
    }

    @Autowired
    @MyQualifier
    lateinit var bean: Interface
    @Test fun `custom @Qualifier`() {
        assertNotNull(bean)
    }
}