前言:本文主要介绍利用IDEA如何搭建SSM环境,并使用mybatis的逆向生成功能,根据数据表生成对应mapper接口和sql映射文件。具体步骤如下。
开发环境:
IDEA 14.1.7
maven 3.5.2
1.搭建web环境
利用idea搭建web环境的具体步骤,请参考笔者的另一篇博文:使用IntelliJ IDEA和Maven管理搭建Web开发环境(以Spring MVC为例)(一)文中有详细介绍。
2.通过maven添加相关依赖包
搭建ssm环境,需要spring、mybatis、数据库驱动等相关依赖包。具体如下pom文件。

  1    <!--相关文件版本-->
  2     <properties>
  3         <spring.version>4.2.1.RELEASE</spring.version>
  4         <aspectj.version>1.8.1</aspectj.version>
  5         <servlet.version>2.5</servlet.version>
  6         <jstl.version>1.2</jstl.version>
  7         <mybatis.version>3.4.5</mybatis.version>
  8         <mybatis-spring.version>1.3.1</mybatis-spring.version>
  9         <junit.version>4.12</junit.version>
 10         <mysql-driver.version>5.1.20</mysql-driver.version>
 11         <log4j.version>1.2.17</log4j.version>
 12         <slf4j.version>1.7.25</slf4j.version>
 13         <c3p0.version>0.9.0.2</c3p0.version>
 14         <mchange.version>0.2.14</mchange.version>
 15         <mbg.version>1.3.6</mbg.version>
 16     </properties>
 17
 18     <!--相关依赖-->
 19     <dependencies>
 20         <!--spring相关jar包-->
 21         <dependency>
 22             <groupId>org.springframework</groupId>
 23             <artifactId>spring-core</artifactId>
 24             <version>${spring.version}</version>
 25         </dependency>
 26         <dependency>
 27             <groupId>org.springframework</groupId>
 28             <artifactId>spring-context-support</artifactId>
 29             <version>${spring.version}</version>
 30         </dependency>
 31
 32         <dependency>
 33             <groupId>org.springframework</groupId>
 34             <artifactId>spring-jdbc</artifactId>
 35             <version>${spring.version}</version>
 36         </dependency>
 37
 38         <dependency>
 39             <groupId>org.springframework</groupId>
 40             <artifactId>spring-tx</artifactId>
 41             <version>${spring.version}</version>
 42         </dependency>
 43
 44         <dependency>
 45             <groupId>org.springframework</groupId>
 46             <artifactId>spring-web</artifactId>
 47             <version>${spring.version}</version>
 48         </dependency>
 49
 50         <dependency>
 51             <groupId>org.springframework</groupId>
 52             <artifactId>spring-webmvc</artifactId>
 53             <version>${spring.version}</version>
 54         </dependency>
 55
 56         <dependency>
 57             <groupId>org.aspectj</groupId>
 58             <artifactId>aspectjweaver</artifactId>
 59             <version>${aspectj.version}</version>
 60         </dependency>
 61
 62         <!--mybatis依赖包-->
 63         <dependency>
 64             <groupId>org.mybatis</groupId>
 65             <artifactId>mybatis</artifactId>
 66             <version>${mybatis.version}</version>
 67         </dependency>
 68         <!--mybatis整合spring依赖包-->
 69         <dependency>
 70             <groupId>org.mybatis</groupId>
 71             <artifactId>mybatis-spring</artifactId>
 72             <version>${mybatis-spring.version}</version>
 73         </dependency>
 74         <!--数据源依赖-->
 75         <dependency>
 76             <groupId>c3p0</groupId>
 77             <artifactId>c3p0</artifactId>
 78             <version>${c3p0.version}</version>
 79         </dependency>
 80
 81         <dependency>
 82             <groupId>com.mchange</groupId>
 83             <artifactId>mchange-commons-java</artifactId>
 84             <version>${mchange.version}</version>
 85         </dependency>
 86         <!--mysql驱动依赖-->
 87         <dependency>
 88             <groupId>mysql</groupId>
 89             <artifactId>mysql-connector-java</artifactId>
 90             <version>${mysql-driver.version}</version>
 91         </dependency>
 92
 93         <!-- servlet相关依赖-->
 94         <dependency>
 95             <groupId>javax.servlet</groupId>
 96             <artifactId>servlet-api</artifactId>
 97             <version>${servlet.version}</version>
 98         </dependency>
 99
100         <dependency>
101             <groupId>javax.servlet</groupId>
102             <artifactId>jstl</artifactId>
103             <version>${jstl.version}</version>
104         </dependency>
105         <!--日志依赖-->
106         <dependency>
107             <groupId>log4j</groupId>
108             <artifactId>log4j</artifactId>
109             <version>${log4j.version}</version>
110         </dependency>
111
112         <dependency>
113             <groupId>org.slf4j</groupId>
114             <artifactId>slf4j-log4j12</artifactId>
115             <version>${slf4j.version}</version>
116         </dependency>
117
118         <!--junit测试包依赖-->
119         <dependency>
120             <groupId>junit</groupId>
121             <artifactId>junit</artifactId>
122             <version>${junit.version}</version>
123         </dependency>
124     </dependencies>
125     <build>
126         <plugins>
127             <plugin>
128                 <!--Mybatis-generator插件,用于自动生成Mapper和POJO-->
129                 <groupId>org.mybatis.generator</groupId>
130                 <artifactId>mybatis-generator-maven-plugin</artifactId>
131                 <version>${mbg.version}</version>
132                 <configuration>
133                     <!--配置文件的位置-->
134                     <configurationFile>src/main/resources/mybatis-generator-config.xml</configurationFile>
135                     <verbose>true</verbose>
136                     <overwrite>true</overwrite>
137                 </configuration>
138                 <executions>
139                     <execution>
140                         <id>Generate MyBatis Artifacts</id>
141                         <goals>
142                             <goal>generate</goal>
143                         </goals>
144                     </execution>
145                 </executions>
146                 <dependencies>
147                     <dependency>
148                         <groupId>org.mybatis.generator</groupId>
149                         <artifactId>mybatis-generator-core</artifactId>
150                         <version>${mbg.version}</version>
151                     </dependency>
152                 </dependencies>
153             </plugin>
154         </plugins>
155     </build>
注:该pom文件中,还加入了mybatis generator插件,其具体用法,请参考笔者的另一篇博文:MyBatis Generator的使用文中有详细介绍。
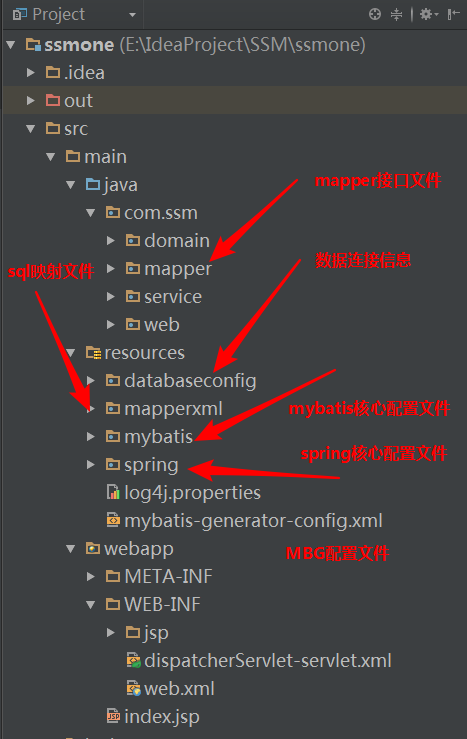
通过上面两步,并创建相关包目录,最终程序目录结构如下。

3.添加数据库配置文件
在databaseconfig目录下,添加dbconfig.properties文件,并添加数据库连接信息。内容如下。

1 jdbc.driver=com.mysql.jdbc.Driver
2 jdbc.url=jdbc:mysql://127.0.0.1:3306/mybatisstudy?useUnicode=true&characterEncoding=UTF-8
3 jdbc.username=root
4 #密码为空,不能写""不然会报错,这里直接不写
5 jdbc.password=
4.添加mybatis核心配置文件
在mybatis目录下,添加mybatis-config.xml文件,并做如下配置。

 1 <?xml version="1.0" encoding="UTF-8" ?>
 2 <!DOCTYPE configuration
 3         PUBLIC "-//mybatis.org//DTD Config 3.0//EN"
 4         "http://mybatis.org/dtd/mybatis-3-config.dtd">
 5 <configuration>
 6
 7     <!--为了防止Oracle中插入null值报错,可以将jdbcTypeForNull,设置为NULL,mysql中是支持NULL和OTHER的-->
 8     <settings>
 9         <setting name="jdbcTypeForNull" value="NULL"/>
10         <!--以下两个属性配置后进行延迟加载-->
11         <setting name="lazyLoadingEnabled" value="true"/>
12         <setting name="aggressiveLazyLoading" value="false"/>
13         <setting name="cacheEnabled" value="true"/><!--开启二级缓存-->
14     </settings>
15
16     <!--别名处理器:typeAliases可以为java类型起别名-->
17     <typeAliases>
18         <!--别名不区分大小写-->
19         <!--type:指实体类的全类名;默认别名为类名小写
20             alias:新的名称-->
21         <!--typeAlias为单独一个实体类起别名 -->
22         <!--<typeAlias type="com.mybatisstudy.domain.User"/>-->
23         <!--package批量起别名
24           为某个包下的所有实体类对象起别名
25           name:指定包名,为包下及其子包下的实体类对象都起一个别名,默认类名的小写
26          -->
27         <!--使用@Alias注解为冲突的类名,重新起一个别名,但是类名重复一般不存在-->
28         <package name="com.ssm.domain"/>
29     </typeAliases>
30
31 </configuration>
5.添加spring核心配置文件
在spring目录下,添加spring-content.xml文件,并做如下配置。

 1 <?xml version="1.0" encoding="UTF-8"?>
 2 <beans xmlns="http://www.springframework.org/schema/beans"
 3        xmlns:xsi="http://www.w3.org/2001/XMLSchema-instance"
 4        xmlns:p="http://www.springframework.org/schema/p"
 5        xmlns:context="http://www.springframework.org/schema/context"
 6        xmlns:aop="http://www.springframework.org/schema/aop"
 7        xmlns:tx="http://www.springframework.org/schema/tx"
 8        xmlns:mybatis="http://mybatis.org/schema/mybatis-spring"
 9        xsi:schemaLocation="http://www.springframework.org/schema/beans
10        http://www.springframework.org/schema/beans/spring-beans-4.0.xsd
11        http://www.springframework.org/schema/context
12        http://www.springframework.org/schema/context/spring-context-4.0.xsd
13        http://www.springframework.org/schema/tx
14        http://www.springframework.org/schema/tx/spring-tx-4.0.xsd
15        http://www.springframework.org/schema/aop
16        http://www.springframework.org/schema/aop/spring-aop-4.0.xsd
17        http://mybatis.org/schema/mybatis-spring
18        http://mybatis.org/schema/mybatis-spring.xsd">
19
20
21     <!--扫描包-->
22     <context:component-scan base-package="com.ssm.domain"/>
23     <context:component-scan base-package="com.ssm.mapper"/>
24     <context:component-scan base-package="com.ssm.service"/>
25
26     <!--配置数据源-->
27     <context:property-placeholder location="classpath:databaseconfig/dbconfig.properties"/>
28     <bean id="dataSource" class="com.mchange.v2.c3p0.ComboPooledDataSource"
29            destroy-method="close"
30             p:driverClass="${jdbc.driver}"
31             p:jdbcUrl="${jdbc.url}"
32             p:user="${jdbc.username}"
33             p:password="${jdbc.password}"/>
34
35     <!--spring事务管理-->
36     <bean id="transactionManager" class="org.springframework.jdbc.datasource.DataSourceTransactionManager"
37           p:dataSource-ref="dataSource"/>
38     <tx:annotation-driven transaction-manager="transactionManager"/>
39
40     <!--整合mybatis
41       目的:1.spring来管理所有组件,通过自动注入来进行操作
42                2.spring来管理事务
43     -->
44     <!--通过configLocation指定mybatis配置文件的位置,mybatis全局配置文件
45       mapperLocations:通过该属性,指定mapper文件的位置,就可以进行自动注册  mapper.xml文件
46       注意这里的写法,是该文件夹下所有的xml文件
47      -->
48     <bean id="sqlSessionFactory" class="org.mybatis.spring.SqlSessionFactoryBean"
49           p:dataSource-ref="dataSource"
50           p:configLocation="classpath:mybatis/mybatis-config.xml"
51           p:mapperLocations="classpath:mapperxml/*.xml"
52             />
53    <!--扫描所有的mapper文件,可以让其自动注册-->
54     <mybatis:scan base-package="com.ssm.mapper"/>
55 </beans>
注:在spring核心配置文件中,进行了数据库、事务以及整合mybatis的相关配置。
6.添加springmvc配置文件
在WEB-INF目录下,添加dispatcherServlet-servlet.xml文件,进行springmvc的相关配置。

 1 <?xml version="1.0" encoding="UTF-8"?>
 2 <beans xmlns="http://www.springframework.org/schema/beans"
 3        xmlns:xsi="http://www.w3.org/2001/XMLSchema-instance"
 4        xmlns:p="http://www.springframework.org/schema/p"
 5        xmlns:context="http://www.springframework.org/schema/context"
 6        xmlns:mvc="http://www.springframework.org/schema/mvc"
 7        xsi:schemaLocation="http://www.springframework.org/schema/beans
 8        http://www.springframework.org/schema/beans/spring-beans.xsd
 9        http://www.springframework.org/schema/context
10        http://www.springframework.org/schema/context/spring-context-4.0.xsd
11        http://www.springframework.org/schema/mvc
12        http://www.springframework.org/schema/mvc/spring-mvc-4.0.xsd">
13
14     <mvc:default-servlet-handler/>
15     <mvc:annotation-driven/>
16
17     <!--default-servlet-handler的作用-->
18     <context:component-scan base-package="com.ssm.web"/>
19
20     <!-- 配置视图解析器-->
21     <bean id="viewResolver" class="org.springframework.web.servlet.view.InternalResourceViewResolver"
22           p:viewClass="org.springframework.web.servlet.view.JstlView"
23           p:prefix="/WEB-INF/jsp/"
24           p:suffix=".jsp"/>
25
26 </beans>
注:在springmvc配置文件中,主要进行视图解析器等相关配置。
7.在web.xml文件中进行spring及其相关配置。
在web.xml中需要对spring配置文件的启动,以及springmvc配置文件的相关信息进行配置,具体如下。

 1 <?xml version="1.0" encoding="UTF-8"?>
 2 <web-app xmlns="http://java.sun.com/xml/ns/javaee"
 3            xmlns:xsi="http://www.w3.org/2001/XMLSchema-instance"
 4            xsi:schemaLocation="http://java.sun.com/xml/ns/javaee
 5           http://java.sun.com/xml/ns/javaee/web-app_2_5.xsd"
 6            version="2.5">
 7
 8     <!-- spring位置文件信息-->
 9     <context-param>
10         <param-name>contextConfigLocation</param-name>
11         <param-value>classpath:spring/spring-content.xml</param-value>
12     </context-param>
13
14     <!-- 配置监听器-->
15     <listener>
16         <listener-class>org.springframework.web.context.ContextLoaderListener</listener-class>
17     </listener>
18
19     <!-- 配置servlet-->
20     <servlet>
21         <servlet-name>dispatcherServlet</servlet-name>
22         <servlet-class>
23             org.springframework.web.servlet.DispatcherServlet
24         </servlet-class>
25         <load-on-startup>1</load-on-startup>
26     </servlet>
27
28     <servlet-mapping>
29         <servlet-name>dispatcherServlet</servlet-name>
30         <url-pattern>/</url-pattern> <!--配置为/则对html和restful风格的都可以使用,这种方式更为灵活-->
31     </servlet-mapping>
32
33     <!--配置字符过滤器,解决中文乱码问题-->
34     <filter>
35         <filter-name>CharacterEncoding</filter-name>
36         <filter-class>org.springframework.web.filter.CharacterEncodingFilter</filter-class>
37         <init-param>
38             <param-name>encoding</param-name>
39             <param-value>UTF-8</param-value>
40         </init-param>
41         <init-param>
42             <param-name>forceEncoding</param-name>
43             <param-value>true</param-value>
44         </init-param>
45     </filter>
46     <filter-mapping>
47         <filter-name>CharacterEncoding</filter-name>
48         <url-pattern>/*</url-pattern>
49     </filter-mapping>
50
51 </web-app>
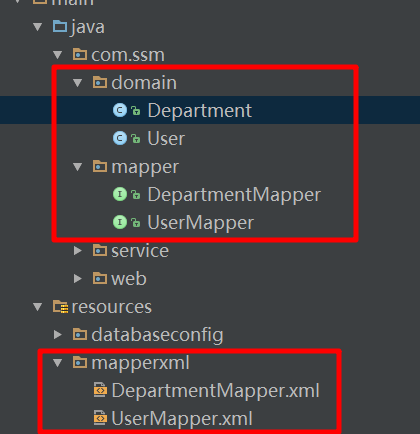
通过以上配置,ssm环境的基本框架已经搭建成功,下面通过MBG进行相关文件的逆向生成,具体操作步骤,请参考:MyBatis Generator的使用。通过MBG生成文件如下:

至此,其前期主要工作已准备就绪,下面进行测试。
主要实现功能:
1)向数据库中添加用户信息。
2)显示所有用户信息。
其具体测试步骤,笔者这里不再进行详述,直接给出该工程的源码,以及数据库的创建脚本,有兴趣的读者可自行进行测试。
注:1)由于该工程基于maven,因此需修改idea的maven配置。
2)注意mysql版本与驱动的对应关系,具体可参考:MySQL JDBC驱动版本与MySQL数据库版本对应关系。
3)本项目源码下载
by Shawn Chen,2018.3.23日,晚。
