1.理解Matplotlib
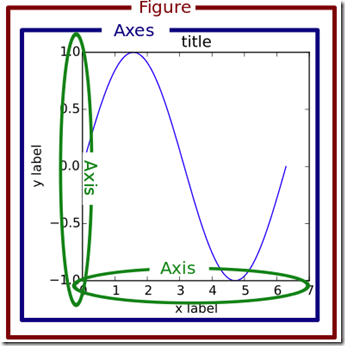
- 在Matplotlib中,整个图像为一个Figure 对象。Figure对象中可以包含一个或者多个Axes对象,每个Axes 对象都是一个拥有自己坐标系统的绘图区域。
add_subplot(numRows, numCols, plotNum)
- 图表的整个绘图区域被分成 numRows 行和 numCols 列;
- 然后按照从左到右,从上到下的顺序对每个子区域进行编号,左上的子区域的编号为1;
- plotNum 参数指定创建的 Axes 对象所在的区域;
subplots(numRows, numCols) 在一个figure创建指定的numRows*numCols示例图
# 获取figure 方式一, fig = plt.figure() ax = fig.add_subplot(1, 1, 1) # 获取figure方式二 ax2 = plt.subplot(1,1,1) # 一个figure下存在多个坐标轴 fig ,(ax1,ax2,ax3) = plt.subplots(3,1)
说明:
- figure 代表一张画布,画布中可以存放多个axes ais 代表坐标轴参数
2.matplotlib图标正常显示中文
import matplotlib.pyplot as plt plt.rcParams['font.sas-serig']=['SimHei'] #用来正常显示中文标签 plt.rcParams['axes.unicode_minus']=False #用来正常显示负号
3.使用参数
配置文件包括以下配置项:
- axex: 设置坐标轴边界和表面的颜色、坐标刻度值大小和网格的显示
- backend: 设置目标暑促TkAgg和GTKAgg
- figure: 控制dpi、边界颜色、图形大小、和子区( subplot)设置
- font: 字体集(font family)、字体大小和样式设置
- grid: 设置网格颜色和线性
- legend: 设置图例和其中的文本的显示
- line: 设置线条(颜色、线型、宽度等)和标记
- patch: 是填充2D空间的图形对象,如多边形和圆。控制线宽、颜色和抗锯齿设置等。
- savefig: 可以对保存的图形进行单独设置。例如,设置渲染的文件的背景为白色。
- verbose: 设置matplotlib在执行期间信息输出,如silent、helpful、debug和debug-annoying。
- xticks和yticks: 为x,y轴的主刻度和次刻度设置颜色、大小、方向,以及标签大小。
4.使用参考
- 确定坐标范围
- plt.axis([xmin, xmax, ymin, ymax])
- xlim(xmin, xmax)和ylim(ymin, ymax)来调整x,y坐标范围
- 改变绘图风格
plt.style.use('ggplot')
- plt.figure()
plt.figure(1) # 第一张图 plt.subplot(211) # 第一张图中的第一张子图 plt.plot([1,2,3]) plt.subplot(212) # 第一张图中的第二张子图 plt.plot([4,5,6]) plt.figure(2) # 第二张图 plt.plot([4,5,6]) # 默认创建子图subplot(111) plt.figure(1) # 切换到figure 1 ; 子图subplot(212)仍旧是当前图 plt.subplot(211) # 令子图subplot(211)成为figure1的当前图 plt.title('Easy as 1,2,3') # 添加subplot 211 的标题
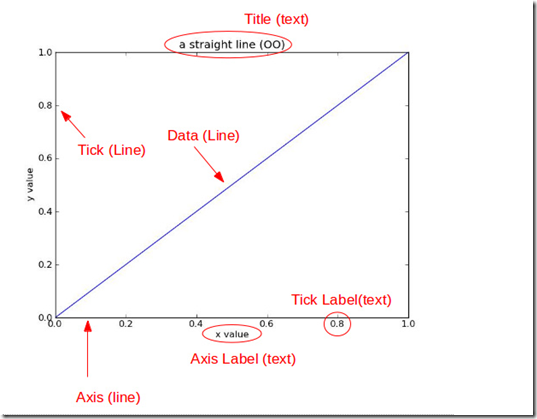
- plt.text()添加文字说明
plt.xlabel('Smarts') # 标识坐标轴 plt.ylabel('Probability') #添加标题 plt.title('Histogram of IQ') #添加文字 plt.text(60, .025, r'$mu=100, sigma=15$') plt.axis([40, 160, 0, 0.03]) # 图像的大小 plt.grid(True) # 显示表格
- plt.annotate()文本注释
plt.annotate('local max', xy=(2, 1), xytext=(3, 1.5), arrowprops=dict(facecolor='black', shrink=0.05), ) # 参数分别为:注释内容 注释位置 内容位置 指示线参数 plt.ylim(-2,2)
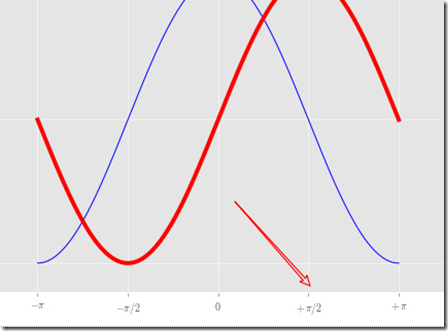
- plt.xticks()/plt.yticks()设置轴记号
# 设置轴记号 xticks([-np.pi, -np.pi/2, 0, np.pi/2, np.pi], [r'$-pi$', r'$-pi/2$', r'$0$', r'$+pi/2$', r'$+pi$']) yticks([-1, 0, +1], [r'$-1$', r'$0$', r'$+1$'])
- plt.legend()添加图例
plot(X, C, color="blue", linewidth=2.5, linestyle="-", label="cosine") plot(X, S, color="red", linewidth=2.5, linestyle="-", label="sine") legend(loc='upper left') # 指定图例的位置
5. 样式
- 颜色 按照RGB 定色
- 线条类型 linestyle
'-'       solid line style
'--'      dashed line style
'-.'      dash-dot line style
':'       dotted line style
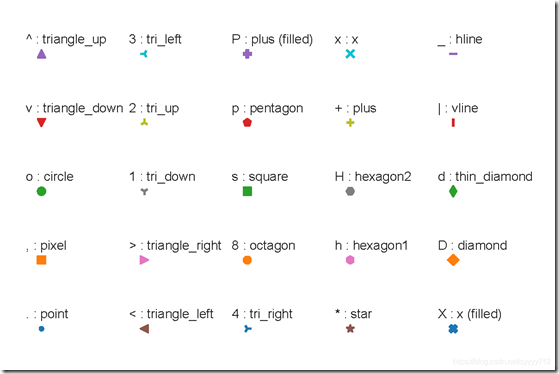
- 转角的风格 Marker
'.'       point marker
','       pixel marker
'o'       circle marker
'v'       triangle_down marker
'^'       triangle_up marker
'<'       triangle_left marker
'>'       triangle_right marker
'1'       tri_down marker
'2'       tri_up marker
'3'       tri_left marker
'4'       tri_right marker
's'       square marker
'p'       pentagon marker
'*'       star marker
'h'       hexagon1 marker
'H'       hexagon2 marker
'+'       plus marker
'x'       x marker
'D'       diamond marker
'd'       thin_diamond marker
'|'       vline marker
'_'       hline marker


