Springboot支持thymeleaf、freemarker、JSP,但是官方不建议使用JSP,因为有些功能会受限制,这里介绍thymeleaf和freemarker。

一、thymeleaf模板
thymeleaf模板的前端界面为.html格式的文件,可以直接使用浏览器进行查看,方便进行样式等方面的调试。
1、pom依赖添加
<dependency>
<groupId>org.springframework.boot</groupId>
<artifactId>spring-boot-starter-thymeleaf</artifactId>
</dependency>
2、application属性配置
查看官方文档的默认配置介绍如下:
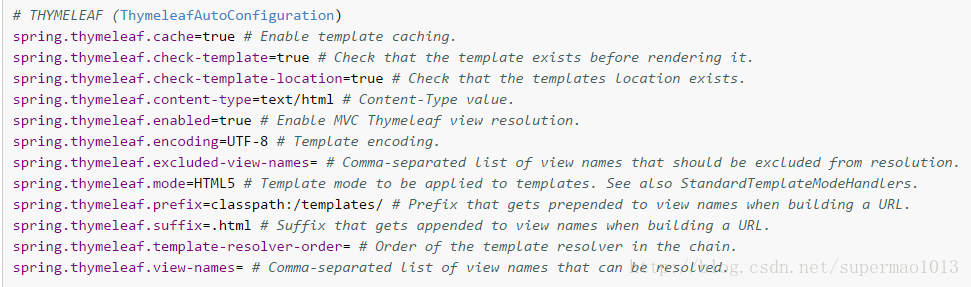
这里必须要注意的是,开发的时候要关闭模板缓存,不然修改界面文件后无法实时显示。在application.properties文件中关闭模板缓存:
spring.thymeleaf.cache=false
关闭缓存后,修改html文件,可以直接Ctrl+F9编译后,显示最新的修改内容。
3、编写界面
我的界面hello.html路径为:templates/template/hello.html,代码:
<!DOCTYPE html>
<html xmlns:th="http://www.thymeleaf.org">
<head>
    <title>Title</title>
</head>
<body>
    <!--/*@thymesVar id="name" type="java.lang.String"*/-->
    <p th:text="'Hello, ' + ${name}" ></p>
</body>
</html>
4、编写controller
package com.example.demo.template;

import org.springframework.stereotype.Controller;
import org.springframework.ui.Model;
import org.springframework.web.bind.annotation.RequestMapping;

@Controller
@RequestMapping("/html")
public class HtmlController {

    @RequestMapping("/hello")
    public String hello(Model model) {
        model.addAttribute("name", "world");

        return "template/hello";
    }
}
运行访问,如下:

thymeleaf具体使用参考
http://blog.csdn.net/z719725611/article/details/53908294
二、freemarker模板
1、pom依赖添加
<dependency>
            <groupId>org.springframework.boot</groupId>
            <artifactId>spring-boot-starter-freemarker</artifactId>
        </dependency>
注意:允许thymeleaf和freemarker同时存在
2、application属性配置
查看官方文档的默认配置介绍如下:

application.properties文件无需配置,使用默认配置即可
3、编写界面
我的界面hello.ftl路径为:templates/ftl/hello.ftl,代码:
<!DOCTYPE html>
<html>
<head>
    <title>Title</title>
</head>
<body>
    message:${message}
</body>
</html>
4、编写controller
package com.example.demo.template;

import org.springframework.stereotype.Controller;
import org.springframework.ui.Model;
import org.springframework.web.bind.annotation.RequestMapping;

@Controller
@RequestMapping("/html")
public class HtmlController {

    @RequestMapping("/hello")
    public String hello(Model model) {
        model.addAttribute("name", "world");

        return "template/hello";
    }
}
接下来启动运行即可。
freemarker具体使用参考
http://blog.csdn.net/fhx007/article/details/7902040/
http://blog.csdn.net/tang9140/article/details/39695653