Python环境构建
@
说明
同一台机器上,如果要使用不同版本的Python编译器,直接安装Python的编译的话,环境变量和安装路径都难以兼顾,所以Python提供了pyenv这个工具对Python的运行环境进行管理;
git安装
[root@python ~]# yum install git -y
pyenv安装
安装pyenv依赖
yum -y install gcc make patch gdbm-devel openssl-devel sqlite-devel readline-devel zlib-devel bzip2-devel
这几个必须安装,否则的话,安装pyenv的时候会报错
安装pyenv
mac环境下,使用brew install即可
/:brew update
/:brew install  pyenv
/:brew install  yenv-virtualenv
如果mac下使用的是zsh:将下面内容追加到~/.zshrc,如果是bash环境下,将下面内容追加到~/.bash_profile中
export PATH="$HOME/.pyenv/bin:$PATH"
eval "$(pyenv init -)"
eval "$(pyenv virtualenv-init -)"
CentOS环境下
useradd python #创建一个用户,最好不要使用root用直接安装
su - python #切换到python用户下
# 安装必须联网,需要到GitHub上下载安装文件
$ curl -L https://github.com/pyenv/pyenv-installer/raw/master/bin/pyenv-installer | bash

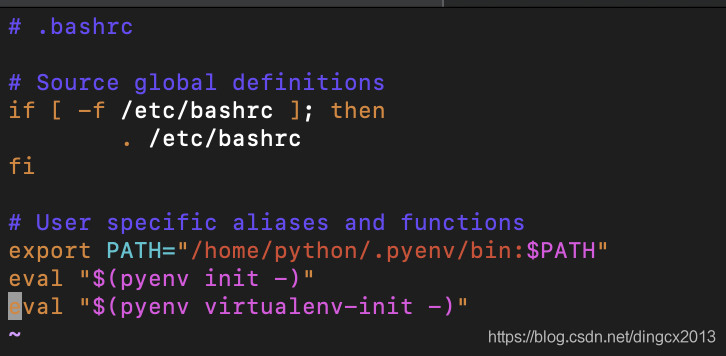
出现这样的提醒告诉我们,需要将pyenv加入到加载路径下
[python@dcx ~]$ vim ~/.bashrc #编辑启动加载文件

[python@dcx ~]$ source .bashrc # 使起立即生效
pyenv的基本使用
pyenv的使用概要
[python@python ~]$ pyenv #直接运行,可以查看其版本和基本使用
pyenv 1.2.9
Usage: pyenv <command> [<args>]

Some useful pyenv commands are:
   commands    List all available pyenv commands
   local       Set or show the local application-specific Python version
   global      Set or show the global Python version
   shell       Set or show the shell-specific Python version
   install     Install a Python version using python-build
   uninstall   Uninstall a specific Python version
   rehash      Rehash pyenv shims (run this after installing executables)
   version     Show the current Python version and its origin
   versions    List all Python versions available to pyenv
   which       Display the full path to an executable
   whence      List all Python versions that contain the given executable

See `pyenv help <command>' for information on a specific command.
pyenv的install选项
- -l :列出可以安装的版本
[python@python ~]$ pyenv install -l  #列出可以安装的版本
Available versions:
  2.1.3
  2.2.3
  2.3.7
 .....
- 安装指定的python版本,如果直接用install就会去官网上去找
[python@python ~]$ pyenv install 3.6.6
Downloading Python-3.6.6.tar.xz...
-> https://www.python.org/ftp/python/3.6.6/Python-3.6.6.tar.xz
....
注:pyenv提供了缓存的机制,也就是说,如果在cache路径中找的参数对应的安装文件,则使用cache路径下的安装文件进行安装,安装包上传好之后,再执行上述安装命令,即可使用本地安装包进行安装
[python@python cache]$mkdir ~/.pyenv/cache #在本用户下的家目录下创建cache路径,必须是~/.pyenv/cache
[python@python cache]$ cd ~/.pyenv/cache;ll  #将python安装包上传到该路径下
total 94356
-rw-rw-r--. 1 python python 20656090 Feb  2 17:38 Python-3.5.3.tar.gz
-rw-rw-r--. 1 python python 15213396 Feb  2 17:36 Python-3.5.3.tar.xz
-rw-rw-r--. 1 python python 20656090 Feb  2 17:39 Python-3.5.3.tgz
-rw-rw-r--. 1 python python 17156744 Feb  2 17:39 Python-3.6.6.tar.xz
-rw-rw-r--. 1 python python 22930752 Feb  2 17:40 Python-3.6.6.tgz
- versions:查看当前系统上已经安装的python版本
[python@python cache]$ pyenv versions # *表示当前正在使用的
* system (set by /home/python/.pyenv/version)
  3.6.6
- version:查看当前正在使用的python版本
[python@python cache]$ pyenv version
3.6.6 (set by /home/python/.pyenv/version)
# 这与python -V的结果类似
[python@python ~]$ python -V
Python 2.6.6
- global:用户级别的,表示修改当前用户下使用的python版本
[python@python ~]$ pyenv global system
[python@python ~]$ python -V
Python 2.6.6
python@python ~]$ pyenv global 3.6.6
[python@python ~]$ python -V
Python 3.6.6
如果想要在一个用户下,控制不同的项目的python版本,可以使用一下方法
- shell:会话级别的,也就是说设置当前运行的终端下使用的python版本
[python@python ~]$ pyenv shell 3.5.3
[python@python ~]$ python -V
Python 3.5.3
要想在目录级别使用不同版本的python,则可以使用如下选项
- local:设置目录级别的版本控制
注意:子目录下一样可以使用local来重新定义,如果不定义,则继承上面的python版本
[python@python ~]$ mkdir -p ~/dingcx/projects/web
[python@python ~]$ cd ~/dingcx/projects/web
#在当前目录下,修改当前目录的python版本,并且,这个级别的版本不会受shell或者global下的python版本控制
[python@python web]$ pyenv local 3.5.3
[python@python web]$ python -V
Python 3.5.3
[python@python web]$ cd ..
[python@python projects]$ python -V
Python 3.6.6
pyenv的local版本控制的本质
使用一个隐藏文件来实现了该目录及其子目录下的版本控制,但是如果我们在当前目录下安装了一个pip,那影响的就是整个3.5.3的
[python@python projects]$ pwd
/home/python/dingcx/projects
[python@python projects]$ cd ./web
[python@python web]$ ll -a
total 12
drwxrwxr-x. 2 python python 4096 Mar 14 10:20 .
drwxrwxr-x. 3 python python 4096 Mar 14 10:20 ..
-rw-rw-r--. 1 python python    6 Mar 14 10:20 .python-version
[python@python web]$ cat .python-version
3.5.3
[python@python web]$ pwd
/home/python/dingcx/projects/web
#pyenv local --unset,撤销
以上都是在公共的空间中配置不同的python版本,如果多个项目使用不同的版本开发,或者使用不同的Python版本部署运行,或者同样的版本开发但是不同项目使用了不同版本的库,使用公共空间配置Python版本就会发生冲突,那么最好的解决办法就是使用虚拟环境
- virtualenv:配置虚拟环境
这是一个pyenv的插件,虚拟环境下使用pip安装,不会影响到公共的库
(ding) [python@www plugins]$ ll
total 24
drwxr-xr-x. 4 python python 4096 Dec 30 07:54 pyenv-doctor
drwxr-xr-x. 6 python python 4096 Dec 30 07:54 pyenv-installer
drwxr-xr-x. 5 python python 4096 Dec 30 07:55 pyenv-update
drwxr-xr-x. 8 python python 4096 Dec 30 07:55 pyenv-virtualenv
drwxr-xr-x. 4 python python 4096 Dec 30 07:55 pyenv-which-ext
drwxrwxr-x. 5 python python 4096 Dec 30 07:54 python-build
(ding) [python@www plugins]$ pwd
/home/python/.pyenv/plugins
pyenv-virtualenv的使用,setuptools和pip是默认就安装的
[python@python web]$ pyenv virtualenv 3.6.6 ding #安装virtualenv
Looking in links: /tmp/tmp8eq3hccs
Requirement already satisfied: setuptools in /home/python/.pyenv/versions/3.6.6/envs/ding/lib/python3.6/site-packages (39.0.1)
Requirement already satisfied: pip in /home/python/.pyenv/versions/3.6.6/envs/ding/lib/python3.6/site-packages (10.0.1)
[python@python web]$ pyenv versions
  system
* 3.5.3 (set by /home/python/dingcx/projects/web/.python-version)
  3.6.6
  3.6.6/envs/ding
  ding
创建完虚拟环境之后,可以把这个当做一个版本来使用
[python@www ~]$ pyenv global ding
(ding) [python@www ~]$ python -V
Python 3.6.6
(ding) [python@www ~]$ pyenv global 3.6.6
[python@www ~]$ pyenv shell ding
(ding) [python@www ~]$ python -V
Python 3.6.6
(ding) [python@www ~]$ pyenv global 3.6.6
(ding) [python@www ~]$ pyenv local ding
(ding) [python@www ~]$ python -V
Python 3.6.6
pyenv虚拟环境的本质
1.在~/.pyenv/versions下有一个软连接文件,会指向pyenv管理的版本目录(3.6.6)中,在这个路径中的envs路径下会创建虚拟环境名的路径

2.在虚拟环境下,使用pip安装的包,都放置在一下路径下

3.公共环境下的包放置在对应版本下的lib路径下

4.在~/.pyenv/version文件保存了pyenv当前使用的python版本

pip的使用
通用配置(最好是使用这个配置,不然的话,速度非常慢)
pip通用配置步骤
1.在家目录下创建一个隐藏目录
mkdir ~/.pip
(Windows下为pip目录)
2.创建一个pip.conf文件(Windows下为pip.ini)
[python@www ~]$ vim ~/.pip/pip.conf
文件内容为:
[global]
index-url=https://mirrors.aliyun.com/pypi/simple/
trusted-host=mirrors.alyun.com
trusted-host选项为了避免麻烦是必须的,否则使用的时候会提示不受信任,或者添加“--trusted-host=mirrors.aliyun.com”选项;
注意:有网页提示需要创建或修改配置文件(linux的文件在~/.pip/pip.conf,windows在%HOMEPATH%pippip.ini),至少Windows7下“%HOMEPATH%pippip.ini”这个目录是不起作用的。
pip使用:
pip安装python库
#pip install psutil
pip卸载python库
#pip uninstall psutil
pip查看安装的库具体信息
#pip show psutil
pip查看所有安装的包(库)
#pip list
pip中freeze的使用
用于实现将开发环境中已经安装的包快速打包给部署环境
(ding) [python@www ~]$ pip list
Package          Version
---------------- -------
backcall         0.1.0
decorator        4.4.1
ipython          7.12.0
ipython-genutils 0.2.0
jedi             0.16.0
parso            0.6.1
pexpect          4.8.0
pickleshare      0.7.5
pip              10.0.1
prompt-toolkit   3.0.3
ptyprocess       0.6.0
Pygments         2.5.2
setuptools       39.0.1
six              1.14.0
traitlets        4.3.3
wcwidth          0.1.8
You are using pip version 10.0.1, however version 20.0.2 is available.
You should consider upgrading via the 'pip install --upgrade pip' command.
(ding) [python@www ~]$ pip freeze > requirements
You are using pip version 10.0.1, however version 20.0.2 is available.
You should consider upgrading via the 'pip install --upgrade pip' command.
(ding) [python@www ~]$ more requirements
backcall==0.1.0
decorator==4.4.1
ipython==7.12.0
ipython-genutils==0.2.0
jedi==0.16.0
parso==0.6.1
pexpect==4.8.0
pickleshare==0.7.5
prompt-toolkit==3.0.3
ptyprocess==0.6.0
Pygments==2.5.2
six==1.14.0
traitlets==4.3.3
wcwidth==0.1.8
#在部署环境中,安装库
(dcx) [python@www ~]$ pip install -r requirements