1. 前言
上一篇文章介绍了使用WindowChrome自定义Window,实际使用下来总有各种各样的问题,这些问题大部分都不影响使用,可能正是因为不影响使用所以一直没得到修复(也有可能别人根本不觉得这些是问题)。
这篇文章我总结了一些实际遇到的问题及其解决方案。
2. WindowChrome最大化的问题
2.1 影响Chrome尺寸的几个值
上一篇文章提到有几个值用于计算Chrome的尺寸:
| 属性 | 值(像素) | 描述 |
|---|---|---|
| SM_CXFRAME/SM_CYFRAME | 4 | The thickness of the sizing border around the perimeter of a window that can be resized, in pixels. SM_CXSIZEFRAME is the width of the horizontal border, and SM_CYSIZEFRAME is the height of the vertical border.This value is the same as SM_CXFRAME. |
| SM_CXPADDEDBORDER | 4 | The amount of border padding for captioned windows, in pixels.Windows XP/2000: This value is not supported. |
| SM_CYCAPTION | 23 | The height of a caption area, in pixels. |
在有标题的标准Window,chrome的顶部尺寸为SM_CYFRAME + SM_CXPADDEDBORDER + SM_CYCAPTION = 31,左右两边尺寸为SM_CXFRAME + SM_CXPADDEDBORDER = 8,底部尺寸为SM_CYFRAME + SM_CXPADDEDBORDER = 8。
具体的计算方式可以参考Firefox的源码:
  // mCaptionHeight is the default size of the NC area at
  // the top of the window. If the window has a caption,
  // the size is calculated as the sum of:
  //      SM_CYFRAME        - The thickness of the sizing border
  //                          around a resizable window
  //      SM_CXPADDEDBORDER - The amount of border padding
  //                          for captioned windows
  //      SM_CYCAPTION      - The height of the caption area
  //
  // If the window does not have a caption, mCaptionHeight will be equal to
  // `GetSystemMetrics(SM_CYFRAME)`
  mCaptionHeight = GetSystemMetrics(SM_CYFRAME) +
                   (hasCaption ? GetSystemMetrics(SM_CYCAPTION) +
                                     GetSystemMetrics(SM_CXPADDEDBORDER)
                               : 0);

  // mHorResizeMargin is the size of the default NC areas on the
  // left and right sides of our window.  It is calculated as
  // the sum of:
  //      SM_CXFRAME        - The thickness of the sizing border
  //      SM_CXPADDEDBORDER - The amount of border padding
  //                          for captioned windows
  //
  // If the window does not have a caption, mHorResizeMargin will be equal to
  // `GetSystemMetrics(SM_CXFRAME)`
  mHorResizeMargin = GetSystemMetrics(SM_CXFRAME) +
                     (hasCaption ? GetSystemMetrics(SM_CXPADDEDBORDER) : 0);

  // mVertResizeMargin is the size of the default NC area at the
  // bottom of the window. It is calculated as the sum of:
  //      SM_CYFRAME        - The thickness of the sizing border
  //      SM_CXPADDEDBORDER - The amount of border padding
  //                          for captioned windows.
  //
  // If the window does not have a caption, mVertResizeMargin will be equal to
  // `GetSystemMetrics(SM_CYFRAME)`
  mVertResizeMargin = GetSystemMetrics(SM_CYFRAME) +
(hasCaption ? GetSystemMetrics(SM_CXPADDEDBORDER) : 0);
在WPF中这几个值分别映射到SystemParameters的相关属性:
| 系统值 | SystemParameters属性 | 值 |
|---|---|---|
| SM_CXFRAME/SM_CYFRAME | WindowResizeBorderThickness | 4,4,4,4 |
| SM_CXPADDEDBORDER | 无 | 4 |
| SM_CYCAPTION | WindowCaptionHeight | 23 |
另外还有WindowNonClientFrameThickness,相当于WindowResizeBorderThickness的基础上,Top+=WindowCaptionHeight,值为 4,27,4,4。
SM_CXPADDEDBORDER在WPF里没有对应的值,我写了个WindowParameters的类,添加了这个属性:
/// <summary>
/// returns the border thickness padding around captioned windows,in pixels. Windows XP/2000:  This value is not supported.
/// </summary>
public static Thickness PaddedBorderThickness
{
    [SecurityCritical]
    get
    {
        if (_paddedBorderThickness == null)
        {
            var paddedBorder = NativeMethods.GetSystemMetrics(SM.CXPADDEDBORDER);
            var dpi = GetDpi();
            Size frameSize = new Size(paddedBorder, paddedBorder);
            Size frameSizeInDips = DpiHelper.DeviceSizeToLogical(frameSize, dpi / 96.0, dpi / 96.0);
            _paddedBorderThickness = new Thickness(frameSizeInDips.Width, frameSizeInDips.Height, frameSizeInDips.Width, frameSizeInDips.Height);
        }

        return _paddedBorderThickness.Value;
    }
}
2.2 WindowChrome的实际大小和普通Window不同
先说说我的环境,WIndows 10,1920 * 1080 分辨率,100% DPI。
<WindowChrome.WindowChrome>
    <WindowChrome />
</WindowChrome.WindowChrome>
<Window.Style>
    <Style TargetType="{x:Type Window}">
        <Setter Property="Template">
            <Setter.Value>
                <ControlTemplate TargetType="{x:Type Window}">
                    <Border>
                        <Grid>
                            <AdornerDecorator>
                                <ContentPresenter />
                            </AdornerDecorator>
                            <ResizeGrip x:Name="WindowResizeGrip"
                                        HorizontalAlignment="Right"
                                        IsTabStop="false"
                                        Visibility="Collapsed"
                                        VerticalAlignment="Bottom" />
                        </Grid>
                    </Border>
                    <ControlTemplate.Triggers>
                        <MultiTrigger>
                            <MultiTrigger.Conditions>
                                <Condition Property="ResizeMode"
                                           Value="CanResizeWithGrip" />
                                <Condition Property="WindowState"
                                           Value="Normal" />
                            </MultiTrigger.Conditions>
                            <Setter Property="Visibility"
                                    TargetName="WindowResizeGrip"
                                    Value="Visible" />
                        </MultiTrigger>
                    </ControlTemplate.Triggers>
                </ControlTemplate>
            </Setter.Value>
        </Setter>
    </Style>
</Window.Style>
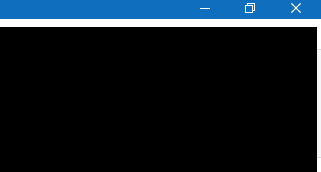
按上一篇文章介绍的方法打开一个使用WindowChrome的Window(大小为800 * 600),在VisualStudio的实时可视化树可以看到AdornerDecorator的实际大小和Window的实际大小都是800 * 600(毕竟边WindowChrome里的Border、Grid等都没设Margin或Padding)。然后用Inspect观察它的边框。可以看到Window实际上的范围没什么问题。但和标准Window的对比就可以看出有区别,我在之前的文章中介绍过标准Window的实际范围和用户看到的并不一样。

上面两张图分别是通过Inspect观察的标准Window(上图)和使用WindowChrome的Window(下图),可以看到标准Window左右下三个方向有些空白位置,和边框加起来是8个像素。WindowChrome则没有这个问题。
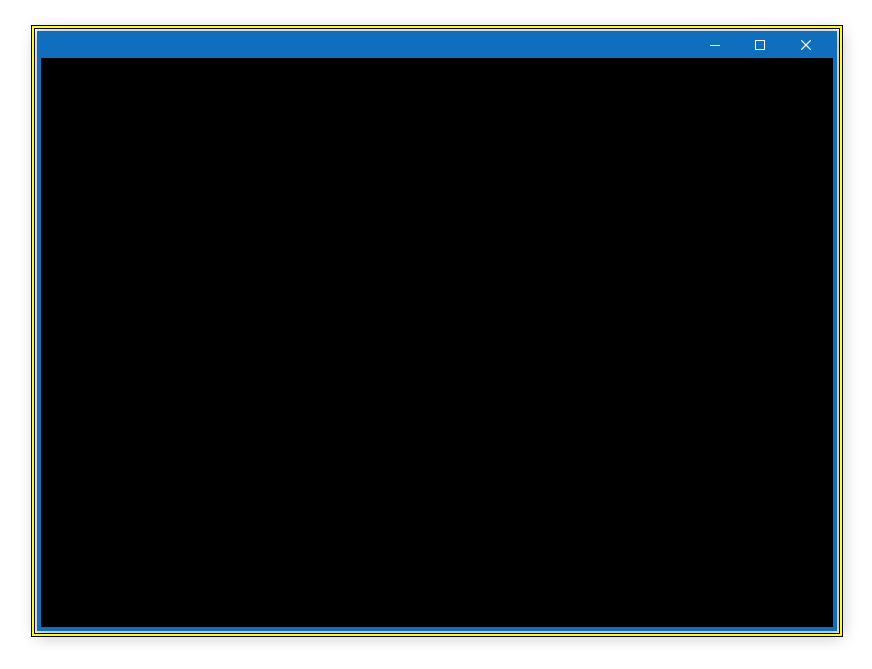
2.3 最大化状态下Margin和标题高度的问题
WindowChrome最大化时状态如上图所示,大小也变为1936 * 1066,这个大小没问题,有问题的是它不会计算好client-area的尺寸,只是简单地加大non-client的尺寸,导致client-area的尺寸也成了1936 * 1066。标准Window在最大化时non-client area的尺寸为1936 * 1066,client-area的尺寸为1920 * 1027。
2.4 最大化时chrome尺寸的问题
结合Window(窗体)的UI元素及行为这篇文章,WindowChrome最大化时的client-area的尺寸就是Window尺寸(1936 * 1066)减去WindowNonClientFrameThickness(4,27,4,4)再减去PaddedBorderThickness(4,4,4,4)。这样就准确地计算出client-area在最大化状态下的尺寸为1920 * 1027。
在自定义Window的ControlTempalte中我使用Trigger在最大化状态下将边框改为0,然后加上WindowResizeBorderThickness的Padding和PaddedBorderThickness的Margin:
<Trigger Property="WindowState"
         Value="Maximized">
    <Setter TargetName="MaximizeButton"
            Property="Visibility"
            Value="Collapsed" />
    <Setter TargetName="RestoreButton"
            Property="Visibility"
            Value="Visible" />
    <Setter TargetName="WindowBorder"
            Property="BorderThickness"
            Value="0" />
    <Setter TargetName="WindowBorder"
            Property="Padding"
            Value="{x:Static SystemParameters.WindowResizeBorderThickness}" />
    <Setter Property="Margin"
            TargetName="LayoutRoot"
            Value="{x:Static local:WindowParameters.PaddedBorderThickness}" />
</Trigger>
以前我还试过让BorderThickness保持为1,Margin改为7,但后来发现运行在高于100% DPI的环境下出了问题,所以改为绑定到属性。
在不同DPI下这几个属性值如下:
| DPI | non-client area 尺寸 | client area 尺寸 | WindowNonClientFrameThickness | PaddedBorderThickness |
|---|---|---|---|---|
| 100 | 1936 * 1066 | 1920 * 1027 | 4,4,4,4 | 4,4,4,4 |
| 125 | 1550.4 | 1536 | 3.2,3.2,3.2,3.2 | 4,4,4,4 |
| 150 | 1294.66666666667 | 280 | 3.3333,3.3333,3.3333,3.3333 | 4,4,4,4 |
| 175 | 1110.85714285714 | 1097.14285714286 | 2.8571428,2.8571428,2.8571428,2.8571428 | 4,4,4,4 |
| 200 | 973 | 960 | 2.5,2.5,2.5,2.5 | 4,4,4,4 |
可以看到PaddedBorderThickness总是等于4,所以也可以使用不绑定PaddedBorderThickness的方案:
<Border x:Name="WindowBorder"
        BorderThickness="3"
        BorderBrush="{TemplateBinding BorderBrush}"
        Background="{TemplateBinding Background}"
        >
    <Border.Style>
        <Style TargetType="{x:Type Border}">
            <Style.Triggers>
                <DataTrigger Binding="{Binding WindowState, RelativeSource={RelativeSource TemplatedParent}}" Value="Maximized">
                    <Setter Property="Margin" Value="{x:Static SystemParameters.WindowResizeBorderThickness}"/>
                    <Setter Property="Padding" Value="1"/>
                </DataTrigger>
            </Style.Triggers>
        </Style>
    </Border.Style>
但我还是更喜欢PaddedBorderThickness,这是心情上的问题(我都写了这么多代码了,你告诉我直接用4这个神奇的数字就好了,我断然不能接受)。而且有可能将来Windows的窗体设计会改变,绑定系统的属性比较保险。
最后,其实应该监视SystemParameters的StaticPropertyChanged事件然后修改PaddedBorderThickness,因为WindowNonClientFrameThickness和WindowResizeBorderThickness会在系统主题改变时改变,但不想为了这小概率事件多写代码就偷懒了。
3. SizeToContent的问题
SizeToContent属性用于指示Window是否自动调整它的大小,但当设置'SizeToContent="WidthAndHeight"'时就会出问题:
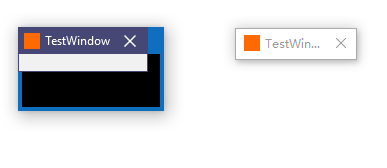
上图左面时一个没内容的自定义Window,右边是一个没内容的系统Window,两个都设置了SizeToContent="WidthAndHeight"。可以看到自定义WindowChorme多出了一些黑色的区域,仔细观察这些黑色区域,发觉它的尺寸大概就是non-client area的尺寸,而且内容就是WindowChrome原本的内容。
SizeToContent="WidthAndHeight"时Window需要计算ClientArea的尺寸然后再确定Window的尺寸,但使用WindowChrome自定义Window时程序以为整个ControlTempalte的内容都是ClientArea,把它当作了ClientArea的尺寸,再加上non-client的尺寸就得出了错误的Window尺寸。ControleTemplate的内容没办法遮住整个WindowChrome的内容,于是就出现了这些黑色的区域。
解决方案是在OnSourceInitialized时简单粗暴地要求再计算一次尺寸:
protected override void OnSourceInitialized(EventArgs e)
{
    base.OnSourceInitialized(e);
    if (SizeToContent == SizeToContent.WidthAndHeight && WindowChrome.GetWindowChrome(this) != null)
    {
        InvalidateMeasure();
    }
}
以前我曾建议在OnContentRendered中执行这段代码,但后来发现调试模式,或者性能比较差的场合会有些问题,所以改为在OnSourceInitialized中执行了。
4. FlashWindow的问题
如果一个Window设置了Owner并且以ShowDialog的方式打开,点击它的Owner将对这个Window调用FlashWindowEx功能,即闪烁几下,并且还有提示音。除了这种方式还可以用编程的方式调用FlashWindow功能。

WindowChrome提供通知FlashWindow发生的事件,FlashWindow发生时虽然Window看上去在Active/Inactive 状态间切换,但IsActive属性并不会改变。
要处理这个问题,可以监听WM_NCACTIVATE消息,它通知Window的non-client area是否需要切换Active/Inactive状态。
IntPtr handle = new WindowInteropHelper(this).Handle;
HwndSource.FromHwnd(handle).AddHook(new HwndSourceHook(WndProc));


protected override void OnActivated(EventArgs e)
{
    base.OnActivated(e);
    SetValue(IsNonClientActivePropertyKey, true);
}

protected override void OnDeactivated(EventArgs e)
{
    base.OnDeactivated(e);
    SetValue(IsNonClientActivePropertyKey, false);
}

private IntPtr WndProc(IntPtr hwnd, int msg, IntPtr wParam, IntPtr lParam, ref bool handled)
{
    if (msg == WindowNotifications.WM_NCACTIVATE)
        SetValue(IsNonClientActivePropertyKey, wParam == _trueValue);

    return IntPtr.Zero;
}
需要添加一个只读的IsNonClientActive依赖属性,ControlTemplate通过Trigger使边框置灰:
<Trigger Property="IsNonClientActive"
         Value="False">
    <Setter Property="BorderBrush"
            Value="#FF6F7785" />
</Trigger>
5. ResizeBorder的问题
5.1 ResizeBorder尺寸的问题

标准Window可以单击并拖动以调整窗口大小的区域为8像素(可以理解为SM_CXFRAME的4像素加上SM_CXPADDEDBORDER的4像素)。

WindowChrome实际大小就是看起来的大小,默认的ResizeBorderThickness是4像素,就是从Chrome的边框向内的4像素范围,再多就会影响client-area里各元素的正常使用。
由于标准Window的课拖动区域几乎在Window的外侧,而且有8个像素,而WindowChrome只能有4个像素,所以WindowChrome拖动起来手感没那么好。
5.2 拖动边框产生的性能问题
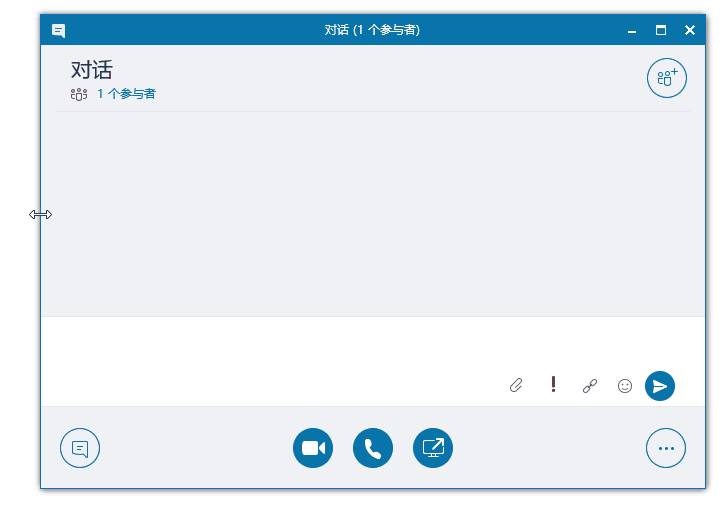
最后提一下WindowChrome的性能问题,正常操作我觉得应该没什么问题,只有拖动左右边缘尤其是左边缘改变Window大小的时候右边的边缘会很不和谐。其实这个问题不是什么大问题,看看这个空的什么都没有的Skype窗体都会这样,所以不需要特别在意。
6. 其它自定义Window的方案
在Kino.Toolkit.Wpf里我只提供了最简单的使用WindowChrome的方案,这个方案只能创建没有圆角的Window,而且不能自定义边框阴影颜色。如果真的需要更高的自由度可以试试参考其它方案。
6.1 VisualStudio
VisualStudio当然没有开源,但并不妨碍我们去参考它的源码。可以在以下DLL找到Microsoft.VisualStudio.PlatformUI.MainWindow:
X:Program Files (x86)Microsoft Visual Studio2017EnterpriseCommon7IDEMicrosoft.VisualStudio.Shell.UI.Internal.dll
6.2 FirstFloor.ModernUI
Modern UI for WPF (MUI),A set of controls and styles converting your WPF application into a great looking Modern UI app.
6.3 MahApps.Metro
MahApps.Metro
,A framework that allows developers to cobble together a Metro or Modern UI for their own WPF applications with minimal effort.
6.4 Fluent.Ribbon
Fluent.Ribbon is a library that implements an Office-like user interface for the Windows Presentation Foundation (WPF).
6.5 HandyControl
HandyControll是一套WPF控件库,它几乎重写了所有原生样式,同时包含50多款额外的控件,还提供了一些好看的Window。
6.6 Sakuno.UserInterface
Sakuno.UserInterface,A framework with some powerful tools that allows developers to build a WPF application in modern UI.
7. 参考
WindowChrome Class (System.Windows.Shell) Microsoft Docs
SystemParameters Class (System.Windows) Microsoft Docs
WPF Windows 概述 _ Microsoft Docs
GetSystemMetrics function Microsoft Docs
FlashWindowEx function Microsoft Docs
Window Class (System.Windows) Microsoft Docs
Inspect - Windows applications Microsoft Docs