在上一节我们已经可以成功连接上WIFI,连接上WIFI后就可以进行TCP通讯
项目地址:
https://github.com/SmartArduino/Doiting_BL/tree/master/examples/WIFI_CLIENT
下面来看看bl602作为TCP client与TCP server的通讯。 bl_iot sdk的socket就是bsd socket,常见的linux socket编程直接可以使用。但目前暂不支持poll api。
//TCP任务函数
static void tcp_client_conn(void *pvParameters){
    LOGI(TAG, "tcp_client_conn init");
    char re_hostbyname_cnt = 0;
    char databuff[512];
    memset(databuff, 0x00, sizeof(databuff));
    char sub_buf[200];
    memset(sub_buf, 0x00, sizeof(sub_buf));
    struct sockaddr_in server_addr;
    int client_fd = 0;
    struct hostent *server_host = NULL;
    while(1){
    if (!wifi_get_connect_status()) {
            // LOGI(TAG, "wifi disconnected!");
    vTaskDelay(1000 / portTICK_RATE_MS);
    continue;
    }
    client_fd = socket(AF_INET, SOCK_STREAM, 0);

    if (client_fd < 0) {
    LOGI(TAG, "create socket fail: %d", client_fd);
    vTaskDelay(1000 / portTICK_RATE_MS);
    continue;
    }

    memset(&server_addr, 0, sizeof(server_addr));
server_addr.sin_family = AF_INET;
//修改为你的服务器端口号
server_addr.sin_port = htons(80);
//修改为你的连接IP地址
    uint8_t upload_srv_ip[4] = {192, 168, 9, 146};

    memcpy(&server_addr.sin_addr.s_addr, upload_srv_ip, 4);
    re_hostbyname_cnt = 0;
    uint8_t sip[4];
    memcpy(sip, (void *)&server_addr.sin_addr.s_addr, 4);
    LOGI(TAG, "connectting server:(%d.%d.%d.%d)", sip[0], sip[1], sip[2], sip[3]);

    for (;;) {
                    //连接服务器
    if (connect(client_fd, (struct sockaddr *)&server_addr, sizeof(server_addr)) < 0) {
    LOGE(TAG, "client connect %d", client_fd);
    LOGI(TAG, "connect failed!");
    vTaskDelay(5000 / portTICK_RATE_MS);
    close(client_fd);
    break;
    }
    LOGI(TAG, "connect success!");
    g_client_fd = client_fd;

    const struct timeval timeout = { 10, 0 };
    setsockopt(client_fd, SOL_SOCKET, SO_RCVTIMEO, &timeout, sizeof(timeout));
    memset(sub_buf, 0x00, sizeof(sub_buf));
            //发送注册包
    sprintf(sub_buf, "hello");
    LOGI(TAG, "
subscribe buff: %s", sub_buf);
    send(client_fd, sub_buf, strlen(sub_buf), 0);

    b_start_keep_alive = true;
    //处理服务器发送的消息
    while (1) {
    memset(databuff, 0x00, sizeof(databuff));
    int len = recv(client_fd, databuff, sizeof(databuff), 0);
    if (len > 0) {
    LOGE(TAG, "recv: %s", databuff);
    }
    if (len == 0) {
    LOGE(TAG, "close fd %d", client_fd);
    break;
    }
    if (len < 0) {
    if (errno == EAGAIN || errno == EWOULDBLOCK || errno == EINTR) {
        ;
    } else {
    LOGE(TAG, "len < 0");
    break;
    }

    }
    close(client_fd);
    b_start_keep_alive = false;
    break;
    } //recv
    }
    while (1)
    {
    vTaskDelay(10000 / portTICK_RATE_MS);
    }
        }
在上节的wifi连接状态函数中添加创建TCP任务创建即可
/*
    wifi连接状态
 */
void wifi_event_handler(wifi_event_indicate_t event){
    switch (event)
    {
        case WIFI_EVENT_CONNECT:
            LOGE(TAG, "wifi_connect");
    //WIFI连接成功创建TCP任务
    if (!tcpc_task_handle) {
        if (xTaskCreate(tcp_client_conn, "tcp_client_conn", TCPC_TASK_SIZE, NULL, 2, &tcpc_task_handle) != pdPASS) {
            LOGE(TAG, "create tcp_client_conn fail");
        }
    }

            break;
        case WIFI_EVENT_DISCONNECT:
            LOGE(TAG, "wifi_disconnect");
            break;
        default:
            LOGE(TAG, "wifi_event: %d",event);
            break;
    }
}
在例程中根据你自己的TCP服务器修改IP地址和端口号,将程序编译好完成后烧录到模块,下面用TCP测试工具进行测试。

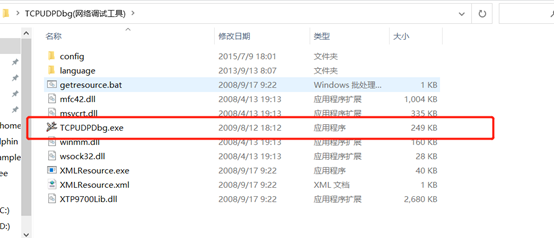
本例程所用到的TCP测试工具,下载地址:
http://bbs.doit.am/forum.php?mod=viewthread&tid=174&highlight=tcp
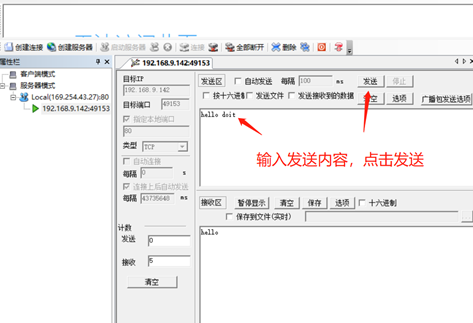
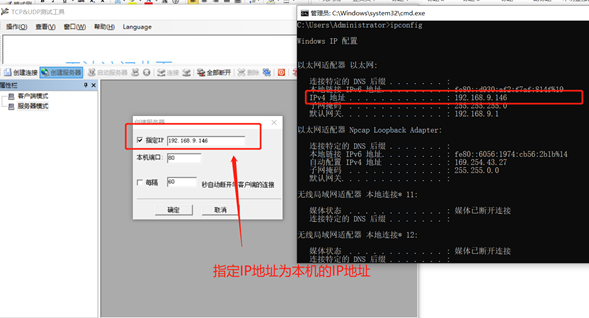
按win+R打开程序搜索,输入cmd按回车打开cmd窗口,输入ipconfig查看本地的IP地址,在调试工具中创建服务器,将IP地址指定为查看到的本机IP地址。
创建服务器后启动服务器
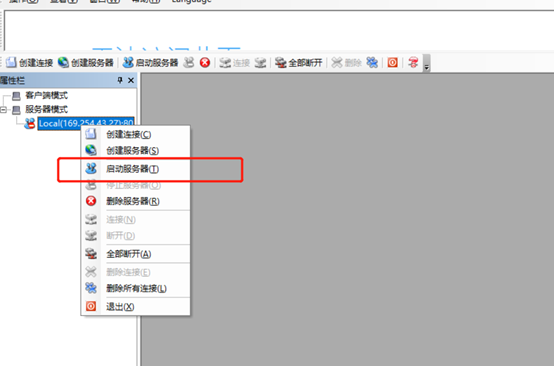
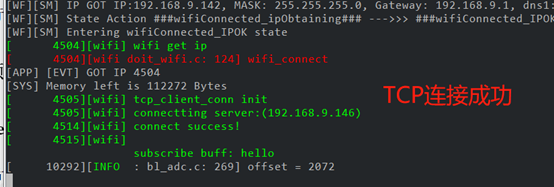
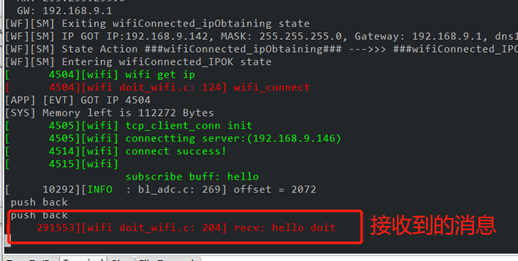
等待模块进行TCP连接,连接成功后会向服务器发送“hello”,串口会输出相关信息,同时在TCP调试工具中会出现一个新的连接。