Angular2以组件化的视角来看待web应用,使用Angular2开发的web应用,就是一棵组件树。组件大致分为两类:一类是如list、table这种通放之四海而皆准的通用组件,一类是专为业务开发的业务组件。实际开发中大部分时间我们都需要处理业务组件。对于SPA应用来说,一个通用的问题就是如何控制页面的切换,解决这个问题的通用方法就是利用路由器来实现。
路由配置
现在我们先撇开Angular2来看看通用的路由器模型。通常来讲SPA应用需要路由配置信息:
[
  { path: '', pathMatch: 'full', redirectTo: '/inbox' },
  {
    path: ':folder',
    children: [
      {
        path: '',
        component: ConversationsCmp
      },
      {
        path: ':id',
        component: ConversationCmp,
        children: [
          { path: 'messages', component: MessagesCmp },
          { path: 'messages/:id', component: MessageCmp }
        ]
      }
    ]
  },
  {
    path: 'compose',
    component: ComposeCmp,
    outlet: 'popup'
  },
  {
    path: 'message/:id',
    component: PopupMessageCmp,
    outlet: 'popup'
  }
]
这个配置信息定义了应用的潜在路由状态(Router State)。一个路由状态代表了一份组件布置信息。 现在我们换一个视角来看这份配置:
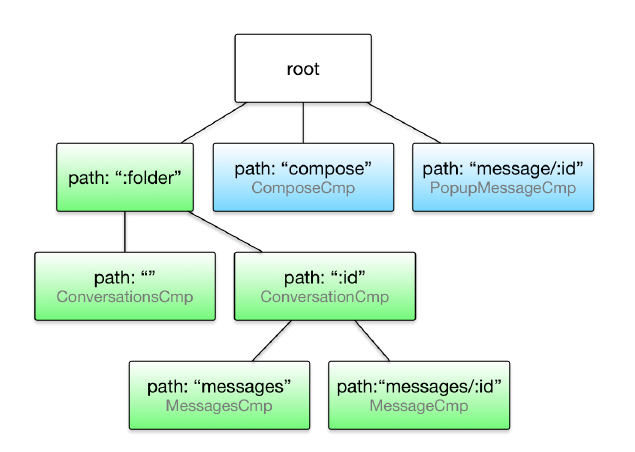
在这棵配置树中,每一个节点就是一个路由,它对应了一个组件。
路由状态
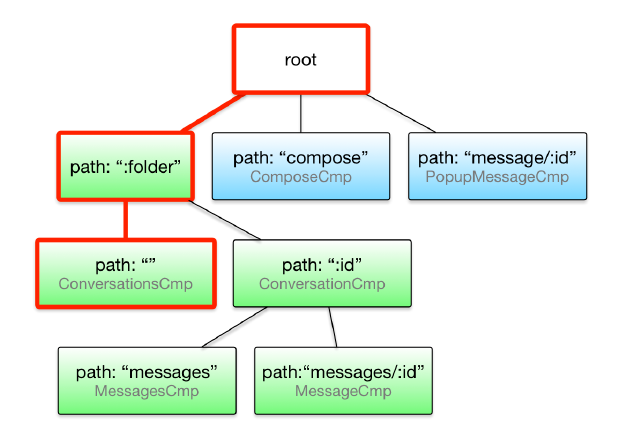
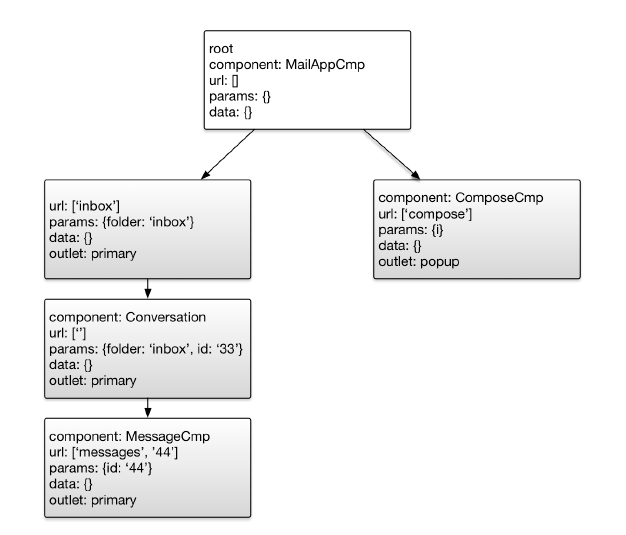
在路由树这种视角下,每一个路由状态就是配置树的一棵子树。下图中的路由状态下,最终被激活的组件是ConversationCmp:
导航
路由器的首要任务就是控制在不同路由状态之间导航以及更新组件树。如下图所示,当我们导航到另一个页面时,路由状态也会发生改变,随之页面上显示的组件也跟随变化。
到此为止路由器的基本模型已经介绍完毕,下面我们来看一下Angular2中的路由模型。
Angular2路由处理流程
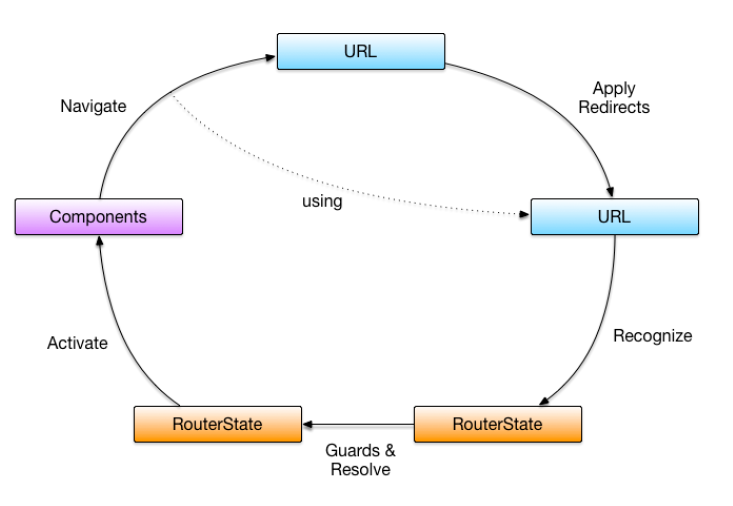
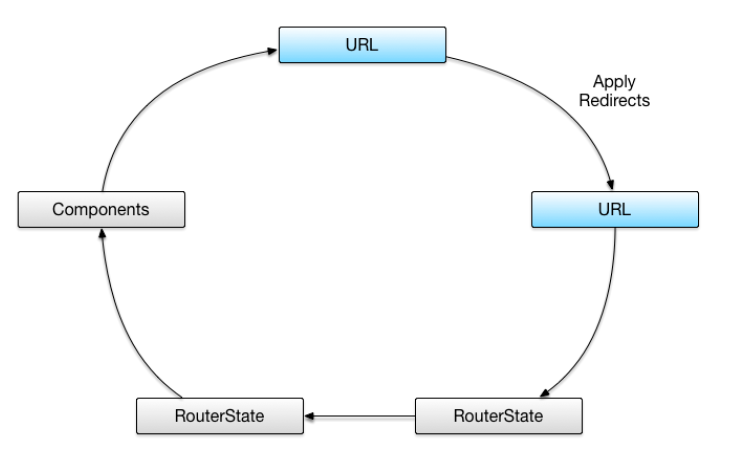
Angular2对待一个URL的处理流程为:
- 应用重定向
- 识别路由状态
- 应用哨兵与传递数据
- 激活对应组件
在所有步骤之前路由器要进行url格式解析,这部分内容不是本文重点,请大家自行查看其它资料。
重定向
假设我们访问的地址是:http://hostname/inbox/33/message/44。路由器首先根据配置规则:
{ path: ‘’, pathMatch: ‘full’, redirectTo: ‘/inbox’ }
来判断是否需要重定向,如果我们的url是http://hostname/此时,就是重定向到http://hostname/inbox,根据配置规则:folder,这时候被激活的组件就是ConversationComp。但现在我们的url是http://hostname/inbox/33/message/44,所以不会发生重定向。
识别路由状态

接下来路由器会为这个URL分发一个路由状态。根据配置规则
{
    path: ':folder',
    children: [
      {
        path: '',
        component: ConversationsCmp
      },
      {
        path: ':id',
        component: ConversationCmp,
        children: [
          { path: 'messages', component: MessagesCmp },
          { path: 'messages/:id', component: MessageCmp }
        ]
      }
    ]
  }
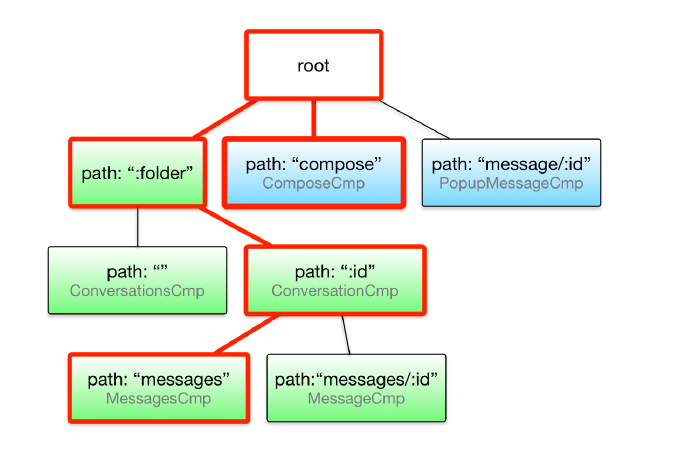
/inbox/33/message/44首先匹配:folder,对应组件为ConversationCmp,而后进入子配置,'message/:id',MessageCmp组件被激活。
根据上图的状态树,我们可以看出MessageCmp与ConversationCmp对应的路由状态。与此同时一个被称为激活路由(ActivatedRoute)的对象将被创建,并可以在MessageCmp访问到,通过ActivatedRoute我们可以拿到它的routerState属性,通过路由状态我们可以拿到具体参数如id对应的44。从此也可以看出拿到父级参数id(33)就必须访问父级的路由状态。
    ngOnInit() {
        this.sub = this.router.routerState.parent(this.route).params.subscribe(params => {
            this.parentRouteId = +params["id"];
        });
    }
哨兵与分发数据
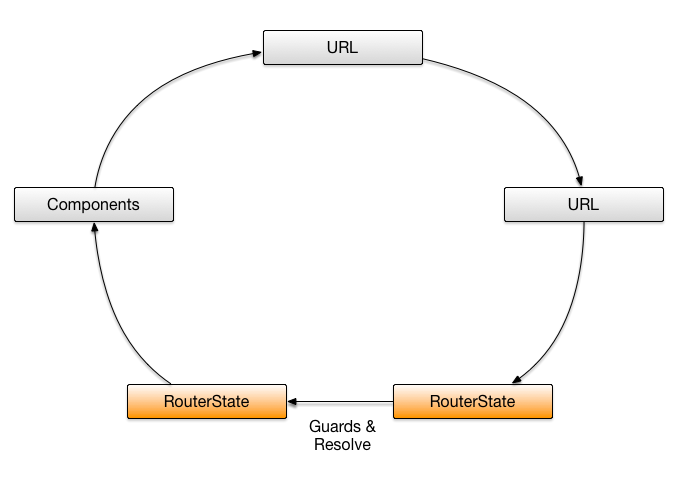
哨兵的作用是判断是否允许应用在不同状态间进行切换,比如:如果用户没有登陆就不允许进入Message页面。哨兵可以用来判断是否允许进入本路由状态,是否允许离开本路由状态。下例中的CanActivate用来判断是否允许进入,这个服务类需要继承CanActivate接口。
import { AuthGuard }                from '../auth-guard.service';

const adminRoutes: Routes = [
  {
    path: 'admin',
    component: AdminComponent,
    canActivate: [AuthGuard],
    children: [
      {
        path: '',
        children: [
          { path: 'crises', component: ManageCrisesComponent },
          { path: 'heroes', component: ManageHeroesComponent },
          { path: '', component: AdminDashboardComponent }
        ],
      }
    ]
  }
];

export const adminRouting: ModuleWithProviders = RouterModule.forChild(adminRoutes);
import { Injectable }     from '@angular/core';
import { CanActivate }    from '@angular/router';

@Injectable()
export class AuthGuard implements CanActivate {
  canActivate() {
    console.log('AuthGuard#canActivate called');
    return true;
  }
}
哨兵内容涉及到另一个部分知识,所以我会把他放到下一篇文章中。
Angular2的路由器允许我们在进入组件中拿到除当前路由参数之外的其他信息。在路由配置中使用resolve属性指定一个数据分发器。
[
  {
    path: ':folder',
    children: [
      {
        path: '',
        component: ConversationsCmp,
        resolve: {
          conversations: ConversationsResolver
        }
      }
    ]
  }
]
数据分发器需要继承DataResolver接口:
@Injectable()
class ConversationsResolver implements DataResolver {
  constructor(private repo: ConversationsRepo, private currentUser: User) {}

  resolve(route: ActivatedRouteSnapshot, state: RouteStateSnapshot):
      Promise<Conversation[]> {
    return this.repo.fetchAll(route.params['folder'], this.currentUser);
  }
}
还需要把这个数据分发器加入到module的Providers中:
@NgModule({
  //...
  providers: [ConversationsResolver],
  bootstrap: [MailAppCmp]
})
class MailModule {
}

platformBrowserDynamic().bootstrapModule(MailModule);
而后我们在组件中就可以通过ActivatedRoute来访问分发数据了。
@Component({
  template: `
    <conversation *ngFor="let c of conversations | async"></conversation>
  `
})
class ConversationsCmp {
  conversations: Observable<Conversation[]>;
  constructor(route: ActivatedRoute) {
    this.conversations = route.data.pluck('conversations');
  }
}
激活组件
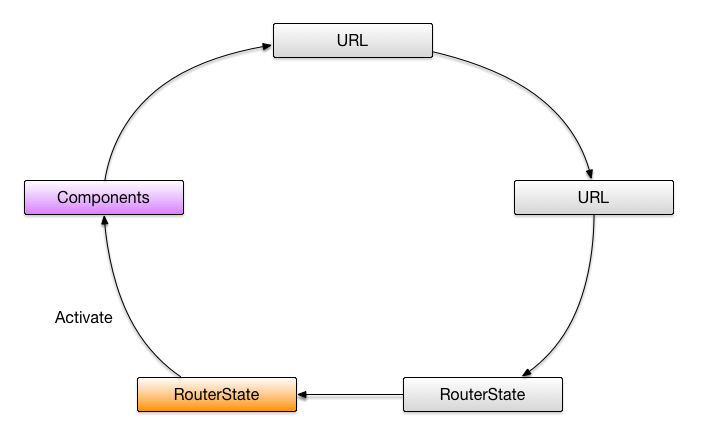
此时路由器根据路由状态来实例化组件并把他们放到合适的路由组出发点上。
@Component({
  template: `
    ...
    <router-outlet></router-outlet>
    ...
    <router-outlet name="popup"></router-outlet>
  `
})
class MailAppCmp {
}
如‘/inbox/33/message/44(popup:compose)’,首先实例化ConversationCmp放到主<router-outlet>中,然后实例化MessageCmp放到name为popup的<Router-outlet>中。
现在路由器对URL的解析过程完毕。但是如果用户想从MessageCmp中跳转到别的路由状态该如何做呢?Angular2提供了两种方式。
一种是通过router.navigate方法来导航:
@Component({...})
class MessageCmp {
  private id: string;
  constructor(private route: ActivatedRoute, private router: Router) {
    route.params.subscribe(_ => this.id = _.id);
  }

  openPopup(e) {
    this.router.navigate([{outlets: {popup: ['message', this.id]}}]).then(_ => {
      // navigation is done
    });
  }
}
一种是利用router-link方式:
@Component({
  template: `
    <a [routerLink]="['/', {outlets: {popup: ['message', this.id]}}]">Edit</a>
  `
})
class MessageCmp {
  private id: string;
  constructor(private route: ActivatedRoute) {
    route.params.subscribe(_ => this.id = _.id);
  }
}
参考资料:
http://stackoverflow.com/questions/34500147/angular-2-getting-routeparams-from-parent-component