opengl 计算机图形学 第三版 第二部分 第三章更多的绘图工具
3.1 概述
第2章中 我们绘图使用的是屏幕窗口的基础坐标系 以像素为单位
屏幕坐标从左下角x从0延伸到screenWidth-1 y从0向上延伸到screenHeight-1 只能使用非负的x和y
程序中用于描述对象几何信息 此过程为建模任务
在屏幕中如何将这个对象 按照一定比例显示出来 是一个观看的任务
使用最适合与手中问题的坐标系来描述对象,并且可以自动的缩放和平移图片,使得其能正确地在屏幕窗口中显示,这个描述对象的空间被称为世界坐标系(场景中的物体在实际世界中的坐标)。在合适的单位下,它就是数学中常用的笛卡尔xy坐标系。
世界窗口:在世界坐标系中定义一个对齐的矩形 (矩形的边与坐标轴平行) 不一定是屏幕
世界窗口指明了要绘制世界的哪一部分。对此可以理解为,任何在窗口中的部分需要被绘制,而窗口外的部分被裁减并不被绘制。 opengl会自动的裁减。
显示器的屏幕窗口上定义一个对齐的矩形的视口,不同于世界窗口 opengl会自动建立世界窗口和视口的变换(包括缩放和平移)。
对象在世界窗口中显示的部分会被自动的映射到视口中,也就是被映射到屏幕坐标中。
对齐的矩形作为窗口和视口(屏幕窗口)的形状原因:
1.矩形仅需要四个参数描述
2.检测一个点的位置(窗口内外) 很容易,可以简化裁减算法。
3.对齐的矩形为凸 简化绘制算法
4.通过一个窗口取看被绘制的物体, 并价格窗口中可见的快照放到显示器的视口中
采用窗口/视口的联合方式, 当两个口被指定时,coder可以编写一个算法,不考虑图片的大小和位置,所有潜在的操作(缩放、位置和裁减)都会自动完成,并将图片放到视口中去。
3.2世界窗口和视口
创建一个函数图像之后,并不知道 图像的位置和图像的大小,所以使用世界窗口就非常的重要
setWindow()用来建立世界窗口
setViewport()来建立视口
代码中涉及的坐标是在自然坐标系中操作的 例如x在-4.0~4.0 变化的 关键问题是如何缩放和平移不同的(x,y) 使得图像能在屏幕窗口中恰当的显示。
通过设置一个世界窗口和一个视口,并建立它们之间的一个合适的映射,就可以完成适当的平移和缩放。视口和窗口是coder 指定的对齐的矩形。
窗口为世界坐标系中
视口为屏幕窗口的一部分。

前者为世界窗口;后者为在屏幕中划出一部分区域为屏幕窗口,在其中再画出一部分为视口。
3.2.1 窗口到视口的映射
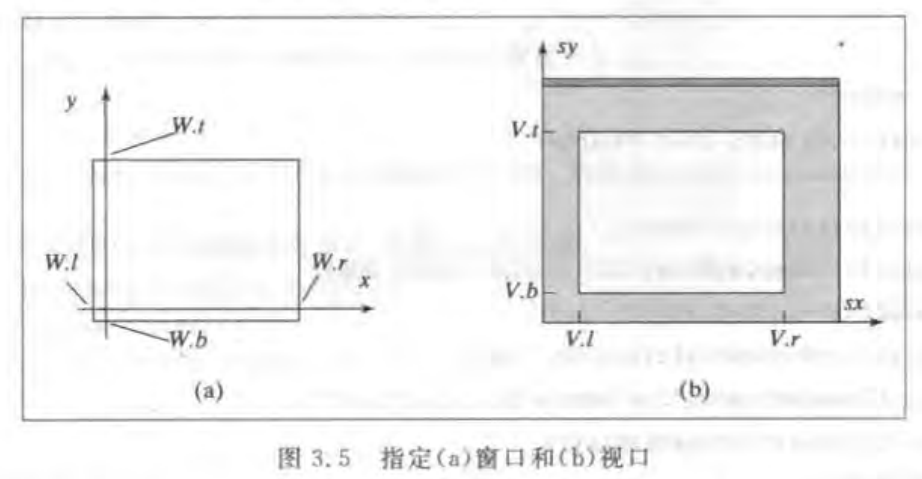
图中的w和v都是GLfloat类型的数值,代表作标值,其中left 和right为x轴的值 、 bottom和top为y轴的值,综合到一起成为了对齐的矩形
世界窗口和视口 纵横比不一定一致 如果不一致会导致图像的拉伸,所以需要调整世界窗口和视口的纵横比一致
一个映射或者变换,即窗口到视口的映射,这个映射是基于一个等式,对每一个在世界坐标下的点(x,y),产生屏幕坐标系中的一个点(sx,sy)。
保持比例的性质 有下面的线性性质:
sx=A*x+C
sy=B*y+D
其中A、B、C、D是常数, A B缩放x和y的坐标 而 C D用来平移它们。
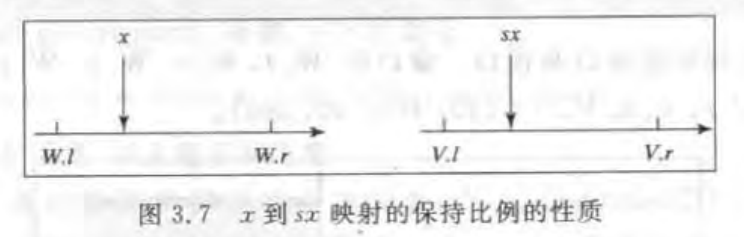


a 如果x是窗口的左边界 x=w.left 则sx为视口的左边界 sx=v.left
b 如果x是在窗口的右边界x=w.right,则sx是在视口的右边界 sx=v.right
c 对于某个比例f 如果x位于窗口的1/f处 则sx位于视口宽度的1/f处
d 如果x在窗口的左边界外 x<w.left 则sx也在视口的的左边界外 sx<v.left
设立窗口到视口的映射
opengl通过多个变换完成所需要的映射,自动的传送给定的每一个顶点 通过glVertex2*()命令
二维图形中,世界窗口由函数gluOrth2D()来设定 原型如下:
void gluOrtho2D(GLdouble left,GLdouble right,GLdouble bottom,GLdouble top);
三维的情况 还有另外两个参数需要设定 省略
视口的设定:
void glViewport(GLint x,GLint y,GLint width,GLint eight); 左下角的坐标以及宽度和高度
通过矩阵来完成所有的变换,因此gluOrtho2D()的调用必须在glMatrixModel(GL_PROJECTION)和glLoadIdentity()两个函数之后完成
所以建立窗口设视口之间的联系需要如下代码:
glMatrixModel(GL_PROJECTION;
glLoadIdentity();
gluOrtho2D(0.0,2.0,0.0,1.0); 设置窗口
glViewport(40,60,360,240); 设置视口
在此之后 每个使用glVertex2*(x,y)发送给opengl的点,会进行等式的映射,并且在窗口的边界处会被自动裁减掉边缘。
将设定窗口的函数放在setWindow()函数中 将glViewport() 放在setViewport函数中
void setWindow(GLdouble left,GLdouble right,GLdouble bottom,GLdouble top) 设置窗口
{
glMatrixModel(GL_PROJECTION);
glLoadIdentity();
gluOrtho2D(left,right,bottom,top);
}
void setViewport(GLint left,GLint right,GLint bottom,GLint top) 设置视口
{
glViewport(left,bottom,right-left,top-bottom);
}
(1)在main()中
glutInitWindowSize(640,480) 设置窗口大小
没有使用glViewport的命令 所以使用默认的视口,默认的视口就是整个屏幕窗口。
(2)在myInit()中
glMatrixModel(GL_PROJECTION);
glLoadIdentity();
gluOrtho2D(0.0,640.0,0.0,480.0); //关键的设置 与视口比较 以及纵横比
上面这些函数都是将世界窗口设置为对齐的矩形,其两个角的坐标是(0,0)和(640.0,480.0) 正好与视口的大小相等。
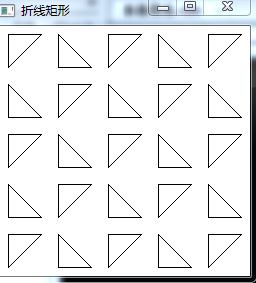
案例1:针对同一个图案,使用不同的视口,可以做到在屏幕窗口上的平铺
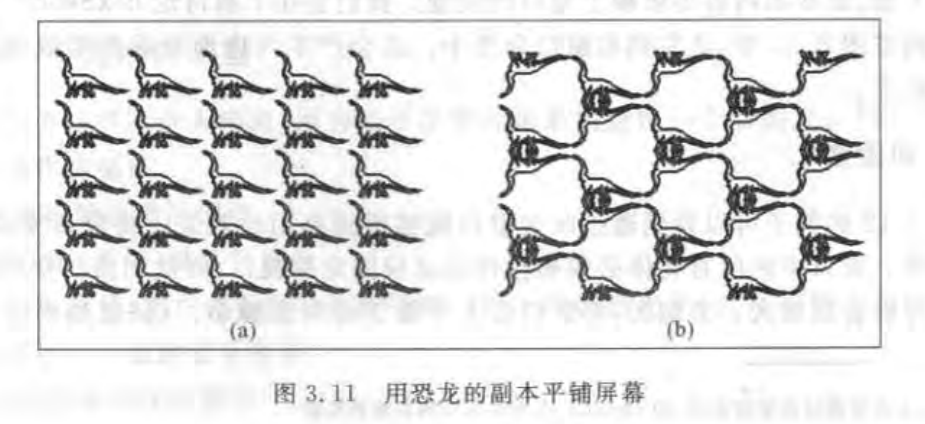
例如a所示的就是平铺
代码如下: 将恐龙替换成矩形 代码如下
setWindow(0,640.0,0,440.0)        //设置窗口
for(int i=0,i<5;i++)                     //每列
{
   for(int j=0;j<5;j++)                 //每行
    {
        glViewport(i*64,j*44,64,44)   //  视口的移动方向先第0列  再第1列 ...
        drawPolylineFile("dino.dat");//在绘制一遍
    }
}
其中dino.dat为折线的文件
//折线恐龙
#include <windows.h>
#include <gl/gl.h>
#include <gl/glu.h>
#include <gl/glut.h>
#include <iostream>
#include <math.h>
using namespace std;
const int screenWidth=250;
const int screenHeight=250;
void setWindow(GLdouble left,GLdouble right,GLdouble bottom,GLdouble top)        //设置窗口
{
    gluOrtho2D(left,right,bottom,top);//窗口到视口的转换
}
void setViewport(GLint left,GLint right,GLint bottom,GLint top)      //设置视口
{
    glViewport(left,bottom,right-left,top-bottom);
}
void myInit(void)
{
    glClearColor(1.0,1.0,1.0,0.0);              //背景颜色  白色    最亮
    glColor3f(0.0f,0.0f,0.0f);                  //线条颜色为黑色
    glPointSize(10.0);                           //点像素大小
    glMatrixMode(GL_PROJECTION);
    glLoadIdentity();
    setWindow(0,60.0,0,60.0);//设置世界坐标系中的窗口
}
void draw(void)             //画图函数
{
    glBegin(GL_LINE_LOOP);   //三角形的点
                glVertex2i(10,10);
                glVertex2i(10,50);
                glVertex2i(50,50);
    glEnd();
}
void myDisplay(void)    //注册函数
{
   glClear(GL_COLOR_BUFFER_BIT);
   for(int i=0;i<5;i++)
   {
      for(int j=0;j<5;j++)
      {
       glViewport(i*50,j*50,50,50);         //设置视口
       draw();
      }
   }
    glFlush();
}
int main(int argc,char ** argv)
{
    glutInit(&argc,argv);
    glutInitDisplayMode(GLUT_SINGLE|GLUT_RGB);
    glutInitWindowSize(screenWidth,screenHeight);
    glutInitWindowPosition(100,150);
    glutCreateWindow("折线矩形");
    glutDisplayFunc(myDisplay);
    myInit();
    glutMainLoop();
    return 0;
}
下图为执行效果图:

b图为交替倒置 产生的效果
判断i+j是偶数和奇数,然后倒转top和bottom的值 以实现视口的倒转
代码如下:
for(int i=0;i<5;i++)//列
{
    for(int j=0;j<5;j++)//行
    {
      if((i+j)%2==0)//i+j是偶数
        setWindow(0.0,640.0,0.0,440.0);//正常的世界窗口
      else //i+j为奇数
        setWindow(0.0,640.0,440.0,0.0);//颠倒的世界窗口
      glViewport(i*64,j*44,64,44);//设置下一个视口
      drawPloylineFile("dino.dat");//再次绘制
    }
}
完整代码如下
//折线恐龙
#include <windows.h>
#include <gl/gl.h>
#include <gl/glu.h>
#include <gl/glut.h>
#include <iostream>
#include <math.h>

using namespace std;

const int screenWidth=250;
const int screenHeight=250;

void setWindow(GLdouble left,GLdouble right,GLdouble bottom,GLdouble top)        //设置窗口
{
    glMatrixMode(GL_PROJECTION);                //以下这两句一定要从myInit函数中抽出放到此位置
    glLoadIdentity();
    gluOrtho2D(left,right,bottom,top);          //窗口到视口的转换
}
void setViewport(GLint left,GLint right,GLint bottom,GLint top)      //设置视口
{
    glViewport(left,bottom,right-left,top-bottom);
}

void myInit(void)
{
    glClearColor(1.0,1.0,1.0,0.0);              //背景颜色  白色    最亮
    glColor3f(0.0f,0.0f,0.0f);                  //线条颜色为黑色
    glPointSize(10.0);                          //点像素大小
}
void draw(void)                                 //画图函数
{
    glBegin(GL_LINE_LOOP);
                glVertex2i(10,10);
                glVertex2i(10,50);
                glVertex2i(50,50);

    glEnd();
}
void myDisplay(void)    //注册函数
{
   glClear(GL_COLOR_BUFFER_BIT);
   for(int i=0;i<5;i++)
   {
      for(int j=0;j<5;j++)
      {
        if((i+j)%2==0)//i+j是偶数
        setWindow(0.0,60.0,0.0,60.0);//正常的世界窗口
        else //i+j为奇数
        setWindow(0.0,60.0,60.0,0.0);//颠倒的世界窗口
        glViewport(i*50,j*50,50,50); //设置视口
        draw();
      }
   }
    glFlush();
}
int main(int argc,char ** argv)
{
    glutInit(&argc,argv);
    glutInitDisplayMode(GLUT_SINGLE|GLUT_RGB);
    glutInitWindowSize(screenWidth,screenHeight);
    glutInitWindowPosition(100,150);
    glutCreateWindow("折线矩形");
    glutDisplayFunc(myDisplay);
    myInit();
    glutMainLoop();
    return 0;
}
执行结果的图片
裁减图片的某部分
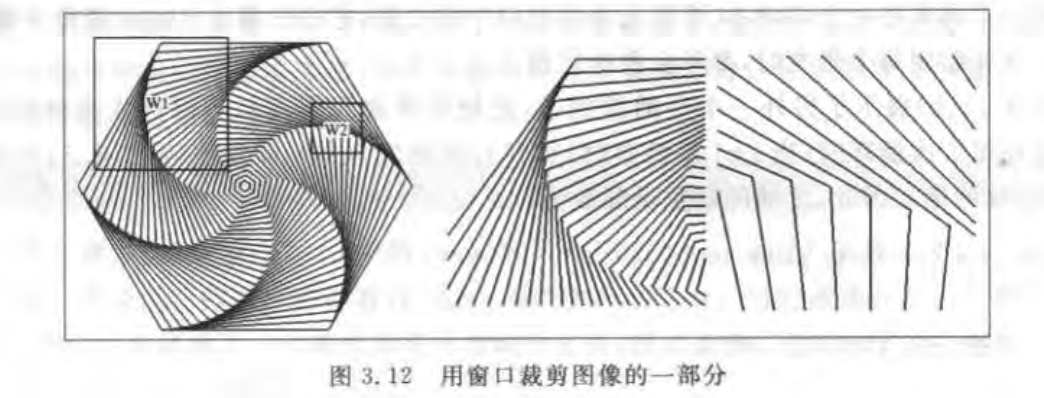
视口不变,改变世界窗口 用以显示不同的图案
上例中w1 和w2两个不同的窗口 视口不变,当使用w1时屏幕视口中显示的是w1中所裁切出的图案,而使用w2时则屏幕显示的是w2中裁切出的图案。
代码框架如下:
setWindow(...);       //每张图片都改变窗口
setViewport(...);     //每张图片使用同样的视口
hexSwirl();             //调用同样的画图函数
坐标系统绘制
//画笛卡尔坐标系

#include <windows.h>
#include <gl/gl.h>
#include <gl/glu.h>
#include <gl/glut.h>
#include <iostream>
#include <math.h>

using namespace std;

const int screenWidth=1024;
const int screenHeight=768;

void setWindow(GLdouble left,GLdouble right,GLdouble bottom,GLdouble top)
{
    glMatrixMode(GL_PROJECTION);
    glLoadIdentity();
    gluOrtho2D(left,right,bottom,top);
}

void setViewport(GLint left,GLint right,GLint bottom,GLint top)
{
    glViewport(left,bottom,right-left,top-bottom);
}

void drawpolygon(void)
{
    setWindow(0,screenWidth,0,screenHeight);
    setViewport(0,screenWidth,0,screenHeight);
    glClear(GL_COLOR_BUFFER_BIT);
    glBegin(GL_POINTS);
        for(int x=0;x<=screenWidth;x++)
        glVertex2i(x,screenHeight/2);
        for(int y=0;y<=screenHeight;y++)
        glVertex2i(screenWidth/2,y);
    glEnd();
    glFlush();
}
void myInit(void)
{
    glClearColor(1.0,1.0,1.0,0.0);
    glColor3f(0.0f,0.0f,0.0f);
    glPointSize(3.0);
}

int main(int argc,char ** argv)
{
    glutInit(&argc,argv);
    glutInitDisplayMode(GLUT_SINGLE|GLUT_RGB);
    glutInitWindowSize(screenWidth,screenHeight);
    glutInitWindowPosition(100,150);
    glutCreateWindow("画坐标系");
    glutDisplayFunc(drawpolygon);
    myInit();
    glutMainLoop();
    return 0;
}
画六边形:
//画笛卡尔坐标系中的六边形
#include <windows.h>
#include <gl/gl.h>
#include <gl/glu.h>
#include <gl/glut.h>
#include <iostream>
#include <math.h>
using namespace std;

typedef struct point{
GLdouble x;
GLdouble y;
}point;

const int screenWidth=500;
const int screenHeight=500;
const int N=6;
point sp[N];
point temp;     //全局变量
double pi=3.1415926;
double theta=2*pi/N;
double r=150;

void moveto(GLdouble x,GLdouble y)  //设置当前的笔触到坐标点
{
    temp.x=x;
    temp.y=y;
}

void lineto(GLdouble x,GLdouble y)//从当前的点画线到指定的坐标点  两点间的连线
{
    glBegin(GL_LINES);
        glVertex2d(temp.x,temp.y);
        glVertex2d(x,y);
    glEnd();
    //glFlush();
    temp.x=x;   //重新设置当前虚拟笔触的坐标值
    temp.y=y;
}

void setWindow(GLdouble left,GLdouble right,GLdouble bottom,GLdouble top)   //设置窗口
{
    glMatrixMode(GL_PROJECTION);
    glLoadIdentity();
    gluOrtho2D(left,right,bottom,top);
}
void setViewport(GLint left,GLint right,GLint bottom,GLint top) //设置视口
{
    glViewport(left,bottom,right-left,top-bottom);
}
int drawpolygon(struct point  p[],GLdouble theta,GLdouble r)//注意传递的参数   接收的参数
{
    setWindow(0,screenWidth,0,screenHeight);
    setViewport(0,screenWidth,0,screenHeight);
    glClear(GL_COLOR_BUFFER_BIT);
    glBegin(GL_POINTS);
        for(int x=0;x<=screenWidth;x++)       //画坐标系
        glVertex2i(x,screenHeight/2);
        for(int y=0;y<=screenHeight;y++)
        glVertex2i(screenWidth/2,y);
        for(int i=0;i<N;i++)
        {
            double x=r*cos(i*theta)+screenWidth/2;  //计算六个点的坐标   并画出
            double y=r*sin(i*theta)+screenHeight/2;
            glVertex2i(x,y);
           p[i].x=x;
           p[i].y=y;
        }
    glEnd();
    for(int i=0;i<N;i++)                    //画线循环
    {
        moveto(sp[i].x,sp[i].y);    //利用全局变量   来画六边形
        lineto(sp[(i+1)%6].x,sp[(i+1)%6].y);//取模算余数
    }
    glFlush();
    return 0;
}
void mydisplay(void)                //注册的函数
{
    //
    drawpolygon(sp,theta,r);

}
void myInit(void)
{
    glClearColor(1.0,1.0,1.0,0.0);
    glColor3f(0.0f,0.0f,0.6f);
    glPointSize(6.0);
}
int main(int argc,char ** argv)
{
    glutInit(&argc,argv);
    glutInitDisplayMode(GLUT_SINGLE|GLUT_RGB);
    glutInitWindowSize(screenWidth,screenHeight);
    glutInitWindowPosition(100,150);
    glutCreateWindow("画六边形");
    glutDisplayFunc(mydisplay);
    myInit();
    glutMainLoop();
    return 0;
}
结果如下:

多个六边形
//多六边形
#include <windows.h>
#include <gl/gl.h>
#include <gl/glu.h>
#include <gl/glut.h>
#include <iostream>
#include <math.h>
using namespace std;

typedef struct point{
GLdouble x;
GLdouble y;
}point;

const int screenWidth=500;
const int screenHeight=500;
const int N=6;
point sp[N];
point temp;     //全局变量
double pi=3.1415926;
double theta=2*pi/N;
double r=240;

void moveto(GLdouble x,GLdouble y)  //设置当前的笔触到坐标点
{
    temp.x=x;
    temp.y=y;
}

void lineto(GLdouble x,GLdouble y)//从当前的点画线到指定的坐标点  两点间的连线
{
    glBegin(GL_LINES);
        glVertex2d(temp.x,temp.y);
        glVertex2d(x,y);
    glEnd();
    //glFlush();
    temp.x=x;   //重新设置当前虚拟笔触的坐标值
    temp.y=y;
}

void setWindow(GLdouble left,GLdouble right,GLdouble bottom,GLdouble top)   //设置窗口
{
    glMatrixMode(GL_PROJECTION);
    glLoadIdentity();
    gluOrtho2D(left,right,bottom,top);
}
void setViewport(GLint left,GLint right,GLint bottom,GLint top) //设置视口
{
    glViewport(left,bottom,right-left,top-bottom);
}
int drawpolygon(struct point  p[],GLdouble tempt,GLdouble tempr)//注意传递的参数   接收的参数
{
    //setWindow(0,screenWidth,0,screenHeight);
    //setViewport(0,200,0,200);

    glBegin(GL_POINTS);
        //for(int x=0;x<=screenWidth;x++)       //画坐标系
        //glVertex2i(x,screenHeight/2);
        //for(int y=0;y<=screenHeight;y++)
        //glVertex2i(screenWidth/2,y);
        for(int i=0;i<N;i++)
        {
            double x=tempr*cos(i*tempt)+screenWidth/2;  //计算六个点的坐标   并画出
            double y=tempr*sin(i*tempt)+screenHeight/2;
            glVertex2i(x,y);
            p[i].x=x;
            p[i].y=y;
        }
    glEnd();
   for(int i=0;i<N;i++)                    //画线循环
    {
        moveto(sp[i].x,sp[i].y);    //利用全局变量   来画六边形
        lineto(sp[(i+1)%6].x,sp[(i+1)%6].y);//取模算余数
    }
   // for(int j=0;j<N;j++)

    return 0;
}
void mydisplay(void)                //注册的函数
{
    glClear(GL_COLOR_BUFFER_BIT);
    setWindow(0,screenWidth,0,screenHeight);
    setViewport(0,screenWidth,0,screenHeight);
    while(r>0)                   //循环画六边形
        drawpolygon(sp,theta,r-=10);
    glFlush();
    cout<<sp[1].x<<endl;
}
void myInit(void)
{
    glClearColor(1.0,1.0,1.0,0.0);
    glColor3f(0.0f,0.0f,0.6f);
    glPointSize(3.0);
}
int main(int argc,char ** argv)
{
    glutInit(&argc,argv);
    glutInitDisplayMode(GLUT_SINGLE|GLUT_RGB);
    glutInitWindowSize(screenWidth,screenHeight);
    glutInitWindowPosition(100,150);
    glutCreateWindow("画六边形");
    glutDisplayFunc(mydisplay);
    myInit();
    glutMainLoop();
    return 0;
}
结果:

缩放和漫游
将窗口变小则用于放大对象 相反窗口变大 相当于对象缩小。
有时候漫游也叫全视
在动画中放大图片
同心的多个窗口 固定的纵横比 窗口逐渐缩小 形成动画,每个窗口中显示的图片都是一帧 此过程类似与放大图像
绘制每一帧 都需要清一次屏幕 同时窗口越来越小 代码如下:
动画1:
float cx=0.3,cy=0.2;//窗口中心
float H,W=1.2, aspect=0.7;//窗口性质
set the viewport    //设置视口
for(int frame=0;frame<NumFrames;frame++)//循环显示每一帧图像
{
    clear the screen       //每次循环都清除之前的图案
    W*=0.7;
    H=W*aspect;          //保持纵横比
    setWindow(cx-W,cx+W,cy-H,cy+H);//设置下一个窗口
    hexSwirl();
}
动画2:
动画1的方式存在的问题
过程如下:
迅速擦除当前的图像;然后新图像被缓慢的重绘,因为仅仅有一个图像的缓存
解决上面问题的方法就是在用户浏览当前图像时,在一个“屏幕外内存”的地方绘制新的图像,然后将新图像显示在显示器上。
opengl提供了双缓存来完成任务,使用一个内存来模拟一个额外的屏幕,这个屏幕不显示在真实的显示器上,并所有的绘制都在这个缓存中进行。之后glutSwapBuufers()函数会将缓存中的图片转移到屏幕窗口上。
设置单缓存:glutInitDisplayModel(GLUT_SINGLE | GLUT_RGB);
设置成双缓存:glutInitDisplayModel(GLUT_DOUBLE | GLUT_RGB);
练习:3.2.2回旋的旋涡
3.3 裁减线
图形学中的基本任务,用于保持对象在给定的区域外的部分不被绘制
opengl环境中,每个对象都会被一个特殊的算法,自动的裁减到世界窗口 裁减器
3.3.1裁减一条线
cohen-sutherland 裁减器 计算p1和p2两个端点的线段的哪一部分位于世界窗口之内,并返回位于世界窗口内的部分的端点
函数 int clipSegment(Point2& p1,Point2& p2,RealRect window) 参数为两个二维的点以及一个对齐的矩形
功能为将p1和p2为端点的线段裁减到窗口边界处。如果线段的某一部分位于窗口内,则将新的端点存放在p1 和p2中,并且函数返回1,说明线段的某些部分是可见的。如果这条线温泉被裁减掉了,函数返回0,说明没有任何部分可见。
案例1:

典型的裁减器的情况 : clipsegment()函数对每条线段执行下列事件中的一件。
1.如果整条线段都在窗口内(例如线段cd) 函数返回1
2.整条线段在窗口外 例如线段AB 函数返回0
3.一个端点在窗口外,一个在窗口内 例如ED 函数将一个端点裁减 设置新的端点 然后返回1
4.两个端点都在窗口外, 但是此线段的一部分位于窗口内 例如线段AE 函数将裁减两个端点 并返回1
还有可能线段位于窗口的左侧 右侧 上面或者下面等等。
为了判断线段的位置 并且做出相应的裁减 cohen-sutherland提供了一个快速的分治算法。
3.3.2 cohen-sutherland裁减算法
平凡接受和平凡拒绝两种常见情况

图中的AB整个线段位于窗口内 因此AB被平凡的接受,而不需要裁减, 窗口很大时,大部分情况都是平凡接受。
图中CD整个线段 两个端点都位于W的另一条边外,则线段CD整个都在窗口外 此时CD就是平凡的拒绝。 窗口很小时,大部分情况都是平凡拒绝。
检测平凡接受或者平凡拒绝
仅仅检测端点即可

对线段的每一个端点计算一个“窗口内部/外部编码”,用于后续的测试。
四个编码的位置信息从左到右分别为 left above right below 分别代表 在左面 上面 下面 右面;
t代表true f代表false
如果点在窗口内部,则编码表示为FFFF;
下图为点与窗口的位置关系 的9种可能性
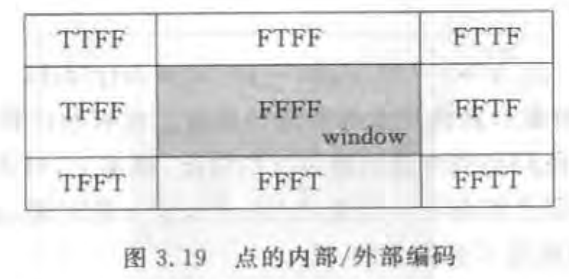
平凡接受:两个码字都是FFFF;
平凡拒绝:两个码字在某一位元素上都是T 两个点都是在窗口左边,或者都在它上面,等等
使用c/c++的位操作函数 可以实现码字的计算和测试。
没有平凡接受和拒绝时的截断
如果没有平凡接受或者拒绝时,此线段一定会被某个边界分成两个部分
do
{
设置p1 和p2的码字;
if(平凡接受) return 1;
if(平凡拒绝) return 0;
将线段在下一个窗口边界处截断;(重新设置p1或p2端点的位置)丢掉外面的部分;
}while(1);
最多四次循环就会终止,针对每个点 对齐矩形的四条边都会进行检测 所以需要四次循环。也就会出现平凡接受或者平凡拒绝的情况。

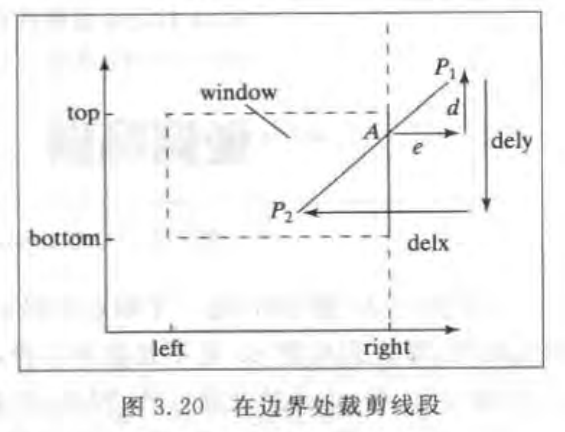
已知:p1和p2的坐标x和y w.right
未知:A点的x=w.right y=p1.y-d
d/dely=e/delx
delx=p2.x-p1.x;.........1
dely=p2.y-p1.y;........2
e=p1.x-w.right;.........3
由1 2 3可以计算出d的值 由此就可以计算出A点的y值
所以新p1.y (点A)
p1.y+=(w.right-p1.x)*dely/delx
剩余的窗口的三个边界的裁减方法类似。
对于水平的线 dely=0 ;对于垂直的线 delx=0; 分母为0的情况不会发生
伪代码2:
int clipSegment(Point & p1,Point2& p2,RealRect W)
{

    do{
       if(平凡接受) return 1;
       if(平凡拒绝) return 0;
       if(p1在窗口外面)
       {
            if(p1在窗口左边)   用左边界截断,更新p1;
            else if(p1在窗口右边) 用右边界截断,更新p1;
            else if(p1在窗口下面) 用下边界截断,更新p1;
            else if(p1在窗口上面) 用上边界截断,更新p1;
       }
        else //p2在窗口外面
        {
            if(p2在窗口左边)   用左边界截断,更新p2;
            else if(p2在窗口右边) 用右边界截断,更新p2;
            else if(p2在窗口下面) 用下边界截断,更新p2;
            else if(p2在窗口上面) 用上边界截断,更新p2;
        }
    }while(1);
}
每次执行循环时,每个端点的码字都会被重新计算和测试,每次都会对平凡接受和拒绝进行检测 ,如果失败,算法会检测p1是否在窗口外,如果p1在窗口内,那么p2一定在窗口外,针对在窗口外的点进行按边裁减。
裁减的顺序为左,右,下,上。
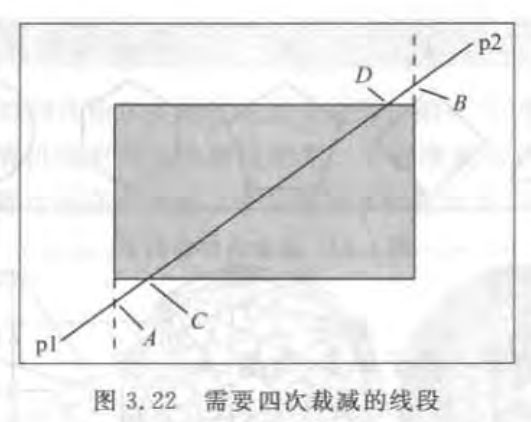
第一次:p1变为A
第二次:p2变为B
第三次:A变为C
第四次: B变为D
练习:3.3.1 手工模拟clipSegment (略)
3.3.2 除以0的情况永远不会发生。
3.4正多边形、圆和圆弧
3.4.1正多边形
所有边相等 内角相等 且边只能在端点处接触,称n条边的正多边形为正n边形。顶点等距离排放

半径为R的外接圆的圆心位于远点,而第一个点p0位于x轴的正方向,其它的顶点位于下面等式指定的位置:pi=(R*cos(i*a),R*sin(i*a)), i=1,2...5
其中a=2π/6=π/3。
1.如果圆心的坐标为(x,y),只要在上式中坐标中分别加上x和y即可。
2.如果将正六边形缩放S倍,只需要将R乘上S。
3.旋转只需要在cos和sin函数的参数中增加A即可
3.4.2正n边形的变种
将正n边形中的各个顶点均相连 会得到花环
花环.cpp
//绘制sinc函数
#include <windows.h>
#include <iostream>
#include <math.h>
#include <gl/GL.h>
#include <gl/GLU.h>
#include <gl/GLUT.h>


class GLintPoint        //点类
{
public:
    GLint x,y;
};

class Point2            //线段端点类
{
public:
    float x,y;
    void set(float dx,float dy){x=dx;y=dy;}     //内联函数     且重载
    void set(Point2 &p){x=p.x;y=p.y;}           //内联函数     重载    设置端点
    Point2(float xx,float yy){x=xx,y=yy;}       //构造函数   非默认
    Point2(){x=y=0;}                            //默认构造函数
};
Point2 currPos;                     //定义两个端点类的对象
Point2 CP;

void moveTo(Point2 p)              //移动当前的虚拟笔触   到一个端点
{
    CP.set(p);                      //设置当前点的坐标
}

void lineTo(Point2 p)               //从当前点的位置cp     到参数给定的点划线
{
    glBegin(GL_LINES);
        glVertex2f(CP.x,CP.y);
        glVertex2f(p.x,p.y);
    glEnd();
    glFlush();
    CP.set(p);                  //***重新设置当前的点  cp
}
//myInit
void myInit(void)           //初始化  窗口的个参数    背景颜色    线条颜色  以及宽度等等
{
    glClear(GL_COLOR_BUFFER_BIT);
    glClearColor(1.0,1.0,1.0,0.0);
    glColor3f(0.0f,0.0f,1.0f);
}

void rosette(int N,float radius)        //触发的画图函数    参数为点数 和 半径值
{
    Point2 * pointlist=new Point2[N];       //创建数组用来存储线段的端点
    GLfloat theta=(2.0f*3.1415926536)/N;    //360度除以点数   算出角度数
    for(int c=0;c<N;c++)
    {
        pointlist[c].set(radius*sin(theta*c),radius*cos(theta*c));//计算每个点的x和y值   并且填入对象数组
    }
    for(int i=0;i<N;i++)//将数组中的所有点都连接起来
    {
        for(int j=0;j<N;j++)
        {
            moveTo(pointlist[i]);
            lineTo(pointlist[j]);
        }

    }
}

void render()//渲染
{
    glClear(GL_COLOR_BUFFER_BIT);//清除背景颜色
    glViewport(10,10,600,600);      //设置视口 *****  x,y    width   height
    rosette(10,.50f);            //画图    实参传送
    glFlush();                  //传送给opengl
}
//main
int main(int argc,char ** argv)
{
    glutInit(&argc,argv);
    glutInitDisplayMode(GLUT_SINGLE|GLUT_RGB);
    glMatrixMode(GL_PROJECTION);
    glLoadIdentity();
    glutInitWindowSize(600,600);
    glutCreateWindow("rosette");
    glutDisplayFunc(render);
    myInit();
    glutMainLoop();
    return 0;
}
特例: 5花环 的特性
体现很多黄金分割率φ
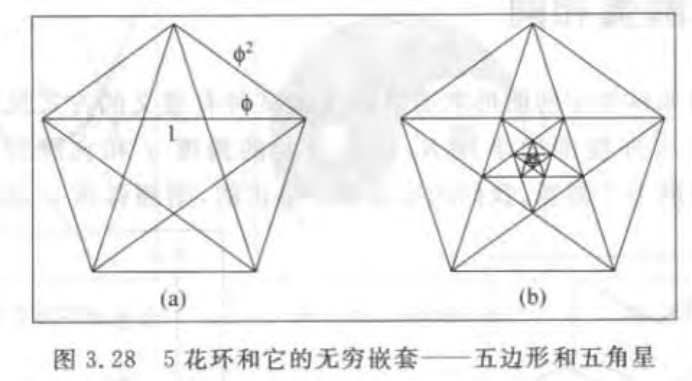
每条线段要比短于它的线段长φ倍,而且由于五角星的边又构成了一个内五边形,可以实现一个无穷的嵌套。
例子:3.4.2基于两个同心多边形的图形
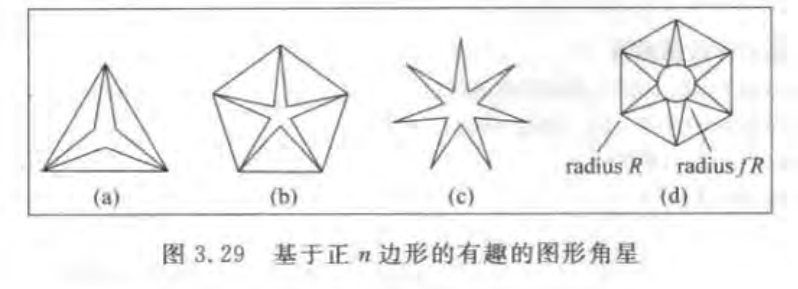
外半径是R,内半径是fR ,f是某个因子。每个图都使用了一个正n边形的变种,其半径在内径和外径之间交替。
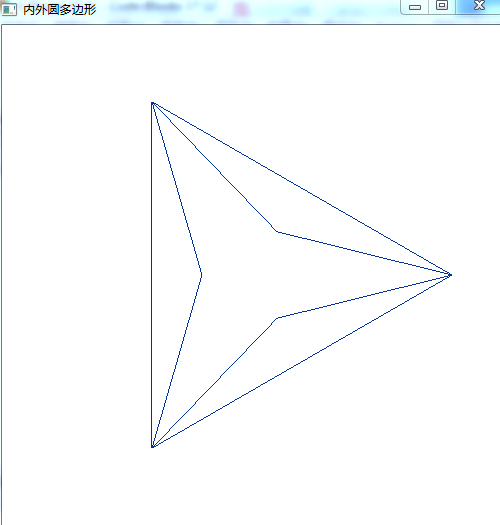
图3.29a 代码示例:
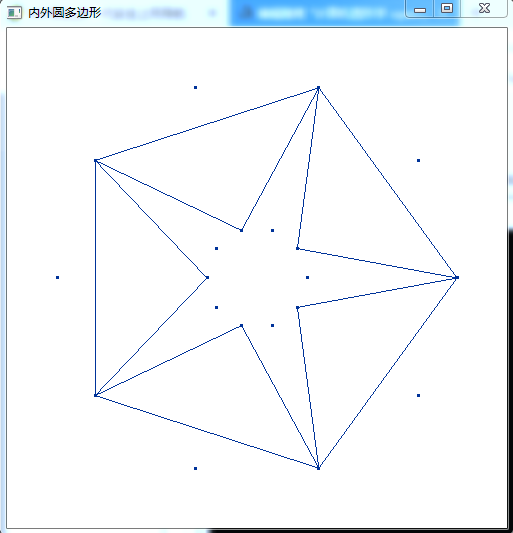
//3.2.9图a

#include <windows.h>
#include <gl/gl.h>
#include <gl/glu.h>
#include <gl/glut.h>
#include <iostream>
#include <math.h>

using namespace std;

const int N=6;
const double pi=3.1415926;
const double theta=2*pi/N;
const double R=200;
const double r=50;
const double screenWidth=500;
const double screenHeight=500;

class point
{
  public:
    GLdouble x;
    GLdouble y;
    void setp(GLdouble _x,GLdouble _y){x=_x;y=_y;};

};
point sp;
void moveTo(GLdouble x,GLdouble y)
{
   sp.setp(x,y);
}
void lineTo(GLdouble x,GLdouble y)
{
    glBegin(GL_LINES);
        glVertex2d(sp.x,sp.y);
        glVertex2d(x,y);
    glEnd();
    sp.x=x;
    sp.y=y;
}
void photo(void)
{
    class point p1[6];
    class point p2[6];
    glClear(GL_COLOR_BUFFER_BIT);
    glBegin(GL_POINTS);
    for(int i=0;i<N;i++)
    {
        GLdouble Rx=R*cos(i*theta)+screenWidth/2;
        GLdouble Ry=R*sin(i*theta)+screenHeight/2;
        p1[i].x=Rx;
        p1[i].y=Ry;
        GLdouble rx=r*cos(i*theta)+screenWidth/2;
        GLdouble ry=r*sin(i*theta)+screenHeight/2;
        p2[i].x=rx;
        p2[i].y=ry;
        glVertex2d(p1[i].x,p1[i].y);
        glVertex2d(p2[i].x,p2[i].y);
    }
    glEnd();
   for(int i=0;i<N;i+=2)
    {
        moveTo(p1[i].x,p1[i].y);
        lineTo(p1[(i+2)%N].x,p1[(i+2)%N].y);

    }
    for(int i=0;i<N;i+=2)
    {
        moveTo(p1[i].x,p1[i].y);
        lineTo(p2[(i+1)%N].x,p2[(i+1)%N].y);
        moveTo(p2[i+1].x,p2[i+1].y);
        lineTo(p1[(i+2)%N].x,p1[(i+2)%N].y);
    }
    glFlush();
}
void myInit(void)
{
    glClearColor(1.0,1.0,1.0,0.0);      //background color
    glColor3f(0.0f,0.2f,0.6f);          //point color
    glPointSize(3.0);
    glMatrixMode(GL_PROJECTION);
    glLoadIdentity();
    gluOrtho2D(0.0,500,0.0,500);
}
int main(int argc,char ** argv)
{
    glutInit(&argc,argv);
    glutInitDisplayMode(GLUT_SINGLE|GLUT_RGB);
    glutInitWindowPosition(0,0);
    glutInitWindowSize(500,500);
    glutCreateWindow("内外圆多边形");
    glutDisplayFunc(photo);
    myInit();
    glutMainLoop();
    return 0;
}
结果
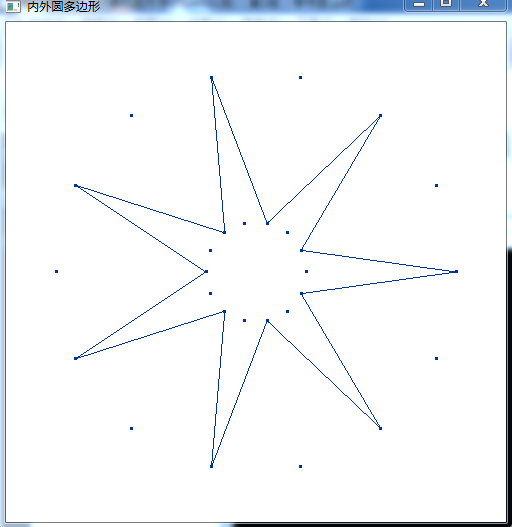
3.2.9图B 仅将a图代码中的N改为10即可
//3.2.9图b

#include <windows.h>
#include <gl/gl.h>
#include <gl/glu.h>
#include <gl/glut.h>
#include <iostream>
#include <math.h>

using namespace std;

const int N=10;
const double pi=3.1415926;
const double theta=2*pi/N;
const double R=200;
const double r=50;
const double screenWidth=500;
const double screenHeight=500;

class point
{
  public:
    GLdouble x;
    GLdouble y;
    void setp(GLdouble _x,GLdouble _y){x=_x;y=_y;};

};
point sp;
void moveTo(GLdouble x,GLdouble y)
{
   sp.setp(x,y);
}
void lineTo(GLdouble x,GLdouble y)
{
    glBegin(GL_LINES);
        glVertex2d(sp.x,sp.y);
        glVertex2d(x,y);
    glEnd();
    sp.x=x;
    sp.y=y;
}
void photo(void)
{
    class point p1[N];
    class point p2[N];
    glClear(GL_COLOR_BUFFER_BIT);
    glBegin(GL_POINTS);
    for(int i=0;i<N;i++)
    {
        GLdouble Rx=R*cos(i*theta)+screenWidth/2;
        GLdouble Ry=R*sin(i*theta)+screenHeight/2;
        p1[i].x=Rx;
        p1[i].y=Ry;
        GLdouble rx=r*cos(i*theta)+screenWidth/2;
        GLdouble ry=r*sin(i*theta)+screenHeight/2;
        p2[i].x=rx;
        p2[i].y=ry;
        glVertex2d(p1[i].x,p1[i].y);
        glVertex2d(p2[i].x,p2[i].y);
    }
    glEnd();
   for(int i=0;i<N;i+=2)
    {
        moveTo(p1[i].x,p1[i].y);
        lineTo(p1[(i+2)%N].x,p1[(i+2)%N].y);

    }
    for(int i=0;i<N;i+=2)
    {
        moveTo(p1[i].x,p1[i].y);
        lineTo(p2[(i+1)%N].x,p2[(i+1)%N].y);
        moveTo(p2[i+1].x,p2[i+1].y);
        lineTo(p1[(i+2)%N].x,p1[(i+2)%N].y);
    }
    glFlush();
}
void myInit(void)
{
    glClearColor(1.0,1.0,1.0,0.0);      //background color
    glColor3f(0.0f,0.2f,0.6f);          //point color
    glPointSize(3.0);
    glMatrixMode(GL_PROJECTION);
    glLoadIdentity();
    gluOrtho2D(0.0,500,0.0,500);
}
int main(int argc,char ** argv)
{
    glutInit(&argc,argv);
    glutInitDisplayMode(GLUT_SINGLE|GLUT_RGB);
    glutInitWindowPosition(0,0);
    glutInitWindowSize(500,500);
    glutCreateWindow("内外圆多边形");
    glutDisplayFunc(photo);
    myInit();
    glutMainLoop();
    return 0;
}
代码结果
3.29图c 修改N 去掉外框线
//3.2.9图c

#include <windows.h>
#include <gl/gl.h>
#include <gl/glu.h>
#include <gl/glut.h>
#include <iostream>
#include <math.h>

using namespace std;

const int N=14;
const double pi=3.1415926;
const double theta=2*pi/N;
const double R=200;
const double r=50;
const double screenWidth=500;
const double screenHeight=500;

class point
{
  public:
    GLdouble x;
    GLdouble y;
    void setp(GLdouble _x,GLdouble _y){x=_x;y=_y;};

};
point sp;
void moveTo(GLdouble x,GLdouble y)
{
   sp.setp(x,y);
}
void lineTo(GLdouble x,GLdouble y)
{
    glBegin(GL_LINES);
        glVertex2d(sp.x,sp.y);
        glVertex2d(x,y);
    glEnd();
    sp.x=x;
    sp.y=y;
}
void photo(void)
{
    class point p1[N];
    class point p2[N];
    glClear(GL_COLOR_BUFFER_BIT);
    glBegin(GL_POINTS);
    for(int i=0;i<N;i++)
    {
        GLdouble Rx=R*cos(i*theta)+screenWidth/2;
        GLdouble Ry=R*sin(i*theta)+screenHeight/2;
        p1[i].x=Rx;
        p1[i].y=Ry;
        GLdouble rx=r*cos(i*theta)+screenWidth/2;
        GLdouble ry=r*sin(i*theta)+screenHeight/2;
        p2[i].x=rx;
        p2[i].y=ry;
        glVertex2d(p1[i].x,p1[i].y);
        glVertex2d(p2[i].x,p2[i].y);
    }
    glEnd();
     for(int i=0;i<N;i+=2)
    {
        moveTo(p1[i].x,p1[i].y);
        lineTo(p2[(i+1)%N].x,p2[(i+1)%N].y);
        moveTo(p2[i+1].x,p2[i+1].y);
        lineTo(p1[(i+2)%N].x,p1[(i+2)%N].y);
    }
    glFlush();
}
void myInit(void)
{
    glClearColor(1.0,1.0,1.0,0.0);      //background color
    glColor3f(0.0f,0.2f,0.6f);          //point color
    glPointSize(3.0);
    glMatrixMode(GL_PROJECTION);
    glLoadIdentity();
    gluOrtho2D(0.0,500,0.0,500);
}
int main(int argc,char ** argv)
{
    glutInit(&argc,argv);
    glutInitDisplayMode(GLUT_SINGLE|GLUT_RGB);
    glutInitWindowPosition(0,0);
    glutInitWindowSize(500,500);
    glutCreateWindow("内外圆多边形");
    glutDisplayFunc(photo);
    myInit();
    glutMainLoop();
    return 0;
}
结果图
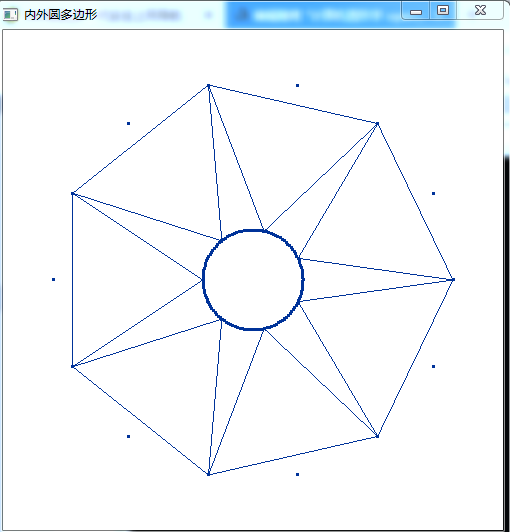
3.29图d 多加上一个画内圆的代码段
//3.2.9图c

#include <windows.h>
#include <gl/gl.h>
#include <gl/glu.h>
#include <gl/glut.h>
#include <iostream>
#include <math.h>

using namespace std;

const int N=14;
const double pi=3.1415926;
const double theta=2*pi/N;
const double R=200;
const double r=50;
const double screenWidth=500;
const double screenHeight=500;

class point
{
  public:
    GLdouble x;
    GLdouble y;
    void setp(GLdouble _x,GLdouble _y){x=_x;y=_y;};

};
point sp;
void moveTo(GLdouble x,GLdouble y)
{
   sp.setp(x,y);
}
void lineTo(GLdouble x,GLdouble y)
{
    glBegin(GL_LINES);
        glVertex2d(sp.x,sp.y);
        glVertex2d(x,y);
    glEnd();
    sp.x=x;
    sp.y=y;
}
void photo(void)
{
    class point p1[N];
    class point p2[N];
    glClear(GL_COLOR_BUFFER_BIT);
    glBegin(GL_POINTS);
    for(int i=0;i<N;i++)
    {
        GLdouble Rx=R*cos(i*theta)+screenWidth/2;
        GLdouble Ry=R*sin(i*theta)+screenHeight/2;
        p1[i].x=Rx;
        p1[i].y=Ry;
        GLdouble rx=r*cos(i*theta)+screenWidth/2;
        GLdouble ry=r*sin(i*theta)+screenHeight/2;
        p2[i].x=rx;
        p2[i].y=ry;
        glVertex2d(p1[i].x,p1[i].y);
        glVertex2d(p2[i].x,p2[i].y);
    }
    glEnd();
   for(int i=0;i<N;i+=2)//画外框
    {
        moveTo(p1[i].x,p1[i].y);
        lineTo(p1[(i+2)%N].x,p1[(i+2)%N].y);

    }
    for(int i=0;i<N;i+=2)//画内角
    {
        moveTo(p1[i].x,p1[i].y);
        lineTo(p2[(i+1)%N].x,p2[(i+1)%N].y);
        moveTo(p2[i+1].x,p2[i+1].y);
        lineTo(p1[(i+2)%N].x,p1[(i+2)%N].y);
    }
    //画内圆
    glBegin(GL_POINTS);
    for(double i=0.0;i<=2*pi;i+=0.05)
        glVertex2d(r*cos(i)+screenWidth/2,r*sin(i)+screenHeight/2);
    glEnd();
    glFlush();
}
void myInit(void)
{
    glClearColor(1.0,1.0,1.0,0.0);      //background color
    glColor3f(0.0f,0.2f,0.6f);          //point color
    glPointSize(3.0);
    glMatrixMode(GL_PROJECTION);
    glLoadIdentity();
    gluOrtho2D(0.0,500,0.0,500);
}
int main(int argc,char ** argv)
{
    glutInit(&argc,argv);
    glutInitDisplayMode(GLUT_SINGLE|GLUT_RGB);
    glutInitWindowPosition(0,0);
    glutInitWindowSize(500,500);
    glutCreateWindow("内外圆多边形");
    glutDisplayFunc(photo);
    myInit();
    glutMainLoop();
    return 0;
}
练习3.4.1
3.4.2证明
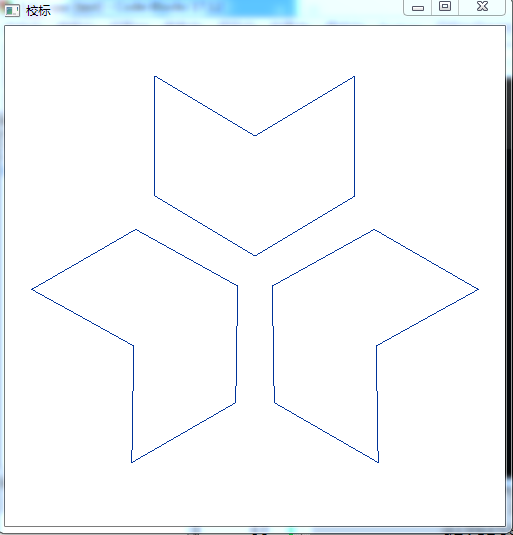
图片3.30 某大学的标志
给定一点
//3.4.3  校标

#include <windows.h>
#include <gl/gl.h>
#include <gl/glu.h>
#include <gl/glut.h>
#include <iostream>
#include <math.h>

using namespace std;

const double screenWidth=500;
const double screenHeight=500;

int j=0;//声明一个全局变量

class point
{
  public:
    GLdouble x;
    GLdouble y;
    void setp(GLdouble _x,GLdouble _y){x=_x;y=_y;};
};
void photo(void)
{
    point p[6]; //定义对象数组  并且初始化
    p[0].x=0;
    p[0].y=20;
    p[1].x=-100;
    p[1].y=80;
    p[2].x=-100;
    p[2].y=200;
    p[3].x=0;
    p[3].y=140;
    p[4].x=100;
    p[4].y=200;
    p[5].x=100;
    p[5].y=80;
    int N=3;
    double pi=3.1415926;
    double theta=2*pi/N;
    //开始画图
    glClear(GL_COLOR_BUFFER_BIT);
    for(int j=0;j<3;j++)        //j定义为全局变量    否则不能通过编译
    {
        glBegin(GL_LINE_LOOP);
          for(int i=0;i<6;i++)

            glVertex2d((cos(theta*j)*p[i].x-sin(theta*j)*p[i].y)+screenWidth/2,(sin(theta*j)*p[i].x+cos(theta*j)*p[i].y)+screenHeight/2);
        glEnd();
    }
    glFlush();
}
void myInit(void)
{
    glClearColor(1.0,1.0,1.0,0.0);      //background color
    glColor3f(0.0f,0.2f,0.6f);          //point color
    glPointSize(3.0);
    glMatrixMode(GL_PROJECTION);
    glLoadIdentity();
    gluOrtho2D(0.0,500,0.0,500);
}
int main(int argc,char ** argv)
{
    glutInit(&argc,argv);
    glutInitDisplayMode(GLUT_SINGLE|GLUT_RGB);
    glutInitWindowPosition(0,0);
    glutInitWindowSize(500,500);
    glutCreateWindow("校标");
    glutDisplayFunc(photo);
    myInit();
    glutMainLoop();
    return 0;
}
3.4.3 绘制圆与圆弧
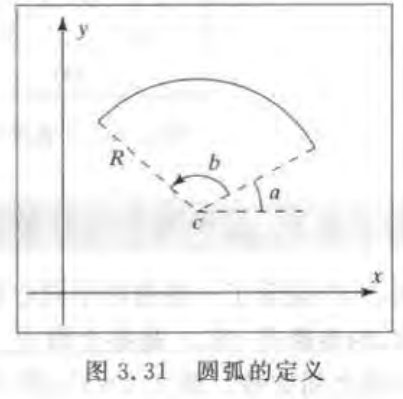
圆心:c
半径:R
开始角度:a
展开角度:b
b为负值 则顺时针画图
b为正值 则逆时针画图
展开的角度是360度
drawCirlce() 通过指定圆心和半径来绘制,还有其他的方法来描述圆,常见的方式是:
1.已知圆心以及一个院上的点。 利用圆心以及一个圆上的点 计算两点的距离即半径
2.给定圆必须经过的三个点。 三个不共线的点可以唯一确定一个圆
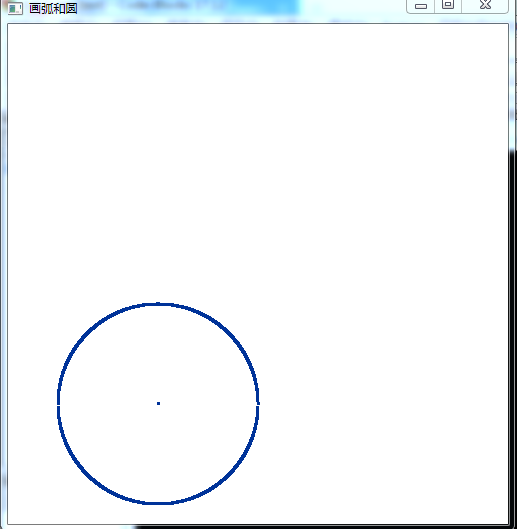
画圆案例2
//3.4.3  圆外切

#include <windows.h>
#include <gl/gl.h>
#include <gl/glu.h>
#include <gl/glut.h>
#include <iostream>
#include <math.h>

using namespace std;

const double screenWidth=500;
const double screenHeight=500;

class point
{
  public:
    GLdouble x;
    GLdouble y;
    void setp(GLdouble _x,GLdouble _y){x=_x;y=_y;};
};
void photo(void)
{
    double r=100;
    double x;
    int w=150;
    int h=120;
    glClear(GL_COLOR_BUFFER_BIT);
        glBegin(GL_POINTS);
        for(x=-100;x<100;x+=0.05)
        {
         glVertex2d(x+w,sqrt(r*r-x*x)+h);
         glVertex2d(x+w,-sqrt(r*r-x*x)+h);
        }
        glVertex2d(w,h);
        glEnd();
    glFlush();
}
void myInit(void)
{
    glClearColor(1.0,1.0,1.0,0.0);      //background color
    glColor3f(0.0f,0.2f,0.6f);          //point color
    glPointSize(3.0);
    glMatrixMode(GL_PROJECTION);
    glLoadIdentity();
    gluOrtho2D(0.0,500,0.0,500);
}
int main(int argc,char ** argv)
{
    glutInit(&argc,argv);
    glutInitDisplayMode(GLUT_SINGLE|GLUT_RGB);
    glutInitWindowPosition(0,0);
    glutInitWindowSize(500,500);
    glutCreateWindow("画弧和圆");
    glutDisplayFunc(photo);
    myInit();
    glutMainLoop();
    return 0;
}
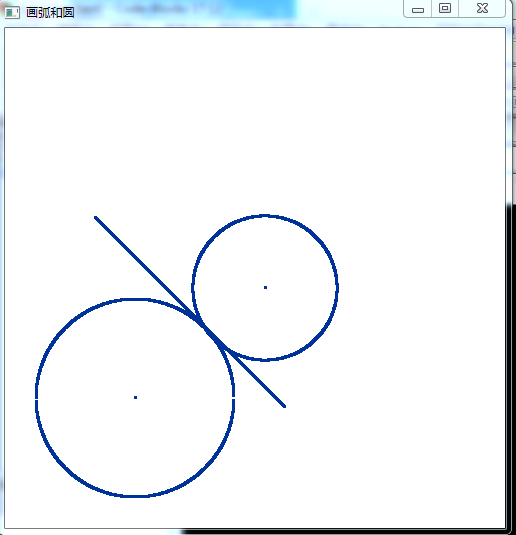
画圆案例3
//3.4.3  圆外切   给定一个两个圆心  和两个圆的交点    画两个圆和一条切线

#include <windows.h>
#include <gl/gl.h>
#include <gl/glu.h>
#include <gl/glut.h>
#include <iostream>
#include <math.h>

using namespace std;

const double screenWidth=500;
const double screenHeight=500;
int w=80;//位移
int h=80;
class point
{
  public:
    GLdouble x;
    GLdouble y;
    void setp(GLdouble _x,GLdouble _y){x=_x;y=_y;};
};

double getr(point p1,point p2)//获取半径的平方
{
    double r=sqrt((p1.x-p2.x)*(p1.x-p2.x)+(p1.y-p2.y)*(p1.y-p2.y));
    return r;
}
void line(point p1,point p2)//p1为圆心,p2为圆上点   直线过p2点
{
    double k,b;
    k=-(p2.x-p1.x)/(p2.y-p1.y);
    b=p2.y-k*p2.x;
    glBegin(GL_POINTS);
        for(double x=10;x<200;x++)
        glVertex2d(x+w,k*x+b+h);
    glEnd();
}
void photo(point p1,point p2)    //根据两个点画圆   p1为圆心   p2为圆上的点
{
    double r=getr(p1,p2);
    double x;

    glBegin(GL_POINTS);
        for(x=p1.x-r;x<=p1.x+r;x+=0.05)
        {
            glVertex2d(x+w,sqrt(r*r-(x-p1.x)*(x-p1.x))+p1.y+h);
            glVertex2d(x+w,-sqrt(r*r-(x-p1.x)*(x-p1.x))+p1.y+h);
        }
        glVertex2d(p1.x+w,p1.y+h);
    glEnd();
 }
 void mydisplay(void)
 {
    class point p1;//初始化 三个对象
    p1.x=50;
    p1.y=50;
    point p2;
    p2.x=120;
    p2.y=120;
    point p3;
    p3.x=180;
    p3.y=160;
    glClear(GL_COLOR_BUFFER_BIT);
        photo(p1,p2);
        photo(p3,p2);
        line(p1,p2);
    glFlush();
 }
void myInit(void)
{
    glClearColor(1.0,1.0,1.0,0.0);      //background color
    glColor3f(0.0f,0.2f,0.6f);          //point color
    glPointSize(3.0);
    glMatrixMode(GL_PROJECTION);
    glLoadIdentity();
    gluOrtho2D(0.0,500,0.0,500);
}
int main(int argc,char ** argv)
{
    glutInit(&argc,argv);
    glutInitDisplayMode(GLUT_SINGLE|GLUT_RGB);
    glutInitWindowPosition(0,0);
    glutInitWindowSize(500,500);
    glutCreateWindow("画弧和圆");
    glutDisplayFunc(mydisplay);
    myInit();
    glutMainLoop();
    return 0;
}
执行结果:
3.4.4曲线的逐次细化
逐次细化一个简单的曲线,可以递归形成非常复杂的曲线。 例如koch曲线 逐渐逼近真实的曲线
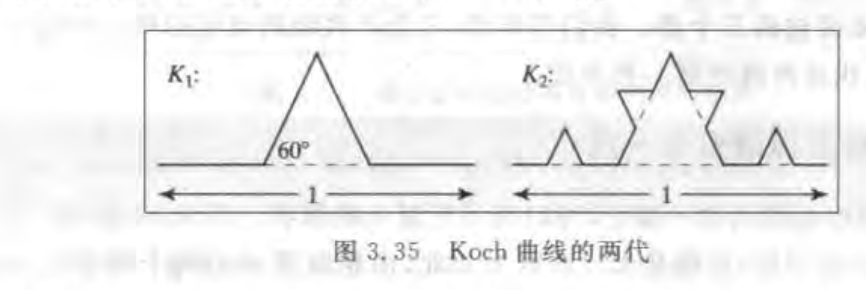
将kn的每一条线段平均分为3的段,然后将中间的那段用一个等边三角形来提高代替,采用递归的方式,每一线段的长度变为原来的4/3,所以总的曲线长度也是它上一代的4/3.因此kn的总长度为(4/3)的n次幂。
3.5曲线的参数形式
描述曲线的形状主要有两种方法:
隐式法和参数形式
隐式法:使用函数f(x,y)来描述曲线 并且提供xy之间的关系
点在曲线上的条件:f(x,y)=0
一类曲线 曲线的内部和外部是有意义的,此种情况下 f(x,y)也被叫做内部-外部函数 其意义是:
f(x,y)=0 对应所有在曲线上的点 (x,y)
f(x,y)>0 对所有在曲线外的点(x,y)
f(x,y)<0 对所有在曲线内的点(x,y)
曲线对x是单值 那么 g(x)对于每一个x 仅有一个g(x) 可以写成f(x,y)=y-g(x)
曲线对y是单值, 存在函数h() 使得曲线上的所有点满足x=h(y)
还有对于x和y都不是单值的:f(x,y)=0 不能写成y=g(x) 或者 x=h(y)的形式 可以表示成:
y=+-根号下(r^2-x^2) 这里为两个函数 一个是正号,另一个是负号
3.5.1曲线的参数形式
当参数取不同值的时候,会产生出曲线上不同的点。推荐使用 以时间t的运动轨迹
粒子沿着曲线运动的路径由两个函数x()和y()来确定,如果是三维 则有三个函数 x() y() z() 他们确定粒子在时刻t的位置。
参数t通常被看作是时间,而曲线本身就是粒子随着时间在某一个区间内的变化所经过的点。
通常证明隐式形式和参数形式相同 将参数形式带入隐式形式即可 即从参数形式求隐式形式
3.5.2 绘制参数形式
根据p(t)=(x(t),y(t)) 其中t从0变化到T 我们只需要用非常紧凑的间隔采集p(t)的样本 然后连接成折线 近似的逼近曲线
时间数组 t[i] i=0 1 2 3...
glBegin(GL_LINES);
    for(int i=0;i<n;i++)
    glVertex2f(x(t[i]),y(t[i]));
glEnd();
案例绘制椭圆
glBegin(GL_LINES);
    for(double t=0;t<2*pi;t+=2*pi/n)//将2pi   n等分  越细分曲线越光滑
    glVertex2f(W*cos(t),H*sin(t));
glEnd();
3.5.4 样例曲线代码
//3.4.3  圆外切   给定一个两个圆心  和两个圆的交点    画两个圆和一条切线

#include <windows.h>
#include <gl/gl.h>
#include <gl/glu.h>
#include <gl/glut.h>
#include <iostream>
#include <math.h>

using namespace std;

const double screenWidth=500;
const double screenHeight=500;
int w=180;//位移
int h=80;
const double pi=3.141592;
const int n=360;


 void mydisplay(void)
 {
    glClear(GL_COLOR_BUFFER_BIT);
      glBegin(GL_LINE_LOOP);
      for(double t=0.0;t<2*pi;t+=2*pi/n)
        glVertex2d(w*cos(t)+screenWidth/2,h*sin(t)+screenHeight/2);
      glEnd();
    glFlush();
 }

void myInit(void)
{
    glClearColor(1.0,1.0,1.0,0.0);      //background color
    glColor3f(0.0f,0.2f,0.6f);          //point color
    glPointSize(3.0);
    glMatrixMode(GL_PROJECTION);
    glLoadIdentity();
    gluOrtho2D(0.0,500,0.0,500);
}
int main(int argc,char ** argv)
{
    glutInit(&argc,argv);
    glutInitDisplayMode(GLUT_SINGLE|GLUT_RGB);
    glutInitWindowPosition(0,0);
    glutInitWindowSize(500,500);
    glutCreateWindow("画椭圆");
    glutDisplayFunc(mydisplay);
    myInit();
    glutMainLoop();
    return 0;
}
执行结果

3.5.5 画图
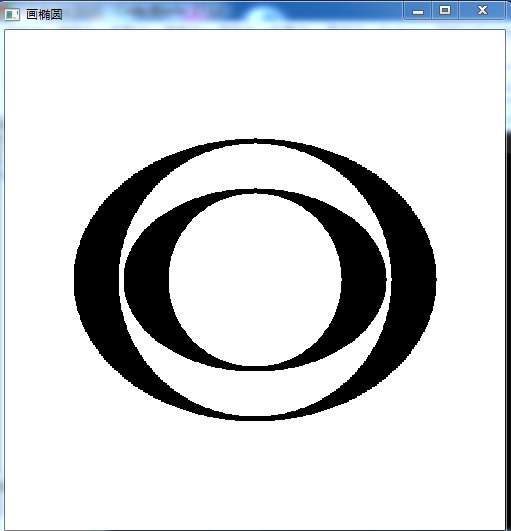
//3.4.3  圆外切   给定一个两个圆心  和两个圆的交点    画两个圆和一条切线

#include <windows.h>
#include <gl/gl.h>
#include <gl/glu.h>
#include <gl/glut.h>
#include <iostream>
#include <math.h>

using namespace std;

const double screenWidth=500;
const double screenHeight=500;
int w=180;//位移
int h=140;
const float f=h/w;
double d=0.5;
double t=d*f;


const double pi=3.141592;
const int n=360;
const float color1[3]={1.0,1.0,1.0};
const float color2[3]={0.0,0.0,0.0};
void drawEllipse(int w,int h,const float * clr)//画圆并填充
{
    if(w!=h)
    {
        glBegin(GL_POINTS);
        for(;w>0&&h>0;w-=d,h-=t)
       {
            glColor3f(clr[0],clr[1],clr[2]);
            for(double t=0.0;t<2*pi;t+=2*pi/n)
            glVertex2d(w*cos(t)+screenWidth/2,h*sin(t)+screenHeight/2);
        }
        glEnd();
    }

    if(w==h)
    {
        glBegin(GL_POINTS);
        for(;w>0&&h>0;w-=d)
        {
            glColor3f(clr[0],clr[1],clr[2]);
            for(double t=0.0;t<2*pi;t+=2*pi/n)
            glVertex2d(w*cos(t)+screenWidth/2,w*sin(t)+screenHeight/2);
        }
        glEnd();
    }
}
 void mydisplay(void)
 {
    glClear(GL_COLOR_BUFFER_BIT);
        drawEllipse(w,h,color2);
        drawEllipse(h-5,h-5,color1);
        drawEllipse(h-10,h-50,color2);
        drawEllipse(h-55,h-55,color1);
    glFlush();
 }

void myInit(void)
{
    glClearColor(1.0,1.0,1.0,0.0);      //background color
    glPointSize(3.0);
    glMatrixMode(GL_PROJECTION);
    glLoadIdentity();
    gluOrtho2D(0.0,500,0.0,500);
}
int main(int argc,char ** argv)
{
    glutInit(&argc,argv);
    glutInitDisplayMode(GLUT_SINGLE|GLUT_RGB);
    glutInitWindowPosition(0,0);
    glutInitWindowSize(500,500);
    glutCreateWindow("画椭圆");
    myInit();
    glutDisplayFunc(mydisplay);
    glutMainLoop();
    return 0;
}
执行结果
3.5.3极坐标形式

用来表示和绘制一些有趣曲线
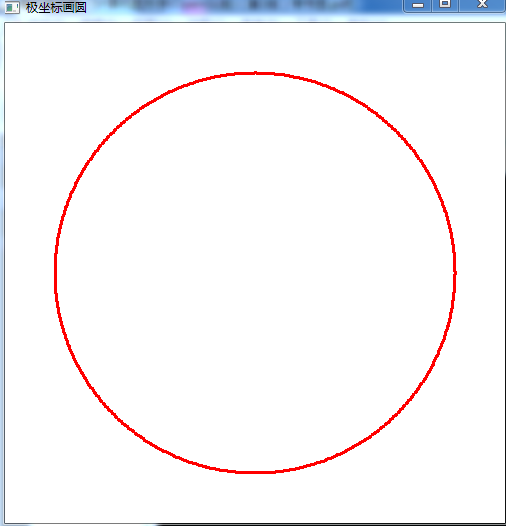
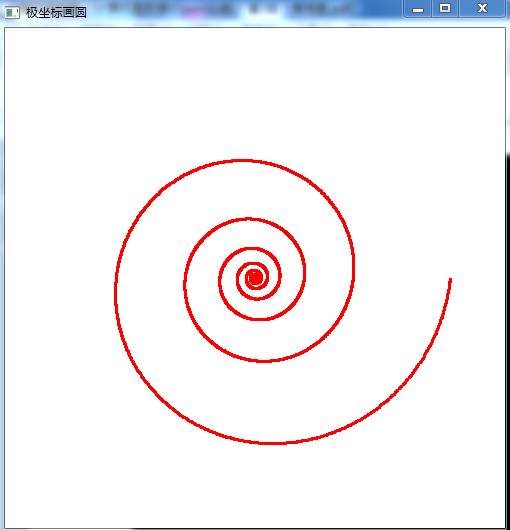
极坐标画圆
//3.4.3  圆外切   给定一个两个圆心  和两个圆的交点    画两个圆和一条切线

#include <windows.h>
#include <gl/gl.h>
#include <gl/glu.h>
#include <gl/glut.h>
#include <iostream>
#include <math.h>

using namespace std;

const double screenWidth=500;
const double screenHeight=500;
double pi=3.1415926;

void drawEllipse(double k)//极坐标画圆
{
   double theta=0;
     glBegin(GL_POINTS);
        for(;theta<=2*pi;theta+=0.01)
        {
           glVertex2d(k*cos(theta)+screenWidth/2,k*sin(theta)+screenHeight/2);
        }
    glEnd();
}
 void mydisplay(void)
 {
    glClear(GL_COLOR_BUFFER_BIT);
        drawEllipse(200);
    glFlush();
 }

void myInit(void)
{
    glClearColor(1.0,1.0,1.0,0.0);      //background color
    glPointSize(3.0);
    glColor3f(1.0,0.0,0.0);
    glMatrixMode(GL_PROJECTION);
    glLoadIdentity();
    gluOrtho2D(0.0,500,0.0,500);
}
int main(int argc,char ** argv)
{
    glutInit(&argc,argv);
    glutInitDisplayMode(GLUT_SINGLE|GLUT_RGB);
    glutInitWindowPosition(0,0);
    glutInitWindowSize(500,500);
    glutCreateWindow("极坐标画圆");
    glutDisplayFunc(mydisplay);
    myInit();
    glutMainLoop();
    return 0;
}
执行结果
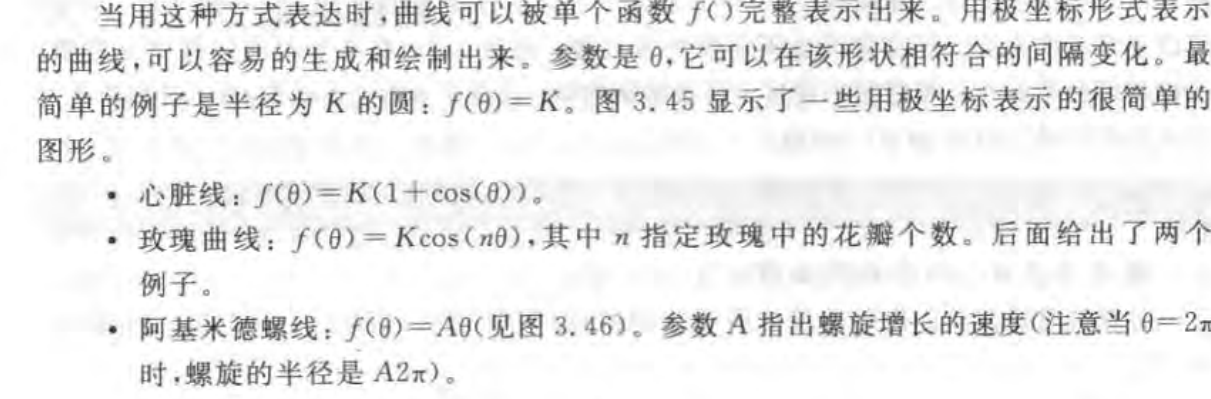
极坐标画心形
替换上面的函数代码段
void drawEllipse(double k)//极坐标画圆
{
   double theta=0;
     glBegin(GL_POINTS);
        for(;theta<=2*pi;theta+=0.01)
        {
            double f=k*(1+cos(theta));
            glVertex2d(f*cos(theta)+screenWidth/3,f*sin(theta)+screenHeight/2);
        }
    glEnd();
}
执行结果

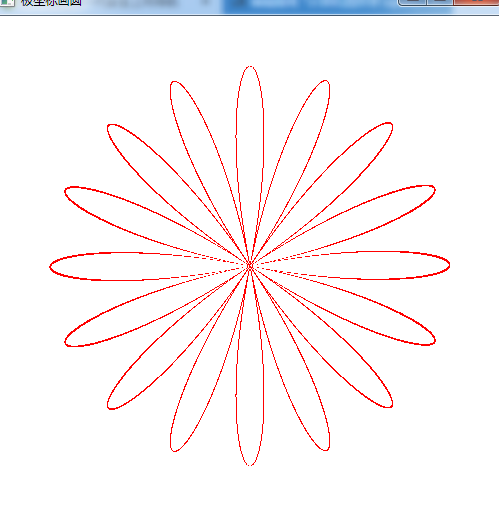
玫瑰曲线 图3.45
代码段替换
void drawEllipse(double k,int n)//极坐标画圆   n为花瓣
{
   double theta=0;
     glBegin(GL_LINES);
        for(;theta<=2*pi;theta+=0.00001)
        {
            double f=k*cos(n*theta);
            glVertex2d(f*cos(theta)+screenWidth/2,f*sin(theta)+screenHeight/2);
            glVertex2d(f*cos(theta+0.00001)+screenWidth/2,f*sin(theta+0.01)+screenHeight/2);
        }
    glEnd();
}
 void mydisplay(void)
 {
    glClear(GL_COLOR_BUFFER_BIT);
        drawEllipse(200,8);
    glFlush();
 }
执行结果
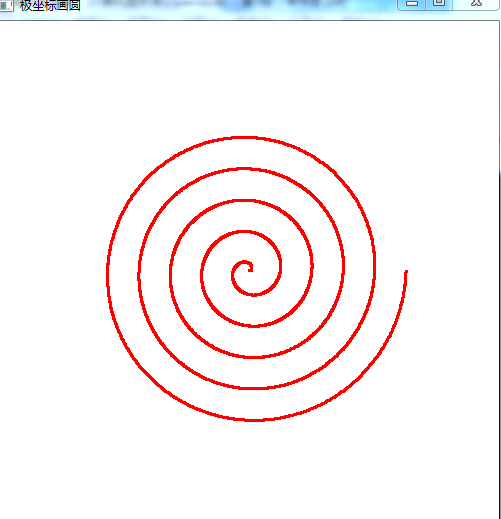
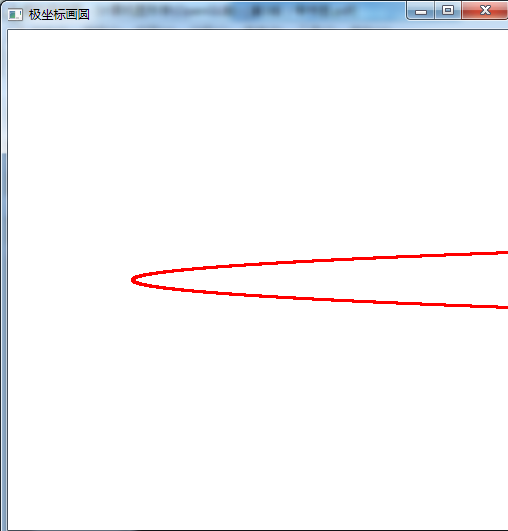
阿基米德螺旋线
替换代码段
void drawEllipse(double k,int n)//极坐标画圆   n为圈数
{
   double theta=0;
     glBegin(GL_POINTS);
        for(;theta<=n*pi;theta+=0.01)
        {
            double f=k*theta;
            glVertex2d(f*cos(theta)+screenWidth/2,f*sin(theta)+screenHeight/2);
        }
    glEnd();
}
以上各类函数如下:

圆锥曲线代码
void drawEllipse(double e)//极坐标画圆   n为圈数
{
   double theta=0;
     glBegin(GL_POINTS);
        for(;theta<=2*pi;theta+=0.0001)
        {
            double f1=1/(1-e*cos(theta));
            //double f2=1/(1+e*cos(theta));
            glVertex2d(f1*cos(theta)+screenWidth/4,f1*sin(theta)+screenHeight/2);
            //glVertex2d(f2*cos(theta)+screenWidth/2,f2*sin(theta)+screenHeight/2);
        }
    glEnd();
}
对数螺旋线
void drawEllipse(double e)//极坐标画圆   n为圈数    调用时  e的值需要大于1
{
   double theta=0;
   double k=0.8;
   double a=0.6;
     glBegin(GL_POINTS);
        for(;theta<=16*pi;theta+=0.01)
        {
            double f1=k*pow(e,a*theta);//e的a*theta次幂
            //double f2=1/(1+e*cos(theta));
            glVertex2d(f1*cos(theta)+screenWidth/2,f1*sin(theta)+screenHeight/2);
            //glVertex2d(f2*cos(theta)+screenWidth/2,f2*sin(theta)+screenHeight/2);
        }
    glEnd();
}
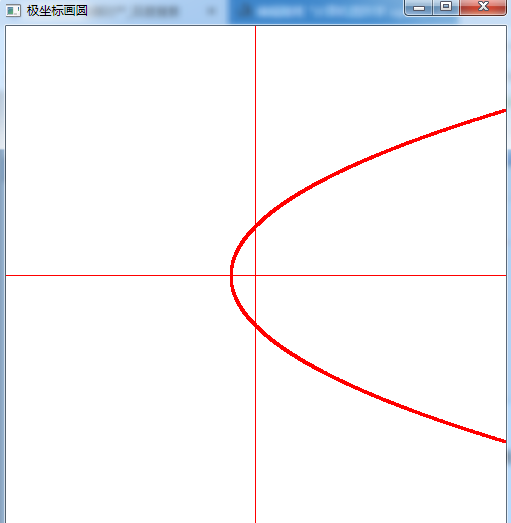
双曲线
void drawEllipse(double e,double p)//极坐标画圆   n为圈数                                   e大于1
{
   double theta=0;

     glBegin(GL_POINTS);
        for(;theta<=2*pi;theta+=0.001)
        {
            double f1=e*p/(1-e*cos(theta));//圆锥曲线通用方程  p为焦点到准线的距离     f1表示数学中极坐标的径向距离
            glVertex2d(f1*cos(theta)+screenWidth/2,f1*sin(theta)+screenHeight/2);
        }
    glEnd();
    glBegin(GL_LINES);  //x轴
        glVertex2d(0,250);
        glVertex2d(500,250);
    glEnd();
    glBegin(GL_LINES);  //y轴
        glVertex2d(250,0);
        glVertex2d(250,500);
    glEnd();
}

由上例可知 双曲线的右焦点为极坐标系的极点 用到的公式如下

同理可得椭圆的极坐标画图代码及图像
void drawEllipse(double e,double p)//极坐标画圆   n为圈数     e小于1
{
   double theta=0;

     glBegin(GL_POINTS);
        for(;theta<=2*pi;theta+=0.001)
        {
            double f1=e*p/(1-e*cos(theta));//圆锥曲线通用方程  p为焦点到准线的距离     f1表示数学中极坐标的径向距离
            glVertex2d(f1*cos(theta)+screenWidth/2,f1*sin(theta)+screenHeight/2);
        }
    glEnd();
    glBegin(GL_LINES);  //x轴
        glVertex2d(0,250);
        glVertex2d(500,250);
    glEnd();
    glBegin(GL_LINES);  //y轴
        glVertex2d(250,0);
        glVertex2d(250,500);
    glEnd();
}
可以看出 椭圆的左焦点为 极坐标的极点
同理上面代码中e=1时 是抛物线 开口向右 极点为焦点