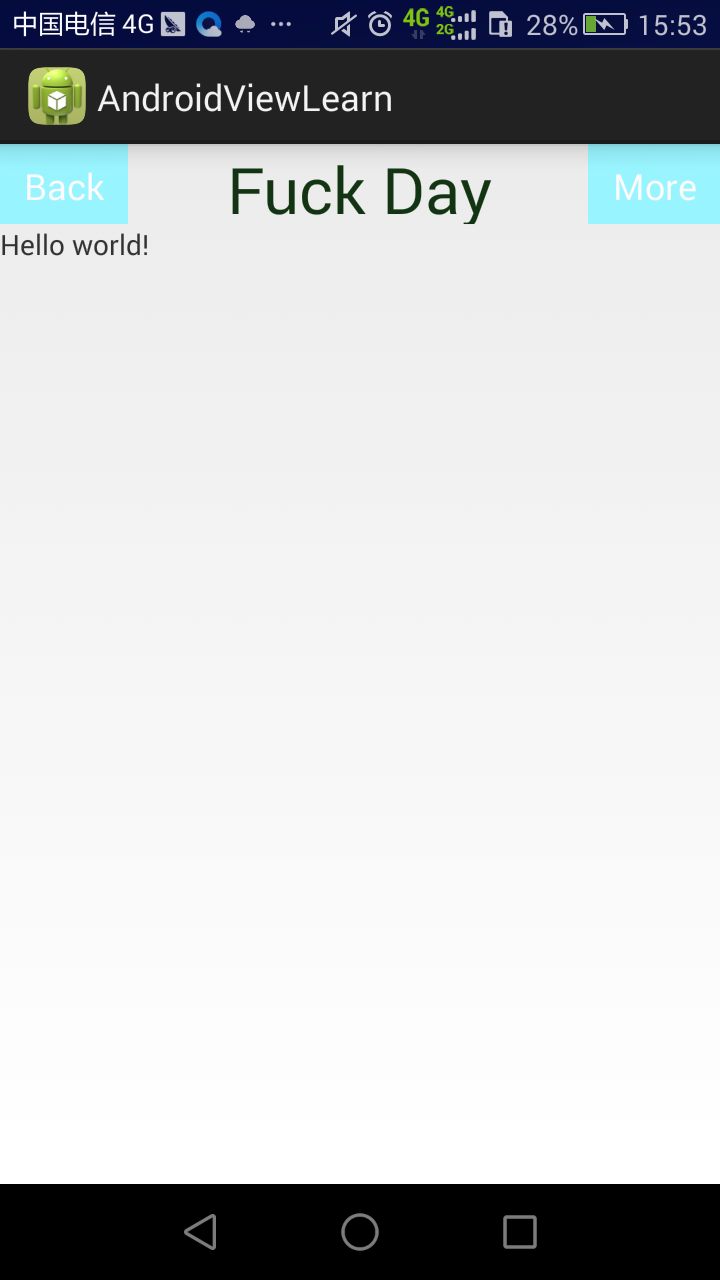
实现了《android 群英传》的TopBar的小实例。效果图如下:
记录下来,方便下次查看。主要的原理是将2个Button和一个TextView组合在一个RelativeLayout之中。
代码如下。首先定义自定义属性attrs.xml,也可能是先实现一个控件,然后再抽象出一些属性。


<?xml version="1.0" encoding="utf-8"?>
<resources>
    <declare-styleable name="TopBar">
        <attr name="title" format="string" />
        <attr name="titleTextSize" format="dimension" />
        <attr name="titleTextColor" format="color" />
        <attr name="leftTextColor" format="color" />
        <attr name="leftBackground" format="reference|color" />
        <attr name="leftText" format="string" />
        <attr name="rightTextColor" format="color" />
        <attr name="rightBackground" format="reference|color" />
        <attr name="rightText" format="string" />
    </declare-styleable>
</resources>
然后是自定一个一个TopBar,在之中组合Button和TextView,动态地设置属性值和布局。下面是自定义的按钮点击事件的接口。
package com.example.androidviewlearn;

public interface TopBarClickListener {

    void leftClick();
    void rightClick();

}
package com.example.androidviewlearn;

import android.annotation.SuppressLint;
import android.content.Context;
import android.content.res.TypedArray;
import android.graphics.drawable.Drawable;
import android.os.Trace;
import android.util.AttributeSet;
import android.view.Gravity;
import android.view.View;
import android.widget.Button;
import android.widget.RelativeLayout;
import android.widget.TextView;

public class TopBar extends RelativeLayout {
    // 获取自定义的类型数组s
    private TypedArray ta;
    private int mLeftTextColor;
    private Drawable mLeftBackground;
    private String mLeftText;

    private int mRightTextColor;
    private Drawable mRightBackground;
    private String mRightText;

    private int mTitleTextSize;
    private int mTitleTextColor;
    private String mTtile;

    private Button mLeftButton;
    private Button mRightButton;
    private TextView mTitleView;

    private LayoutParams mLeftLayoutParams;
    private LayoutParams mRightLayoutParams;
    private LayoutParams mTitleLayoutParams;

    private TopBarClickListener mBarClickListener;

    //三个构造函数,一般采用这些写法。
    public TopBar(Context context) {
        this(context, null);
        // TODO Auto-generated constructor stub
    }
    public TopBar(Context context, AttributeSet attrs) {
        this(context, attrs, 0);
        // TODO Auto-generated constructor stub
    }
    @SuppressLint("NewApi")
    public TopBar(Context context, AttributeSet attrs, int defStyleAttr) {
        super(context, attrs, defStyleAttr);
        // TODO Auto-generated constructor stub

        //获取布局中设置的自定义属性
        getStyleValue(context, attrs);
        //初始化控件,并且把属性值设置进去
        initView(context);
        //设置各个控件的布局
        setLayout();

    }

    /**
     * 设置自定义空间的布局属性
     */
    private void setLayout() {
        mLeftLayoutParams = new LayoutParams(LayoutParams.WRAP_CONTENT, LayoutParams.MATCH_PARENT);
        mLeftLayoutParams.addRule(RelativeLayout.ALIGN_PARENT_LEFT, TRUE);
        addView(mLeftButton, mLeftLayoutParams);

        mRightLayoutParams = new LayoutParams(LayoutParams.WRAP_CONTENT, LayoutParams.MATCH_PARENT);
        mRightLayoutParams.addRule(RelativeLayout.ALIGN_PARENT_RIGHT, TRUE);
        addView(mRightButton, mRightLayoutParams);

        mTitleLayoutParams = new LayoutParams(LayoutParams.WRAP_CONTENT, LayoutParams.MATCH_PARENT);
        mTitleLayoutParams.addRule(RelativeLayout.CENTER_IN_PARENT, TRUE);
        addView(mTitleView, mTitleLayoutParams);
    }

    @SuppressLint("NewApi")
    /**
     * 初始化控件,并且给空间赋予属性和事件
     * @param context
     */
    private void initView(Context context) {
        mLeftButton = new Button(context);
        mRightButton = new Button(context);
        mTitleView = new TextView(context);

        mLeftButton.setTextColor(mLeftTextColor);
        mLeftButton.setText(mLeftText);
        mLeftButton.setBackground(mLeftBackground);
        mLeftButton.setOnClickListener(new OnClickListener() {

            @Override
            public void onClick(View paramView) {
                // TODO Auto-generated method stub
                mBarClickListener.leftClick();
            }
        });

        mRightButton.setOnClickListener(new OnClickListener() {

            @Override
            public void onClick(View paramView) {
                // TODO Auto-generated method stub
                mBarClickListener.rightClick();
            }
        });

        mRightButton.setTextColor(mRightTextColor);
        mRightButton.setText(mRightText);
        mRightButton.setBackground(mRightBackground);

        mTitleView.setText(mTtile);
        mTitleView.setTextColor(mTitleTextColor);
        mTitleView.setTextSize(mTitleTextSize);
        mTitleView.setGravity(Gravity.CENTER);
    }

    /**
     * 获取自定义空间上的style
     * @param context
     * @param attrs
     */
    private void getStyleValue(Context context, AttributeSet attrs) {
        ta = context.obtainStyledAttributes(attrs, R.styleable.TopBar);
        mLeftTextColor = ta.getColor(R.styleable.TopBar_leftTextColor, 0);
        mLeftBackground = ta.getDrawable(R.styleable.TopBar_leftBackground);
        mLeftText = ta.getString(R.styleable.TopBar_leftText);

        mRightTextColor = ta.getColor(R.styleable.TopBar_rightTextColor, 0);
        mRightBackground = ta.getDrawable(R.styleable.TopBar_rightBackground);
        mRightText = ta.getString(R.styleable.TopBar_rightText);

        mTitleTextSize = ta.getDimensionPixelSize(R.styleable.TopBar_titleTextSize, 10);
        mTitleTextColor = ta.getColor(R.styleable.TopBar_titleTextColor, 0);
        mTtile = ta.getString(R.styleable.TopBar_title);

        ta.recycle();
    }

    public TopBarClickListener getmBarClickListener() {
        return mBarClickListener;
    }

    public void setBarClickListener(TopBarClickListener mBarClickListener) {
        this.mBarClickListener = mBarClickListener;
    }

    /**
     * id=1标识→_→,id-0标识左边
     *
     * @param id
     * @param flag
     */
    public void setButtonVisable(int id, boolean flag) {
        if (flag) {
            if (id == 0) {
                mLeftButton.setVisibility(View.VISIBLE);
            } else {
                mRightButton.setVisibility(View.VISIBLE);
            }
        } else {
            if (id == 0) {
                mLeftButton.setVisibility(View.GONE);
            } else {
                mRightButton.setVisibility(View.GONE);
            }
        }

    }

}
之后定义一个layout,activity_main.xml,把放入自定义布局和设置参数。
<LinearLayout xmlns:android="http://schemas.android.com/apk/res/android"
    xmlns:tools="http://schemas.android.com/tools"
    android:layout_width="match_parent"
    android:layout_height="match_parent"
    android:orientation="vertical"
    tools:context="com.example.androidviewlearn.MainActivity" >

    <com.example.androidviewlearn.TopBar
        xmlns:android="http://schemas.android.com/apk/res/android"
        xmlns:custom="http://schemas.android.com/apk/res-auto"
        android:id="@+id/topBar"
        android:layout_width="match_parent"
        android:layout_height="40dp"

           custom:leftBackground="#98F5FF"
           custom:leftText="Back"
           custom:leftTextColor="#FFFAFA"

           custom:rightBackground="#98F5FF"
           custom:rightText="More"
           custom:rightTextColor="#FFFAFA"

           custom:title="Fuck Day"
           custom:titleTextColor="#123412"
           custom:titleTextSize="16sp"

         >

    </com.example.androidviewlearn.TopBar>

    <TextView
        android:layout_width="wrap_content"
        android:layout_height="wrap_content"
        android:text="@string/hello_world" />

</LinearLayout>
特别注意这一行,xmlns:custom="http://schemas.android.com/apk/res-auto"。custom就表示了设置属性时候的前缀:custom:rightBackground
最后的就是Activity的实现了。
package com.example.androidviewlearn;

import android.app.Activity;
import android.os.Bundle;
import android.view.Menu;
import android.view.MenuItem;
import android.widget.Toast;

public class MainActivity extends Activity {
    private TopBar mTopBar;

    @Override
    protected void onCreate(Bundle savedInstanceState) {
        super.onCreate(savedInstanceState);
        setContentView(R.layout.activity_main);
        mTopBar = (TopBar) findViewById(R.id.topBar);
        mTopBar.setBarClickListener(new TopBarClickListener() {
            @Override
            public void rightClick() {
                // TODO Auto-generated method stub
                Toast.makeText(getApplicationContext(), "right fuck button", Toast.LENGTH_LONG).show();
            }
            @Override
            public void leftClick() {
                // TODO Auto-generated method stub
                Toast.makeText(getApplicationContext(), "left fuck button", Toast.LENGTH_LONG).show();
            }
        });
    }
}