一、前言
- 参数化 @pytest.mark.parametrize 的学习:https://www.cnblogs.com/poloyy/p/12675457.html
- 默认 allure 报告上的测试用例标题不设置默认就是用例名称,这样可读性不高
- 当结合 @pytest.mark.parametrize 参数化完成数据驱动时,如果标题写死,这样可读性也不高
- 所以我们希望标题可以动态的生成,来看看如何做吧
二、参数化无标题的例子
2.1 测试代码
#!/usr/bin/env python
# -*- coding: utf-8 -*-

import allure
import pytest


@pytest.fixture()
def login(request):
    """登录"""
    param = request.param
    print(f"账号是:{param['username']},密码是:{param['pwd']}")
    # 返回
    return {"code": 0, "msg": "success!"}

datas = [
    {"username": "name1", "pwd": "pwd1"},
    {"username": "name2", "pwd": "pwd2"},
    {"username": "name3", "pwd": "pwd3"}
]

@allure.story('登录功能')
@pytest.mark.parametrize('login', datas, indirect=True)
def test_login1(login):
    """
    登录测试用例1
    """
    assert login['code'] == 0
allure 报告
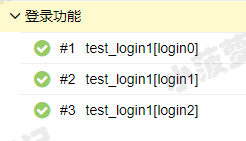
标题就是方法名+参数化的数据,看着可读性就不咋滴
三、参数化有标题写死的例子
3.1 测试代码
将上面的测试代码添加一个 @allure.title 就可以了
@allure.story('登录功能')
@allure.title('登录测试用例2')
@pytest.mark.parametrize('login', datas, indirect=True)
def test_login2(login):
    """
    登录测试用例2
    """
    assert login['code'] == 0
allure 报告

因为参数化可以生成三条用例,所以三条用例都用了同一个 title,可读性也不咋滴
四、参数化使用 ids 的例子
4.1 测试代码
#!/usr/bin/env python
# -*- coding: utf-8 -*-

import allure
import pytest


@pytest.fixture()
def login(request):
    """登录"""
    param = request.param
    print(f"账号是:{param['username']},密码是:{param['pwd']}")
    # 返回
    return {"code": 0, "msg": "success!"}

datas = [
    {"username": "name1", "pwd": "pwd1"},
    {"username": "name2", "pwd": "pwd2"},
    {"username": "name3", "pwd": "pwd3"}
]

ids = [
    "username is name1,pwd is pwd1",
    "username is name2,pwd is pwd2",
    "username is name3,pwd is pwd3"
]

@allure.story('登录功能')
@pytest.mark.parametrize('login', datas, ids=ids, indirect=True)
def test_login1(login):
    """
    登录测试用例1
    """
    assert login['code'] == 0
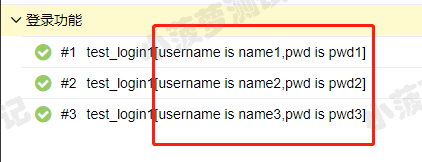
allure 报告
五、参数化动态生成标题的例子
5.1 测试代码
#!/usr/bin/env python
# -*- coding: utf-8 -*-

import allure
import pytest


@pytest.fixture()
def login(request):
    """登录"""
    param = request.param
    print(f"账号是:{param['username']},密码是:{param['pwd']}")
    # 返回
    return {"code": 0, "msg": "success!"}


datas = [
    {"username": "name1", "pwd": "pwd1"},
    {"username": "name2", "pwd": "pwd2"},
    {"username": "name3", "pwd": "pwd3"}
]

data2 = [
    ("name1", "123456"),
    ("name2", "123456"),
    ("name3", "123456")
]


@allure.story('分别传值')
@allure.title('登录测试用例2-账号是:{username}-密码是:{pwd}')
@pytest.mark.parametrize('username,pwd', data2)
def test_login1(username, pwd):
    """
    登录测试用例1
    """
    print(username, pwd)


@allure.story('字典参数化')
@allure.title('登录测试用例2-{dict}')
@pytest.mark.parametrize('dict', datas)
def test_login2(dict):
    """
    登录测试用例1
    """
    print(dict['username'], dict['pwd'])


@allure.story('传值进fixture')
@allure.title('登录测试用例2{login}')
@pytest.mark.parametrize('login', datas, indirect=True)
def test_login3(login):
    """
    登录测试用例2
    """
    assert login['code'] == 0
allure 报告
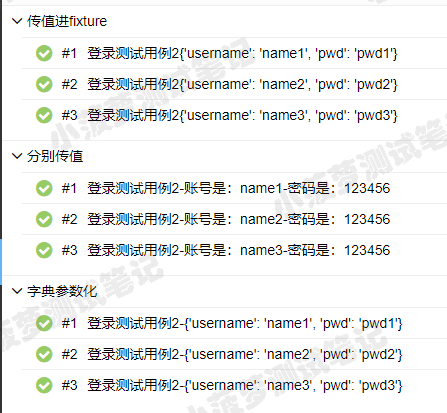
传入的如果是一个字典则显示完整字典值
六、参数化动态生成标题最优方案的例子
6.1 测试代码
#!/usr/bin/env python
# -*- coding: utf-8 -*-
import allure
import pytest
data = [
("name1", "123456", "name1 登录成功"),
("name2", "123456", "name2 登录失败"),
("name3", "123456", "name3 登录成功")
]
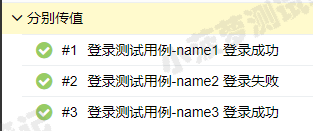
@allure.story('分别传值')
@allure.title('登录测试用例-{title}')
@pytest.mark.parametrize('username,pwd,title', data)
def test_login1(username, pwd, title):
"""
登录测试用例1
"""
print(username, pwd)
allure
6.2 这种做法的优点
- 可以自定义各式各样的标题
- 单独一个值去维护标题值
- 可读性比较好,容易维护