一、引言
在前面的几篇文章中,我们主要讲解了TPL,主要是Task,然后还介绍了如何在ASP.NET MVC中使用异步方法,在这篇文章中,我们结合一个小的实例,使用ASP.NET MVC+EF,实现异步的增删改查。
二、功能实现
我们以学生为例,实现增删改查功能。
1、搭建UI层
我们这里使用ASP.NET MVC作为界面层显示数据,首先创建一个解决方案,然后添加一个MVC项目,命名为TaskAsync.UI,创建后的项目结构如下图所示:

2、添加实体类
我们把实体类放在单独的类库里面,新建一个类型项目,命名为TaskAsync.Model,里面有一个Student类,Student类代码如下:
namespace TaskAsync.Model
{
    /// <summary>
    /// 学生类
    /// </summary>
    public class Student
    {
        /// <summary>
        /// 主键
        /// </summary>
        public int Id { get; set; }

        /// <summary>
        /// 姓名
        /// </summary>
        public string Name { get; set; }

        /// <summary>
        /// 年龄
        /// </summary>
        public int Age { get; set; }

        /// <summary>
        /// 性别
        /// </summary>
        public int Gender { get; set; }
    }
}
3、添加服务接口层
我们把增删改查的方法定义在接口里面,新添加一个类型项目,命名为TaskAsync.IService,需要引用上面创建的实体类库。里面有一个IStudentService接口,接口代码如下:
using System.Collections.Generic;
using System.Threading.Tasks;
using TaskAsync.Model;

namespace TaskAsync.IService
{
    public interface IStudentService
    {
        /// <summary>
        /// 增加的异步方法
        /// </summary>
        /// <param name="entity"></param>
        /// <returns></returns>
        Task<int> AddPersonAsync(Student entity);

        /// <summary>
        /// 删除的异步方法
        /// </summary>
        /// <param name="id"></param>
        /// <returns></returns>
        Task<int> DeleteByIdAsync(int id);

        /// <summary>
        /// 获取所有数据
        /// </summary>
        /// <returns></returns>
        Task<IEnumerable<Student>> GetAllAsync();

        /// <summary>
        /// 根据Id获取单一值
        /// </summary>
        /// <param name="id"></param>
        /// <returns></returns>
        Task<Student> GetStudentByIdAsync(int id);

        /// <summary>
        /// 更新的异步方法
        /// </summary>
        /// <param name="entity"></param>
        /// <returns></returns>
        Task<int> UpdateAsync(Student entity);
    }
}
所有的方法返回值都是Task<T>类型的,方法名称默认以Async结尾,标注为异步方法。
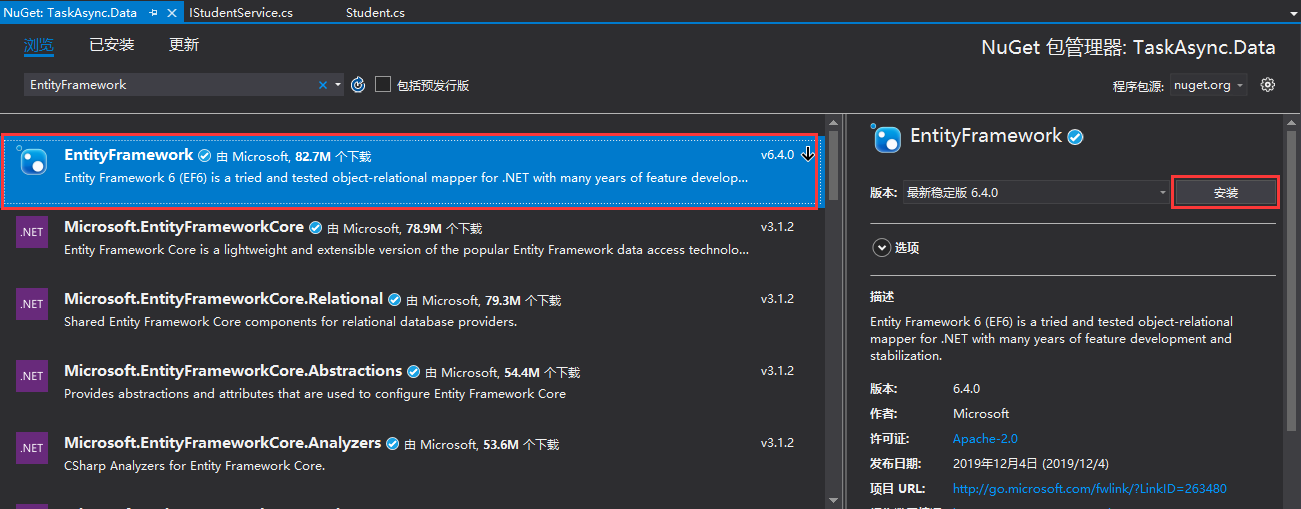
4、添加Entity Framework
我们使用EF作为ORM框架,把EF放在单独类库里面,命名为TaskAsync.Data。直接在NuGet里面安装:
安装完成以后,我们同样需要在创建的ASP.NET MVC程序里面EntityFramework,然后在外层的Web.config文件里面添加链接字符串:
  <connectionStrings>
    <add name="EFContext" connectionString="Data Source=.;Initial Catalog=TaskAsyncDb;User ID=sa;Password=123456;" providerName="System.Data.SqlClient" />
  </connectionStrings>
注意:链接字符串里面的providerName不能省略,否则进行数据迁移的时候会报错。
我们在TaskAsync.Data项目里面添加数据上下文类,继承自父类的DbContext:
using System.Data.Entity;
using TaskAsync.Model;

namespace TaskAsync.Data
{
    /// <summary>
    /// 数据上下文类,继承自父类的DbContext
    /// </summary>
    public class AppDbContext:DbContext
    {
        /// <summary>
        /// 通过创建连接,给父类的构造函数传递参数
        /// 参数是连接字符串的名称
        /// 表示使用连接字符串中名字为DbConnectionString的去连接数据库
        /// </summary>
        public AppDbContext():base("name=DbConnectionString")
        {

        }

        /// <summary>
        /// 重写OnModelCreating方法
        /// </summary>
        /// <param name="modelBuilder"></param>
        protected override void OnModelCreating(DbModelBuilder modelBuilder)
        {
            // 配置生成的表名
            modelBuilder.Entity<Student>().ToTable("T_Student");
            base.OnModelCreating(modelBuilder);
        }

        public DbSet<Student> Students { get; set; }
    }
}
数据上下文类创建完成以后,我们接下来在程序包管理器控制台里面进行数据迁移:

注意:项目要选择EntityFramework所在的类库项目。
1、开启迁移
使用下面的命令开启数据迁移:
Enable-Migrations
命令执行如下图所示:

2、增加迁移
使用下面的命令开始迁移:
Add-Migration Init
命令执行如下图所示:

执行成功以后,会在TaskAsync.Data项目下面添加一个Migrations文件夹
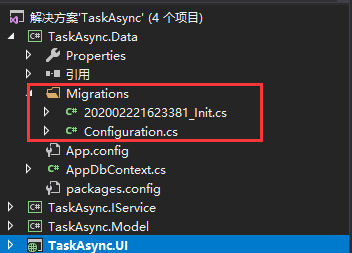
这个文件夹下面有两个类文件:Configuration.cs文件里面是配置信息,另外一个是本次迁移记录文件。我们在Configuration.cs类里面添加一些种子数据:
namespace TaskAsync.Data.Migrations
{
    using System.Collections.Generic;
    using System.Data.Entity.Migrations;
    using System.Linq;
    using TaskAsync.Model;

    internal sealed class Configuration : DbMigrationsConfiguration<TaskAsync.Data.AppDbContext>
    {
        public Configuration()
        {
            AutomaticMigrationsEnabled = false;
        }

        protected override void Seed(TaskAsync.Data.AppDbContext context)
        {
            List<Student> list = new List<Student>()
            {
                new Student()
                {
                    Name="Jack",
                    Age=23,
                    Gender=1
                },
                new Student()
                {
                    Name="Tom",
                    Age=25,
                    Gender=2
                }
            };

            if(!context.Students.Any())
            {
                context.Students.AddRange(list);
            }
        }
    }
}
3、生成数据库
我们在上面配置完成以后,就可以使用下面的命令去生成数据库:
Update-Database
命令执行如下图所示:

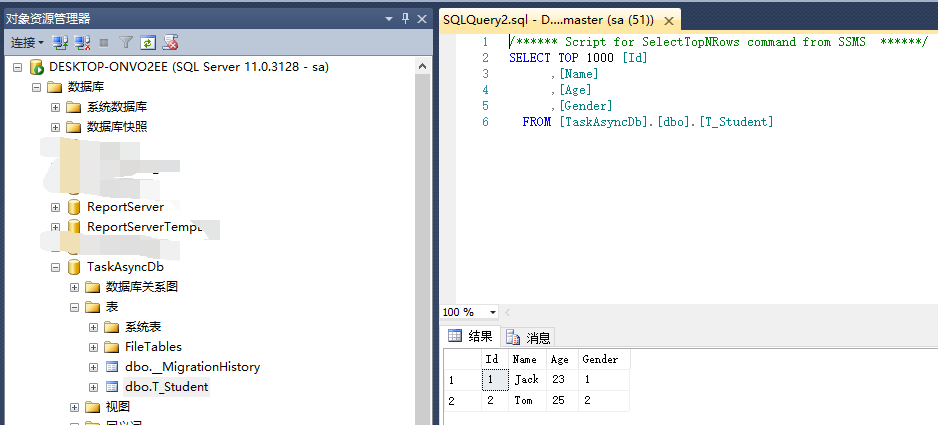
命令执行成功,就会自动创建数据库和表,表里面插入我们添加的种子数据:
5、添加接口的实现类
我们添加IStudentService接口的实现类。添加一个单独的类库,命名为TaskAsync.Service,并添加对TaskAsync.Model、TaskAsync.IService、TaskAsync.Data的引用,然后实现IStudentService接口:
using System.Collections.Generic;
using System.Linq;
using System.Threading.Tasks;
using TaskAsync.Data;
using TaskAsync.IService;
using TaskAsync.Model;

namespace TaskAsync.Service
{
    public class StudentService : IStudentService
    {
        /// <summary>
        /// 新增 方法标注为async
        /// </summary>
        /// <param name="entity"></param>
        /// <returns></returns>
        public async Task<int> AddPersonAsync(Student entity)
        {
            using (AppDbContext dbContext = new AppDbContext())
            {
                dbContext.Students.Add(entity);
                // 调用异步方法
                int count = await dbContext.SaveChangesAsync();
                return count;
            }
        }

        /// <summary>
        /// 删除
        /// </summary>
        /// <param name="id"></param>
        /// <returns></returns>
        public async Task<int> DeleteByIdAsync(int id)
        {
            using (AppDbContext dbContext = new AppDbContext())
            {
                Student student =await dbContext.Students.FindAsync(new object[] { id });
                if(student!=null)
                {
                    dbContext.Students.Remove(student);
                    return await dbContext.SaveChangesAsync();
                }
                else
                {
                    return 0;
                }
            }
        }

        public async Task<IEnumerable<Student>> GetAllAsync()
        {
            List<Student> list = await Task.Run<List<Student>>(() =>
            {
                using (AppDbContext dbContext = new AppDbContext())
                {
                    return dbContext.Students.ToList();
                }
            });

            return list;
        }

        public async Task<Student> GetStudentByIdAsync(int id)
        {
            using (AppDbContext dbContext = new AppDbContext())
            {
                Student student = await dbContext.Students.FindAsync(new object[] { id });
                if (student != null)
                {
                    return student
                }
                else
                {
                    return null;
                }
            }
        }

        public async Task<int> UpdateAsync(Student entity)
        {
            using (AppDbContext dbContext = new AppDbContext())
            {
                Student student = await dbContext.Students.FindAsync(new object[] { entity.Id });
                if (student != null)
                {
                    student.Name = entity.Name;
                    student.Age = entity.Age;
                    student.Gender = entity.Gender;
                    dbContext.Entry(student).State = System.Data.Entity.EntityState.Modified;
                    return await dbContext.SaveChangesAsync();
                }
                else
                {
                    return 0;
                }
            }
        }
    }
}
注意:这里同样需要添加到EntityFramework的引用。
6、添加控制器
我们在ASP.NET MVC项目里面首先添加对上面几个类库的引用。
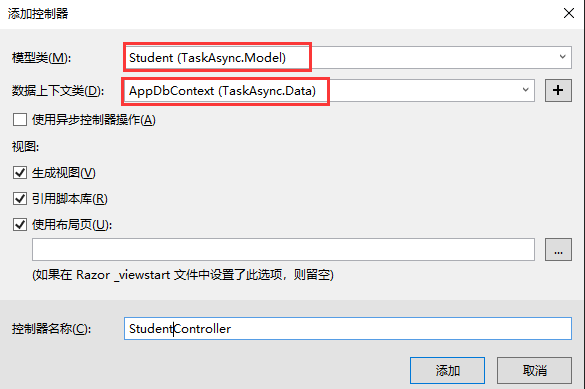
为了测试方法,我们直接添加一个包含视图的MVC5控制器(使用Entity Framework),这样就会自动生成UI界面了,如下图所示:

模型类选择Student,数据上下文类选择AppDbContext,如下图所示:
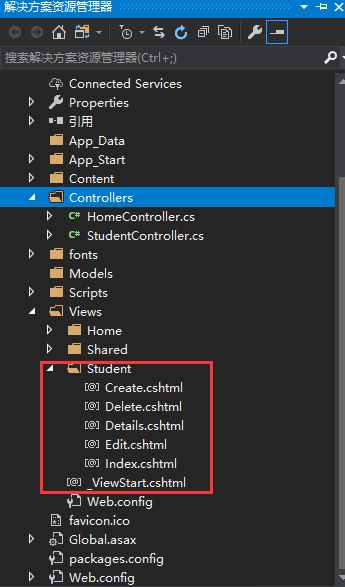
创建完成之后,会看到自动添加了视图:
控制器里也自动生成了代码:
using System.Data.Entity;
using System.Linq;
using System.Net;
using System.Web.Mvc;
using TaskAsync.Data;
using TaskAsync.Model;

namespace TaskAsync.UI.Controllers
{
    public class StudentController : Controller
    {
        private AppDbContext db = new AppDbContext();

        // GET: Student
        public ActionResult Index()
        {
            return View(db.Students.ToList());
        }

        // GET: Student/Details/5
        public ActionResult Details(int? id)
        {
            if (id == null)
            {
                return new HttpStatusCodeResult(HttpStatusCode.BadRequest);
            }
            Student student = db.Students.Find(id);
            if (student == null)
            {
                return HttpNotFound();
            }
            return View(student);
        }

        // GET: Student/Create
        public ActionResult Create()
        {
            return View();
        }

        // POST: Student/Create
        // 为了防止“过多发布”攻击,请启用要绑定到的特定属性,有关
        // 详细信息,请参阅 https://go.microsoft.com/fwlink/?LinkId=317598。
        [HttpPost]
        [ValidateAntiForgeryToken]
        public ActionResult Create([Bind(Include = "Id,Name,Age,Gender")] Student student)
        {
            if (ModelState.IsValid)
            {
                db.Students.Add(student);
                db.SaveChanges();
                return RedirectToAction("Index");
            }

            return View(student);
        }

        // GET: Student/Edit/5
        public ActionResult Edit(int? id)
        {
            if (id == null)
            {
                return new HttpStatusCodeResult(HttpStatusCode.BadRequest);
            }
            Student student = db.Students.Find(id);
            if (student == null)
            {
                return HttpNotFound();
            }
            return View(student);
        }

        // POST: Student/Edit/5
        // 为了防止“过多发布”攻击,请启用要绑定到的特定属性,有关
        // 详细信息,请参阅 https://go.microsoft.com/fwlink/?LinkId=317598。
        [HttpPost]
        [ValidateAntiForgeryToken]
        public ActionResult Edit([Bind(Include = "Id,Name,Age,Gender")] Student student)
        {
            if (ModelState.IsValid)
            {
                db.Entry(student).State = EntityState.Modified;
                db.SaveChanges();
                return RedirectToAction("Index");
            }
            return View(student);
        }

        // GET: Student/Delete/5
        public ActionResult Delete(int? id)
        {
            if (id == null)
            {
                return new HttpStatusCodeResult(HttpStatusCode.BadRequest);
            }
            Student student = db.Students.Find(id);
            if (student == null)
            {
                return HttpNotFound();
            }
            return View(student);
        }

        // POST: Student/Delete/5
        [HttpPost, ActionName("Delete")]
        [ValidateAntiForgeryToken]
        public ActionResult DeleteConfirmed(int id)
        {
            Student student = db.Students.Find(id);
            db.Students.Remove(student);
            db.SaveChanges();
            return RedirectToAction("Index");
        }

        protected override void Dispose(bool disposing)
        {
            if (disposing)
            {
                db.Dispose();
            }
            base.Dispose(disposing);
        }
    }
}
但是框架生成的代码都是同步方法的,不是我们需要的,我们改成异步的方法:
using System.Data.Entity;
using System.Linq;
using System.Net;
using System.Threading.Tasks;
using System.Web.Mvc;
using TaskAsync.Data;
using TaskAsync.IService;
using TaskAsync.Model;
using TaskAsync.Service;

namespace TaskAsync.UI.Controllers
{
    public class StudentController : Controller
    {
        //private AppDbContext db = new AppDbContext();

        IStudentService service = new StudentService();
        // GET: Student
        public async Task<ActionResult> Index()
        {
            return View(await service.GetAllAsync());
        }

        // GET: Student/Details/5
        public async Task<ActionResult> Details(int? id)
        {
            if (id == null)
            {
                return new HttpStatusCodeResult(HttpStatusCode.BadRequest);
            }
            Student student =await service.GetStudentByIdAsync((int)id);
            if (student == null)
            {
                return HttpNotFound();
            }
            return View(student);
        }

        // GET: Student/Create
        public ActionResult Create()
        {
            return View();
        }

        // POST: Student/Create
        // 为了防止“过多发布”攻击,请启用要绑定到的特定属性,有关
        // 详细信息,请参阅 https://go.microsoft.com/fwlink/?LinkId=317598。
        [HttpPost]
        [ValidateAntiForgeryToken]
        public async  Task<ActionResult> Create([Bind(Include = "Id,Name,Age,Gender")] Student student)
        {
            if (ModelState.IsValid)
            {
                int count = await service.AddPersonAsync(student);
                if(count>0)
                {
                    return RedirectToAction("Index");
                }
            }

            return View(student);
        }

        // GET: Student/Edit/5
        public async Task<ActionResult> Edit(int? id)
        {
            if (id == null)
            {
                return new HttpStatusCodeResult(HttpStatusCode.BadRequest);
            }
            Student student = await service.GetStudentByIdAsync((int)id);
            if (student == null)
            {
                return HttpNotFound();
            }
            return View(student);
        }

        // POST: Student/Edit/5
        // 为了防止“过多发布”攻击,请启用要绑定到的特定属性,有关
        // 详细信息,请参阅 https://go.microsoft.com/fwlink/?LinkId=317598。
        [HttpPost]
        [ValidateAntiForgeryToken]
        public async Task<ActionResult> Edit([Bind(Include = "Id,Name,Age,Gender")] Student student)
        {
            if (ModelState.IsValid)
            {
                int count = await service.UpdateAsync(student);
                if (count > 0)
                {
                    return RedirectToAction("Index");
                }
            }
            return View(student);
        }

        // GET: Student/Delete/5
        public async  Task<ActionResult> Delete(int? id)
        {
            if (id == null)
            {
                return new HttpStatusCodeResult(HttpStatusCode.BadRequest);
            }
            Student student = await service.GetStudentByIdAsync((int)id);
            if (student == null)
            {
                return HttpNotFound();
            }
            return View(student);
        }

        // POST: Student/Delete/5
        [HttpPost, ActionName("Delete")]
        [ValidateAntiForgeryToken]
        public async Task<ActionResult> DeleteConfirmed(int id)
        {
            int count = await service.DeleteByIdAsync(id);
            return RedirectToAction("Index");
        }

        //protected override void Dispose(bool disposing)
        //{
        //    if (disposing)
        //    {
        //        db.Dispose();
        //    }
        //    base.Dispose(disposing);
        //}
    }
}
然后我们在修改_Layout.cshtml视图文件,添加学生管理的一个标签:
<!DOCTYPE html> <html> <head> <meta http-equiv="Content-Type" content="text/html; charset=utf-8"/> <meta charset="utf-8" /> <meta name="viewport" content="width=device-width, initial-scale=1.0"> <title>@ViewBag.Title - 我的 ASP.NET 应用程序</title> @Styles.Render("~/Content/css") @Scripts.Render("~/bundles/modernizr") </head> <body> <div class="navbar navbar-inverse navbar-fixed-top"> <div class="container"> <div class="navbar-header"> <button type="button" class="navbar-toggle" data-toggle="collapse" data-target=".navbar-collapse"> <span class="icon-bar"></span> <span class="icon-bar"></span> <span class="icon-bar"></span> </button> @Html.ActionLink("应用程序名称", "Index", "Home", new { area = "" }, new { @class = "navbar-brand" }) </div> <div class="navbar-collapse collapse"> <ul class="nav navbar-nav"> <li>@Html.ActionLink("主页", "Index", "Home")</li> <li>@Html.ActionLink("关于", "About", "Home")</li> <li>@Html.ActionLink("联系方式", "Contact", "Home")</li> <li>@Html.ActionLink("学生管理", "Index", "Student")</li> </ul> </div> </div> </div> <div class="container body-content"> @RenderBody() <hr /> <footer> <p>© @DateTime.Now.Year - 我的 ASP.NET 应用程序</p> </footer> </div> @Scripts.Render("~/bundles/jquery") @Scripts.Render("~/bundles/bootstrap") @RenderSection("scripts", required: false) </body> </html>
运行程序,点击“学生管理”标签,就可以看到列表数据了:

这样我们就完成了一个ASP.NET MVC+EF实现异步增删改查的方法了。 最终项目结构:

GitHub代码地址: git@github.com:JiangXiaoLiang1988/TaskAsync.git。