接上篇,已经搭建好前端代码框架,本文开始进行前端代码的开发

准备工作
地球采用球体+蒙皮的方式实现,贴图来自echarts: https://www.echartsjs.com/examples/data-gl/asset/world.topo.bathy.200401.jpg,下载贴图jpg文件,存放至image文件夹,命名为world.jpg
1 html模板 index.html
在public文件夹中创建index.html,修改文件内容为


 1 <!DOCTYPE html>
 2 <html lang="en">
 3 <head>
 4   <meta charset="UTF-8">
 5   <meta name="viewport" content="width=device-width, initial-scale=1.0">
 6   <title>新冠疫情感染数</title>
 7   <style>
 8     *{
 9       padding:0;
10       margin:0
11     }
12     .container {
13       overflow: hidden;
14       position: fixed;
15       top: 0;
16       left: 0;
17       right:0;
18       bottom: 0;
19       display: flex;
20       flex-direction: row;
21       margin: 0 auto;
22     }
23   </style>
24   <script src="https://cdn.bootcss.com/lodash.js/4.17.15/lodash.min.js"></script>
25 </head>
26 <body>
27   <div class="container"></div>
28 </body>
29   <script>
30     // 调用组件
31     VDEarth.init({container:document.querySelector('.container')});
32   </script>
33 </html>
2 主文件VDEarth.js
创建一个VDEarth类,构造属性,方法
class VDEarth{
     constructor() {
        this.scene = null;
        this.camera = null;
        this.renderer = null;
        this.textrue = null;
        this.font = null;
        this.light = null;
        this.controls = null;
        this.contentWidth = 0;
        this.contentHeight = 0;
        this.options={}
     }
     init(opt = {}) {}
}
export default VDEarth;
修改初始化方法init
由于地球贴图图片较大,这里在初始化的时候进行加载,加载完成后回调场景, 相机,渲染器,灯光,控制器,创建模型,动态更新等方法,具体实现参考后面地球实现章节。
 1   init(opt = {}) {
 2     var self = this;
 3     // 合并用户配置属性
 4     _.merge(this.options, opt);
 5
 6     // 获取容器的宽高
 7     this.contentWidth = this.options.container.offsetWidth;
 8     this.contentHeight = this.options.container.offsetHeight;
 9     // 加载贴图
10     let globeTextureLoader = new TextureLoader();
11     globeTextureLoader.load('./images/world.jpg', function (textrue) {
12       self.textrue = textrue;
13       // 初始化渲染器
14       initRenderer.call(self);
15       // 初始化舞台
16       initScene.call(self);
17       // 初始化相机
18       initCamera.call(self);
19       // 初始化灯光
20       initLight.call(self);
21       // 初始化控制器
22       initControls.call(self);
23       // 初始化模型
24       initObj.call(self);
25       // 播放
26       animate.call(self);
27     });
28   }
3 组件入口index.js
调用VDEarth类,export一个初始化的方法供页面调用
1 import VDEarth from './VDEarth';
2
3 var myVDEarth = new VDEarth();
4 export function init(opt) {
5   return myVDEarth.init(opt);
6 }
4 组件初始化
创建场景
VDEarth.js中添加私有方法
// 初始化场景
function initScene() {
  this.scene = new Scene();
}
创建渲染器
VDEarth.js中添加私有方法
// 初始化渲染器
function initRenderer() {
  this.renderer = new WebGLRenderer({ antialias: true });
  this.renderer.setSize(this.contentWidth, this.contentHeight);
  this.options.container.appendChild(this.renderer.domElement);
}
创建相机
VDEarth.js中添加私有方法
// 初始化照相机
function initCamera() {
  this.camera = new PerspectiveCamera(50,this.contentWidth / this.contentHeight,1,2000);
  this.camera.up.x = 0;
  this.camera.up.y = 1;
  this.camera.up.z = 0;
  this.camera.position.x = 0;
  this.camera.position.y = 0;
  this.camera.position.z = 500;
  this.camera.lookAt(0, 0, 0);
}
创建灯光
VDEarth.js中添加私有方法
// 初始化灯光
function initLight() {
  // 自然光
  this.scene.add(new AmbientLight(0xffffff));
}
创建控制器
VDEarth.js中添加私有方法,创建一个盘旋控制器
// 盘旋控制器
function initControls() {
  this.controls = new OrbitControls(this.camera, this.renderer.domElement);
  // 如果使用animate方法时,将此函数删除
  // 使动画循环使用时阻尼或自转 意思是否有惯性
  this.controls.enableDamping = true;
  //动态阻尼系数 就是鼠标拖拽旋转灵敏度
  //controls.dampingFactor = 0.25;
  //是否可以缩放
  this.controls.enableZoom = true;
  //是否自动旋转
  this.controls.autoRotate = false;
  //是否允许旋转
  this.controls.enableRotate = true;
  //设置相机距离原点的最近距离
  this.controls.minDistance = 20;
  //设置相机距离原点的最远距离
  this.controls.maxDistance = 1000;
  //是否开启右键拖拽
  this.controls.enablePan = false;
}
创建实时更新方法
VDEarth.js增加私有方法
// 实时更新
function animate() {
  //更新控制器
  this.controls.update();
  render.call(this);
  requestAnimationFrame(animate.bind(this));
}
地球的实现
地球采用球体+蒙皮的方式实现,贴图来自echarts: https://www.echartsjs.com/examples/data-gl/asset/world.topo.bathy.200401.jpg,下载贴图jpg文件
创建地球模型
创建材质 - material.js
创建方法createGlobeMat 接受一个蒙皮的参数 textrue
import {
  MeshStandardMaterial,
  PointsMaterial,
  MeshPhongMaterial,
  DoubleSide,
  MeshBasicMaterial,
} from 'three';
class material {
  constructor() {}
  createGlobeMat(texture) {
    let mat = new MeshStandardMaterial({
      map: texture,
    });
    return mat;
  }
}
创建geometry -geometry.js
创建一个球体,createGlobeGeom接受一个size属性,用来定义地球的半径
class vdGeom {
  constructor() {}
  createGlobeGeom(size) {
    let geom = new SphereGeometry(size, 200, 200);
    return geom;
  }
}
创建地球对象- model.js
一个threejs的模型的对象,包含materail和geometry,这里引入前面的geometry.js 和material.js
 1 import { Mesh, Points } from 'three';
 2 import material from './material';
 3 import geometry from './geometry';
 4 class mesh {
 5   constructor() {
 6     this.vdGeom = new geometry();
 7     this.vdMaterial = new material();
 8   }
 9   createGlobe(size,textrue) {
10     let vdGeom = this.vdGeom.createGlobeGeom(size);
11     let vdMaterial = this.vdMaterial.createGlobeMat(textrue);
12     return new Mesh(vdGeom, vdMaterial);
13   }
14 }
15 export default mesh;
调用创建地球队形-VDEarth.js
新增私有方法 initObj,初始化地球模型的加载
function initObj() {
  let self = this;
  let fontloader = new FontLoader();
  // 创建地球模型组
  this.baseGroup = new Group();
  // 创建地球
  this.radius = minSize(this.contentWidth, this.contentHeight) * 0.2;
  let globalMesh = new model().createGlobe(this.radius, this.textrue);
  this.baseGroup.add(globalMesh);
  // 添加到场景
  this.scene.add(this.baseGroup);
}
修改init方法,增加initObj的调用
init(opt = {}) {
    var self = this;
    // 合并用户配置属性
    _.merge(this.options, opt);

    // 获取容器的宽高
    this.contentWidth = this.options.container.offsetWidth;
    this.contentHeight = this.options.container.offsetHeight;
    // 加载贴图
    let globeTextureLoader = new TextureLoader();
    globeTextureLoader.load('./images/world.jpg', function (textrue) {
      self.textrue = textrue;
      // 初始化渲染器
      initRenderer.call(self);
      // 初始化舞台
      initScene.call(self);
      // 初始化相机
      initCamera.call(self);
      // 初始化灯光
      initLight.call(self);
      // 初始化控制器
      initControls.call(self);
      // 初始化模型
      initObj.call(self);
      .
      .
      .
    });
  }
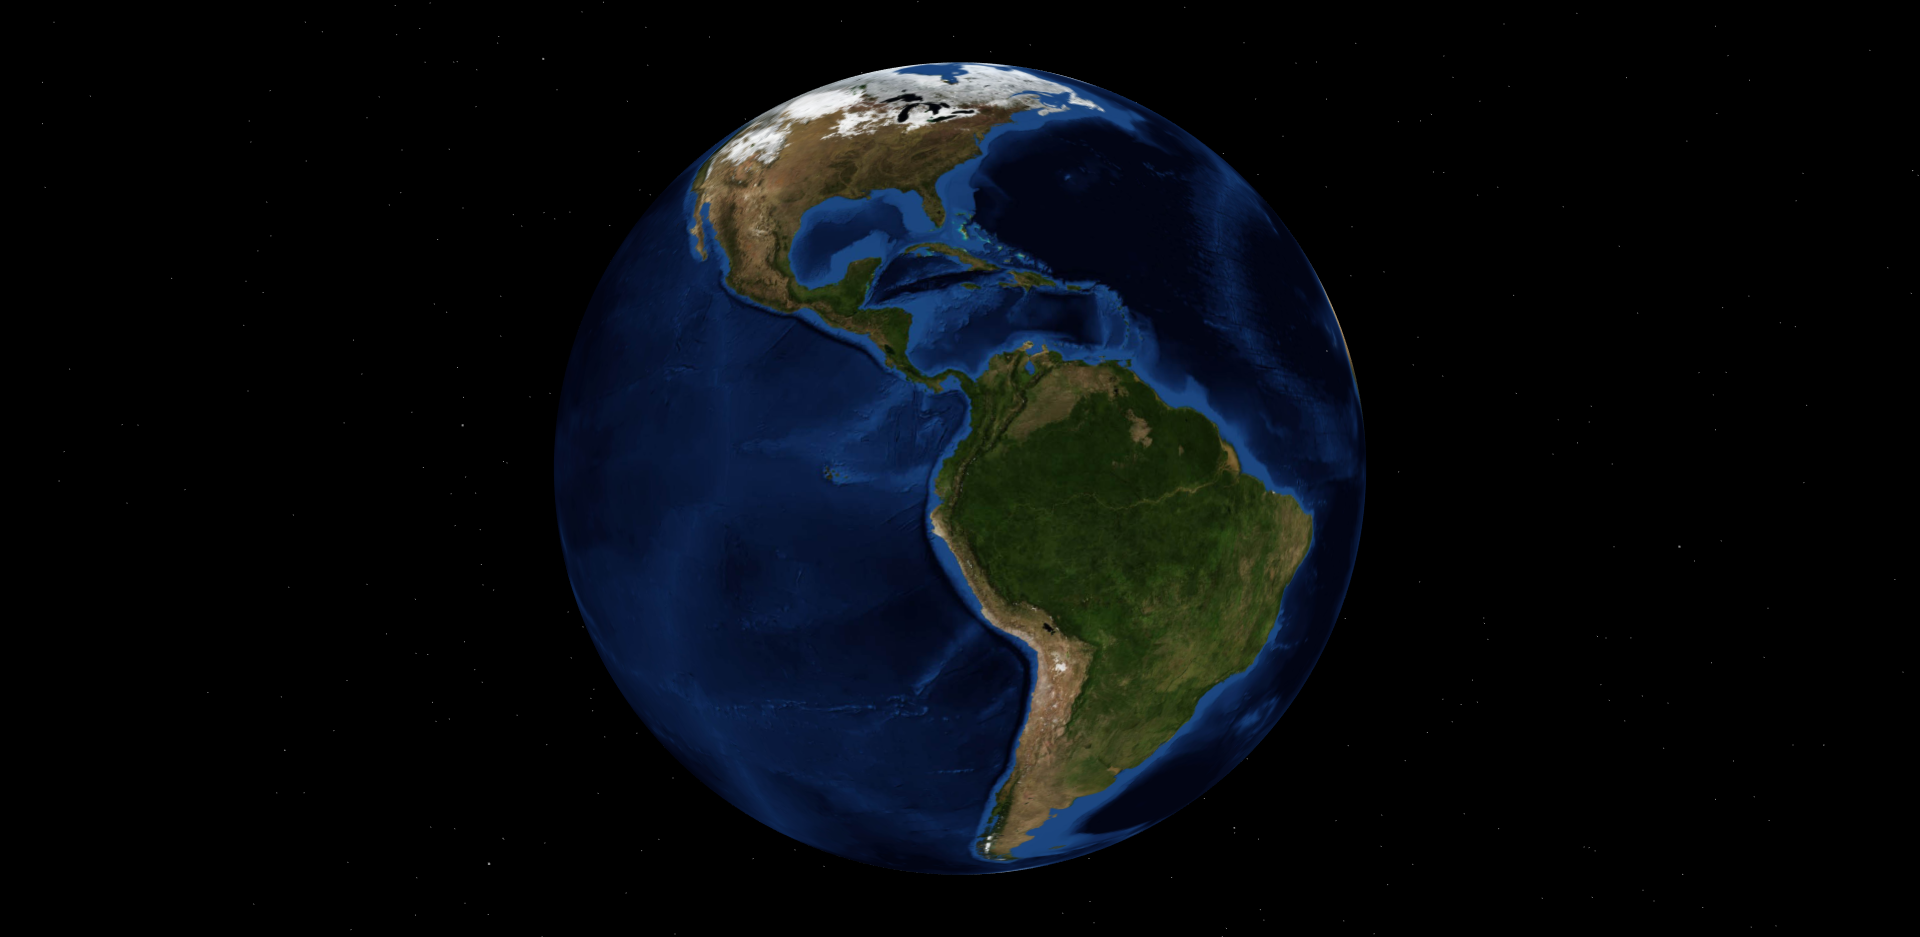
然后一个简单的地球就实现了,npm run start ,打开浏览器就可以看到一个3D地球,可以通过鼠标进行拖拽,旋转等操作
加点佐料
这里地球是静止的,加上地球自转效果
修改VDEarth.js 内 的animate方法,增加地球自转的代码
// 实时更新
function animate() {
  //更新控制器
  this.controls.update();
  render.call(this);

  // 地球自转
  this.baseGroup.rotation.y -= 0.002;
  requestAnimationFrame(animate.bind(this));
}
刷新下浏览器,地球就可以转动起来了
文内未说明import的模块,可以参照上篇里的环境搭建的pagekage.json , npm 安装响应的组件
相关链接
从0开始疫情3D地球 - 3D疫情地球VDEarth - 1- 引言
从0开始疫情3D地球 - 3D疫情地球VDEarth - 2 - 前端代码构建
从0开始疫情3D地球 - 3D疫情地球VDEarth - 3 - 3D地球组件实现(1)
从0开始疫情3D地球 - 3D疫情地球VDEarth - 4 - 3D地球组件实现(2)