https://shaocheng.li/posts/2017/11/27/
x86 计算机的 PCI 总线结
Linux PCI Express 配置空间读写内核实现
http://www.ilinuxkernel.com/files/5/Linux_PCI_Express_Kernel_RW.htm
[root@localhost ~]# grep 05:00.0 /proc/iomem
e9200000-e92fffff : 0000:05:00.0
80000200000-800002fffff : 0000:05:00.0
80000300000-80007afffff : 0000:05:00.0
80007b00000-80007b1ffff : 0000:05:00.0
80007b20000-8000829ffff : 0000:05:00.0
800082a0000-80008a1ffff : 0000:05:00.0
80008a20000-80008a27fff : 0000:05:00.0
[root@localhost ~]# ls /sys/bus/pci/devices/0000:05:00.0/c
class consistent_dma_mask_bits current_link_width
config current_link_speed
[root@localhost ~]# ls /sys/bus/pci/devices/0000:05:00.0/con
config consistent_dma_mask_bits
[root@localhost ~]# hexdump /sys/bus/pci/devices/0000:05:00.0/config
0000000 19e5 0200 0406 0010 0045 0200 0008 0000
0000010 000c 07b0 0800 0000 000c 08a2 0800 0000
0000020 000c 0020 0800 0000 0000 0000 19e5 d139
0000030 0000 e640 0040 0000 0000 0000 00ff 0000
0000040 8010 0002 8fe2 1000 2937 0010 f103 0043
0000050 0008 0103 0000 0000 0000 0000 0000 0000
0000060 0000 0000 0392 0000 0000 0000 000e 0000
0000070 0003 001f 0000 0000 0000 0000 0000 0000
0000080 a005 018a 0000 0000 0000 0000 0000 0000
0000090 0000 0000 0000 0000 0000 0000 0000 0000
00000a0 b011 801f 0002 0000 4002 0000 0000 0000
00000b0 c001 f803 0000 0000 0000 0000 0000 0000
00000c0 0003 8028 3237 ff78 0000 0000 0000 0000
00000d0 0000 0000 0000 0000 0000 0000 0000 0000
*
0000100 0001 1501 0000 0000 0000 0040 2030 0046
0000110 0000 0000 c000 0000 00a0 0000 0001 0400
0000120 0003 0060 0000 0501 0b82 1240 0000 0000
0000130 0000 0000 0000 0000 0000 0000 0000 0000
*
0000150 000e 2001 0000 0000 0000 0000 0000 0000
0000160 0000 0000 0000 0000 0000 0000 0000 0000
*
0000200 0010 3101 0002 0000 0010 0000 0078 0078
0000210 0000 0000 0001 0001 0000 375e 0553 0000
0000220 0010 0000 000c 07b2 0800 0000 000c 082a
0000230 0800 0000 000c 0030 0800 0000 0000 0000
0000240 0000 0000 0000 0000 0000 0000 0000 0000
*
0000310 0019 4e01 0000 0000 0000 0000 0000 0000
0000320 0000 0000 0000 0000 0000 0000 0000 0000
*
00004e0 0003 4f01 9beb ffa4 91ff 44a1 0000 0000
00004f0 0017 6001 0005 0000 0000 0000 0000 0000
0000500 0000 0000 0000 0000 0000 0000 0000 0000
*
0000600 000b 6301 0000 0280 0000 0000 0000 0000
0000610 0000 0000 0000 0000 0000 0000 0000 0000
*
0000630 000d 0001 0000 0000 0000 0000 0000 0000
0000640 0000 0000 0000 0000 0000 0000 0000 0000
*
0001000
[root@localhost ~]#
1 PCI及PCI-E配置空间介绍
PCI-E是用来互联如计算和通信平台应用中外围设备的第三代高性能I/O总线。PCI-E采用了与PCI相同的使用模型和读写(load-store)通信模型,支持各种常见的事务,如存储器读/写、IO读/写和配置读/写事务。其存储器、IO和配置地址空间与PCI的地址空间相同。PCI Express与PCI系统是软件向后兼容的。
PCI-E的配置空间大小为4096字节,如图1所示。其中前256字节是与PCI兼容的配置寄存器,该区域可以用以下两种机制访问:
- PCI配置访问机制。
- PCI Express增强型配置机制。
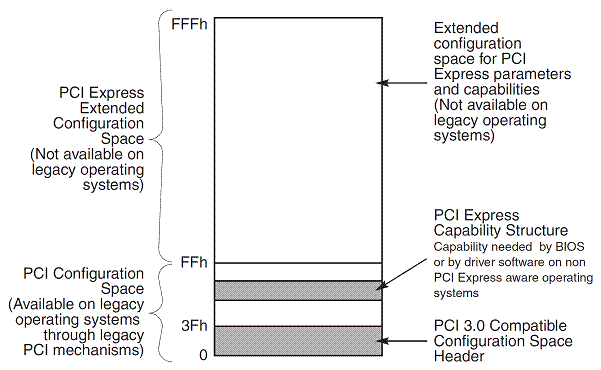
图1 PCI-E配置空间
Memory-mapped I/O (MMIO)与port I/O
MMIO和port I/O(也称为port-mapped I/O或PMIO)是两种CPU与外设之间进行I/O操作的方式。
Port I/O是通过特殊的CPU指令来进行I/O操作,在x86架构上,可以通过指令in和out在特定的端口上进行I/O读写。I/O设备拥有与内存不同的地址空间,实现的方式是通过在CPU上额外的I/O pin或者将整个总线赋予端口。
MMIO即内存映射I/O,它是PCI规范一部分,I/O设备被放置在内存空间而不是I/O空。从处理器角度看,内存映射I/O后系统设备访问起来和内存一样。这样访问AGP/PCI-E显卡上的帧缓存,BIOS,PCI设备就可以使用读写内存一样的汇编指令完成,简化了程序设计的难度和接口的复杂性。
对软件人员来说,MMIO比Port I/O更方便使用。
2 PCI-E配置空间读写在内核的实现
用户空间的两个命令lspci和setpci来查看/修改PCI及PCI-E配置空间。用户命令执行的结果,是由内核来确定。那么我们关心一个问题:内核是如何真正去读取和修改配置空间的?
2.1 内核API接口
Linux内核提供了以下PCI/PCI-E配置空间访问接口,在驱动编写过程中,我们可以直接使用下面函数。这些
- pci_{read,write}_config_byte()
- pci_{read,write}_config_word()
- pci_{read,write}_config_dword()
函数的定义在文件include/linux/pci.h中。
00513: static inline int pci_read_config_byte(struct pci_dev *dev, int where,
00513: u8 *val)
00514: {
00515: return pci_bus_read_config_byte (dev- >bus, dev- >devfn, where, val);
00516: }
00517: static inline int pci_read_config_word(struct pci_dev *dev, int where,
00517: u16 * val)
00518: {
00519: return pci_bus_read_config_word (dev- >bus, dev- >devfn, where, val);
00520: }
00521: static inline int pci_read_config_dword(struct pci_dev *dev,
00521: int where, u32*val)
00522: {
00523: return pci_bus_read_config_dword (dev- >bus, dev- >devfn, where, val);
00524: }
00525: static inline int pci_write_config_byte(struct pci_dev *dev, int where,
00525: u8 val)
00526: {
00527: return pci_bus_write_config_byte (dev- >bus, dev- >devfn, where, val);
00528: }
00529: static inline int pci_write_config_word(struct pci_dev *dev,
00529: int where, u16 val)
00530: {
00531: return pci_bus_write_config_word (dev- >bus, dev- >devfn, where, val);
00532: }
00533: static inline int pci_write_config_dword(struct pci_dev *dev,
00533: int where, u32 val)
00534: {
00535: return pci_bus_write_config_dword (dev- >bus, dev- >devfn, where, val);
00536: }
2.2 内核API实现
在PCI/PCI-E 配置空间读写API接口中,我们看到是对pci_bus_{read, write}_config_{byte, word, dword}的的封装。这些函数由drivers/pci/access.c中以宏的方式定义。
00024: #define PCI_OP_READ(size,type,len)
00025: int pci_bus_read_config_##size
00026: (struct pci_bus *bus , unsigned int devfn, int pos , type *value)
00027: {
00028: int res ;
00029: unsigned long flags ;
00030: u32 data = 0;
00031: if (PCI_##size##_BAD) return PCIBIOS_BAD_REGISTER_NUMBER;
00032: spin_lock_irqsave(&pci_lock, flags );
00033: res = bus - >ops- >read(bus , devfn, pos , len, &data );
00034: *value = (type)data ;
00035: spin_unlock_irqrestore(&pci_lock, flags );
00036: return res ;
00037: }
00038:
00039: #define PCI_OP_WRITE(size,type,len)
00040: int pci_bus_write_config_##size
00041: (struct pci_bus *bus , unsigned int devfn, int pos , type value)
00042: {
00043: int res ;
00044: unsigned long flags ;
00045: if (PCI_##size##_BAD) return PCIBIOS_BAD_REGISTER_NUMBER;
00046: spin_lock_irqsave(&pci_lock, flags );
00047: res = bus - >ops- >write(bus , devfn, pos , len, value);
00048: spin_unlock_irqrestore(&pci_lock, flags );
00049: return res ;
00050: }
00059: EXPORT_SYMBOL(pci_bus_read_config_byte);
00060: EXPORT_SYMBOL(pci_bus_read_config_word);
00061: EXPORT_SYMBOL(pci_bus_read_config_dword);
00062: EXPORT_SYMBOL(pci_bus_write_config_byte);
00063: EXPORT_SYMBOL(pci_bus_write_config_word);
00064: EXPORT_SYMBOL(pci_bus_write_config_dword);
pci_bus_{read, write}_config_{byte, word, dword}()等函数,调用的是bus->ops->write、bus->ops->read方法。显然,现在的bus总线是PCI/PCI-E,我们就关注内核定义PCI/PCI-E总线的读写操作方法。
注:Linux内核没有专门将PCI-E列为一种总线,而是将PCI-E合并到PCI总线中。
2.3 PCI总线读写方法
PCI总线读写方法为pci_root_ops,对应的读写函数分别为pci_read()、pci_write()。实现在文件arch/i386/pci/common.c中。
00036: static int pci_read(struct pci_bus *bus, unsigned int devfn, int where, int size, u32
00036: *value)
00037: {
00038: return raw_pci_ops - >read(pci_domain_nr(bus), bus- >number,
00039: devfn, where, size, value);
00040: }
00041:
00042: static int pci_write(struct pci_bus *bus, unsigned int devfn, int where, int size,
00042: u32 value)
00043: {
00044: return raw_pci_ops - >write(pci_domain_nr(bus), bus- >number,
00045: devfn, where, size, value);
00046: }
00047:
00048: struct pci_ops pci_root_ops = {
00049: .read = pci_read,
00050: .write = pci_write,
00051: };
pci_read()、pci_write()依赖于raw_pci_ops全局变量。
2.3.1 raw_pci_ops全局变量的设置
内核在启动时,会执行pci_access_init()函数,在文件arch/i386/pci/init.c中。该函数中,确定了raw_pci_ops值。
00005: / * arch_initcall has too random ordering, so call the initializers
00006: in the right sequence from here. */
00007: static __init int pci_access_init(void)
00008: {
00009: #ifdef CONFIG_PCI_MMCONFIG
00010: pci_mmcfg_init();
00011: #endif
00012: dmi_check_pciprobe();
00013:
00014: if (raw_pci_ops )
00015: return 0;
00016:
00017: #ifdef CONFIG_PCI_BIOS
00018: pci_pcbios_init();
00019: #endif
00020: / *
00021: * don't check for raw_pci_ops here because we want pcbios as last
00022: * fallback, yet it's needed to run first to set pcibios_last_bus
00023: * in case legacy PCI probing is used. otherwise detecting peer busses
00024: * fails.
00025: */
00026: #ifdef CONFIG_PCI_DIRECT
00027: pci_direct_init();
00028: #endif
00029: return 0;
00030: } ? end pci_access_init ?
00031: arch_initcall(pci_access_init);
对于访问PCI空间,通过Port I/O方式则可以实现完全访问。但要访问全部的PCI-E配置空间,则需要MMIO方式。MMIO方式访问,则需要Linux内核支持。在编译内核时,选中以下选项即可。
Bus options (PCI etc.) --->
--- PCI support
[*] Support mmconfig PCI config space access
即需要选中“Support mmconfig PCI config space access”。 若没有选中该项,则用户通过lspci或setpci命令,访问不到PCI-E的扩展配置空间(256~4096字节)。
为了访问PCI-E扩展配置空间,pci_access_init()函数会调用pci_mmcfg_init()。于是将raw_pci_ops的值设为pci_mmcfg,代码都在文件arch/i386/pci/mmconfig.c中。
00152: void __init pci_mmcfg_init(void)
00153: {
... ...
00173: raw_pci_ops = &pci_mmcfg ;
... ...
00176: } ? end pci_mmcfg_init ?
00147: static struct pci_raw_ops pci_mmcfg = {
00148: .read = pci_mmcfg_read,
00149: .write = pci_mmcfg_write,
00150: };
00151:
若内核中没有选中“Support mmconfig PCI config space access”,则raw_pci_ops方法为:pci_direct_conf1或pci_direct_conf2。通常情况下,使用pci_direct_conf1。代码在文件/arc/i386/pci/direct.c中。
00257: void __init pci_direct_init(void)
00258: {
00259: struct resource *region, *region2;
... ...
00267: if (pci_check_type1()) {
00268: printk(KERN_INFO "PCI: Using configuration type 1 ");
00269: raw_pci_ops = &pci_direct_conf1;
00270: return;
00271: }
... ...
00284: if (pci_check_type2()) {
00285: printk(KERN_INFO "PCI: Using configuration type 2 ");
00286: raw_pci_ops = &pci_direct_conf2 ;
00287: return;
00288: }
00293: } ? end pci_direct_init ?
00079: struct pci_raw_ops pci_direct_conf1 = {
00080: .read = pci_conf1_read,
00081: .write = pci_conf1_write,
00082: };
00171: #undef PCI_CONF2_ADDRESS
00172:
00173: static struct pci_raw_ops pci_direct_conf2 = {
00174: .read = pci_conf2_read,
00175: .write = pci_conf2_write,
00176: };
2.3.2 Port I/O方式访问配置空间
Port I/O方式也称为直接方式访问。
PCI规范规定,直接操作port读取PCI配置信息时,通过CONFIG_ADDRESS和CONFIG_DATA;两个寄存器进行。CONFIG_ADDRESS的值为0xCF8,CONFIG_DATA的值为0xCFC,两个寄存器都为32bit。两个寄存器就是对应x86架构中的端口号。图2为CONFIG_ADDRESS寄存器格式。

图2 CONFIG_ADDRESS寄存器格式
bit31是使能对PCI Bus CONFIG_DATA的访问;
bit 30~24为保留,为只读,访问时返回值为0;
bit 23~16是Bus号;
bit 15~10是设备号;
bit 10~8是功能号;
bit 7~2是配置空间中的寄存器,单位为DWORD。
bit 1~0为只读,读取时放回为0。
这样直接访问PCI配置空间时,分为两步:
第一步是向CONFIG_ADDRESS寄存器(端口0xCF8)写入要读/写的位置;
第二步是从CONFIG_DATA寄存器(端口0xCFC)读/写所需要数据。
Linux内核对PCI配置空间直接访问的实现函数分别为pci_conf1_read()/pci_conf1_write()和pci_conf2_read()/pci_conf2_write(),分别对应读写Type 0和Type 1的配置空间。对于我们的PCI-E外设来说,是Type 0型配置空间。这里我们只关注Type 0。
函数pci_conf1_read()和pci_conf1_write()函数在文件arch/i386/pci/direct.c中。
00017: int pci_conf1_read(unsigned int seg, unsigned int bus,
00018: unsigned int devfn, int reg, int len, u32 *value)
00019: {
00020: unsigned long flags;
00021:
00022: if ((bus > 255) || (devfn > 255) || (reg > 255)) {
00023: *value = - 1;
00024: return - EINVAL;
00025: }
00026:
00027: spin_lock_irqsave(&pci_config_lock , flags);
00028:
00029: outl(PCI_CONF1_ADDRESS(bus, devfn, reg), 0xCF8);
00030:
00031: switch (len) {
00032: case 1:
00033: *value = inb(0xCFC + (reg & 3));
00034: break;
00035: case 2:
00036: *value = inw(0xCFC + (reg & 2));
00037: break;
00038: case 4:
00039: *value = inl(0xCFC);
00040: break;
00041: }
00042:
00043: spin_unlock_irqrestore(&pci_config_lock , flags);
00044:
00045: return 0;
00046: } ? end pci_conf1_read ?
00047:
00048: int pci_conf1_write(unsigned int seg, unsigned int bus,
00049: unsigned int devfn, int reg, int len, u32 value)
00050: {
00051: unsigned long flags;
00052:
00053: if ((bus > 255) || (devfn > 255) || (reg > 255))
00054: return - EINVAL;
00056: spin_lock_irqsave(&pci_config_lock , flags);
00057:
00058: outl(PCI_CONF1_ADDRESS(bus, devfn, reg), 0xCF8);
00059:
00060: switch (len) {
00061: case 1:
00062: outb((u8)value, 0xCFC + (reg & 3));
00063: break;
00064: case 2:
00065: outw((u16)value, 0xCFC + (reg & 2));
00066: break;
00067: case 4:
00068: outl((u32)value, 0xCFC);
00069: break;
00070: }
00071:
00072: spin_unlock_irqrestore(&pci_config_lock , flags);
00073:
00074: return 0;
00075: } ? end pci_conf1_write ?
00076:
2.3.3 MMIO方式访问配置空间
Port I/O方式只能访问PCI配置空间,而不能访问PCI-E扩展配置空间(257~4096字节),此时只能通过MMIO方式。Linux内核中的MMIO实现读/写分别对应函数pci_mmcfg_write()和pci_mmcfg_read()。函数在文件arch/i386/pci/mmconfig.c中。
00071: static int pci_mmcfg_read(unsigned int seg, unsigned int bus,
00072: unsigned int devfn, int reg, int len, u32 *value)
00073: {
00074: unsigned long flags;
00075: u32 base;
00076:
00077: if ((bus > 255) || (devfn > 255) || (reg > 4095)) {
00078: err: *value = - 1;
00079: return - EINVAL;
00080: }
00081:
00082: if (reg < 256)
00083: return pci_conf1_read(seg,bus,devfn,reg,len,value);
00084:
00085: base = get_base_addr(seg, bus, devfn);
00086: if (! base)
00087: goto ↑err;
00088:
00089: spin_lock_irqsave(&pci_config_lock , flags);
00090:
00091: pci_exp_set_dev_base(base, bus, devfn);
00092:
00093: switch (len) {
00094: case 1:
00095: *value = mmio_config_readb(mmcfg_virt_addr + reg);
00096: break;
00097: case 2:
00098: *value = mmio_config_readw(mmcfg_virt_addr + reg);
00099: break;
00100: case 4:
00101: *value = mmio_config_readl(mmcfg_virt_addr + reg);
00102: break;
00103: }
00104:
00105: spin_unlock_irqrestore(&pci_config_lock , flags);
00106:
00107: return 0;
00108: } ? end pci_mmcfg_read ?
00110: static int pci_mmcfg_write(unsigned int seg, unsigned int bus,
00111: unsigned int devfn, int reg, int len, u32 value)
00112: {
00113: unsigned long flags;
00114: u32 base;
00115:
00116: if ((bus > 255) || (devfn > 255) || (reg > 4095))
00117: return - EINVAL;
00118:
00119: if (reg < 256)
00120: return pci_conf1_write(seg,bus,devfn,reg,len,value);
00121:
00122: base = get_base_addr(seg, bus, devfn);
00123: if (! base)
00124: return - EINVAL;
00125:
00126: spin_lock_irqsave(&pci_config_lock , flags);
00127:
00128: pci_exp_set_dev_base(base, bus, devfn);
00129:
00130: switch (len) {
00131: case 1:
00132: mmio_config_writeb(mmcfg_virt_addr + reg, value);
00133: break;
00134: case 2:
00135: mmio_config_writew(mmcfg_virt_addr + reg, value);
00136: break;
00137: case 4:
00138: mmio_config_writel(mmcfg_virt_addr + reg, value);
00139: break;
00140: }
00141:
00142: spin_unlock_irqrestore(&pci_config_lock , flags);
00143:
00144: return 0;
00145: } ? end pci_mmcfg_write ?
若访问的配置空间在前面256字节范围内,则直接调用直接访问方式(Port I/O)。若访问PCI-E扩展配置空间,则首先通过get_base_addr()函数获取设备对应的内存空间物理地址,然后通过pci_exp_set_dev_base()函数将物理地址映射到一个线性地址,最后通过mmio_config_{read, write}{b, w, l}执行真正的读写。
1. get_base_addr()
00028 / *
00029: * Functions for accessing PCI configuration space with MMCONFIG accesses
00030: */
00031: static u32 get_base_addr(unsigned int seg, int bus, unsigned devfn)
00032: {
00033: int cfg_num = - 1;
00034: struct acpi_table_mcfg_config *cfg;
00035:
00036: while (1) {
00037: ++cfg_num;
00038: if (cfg_num >= pci_mmcfg_config_num ) {
00039: break;
00040: }
00041: cfg = &pci_mmcfg_config [cfg_num];
00042: if (cfg- >pci_segment_group_number ! = seg)
00043: continue;
00044: if ((cfg- >start_bus_number <= bus) &&
00045: (cfg- >end_bus_number >= bus))
00046: return cfg- >base_address;
00047: }
00048:
00049: / * Handle more broken MCFG tables on Asus etc.
00050: They only contain a single entry for bus 0- 0. Assume
00051: this applies to all busses. */
00052: cfg = &pci_mmcfg_config [0];
00053: if (pci_mmcfg_config_num == 1 &&
00054: cfg- >pci_segment_group_number == 0 &&
00055: (cfg- >start_bus_number | cfg- >end_bus_number) == 0)
00056: return cfg- >base_address;
00057:
全局变量pci_mmcfg_config是所有PCI/PCI-E设备的MMIO映射表,MMIO映射表是内核根据BIOS POST结构初始化PCI总线时设置好,内核读取分配的值即可。
2. pci_exp_set_dev_base()
通过get_base_addr()获取到的地址是物理地址,为了能读取,还需通过桉树pci_exp_set_dev_base(base, bus, devfn);理地址转换为逻辑地址。
00062: static inline void pci_exp_set_dev_base(unsigned int base, int bus, int
00062: devfn)
00063: {
00064: u32 dev_base = base | (bus << 20) | (devfn << 12);
00065: if (dev_base != mmcfg_last_accessed_device ) {
00066: mmcfg_last_accessed_device = dev_base;
00067: set_fixmap_nocache(FIX_PCIE_MCFG, dev_base);
00068: }
00069: }
文件include/asm-i386/fixmap.h。
00100: / *
00101: * Some hardware wants to get fixmapped without caching.
00102: */
00103: #define set_fixmap_nocache(idx, phys)
00104: __set_fixmap(idx, phys, PAGE_KERNEL_NOCACHE)
00105:
文件arch/i386/mm/pgtable.c。
00140: void __set_fixmap (enum fixed_addresses idx, unsigned long phys, pgprot_t
00140: flags)
00141: {
00142: unsigned long address = __fix_to_virt(idx);
00143:
00144: if (idx >= __end_of_fixed_addresses) {
00145: BUG();
00146: return;
00147: }
00148: set_pte_pfn(address, phys >> PAGE_SHIFT, flags);
00149: }
00150:
00023: #define mmcfg_virt_addr ((void __iomem *) fix_to_virt(FIX_PCIE_MCFG))
2.4 用户接口在内核的实现
前面我们已经提到可以通过lspci和setpci命令来读写PCI/PCI-E配置。而这些命令的实现是基于内核提供的/sysfs接口或/proc接口。
内核为PCI/PCI-E总线提供的/sysfs读写方法如下,文件drivers/pci/pci-sysfs.c。
00510: static struct bin_attribute pci_config_attr = {
00511: .attr = {
00512: .name = "config",
00513: .mode = S_IRUGO | S_IWUSR,
00514: .owner = THIS_MODULE,
00515: },
00516: .size = 256,
00517: .read = pci_read_config,
00518: .write = pci_write_config,
00519: };
00520:
00521: static struct bin_attribute pcie_config_attr = {
00522: .attr = {
00523: .name = "config",
00524: .mode = S_IRUGO | S_IWUSR,
00525: .owner = THIS_MODULE,
00526: },
00527: .size = 4096,
00528: .read = pci_read_config,
00529: .write = pci_write_config,
00530: };
00531:
pci_read_config()和pci_write_config()函数进而调用pci_user_write_config_{dword, word, byte}。我们来看一下setpci命令执行时(图3),内核栈信息和lspci栈信息(图4)。
由栈信息我们可以看出,函数最终调用pci_conf1_write()函数。也就是/sysfs提供的读写接口,也最终是使用Port I/O和MMIO方式。
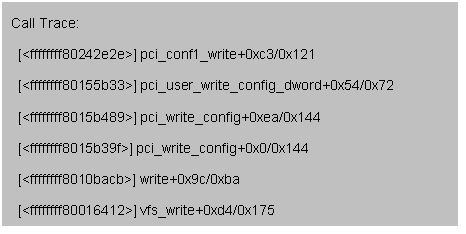
图3 pci_conf1_write()函数调用栈
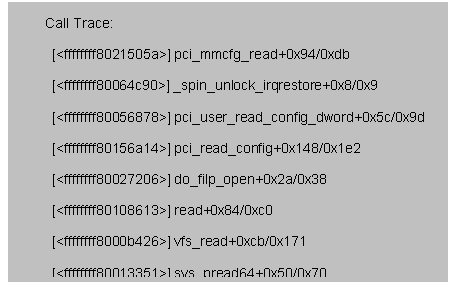
图4 pci_mmcfg_read()函数调用栈
下面是Intel ICH9系列南桥和Intel Cantiga北桥系列的获得Vonder ID和Device ID的PCI访问方法。
HDD:
mov dx,cf8h ;Bus:0,device:31,Function:2
out dx,8000FA00h ;
add dx,04h ;
in eax,dx ;
那么在AH中就是Device ID,在AL 中就是Vendor ID.
独立显卡:
mov dx,cf8h ;Bus:0,device:1,Function:0
out dx,8000800h ;
mov dx,cfch ;
in eax,dx ;
那么在AH中就是Device ID,在AL 中就是Vendor ID.
集成显卡:
mov dx,cf8h ;Bus:0,device:1,Function:0
out dx,80001000h ;
mov dx,cfch ;
in eax,dx ;
那么在AH中就是Device ID,在AL 中就是Vendor ID.
网卡:
mov dx,cf8h ;Bus:0,device:1,Function:0
out dx,8000C800h ;
mov dx,cfch ;
in eax,dx ;
那么在AH中就是Device ID,在AL 中就是Vendor ID.
BIOS入門的第一課大部分都會遇到PCI的作業,前輩們往往都會出個簡單的作業,要求我們去讀寫PCI configuaration space,到底我們該如何去做呢?
根據PCI Local Bus Specification 3.0有提到,"Every device, other than host bus bridges, must implement Configuration Address Space. Host bus bridges may optionally implement Configuration Address Space. In the Configuration Address Space, each function is assigned a unique 256-byte space that is accessed differently than I/O or Memory Address Spaces"
也就是說讀寫PCI的方式有兩種,一種是透過I/O(CF8/CFC)而另一種則是利用MMIO的方式來去讀寫PCI configuration space.
在介紹這兩種讀寫方法以前,我們先來看PCI spec.如何定義Configuration commands。為了支援階層式的PCI buses,在此使用兩種類型的configuration transactions,如Figure 1所示。

Figure 1
在Figure 1中我們可以看到兩種不同的configuration commands,分別為Type0和Type1,其中
Type0: A Type 0 configuration transaction (when AD[1::0] = “00”) is used to select a device on the bus where the transaction is being run.
Type1: A Type 1 configuration transaction (when AD[1::0] = “01”) is used to pass a configuration request to another bus segment.
而IDSEL(Initialization Device Select)是指"it used as a chip select during configuration
read and write transactions." 這部分會連接到PCI AD[31:11],是由硬體拉線所決定的。
其中IDSEL可以辨別PCI的身分,當硬體解出來的configuration cycle為Type0時,會做以下兩件事:1.遮罩[31:11],2.解碼Device number。相反的,當硬體解出的configuration cycle為Type1時,他會做以下的事:1.當bus number和secondary bus number一致時,會將Type1轉成Type0,也就是Bit0設為1,並做Type0該做的事;當bus number和secondary bus number不一致時,則會往下一層送。
透過IDSEL辨別Type0和Type1的方式,我們可以完成PCI的Scan,但在Type0的configuration transactions中好像沒有定義Bus number與Devce number,那麼如何去做transactions呢?還記得Type0的定義,他是在相同的bus下去選擇device,而device number我們又可以透過解碼的方式去獲得,因此就不會有找不到的問題。
Software Generation of Configuration Transactions
系統必須提供一種機制來讓軟體有辦法去Access PCI configuration space,前面有提到可以透過I/O space及MMIO space的方式去存取,但PCI device還沒分配resource之前,還是只能透過I/O space的方式去access。
"Two DWORD I/O locations are used to generate configuration transactions for PC-AT compatible systems. The first DWORD location (CF8h) references a read/write register that is named CONFIG_ADDRESS. The second DWORD address (CFCh) references a read/write register named CONFIG_DATA."
Figure 2為針對CONFIG_ADDRESS所定義的Layout,其中:

Figure 2
where
Bit[31]: It is an enable flag for determining when accesses to CONFIG_DATA are to be translated to configuration transactions on the PCI bus.
Bit[30:24]: Reserved
Bit[23:16]: Bits 23 through 16 choose a specific PCI bus in the system.
Bit[15:11]: Bits 15 through 11 choose a specific device on the bus.
Bit[10:8]: Bits 10 through 8 choose a specific function in a device.
Bit[7:2]: Bits 7 through 2 choose a DWORD in the device's Configuration Space.
Bit[1:0]: Bits 1 and 0 are read-only and must return 0's when read.
由上面定義可以得知最多支援的Bus number為256(2的8次方),最多支援的device number為32(2的5次方),最多支援的function number為8(2的3次方),可以讀取的configuration space為256(2的8次方),速記為8538。
看到這邊,或許會對configuration space有疑問,在Figure 2不是只有用Bit[7:2]去定義嗎,為什麼可以讀到256個呢?這是因為上面定義Bit[1:0]在Read的時候必須是0,所以如果我們要去Read/Write的space剛好在Bit[1:0]不為0的時候只能利用偏移的方式去做讀取,我們之後會有一個小小的範例做說明。
接著我們看這兩種Type的configuration commands如何與SW做結合。

Figure 3
自Figure 3我們可以看到,假設IDSEL辨別為Type0,自然就知道Bus number,而device number可以透過解碼方式獲得,並填到Bit[31:11]中的其中一個,剩下的Function number和Register number則複製到PCI AD BUS當中。
如果IDSEL辨別為Type1,則是將CONFIG_ADDRESS全部複製到PCI AD line當中,當然Bit0也必須是1。
PCI R/W sample:
參考Figure 4,如下:

Figure 4
如圖Figure 所示,假設我們要讀取Bus00, Dev1B,Fun00的Offset3C(Interrupt Line),那麼我們應該如何做呢?步驟描述如下:
Step1:
我們知道透過I/O space(CF8/CFC)可以Read/Write Configuration space,其中把要讀取該Space的PFA填入Config_Address(CF8)後,在Config_Data(CFC)就可以得到該資料。
Step2:
有了步驟1的知識後,我們要先計算出PFA,回顧Figure 2所示,我們必須將要讀取的BUS,Dev,Fun及Offset填入Config_Address所對應的Layout,其中Bit31必須為1,Bit[1:0]必須為0(如果剛好不為0可以用偏移方式讀取),其分析如下:
| 31 | 30 | 29 | 28 | 27 | 26 | 25 | 24 | 23 | 22 | 21 | 20 | 19 | 18 | 17 | 16 | 15 | 14 | 13 | 12 | 11 | 10 | 9 | 8 | 7 | 6 | 5 | 4 | 3 | 2 | 1 | 0 |
| 1 | 0 | 0 | 0 | 0 | 0 | 0 | 0 | 0 | 0 | 0 | 0 | 0 | 0 | 0 | 0 | 1 | 1 | 0 | 1 | 1 | 0 | 0 | 0 | 0 | 0 | 1 | 1 | 1 | 1 | 0 | 0 |
PFA = 8000D83C h
以Tool RW來示範的話就是利用I/O CF8填入PFA,然後在CFC的Offset 00h可以得到Interrupt Line的值16h,如圖Figure 5所示。

Figure 5
如果用組合語言來表示我們可以描述如下:
mov dx, cf8h
mov eax, 8000d83ch (PFA)
out dx, eax
mov dx, cfch
in eax, dx
如此,我們可以在EAX的Offset 00h得到我們要讀取的值。