[root@localhost ring]# ls -al /sys/kernel/iommu_groups
total 0
drwxr-xr-x. 39 root root 0 Sep 11 05:11 .
drwxr-xr-x. 10 root root 0 Sep 11 05:02 ..
drwxr-xr-x.  3 root root 0 Sep 11 05:27 0
drwxr-xr-x.  3 root root 0 Sep 11 05:27 1
drwxr-xr-x.  3 root root 0 Sep 11 05:27 10
drwxr-xr-x.  3 root root 0 Sep 11 05:27 11
drwxr-xr-x.  3 root root 0 Sep 11 05:27 12
drwxr-xr-x.  3 root root 0 Sep 11 05:27 13
drwxr-xr-x.  3 root root 0 Sep 11 05:27 14
drwxr-xr-x.  3 root root 0 Sep 11 05:27 15
drwxr-xr-x.  3 root root 0 Sep 11 05:27 16
drwxr-xr-x.  3 root root 0 Sep 11 05:27 17
drwxr-xr-x.  3 root root 0 Sep 11 05:27 18
drwxr-xr-x.  3 root root 0 Sep 11 05:27 19
drwxr-xr-x.  3 root root 0 Sep 11 05:27 2
drwxr-xr-x.  3 root root 0 Sep 11 05:27 20
drwxr-xr-x.  3 root root 0 Sep 11 05:27 21
drwxr-xr-x.  3 root root 0 Sep 11 05:27 22
[root@localhost ring]# find /sys/kernel/iommu_groups/ -type l
/sys/kernel/iommu_groups/17/devices/0000:7c:00.0
/sys/kernel/iommu_groups/35/devices/0000:b4:02.0
/sys/kernel/iommu_groups/7/devices/0000:ba:02.0
/sys/kernel/iommu_groups/25/devices/0000:81:00.0
/sys/kernel/iommu_groups/15/devices/0000:04:00.0
/sys/kernel/iommu_groups/33/devices/0000:06:00.0
/sys/kernel/iommu_groups/5/devices/0000:ba:00.0
/sys/kernel/iommu_groups/23/devices/0000:02:00.0
/sys/kernel/iommu_groups/13/devices/0000:00:12.0
/sys/kernel/iommu_groups/31/devices/0000:7d:00.2
/sys/kernel/iommu_groups/3/devices/0000:ba:01.0
/sys/kernel/iommu_groups/21/devices/0000:80:10.0
/sys/kernel/iommu_groups/11/devices/0000:00:10.0
x86
root@zj-x86:~# find /sys | grep dmar
root@zj-x86:~# dmesg | grep -i IOMMU
[    3.828448] DMAR-IR: IOAPIC id 12 under DRHD base  0xc5ffc000 IOMMU 6
[    3.828449] DMAR-IR: IOAPIC id 11 under DRHD base  0xb87fc000 IOMMU 5
[    3.828451] DMAR-IR: IOAPIC id 10 under DRHD base  0xaaffc000 IOMMU 4
[    3.828452] DMAR-IR: IOAPIC id 18 under DRHD base  0xfbffc000 IOMMU 3
[    3.828453] DMAR-IR: IOAPIC id 17 under DRHD base  0xee7fc000 IOMMU 2
[    3.828455] DMAR-IR: IOAPIC id 16 under DRHD base  0xe0ffc000 IOMMU 1
[    3.828456] DMAR-IR: IOAPIC id 15 under DRHD base  0xd37fc000 IOMMU 0
[    3.828457] DMAR-IR: IOAPIC id 8 under DRHD base  0x9d7fc000 IOMMU 7
[    3.828459] DMAR-IR: IOAPIC id 9 under DRHD base  0x9d7fc000 IOMMU 7
root@zj-x86:~#
root@zj-x86:~# dmesg | grep -e DMAR -e IOMMU
[    0.009844] ACPI: DMAR 0x0000000077683000 000258 (v01 INSYDE SKYLAKE  00000001 ACPI 00000001)
[    3.828386] DMAR: Host address width 46
[    3.828387] DMAR: DRHD base: 0x000000d37fc000 flags: 0x0
[    3.828393] DMAR: dmar0: reg_base_addr d37fc000 ver 1:0 cap 8d2078c106f0466 ecap f020df
[    3.828395] DMAR: DRHD base: 0x000000e0ffc000 flags: 0x0
[    3.828399] DMAR: dmar1: reg_base_addr e0ffc000 ver 1:0 cap 8d2078c106f0466 ecap f020df
[    3.828400] DMAR: DRHD base: 0x000000ee7fc000 flags: 0x0
[    3.828404] DMAR: dmar2: reg_base_addr ee7fc000 ver 1:0 cap 8d2078c106f0466 ecap f020df
[    3.828406] DMAR: DRHD base: 0x000000fbffc000 flags: 0x0
[    3.828409] DMAR: dmar3: reg_base_addr fbffc000 ver 1:0 cap 8d2078c106f0466 ecap f020df
[    3.828411] DMAR: DRHD base: 0x000000aaffc000 flags: 0x0
[    3.828414] DMAR: dmar4: reg_base_addr aaffc000 ver 1:0 cap 8d2078c106f0466 ecap f020df
[    3.828416] DMAR: DRHD base: 0x000000b87fc000 flags: 0x0
[    3.828421] DMAR: dmar5: reg_base_addr b87fc000 ver 1:0 cap 8d2078c106f0466 ecap f020df
[    3.828423] DMAR: DRHD base: 0x000000c5ffc000 flags: 0x0
[    3.828426] DMAR: dmar6: reg_base_addr c5ffc000 ver 1:0 cap 8d2078c106f0466 ecap f020df
[    3.828428] DMAR: DRHD base: 0x0000009d7fc000 flags: 0x1
[    3.828433] DMAR: dmar7: reg_base_addr 9d7fc000 ver 1:0 cap 8d2078c106f0466 ecap f020df
[    3.828434] DMAR: RMRR base: 0x000000772e2000 end: 0x000000772e4fff
[    3.828436] DMAR: ATSR flags: 0x0
[    3.828438] DMAR: RHSA base: 0x0000009d7fc000 proximity domain: 0x0
[    3.828439] DMAR: RHSA base: 0x000000aaffc000 proximity domain: 0x0
[    3.828440] DMAR: RHSA base: 0x000000b87fc000 proximity domain: 0x0
[    3.828441] DMAR: RHSA base: 0x000000c5ffc000 proximity domain: 0x0
[    3.828442] DMAR: RHSA base: 0x000000d37fc000 proximity domain: 0x2
[    3.828444] DMAR: RHSA base: 0x000000e0ffc000 proximity domain: 0x2
[    3.828445] DMAR: RHSA base: 0x000000ee7fc000 proximity domain: 0x2
[    3.828446] DMAR: RHSA base: 0x000000fbffc000 proximity domain: 0x2
[    3.828448] DMAR-IR: IOAPIC id 12 under DRHD base  0xc5ffc000 IOMMU 6
[    3.828449] DMAR-IR: IOAPIC id 11 under DRHD base  0xb87fc000 IOMMU 5
[    3.828451] DMAR-IR: IOAPIC id 10 under DRHD base  0xaaffc000 IOMMU 4
[    3.828452] DMAR-IR: IOAPIC id 18 under DRHD base  0xfbffc000 IOMMU 3
[    3.828453] DMAR-IR: IOAPIC id 17 under DRHD base  0xee7fc000 IOMMU 2
[    3.828455] DMAR-IR: IOAPIC id 16 under DRHD base  0xe0ffc000 IOMMU 1
[    3.828456] DMAR-IR: IOAPIC id 15 under DRHD base  0xd37fc000 IOMMU 0
[    3.828457] DMAR-IR: IOAPIC id 8 under DRHD base  0x9d7fc000 IOMMU 7
[    3.828459] DMAR-IR: IOAPIC id 9 under DRHD base  0x9d7fc000 IOMMU 7
[    3.828460] DMAR-IR: HPET id 0 under DRHD base 0x9d7fc000
[    3.828461] DMAR-IR: x2apic is disabled because BIOS sets x2apic opt out bit.
[    3.828462] DMAR-IR: Use 'intremap=no_x2apic_optout' to override the BIOS setting.
[    3.830073] DMAR-IR: Enabled IRQ remapping in xapic mode
root@zj-x86:~#
ls /sys/bus/pci/devices/0000:80:08.0/iommu_group/devices/ -al
Surveying Your Motherboard’s PCI Device Architecture
So, the motherboard I’m using for this demonstration is listed above. Your results will vary depending on the way in which your motherboard is designed, but the principles laid out here should give you the understanding and tools you need to figure out the capabilities of your hardware and design on that basis.
VT-d and KVM support IOMMU remapping based on IOMMU groups, which are collections of PCI devices to which control may be passed. You can’t always simply pass control to a particular hard disk; it is often the case that the hard disk will connect to a port that is part of a single controller providing a number of the other ports physically near by. This entire controller will need to be passed to the guest, so this can require some planning to ensure you don’t assign, say, a four-port SATA controller to a guest which needs only two hard disks if it can be avoided.
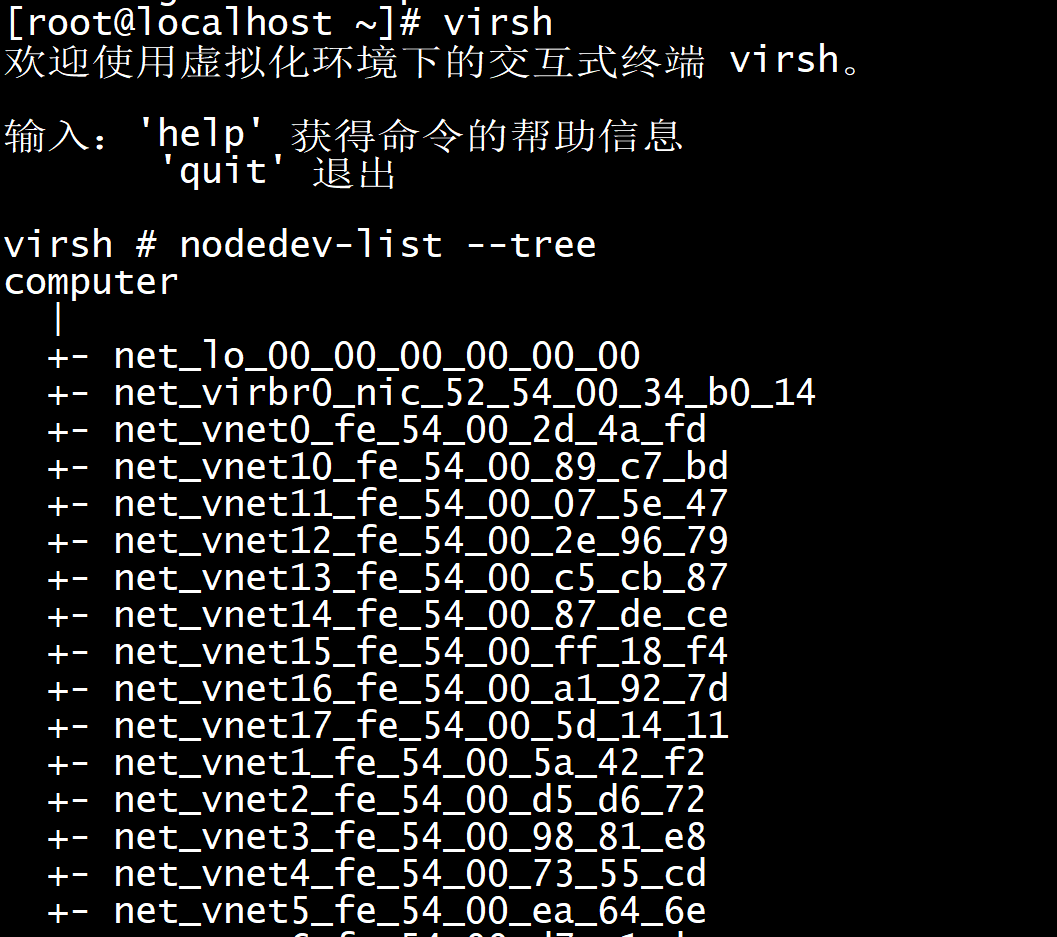
The first thing to do is check out the layout of the system in virsh:
$ sudo virsh
virsh # nodedev-list --tree
computer
  |
  +- net_lo_00_00_00_00_00_00
  +- pci_0000_00_00_0
  +- pci_0000_00_02_0
  +- pci_0000_00_14_0
  |   |
  |   +- usb_usb1
  |   |   |
  |   |   +- usb_1_0_1_0
  |   |   +- usb_1_1
  |   |   |   |
  |   |   |   +- usb_1_1_1_0
  |   |   |       |
  |   |   |       +- scsi_host8
  |   |   |           |
  |   |   |           +- scsi_target8_0_0
  |   |   |               |
  |   |   |               +- scsi_8_0_0_0
  |   |   |                   |
  |   |   |                   +- block_sdf_SanDisk_Cruzer_Fit_4C530009730716110301_0_0
  |   |   |                   +- scsi_generic_sg5
  |   |   |
  |   |   +- usb_1_2
  |   |       |
  |   |       +- usb_1_2_1_0
  |   |
  |   +- usb_usb2
  |       |
  |       +- usb_2_0_1_0
  |
  +- pci_0000_00_16_0
...
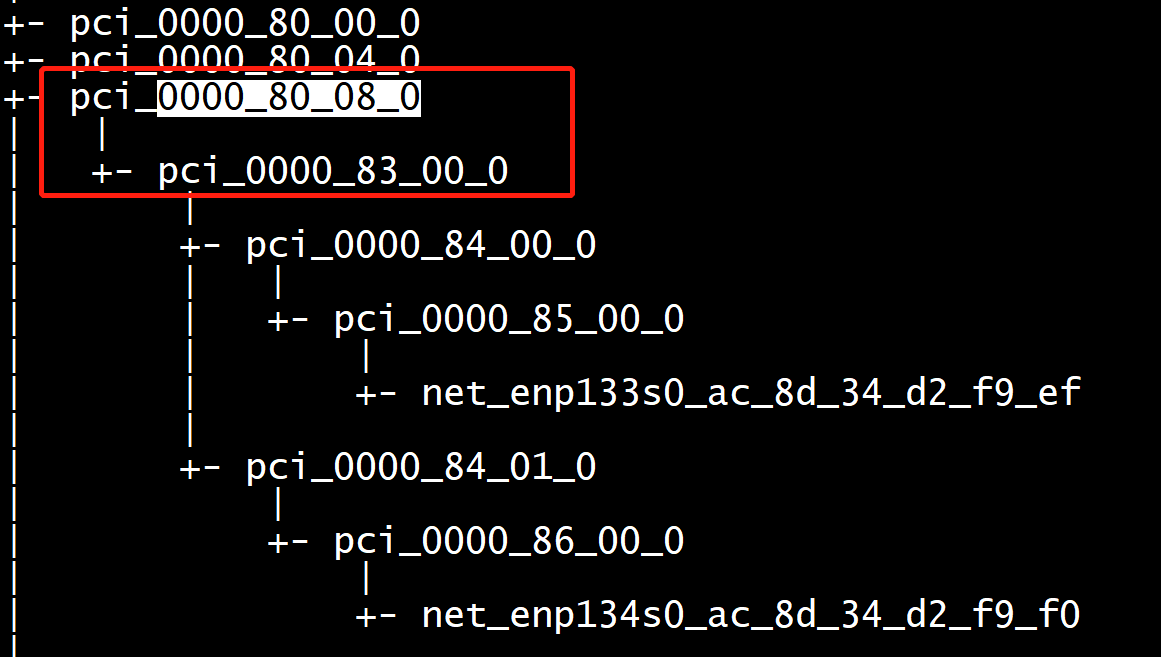
The capture above is only a small fraction of the entire device map of my motherboard. In it, we can see a general form which will be repeated and modified throughout the tree. The device nodes whose labels begin with “pci_” are going to be the devices we can consider passing through to our guests, though even the top-level pci_ devices may be in the same IOMMU group (and therefore require that they be jointly added to any given guest domain).
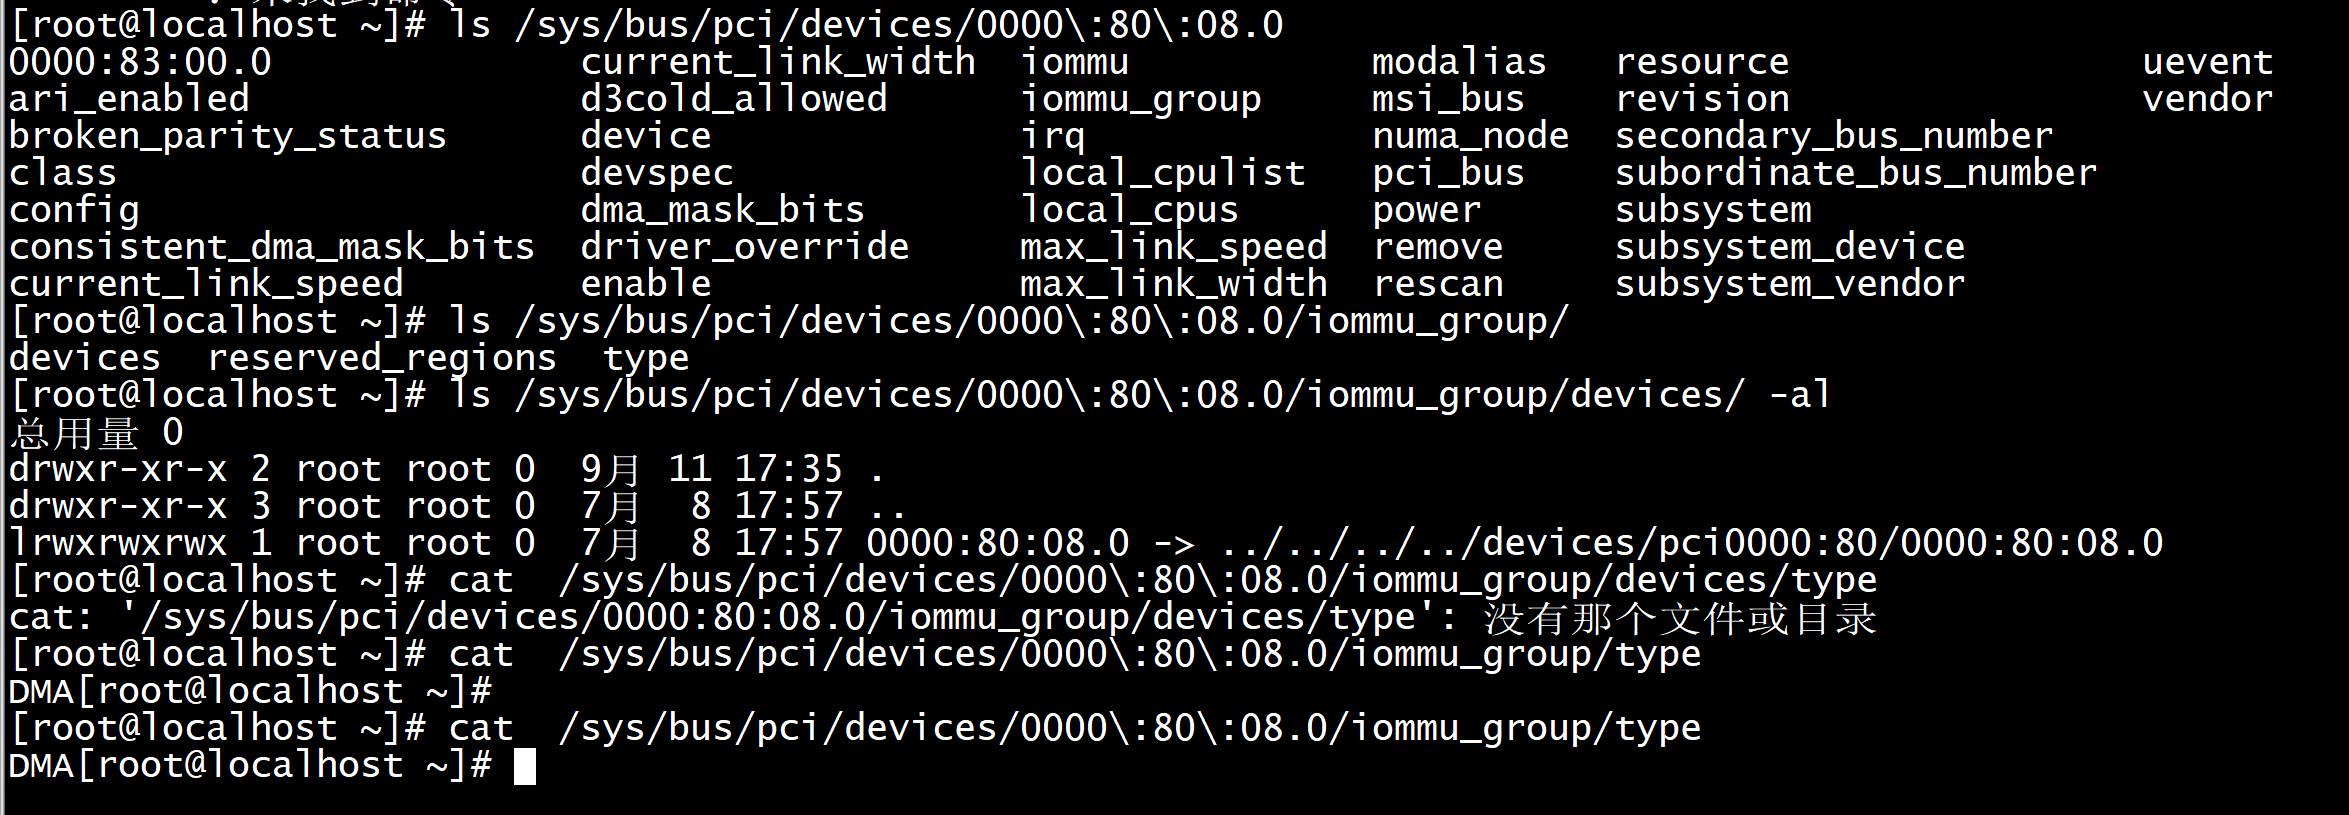
The most expedient way to go about this is to identify the PCI devices hosting the hardware you are interested in passing directly to guest domains and check on their groups by referencing their corresponding virtual file system directories in /sys/bus/pci/devices/. For example, if I were interested in the device labeled “pci_0000_00_1f_0”, I would query as follows:
$ ll /sys/bus/pci/devices/0000:00:1f.0/iommu_group/devices/
     lrwxrwxrwx. 1 root root 0 May  3 10:29 0000:00:1f.0 -> ../../../../devices/pci0000:00/0000:00:1f.0
     lrwxrwxrwx. 1 root root 0 May  3 10:29 0000:00:1f.2 -> ../../../../devices/pci0000:00/0000:00:1f.2
     lrwxrwxrwx. 1 root root 0 May  3 10:29 0000:00:1f.3 -> ../../../../devices/pci0000:00/0000:00:1f.3
This provides the other PCI devices sharing an IOMMU Group with the queried device. So, what we see above is that pci_0000_00_1f.0 must be passed to a guest domain along with devices pci_0000_00_1f.2 and pci_0000_00_1f.3.
If we look at the portion of my device tree which represents these objects, we find that all three devices appear as top-level nodes, so there doesn’t appear to be any way to discern IOMMU Group membership from the virsh nodedev-list output. Unfortunately, the best I know to do is investigate each PCI device of interest individually to gain an understanding of the group topology and plan accordingly.
Detaching PCI Devices in Preparation for Guest Domain Control Transfer
Assuming we had identified the IOMMU Group containing these three PCI devices (above) as the group whose control we would like to transfer to the guest domain, we must now detach these devices from the virtualization platform operating system’s kernel (which is acting as the hypervisor for the guest domains), leaving them available to be controlled by the target guest domain.
#If you're already in virsh, omit the first step:
$ sudo virsh
virsh # nodedev-dettach pci_0000_00_1f_0
Device pci_0000_00_1f_0 detached
virsh # nodedev-dettach pci_0000_00_1f_2
Device pci_0000_00_1f_2 detached
virsh # nodedev-dettach pci_0000_00_1f_3
Device pci_0000_00_1f_3 detached
Using virsh and the Virtual Machine Manager to Grant Device Control to Guest Domains
Brief Apology: I like a command-line-centric approach to problems as much as anyone, but the Virtual Machine Manager is an excellent piece of software, and its GUI interface for the next steps is just a lot easier than the virsh path. I may write instructions for the latter at a later date, but if you’re managing a hypervisor arrangement of this complexity, I imagine you have VMM installed on a remote workstation anyway, or you don’t need me to tell you how to do this in virsh.
Once the device groups are identified and the guest domains are ready to have the devices added (all other hardware choices have been made), open the Virtual Machine Manager and:
- Select the relevant guest domain
- Select Open and then Show virtual hardware details in the upper right.
- Choose Add Hardware in the bottom left.
- Select PCI Host Device from the list of options on the left.
- Locate the PCI devices in the IOMMU Group whose control you wish to transfer to the guest domain which have the values recorded from the nodedev-list output above, converting underscores to colons as demonstrated in the sys virtual file system path above, and add them individually to the guest domain until all have been added.
So, continuing the example using the PCI device IDs provided above, I would search the list for three PCI devices whose addresses read as 0000:00:1f:0, 0000:00:1f:2, and 0000:00:1f:3.
Start the Guest Domain
And enjoy! If all has gone well, you should have no problems. If something has gone wrong, your guest domain will likely suffer a kernel panic, so the problem will be apparent immediately.
Welcome to the cutting edge of modern system engineering! It is flat-out amazing what we can do with commodity hardware.