一、Spring框架
Spring是一个基于IOC和AOP的结构J2EE系统的框架。
1、IOC反转控制是Spring的基础(Inversion Of Control)。也就是说创建对象由以前的程序员自己new构造方法来调用,变成了交给Spring创建对象。
2、DI依赖注入(Dependency Inject):就是拿到的对象的属性,已经被注入好相关值了,可以直接使用。
3、将lib.jar导入到新建的Spring项目的lib目录(类库)中。
导入jar包方法:右键project->properties->java build path->libaries->add external jars就行。
4、在src目录下,建立两个文件夹,一个pojo(放实体类),一个test(测试用)
准备pojo Product,用来测试IOC和DI


package com.demo.pojo;
public class Product{
    private int id;
    private String name;
    //属性的getter和setter方法
    public int getId(){
        return id;
    }
    public void setId(int id){
        this.id=id;
    }
    public String getName(){
        return name;
    }
    public void setName(String name){
        this.name=name;
    }
}
5、在src目录下新建一个applicationContext.xml文件
applicationContext.xml是Spring的核心配置文件,通过配置bean的属性,根据关键字product来获取Product对象,该对象获取的时候,被注入了字符串"Apple"到属性中。
<?xml version="1.0" encoding="UTF-8"?>
<beans xmlns="http://www.springframework.org/schema/beans"
            xmlns:xsi="http://www.w3.org/2001/XMLSchema-instance"
            xmlns:aop="http://www.springframework.org/schema/aop"
            xmlns:tx="http://www.springframework.org/schema/tx"
            xmlns:context="http://www.springframework.org/schema.context"
            xsi:schemaLocation="
                        http://www.springframework.org/schema/beans
                        http://www.springframework.org/schema/beans/spring-beans-3.0.xsd
                        http://www.springframework.org/schema/aop
                        http://www.springframework.org/schema/aop/spring-aop-3.0.xsd
                        http://www.springframework.org/schema/tx
                        http://www.springframework.org/schema/tx/spring-tx-3.0.xsd
                        http://www.springframework.org/schema/context
                        http://www.springframework.org/schema/context/spring-context-3.0.xsd">
    <bean name="product" class="com.demo.pojo.Product">
        <property name="name" value="Apple"/>
    </bean>
</beans>
6、测试TestSpring
在test文件夹下,建立TestSpring
package com.demo.test;

import org.springframework.context.ApplicationContext;
import org.springframework.support.ClassPathXmlApplicationContext;

import com.demo.pojo.Product;

public class TestSpring{
    public static void main(String[] args){
    //加载applicationContext.xml配置文件
        ApplicationContext context=new ClassPathXmlApplicationContext(new String[]{"applicationContext.xml"});
        //根据ApplicationContext对象提供的getBean()方法,获取配置bean的name属性值。
        Product product=(Product)context.getBean("product");
        System.out.println(product.getName());
    }
}
7、工作原理:
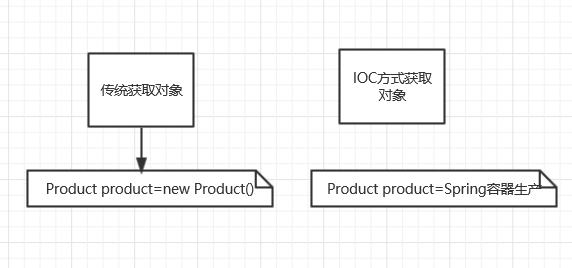
IOC方式获取对象方式:对象的生命周期交给Spring来管理,直接从Spring那里获取一个对象。
传统方式:通过new关键字主动创建一个对象。
二、注入对象
之前直接对Product的name属性注入"Apple"字符串,这一次我们注入一个Category分类对象。
1、首先修改Product.java实体类,新增一个Category属性。
package com.demo.pojo;
public class Product{
    private int id;
    private String name;
    private Category category;//类别属性
    //属性的getter和setter方法
    public int getId(){
        return id;
    }
    public void setId(int id){
        this.id=id;
    }
    public String getName(){
        return name;
    }
    public void setName(String name){
        this.name=name;
    }
    public Category getCategory(){
        return category;
    }
    pulic vodi setCategory(Category category){
        this.category=category;
    }
}
2、修改applicationContext.xml配置文件
在创建Product的时候注入一个Category对象,这里要使用ref来注入另一个对象。
<?xml version="1.0" encoding="UTF-8"?>
<beans xmlns="http://www.springframework.org/schema/beans"
            xmlns:xsi="http://www.w3.org/2001/XMLSchema-instance"
            xmlns:aop="http://www.springframework.org/schema/aop"
            xmlns:tx="http://www.springframework.org/schema/tx"
            xmlns:context="http://www.springframework.org/schema.context"
            xsi:schemaLocation="
                        http://www.springframework.org/schema/beans
                        http://www.springframework.org/schema/beans/spring-beans-3.0.xsd
                        http://www.springframework.org/schema/aop
                        http://www.springframework.org/schema/aop/spring-aop-3.0.xsd
                        http://www.springframework.org/schema/tx
                        http://www.springframework.org/schema/tx/spring-tx-3.0.xsd
                        http://www.springframework.org/schema/context
                        http://www.springframework.org/schema/context/spring-context-3.0.xsd">
    <bean name="product" class="com.demo.pojo.Product">
        <property name="name" value="Apple"/>
        <property name="category" ref="Category"/><!--将category对象注入到product-->
    </bean>
    <!--配置Category的bean-->
    <bean name="category" class="com.demo.pojo.Category">
        <property name="name" value="Fruit"/>
    </bean>
</beans>
3、TestSpring测试
通过Spring获取Product对象被注入的Category对象
package com.demo.test;

import org.springframework.context.ApplicationContext;
import org.springframework.support.ClassPathXmlApplicationContext;

import com.demo.pojo.Product;

public class TestSpring{
    public static void main(String[] args){
    //加载applicationContext.xml配置文件
        ApplicationContext context=new ClassPathXmlApplicationContext(new String[]{"applicationContext.xml"});
        //根据ApplicationContext对象提供的getBean()方法,获取配置bean的name属性值。
        Product product=(Product)context.getBean("product");
        System.out.println(product.getName());//Apple
        System.out.pringln(product.getCategory().getName());//Fruit
    }
}
三、采用注解的方式进行IOC/DI
1、修改applicationContext.xml
添加配置:
<context:annotation-config/>
具体配置修改如下:
<?xml version="1.0" encoding="UTF-8"?>
<beans xmlns="http://www.springframework.org/schema/beans"
            xmlns:xsi="http://www.w3.org/2001/XMLSchema-instance"
            xmlns:aop="http://www.springframework.org/schema/aop"
            xmlns:tx="http://www.springframework.org/schema/tx"
            xmlns:context="http://www.springframework.org/schema.context"
            xsi:schemaLocation="
                        http://www.springframework.org/schema/beans
                        http://www.springframework.org/schema/beans/spring-beans-3.0.xsd
                        http://www.springframework.org/schema/aop
                        http://www.springframework.org/schema/aop/spring-aop-3.0.xsd
                        http://www.springframework.org/schema/tx
                        http://www.springframework.org/schema/tx/spring-tx-3.0.xsd
                        http://www.springframework.org/schema/context
                        http://www.springframework.org/schema/context/spring-context-3.0.xsd">
    <context:annotation-config/
    <bean name="product" class="com.demo.pojo.Product">
        <property name="name" value="Apple"/>
        <!--<property name="category" ref="Category"/><!--将category对象注入到product--><!--注释掉刚才给Product注入的category属性,后面采用注解完成该操作-->
    </bean>
    <!--配置Category的bean-->
    <bean name="Category" class="com.demo.pojo.Category">
        <property name="name" value="Fruit"/>
    </bean>
2、采用注解@Autowired
2.1、在Product.java的Category属性上面加上@Autowired注解
package com.demo.pojo;
public class Product{
    private int id;
    private String name;
    @Autowried//采用注解注入Category属性,不用在xml配置bean的Product引入Category
    private Category category;//类别属性
    //属性的getter和setter方法
    public int getId(){
        return id;
    }
    public void setId(int id){
        this.id=id;
    }
    public String getName(){
        return name;
    }
    public void setName(String name){
        this.name=name;
    }
    public Category getCategory(){
        return category;
    }
    pulic vodi setCategory(Category category){
        this.category=category;
    }
}
2.2、也可以在setCategory方法上面加上@Autowired注解,达到同样效果
package com.demo.pojo;
public class Product{
    private int id;
    private String name;
    //@Autowried//采用注解注入Category属性,不用在xml配置bean的Product引入Category
    private Category category;//类别属性
    //属性的getter和setter方法
    public int getId(){
        return id;
    }
    public void setId(int id){
        this.id=id;
    }
    public String getName(){
        return name;
    }
    public void setName(String name){
        this.name=name;
    }
    public Category getCategory(){
        return category;
    }
    @Autowried
    pulic void setCategory(Category category){
        this.category=category;
    }
}
2.3、还可以采用@Resource注解
package com.demo.pojo;
import javax.annotation.Resource;
public class Product{
    private int id;
    private String name;
    //@Autowried//采用注解注入Category属性,不用在xml配置bean的Product引入Category
    @Resource(name="category")
    private Category category;//类别属性
    //属性的getter和setter方法
    public int getId(){
        return id;
    }
    public void setId(int id){
        this.id=id;
    }
    public String getName(){
        return name;
    }
    public void setName(String name){
        this.name=name;
    }
    public Category getCategory(){
        return category;
    }
    //@Autowried
    pulic void setCategory(Category category){
        this.category=category;
    }
}
3、TestSpring测试
package com.demo.test;

import org.springframework.context.ApplicationContext;
import org.springframework.support.ClassPathXmlApplicationContext;

import com.demo.pojo.Product;

public class TestSpring{
    public static void main(String[] args){
    //加载applicationContext.xml配置文件
        ApplicationContext context=new ClassPathXmlApplicationContext(new String[]{"applicationContext.xml"});
        //根据ApplicationContext对象提供的getBean()方法,获取配置bean的name属性值。
        Product product=(Product)context.getBean("product");
        System.out.println(product.getName());//Apple
        System.out.pringln(product.getCategory().getName());//Fruit
    }
}
4、也可以不用再applicationContext.xml中一个一个配置bean。
配置bean属性的都去掉,直接加上:
<context:component-scan base-package="com.demo.pojo"/>
作用:告诉Spring,bean都放在com.demo.pojo包下
applicationContext.xml修改为:
<?xml version="1.0" encoding="UTF-8"?>
<beans xmlns="http://www.springframework.org/schema/beans"
            xmlns:xsi="http://www.w3.org/2001/XMLSchema-instance"
            xmlns:aop="http://www.springframework.org/schema/aop"
            xmlns:tx="http://www.springframework.org/schema/tx"
            xmlns:context="http://www.springframework.org/schema.context"
            xsi:schemaLocation="
                        http://www.springframework.org/schema/beans
                        http://www.springframework.org/schema/beans/spring-beans-3.0.xsd
                        http://www.springframework.org/schema/aop
                        http://www.springframework.org/schema/aop/spring-aop-3.0.xsd
                        http://www.springframework.org/schema/tx
                        http://www.springframework.org/schema/tx/spring-tx-3.0.xsd
                        http://www.springframework.org/schema/context
                        http://www.springframework.org/schema/context/spring-context-3.0.xsd">

    <context:component-scan base-package="com.demo.pojo"/>

</beans>
4.1、使用@Component注解,为pojo加上注解,说明这个类是bean
Product.java:
package com.demo.pojo;
import javax.annotation.Resource;

import org.springframework.beans.factory.annotation.Autowired;
import org.springframework.stereotype.Component;

@Component("product")
public class Product{
    private int id;
    private String name="Apple";
    //@Autowried//采用注解注入Category属性,不用在xml配置bean的Product引入Category
    @Resource(name="category")
    private Category category;//类别属性
    //属性的getter和setter方法
    public int getId(){
        return id;
    }
    public void setId(int id){
        this.id=id;
    }
    public String getName(){
        return name;
    }
    public void setName(String name){
        this.name=name;
    }
    public Category getCategory(){
        return category;
    }
    //@Autowried
    pulic void setCategory(Category category){
        this.category=category;
    }
}
Category.java
package com.demo.pojo;

import org.springframework.stereotype.Component;

@Component("category")
public class Category {

    private int id;
    private String name="Fruit";

    public int getId() {
        return id;
    }
    public void setId(int id) {
        this.id = id;
    }
    public String getName() {
        return name;
    }
    public void setName(String name) {
        this.name = name;
    }
}
4.2、TestSpring测试
package com.demo.test;

import org.springframework.context.ApplicationContext;
import org.springframework.support.ClassPathXmlApplicationContext;

import com.demo.pojo.Product;

public class TestSpring{
    public static void main(String[] args){
    //加载applicationContext.xml配置文件
        ApplicationContext context=new ClassPathXmlApplicationContext(new String[]{"applicationContext.xml"});
        //根据ApplicationContext对象提供的getBean()方法,获取配置bean的name属性值。
        Product product=(Product)context.getBean("product");
        System.out.println(product.getName());//Apple
        System.out.pringln(product.getCategory().getName());//Fruit
    }
}