环境准备
三台机器:
vm-a 10.200.110.90 centos7
vm-b 10.200.110.91 centos7
vm-c 10.200.110.93 centos7
Consul官网(https://www.consul.io/downloads.html)下载相应系统的consul可执行文件并放系统PATH环境变量目录内。
我下载的是consul_1.4.3_linux_amd64.zip,在上面的每台机器上解压,并拷贝到/usr/local/bin目录下。
unzip consul_1.4.3_linux_amd64.zip
mv cosul /usr/local/bin
集群启动
10.200.110.90启动consul
consul agent -server -bootstrap-expect=3 -data-dir=/tmp/consul -node=10.200.110.90 -bind=10.200.110.90 -client=0.0.0.0 -datacenter=shenzhen -ui
10.200.110.91启动consul
consul agent -server -bootstrap-expect 3 -data-dir /tmp/consul -node 10.200.110.91 -bind=10.200.110.91 -client=0.0.0.0 -datacenter shenzhen -ui
10.200.110.93启动consul
consul agent -server -bootstrap-expect 3 -data-dir /tmp/consul -node 10.200.110.93 -bind=10.200.110.93 -client=0.0.0.0 -datacenter shenzhen -ui
参数说明:
- server: 以server身份启动。默认是client
- bootstrap-expect:集群要求的最少server数量,当低于这个数量,集群即失效。
- data-dir:data存放的目录,更多信息请参阅consul数据同步机制
- node:节点id,集群中的每个node必须有一个唯一的名称。默认情况下,Consul使用机器的hostname
- bind:监听的ip地址。默认绑定0.0.0.0,可以不指定。表示Consul监听的地址,而且它必须能够被集群中的其他节点访问。Consul默认会监听第一个private IP,但最好还是提供一个。生产设备上的服务器通常有好几个网卡,所以指定一个不会出错
- client: 客户端的ip地址,0.0.0.0是指谁都可以访问(不加这个,下面的ui :8500无法访问)
- ui: 可以访问UI界面
- -config-dir指定配置文件夹,Consul会加载其中的所有文件
- -datacenter 指定数据中心名称,默认是dc1
此时三台机器都会打印:
    2019/03/20 10:57:36 [INFO] agent: Started HTTP server on 127.0.0.1:8500 (tcp)
    2019/03/20 10:57:36 [INFO] agent: started state syncer
    2019/03/20 10:57:44 [ERR] agent: failed to sync remote state: No cluster leader
此时三台机器还未join,不能算是一个集群,三台机器上的consul均不能正常工作,因为leader未选出。
三台机器组成consul集群
consul集群:当一个consul agent启动后,它不知道任何其他节点,要学习到集群中的其他节点,agent必须加入一个已经存在的集群(cluster)。要加入这样的集群,它只需要知道这个集群中的一个节点即可。它加入后,将会和这个member gossip(交谈)并迅速发现集群中的其他节点。一个consul agent可以加入任何类型的其他agent,而不只是那些运行于server mode的agent。
分别登录第2台和第3台虚拟机上执行如下命令,让consul加入集群:
10.200.110.91加入10.200.110.90
[root@localhost consul-cluster]# consul join 10.200.110.90
Successfully joined cluster by contacting 1 nodes.
[root@localhost consul-cluster]#
10.200.110.93加入10.200.110.90
[root@localhost consul-cluster]# consul join 10.200.110.90
Successfully joined cluster by contacting 1 nodes.
[root@localhost consul-cluster]#
很快三台机器都会打印:
    2019/03/20 10:59:12 [INFO] raft: Added peer d89335fd-cfb8-1fc0-3902-b847e125fa2c, starting replication
    2019/03/20 10:59:12 [INFO] consul: cluster leadership acquired
    2019/03/20 10:59:12 [INFO] consul: New leader elected: 10.200.110.90
证明此时leader已经选出,集群可以正常工作。访问:http://10.200.110.90:8500/
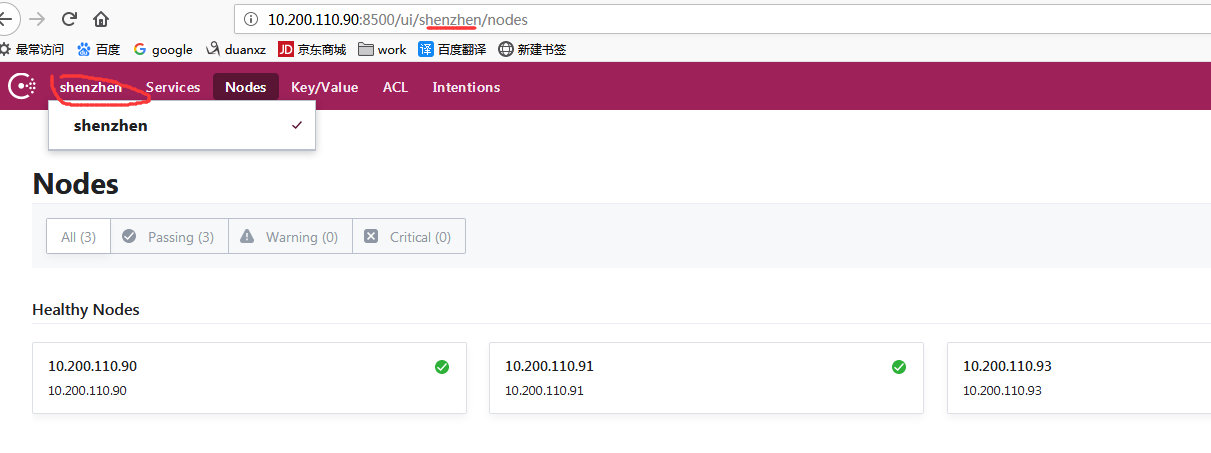
上图中的下拉框是datacenter的选项。
集群状态查看
[root@localhost ~]# consul operator raft list-peers
Node           ID                                    Address             State     Voter  RaftProtocol
10.200.110.90  239bfd6a-28d0-094a-4d93-09bf81414528  10.200.110.90:8300  leader    true   3
10.200.110.91  d1b05900-4f8f-b956-5ba6-5a3c798d93d3  10.200.110.91:8300  follower  true   3
10.200.110.93  d89335fd-cfb8-1fc0-3902-b847e125fa2c  10.200.110.93:8300  follower  true   3
[root@localhost ~]#
查看members状态:
[root@localhost ~]# consul members
Node           Address             Status  Type    Build  Protocol  DC        Segment
10.200.110.90  10.200.110.90:8301  alive   server  1.4.3  2         shenzhen  <all>
10.200.110.91  10.200.110.91:8301  alive   server  1.4.3  2         shenzhen  <all>
10.200.110.93  10.200.110.93:8301  alive   server  1.4.3  2         shenzhen  <all>
[root@localhost ~]#
集群参数get/set测试
10.200.110.93的set操作:
[root@localhost ~]# consul kv put addr nanshan
Success! Data written to: addr
[root@localhost ~]#
10.200.110.91的get操作:
[root@localhost consul-cluster]# consul kv get addr
nanshan
[root@localhost consul-cluster]#
在10.200.110.90可以正常设置key的值为value,并能正常查回来。三台机器获取key的值均为value,如此可知key的值已经在集群中同步。
集群单机故障处理
单机consul进程故障发生
杀死三台机器中任意一台机器上的consul进程,这里杀死leader 192.168.1.235
在10.200.110.90机器上执行:
[root@localhost ~]# ps -ef | grep consul
root      24811   7330  6 10:57 pts/0    00:12:44 consul agent -server -bootstrap-expect=3 -data-dir=/tmp/consul -node=10.200.110.90 -bind=10.200.110.90 -datacenter=shenzhen -ui
root      24957  24939  0 13:59 pts/1    00:00:00 grep --color=auto consul
[root@localhost ~]# kill -9 24811
[root@localhost ~]#
此时看此台机器上的consul的log:
    2019/03/20 11:03:36 [INFO] serf: EventMemberUpdate: 10.200.110.93.shenzhen
    2019/03/20 11:03:37 [WARN] raft: Failed to contact d89335fd-cfb8-1fc0-3902-b847e125fa2c in 2.500740308s
    2019/03/20 11:03:37 [INFO] raft: pipelining replication to peer {Voter d89335fd-cfb8-1fc0-3902-b847e125fa2c 10.200.110.93:8300}
已杀死
[root@localhost consul-cluster]#
Consul进程已经在这台机器上退出。
此时都会10.200.110.91和10.200.110.93都会打印
[ERR] agent: failed to sync remote state:No cluster leader
[WARN] raft: Heartbeat timeout from"10.200.110.90:8300" reached, starting election
Leader丢失,剩下的两台机重新进行leader选举
[root@localhost ~]# consul operator raft list-peers
Node           ID                                    Address             State     Voter  RaftProtocol
10.200.110.93  d89335fd-cfb8-1fc0-3902-b847e125fa2c  10.200.110.93:8300  leader    true   3
10.200.110.91  d1b05900-4f8f-b956-5ba6-5a3c798d93d3  10.200.110.91:8300  follower  true   3
10.200.110.90  239bfd6a-28d0-094a-4d93-09bf81414528  10.200.110.90:8300  follower  true   3
[root@localhost ~]#
此时再对10.200.110.91和10.200.110.93进行key的get/set操作:
[root@localhost ~]# consul kv get addr
nanshan
[root@localhost ~]#
均能正常get到key的值为nanshan。
Consul 多数据中心配置 MULTIPLE DATACENTERS
在consul集群中,多数据中心可以进行配置:
LAN gossip pool包含了同一局域网内所有节点,包括server与client。这基本上是位于同一个数据中心DC。
WAN gossip pool一般仅包含server,将跨越多个DC数据中心,通过互联网或广域网进行通信。
我们之前讲过的启动集群命令使用的是-bootstrap 来作为服务的启动:
10.200.110.95启动consul
consul agent -server -bootstrap-expect 3 -data-dir /tmp/consul -node 10.200.110.95 -bind=10.200.110.93 -datacenter guangzhou -ui
查询当前集群下拥有的datacenter信息:
consul members -wan
我这里有两个数据中心shenzhen和guangzhou,使用下面的命令将数据中心互相可见:
[root@localhost ~]# consul join -wan 10.200.110.91
Successfully joined cluster by contacting 1 nodes.
[root@localhost ~]#
多数据中心就配好了,在之前的UI中也可以看到了: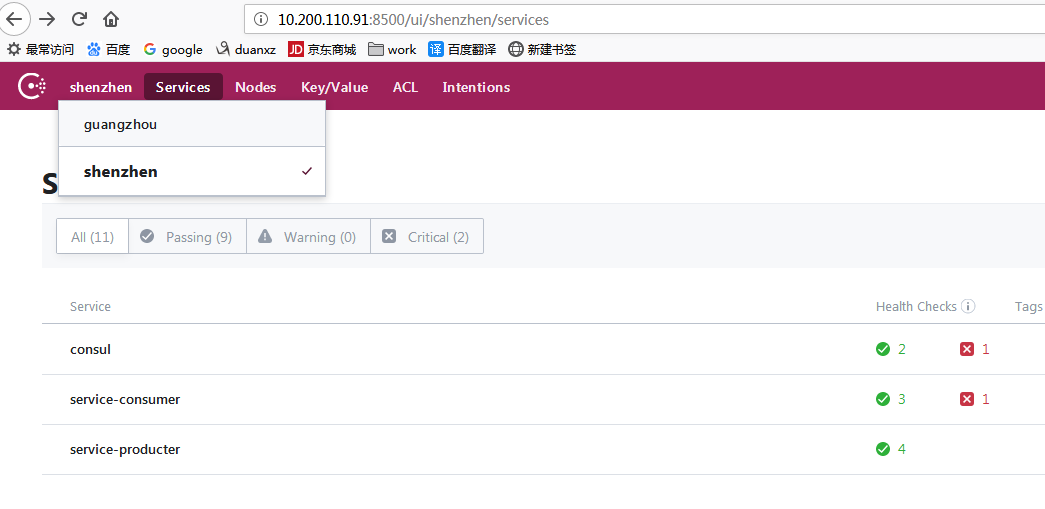
查询当前集群下拥有的datacenter信息:
[root@localhost ~]# consul members -wan
Node                     Address             Status  Type    Build  Protocol  DC         Segment
10.200.110.91.shenzhen   10.200.110.91:8302  alive   server  1.4.3  2         shenzhen   <all>
10.200.110.93.shenzhen   10.200.110.93:8302  alive   server  1.4.3  2         shenzhen   <all>
10.200.110.95.guangzhou  10.200.110.95:8302  alive   server  1.4.3  2         guangzhou  <all>
[root@localhost ~]#
参照consul部署,部署两个数据中dc1和dc2。数据中心的名字对consul而言是不透明的,它们只是用于管理员与consul交互使用。
通过consulmembers –wan命令可以查询WAN中的节点:
$ consul members-wan
...
输出结果是WAN gossip pool中的节点列表,只包含server节点。 client节点只会想本地数据中的server节点发送请求,不会加入WAN Gossip Pool。Client请求会通过本地数据中的Server节点转发到目标数据中心。
下一步是保证所有的Server节点均加入到WAN gossip Pool。
$ consul join -wan<server 1> <server 2> ...
...
join命令加上-wan参数,是讲Server加入到WAN gossip pool。而LAN gossip pool,只需要加入到现有的某个Server节点即可,和通过gossip协议与其他成员交换信息即可知道所有的成员节点。然而,对于启动的consul的Server,只知道自己的信息,必须添加到群集中。
一旦加入完成,基于WAN通过gossip协议就可以使用members命令查询所有的Server节点。
我们也可以通过HTTP API来查询所有的数据中心:
$ curlhttp://localhost:8500/v1/catalog/datacenters
["dc1", "dc2"]
做一个简单的测试,查询某个数据中心的所有节点:
$ curlhttp://localhost:8500/v1/catalog/nodes?dc=dc1
...
$ curlhttp://localhost:8500/v1/catalog/nodes?dc=dc2
...
构建多数据中心,网络需要满足如下要求:1.所有的Server节点都是互通,否则,基于gossip协议的RPC转发将无法工作。如果服务发现是可以跨数据中心,网络必须能够跨区域之间的路由的IP地址以及。2.如果使用服务发现,那么所有的数据中心都是互通的,或者基于VPN或其他隧道机制是互通的。Consul不能处理VPN、address rewritting,或者NAT traversal。
SpringCloud在consul集群示例
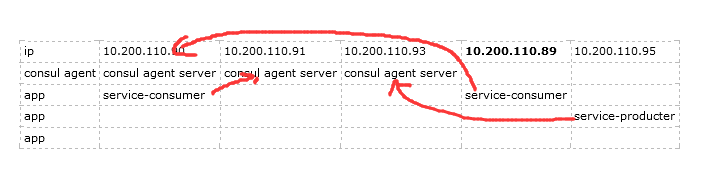
环境:
| ip | 10.200.110.90 | 10.200.110.91 | 10.200.110.93 | 10.200.110.89 | 10.200.110.95 |
| consul agent | consul agent server | consul agent server | consul agent server | ||
| app | service-consumer | service-consumer | |||
| app | service-producter | ||||
| app |
应用注册consul为:
应用启动时注册到consul集群的命令行:
java -jar -Dspring.cloud.consul.host=10.200.110.91 -Dserver.port=8091 -Dspring.cloud.consul.discovery.hostname=10.200.110.90 service-consumer-201903201556.jar
现在测试consul集群的高可用性,将10.200.110.90的consul agent server停掉。
service-consumer:

service-producter:
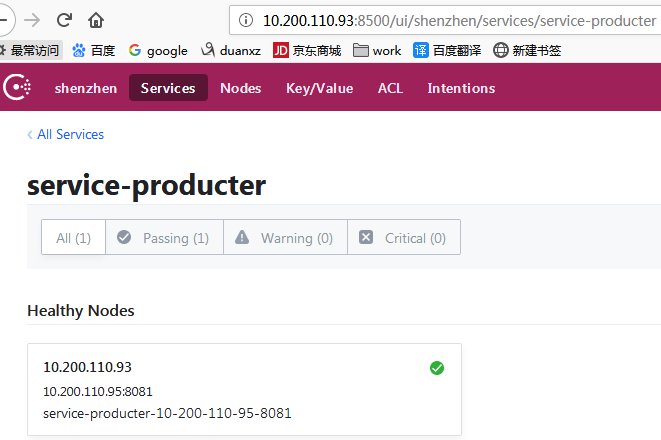
再触发一次service-consumer调用service-producter的测试,访问10.200.110.90:8091,调用到了10.200.110.95:8081的应用上。
http://10.200.110.90:8091/swagger-ui.html#!/book-consumer/getbook5UsingGET

consul的服务注册的两种方式:
和《Consul之:服务注册与发现》有些重复。
方式1:通过配置文件方式
通过在consul的服务器的工作目录中增加consul的配置文件的方式进行服务注册,
例如,我在consul的机器上的/home/consul-cluster/config增加如下配置文件:
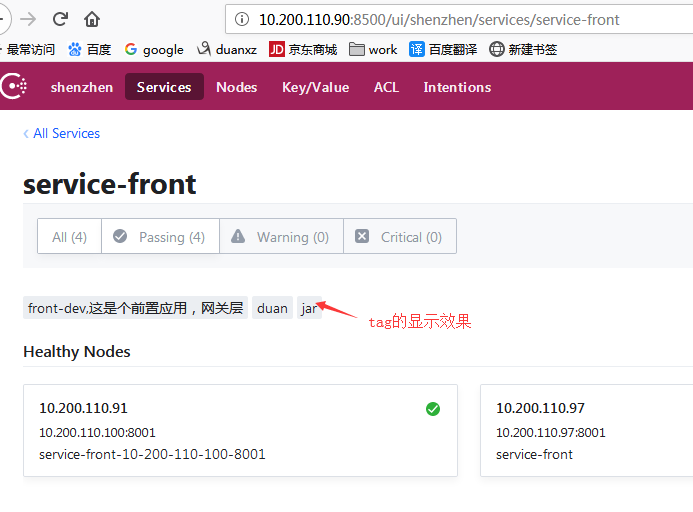
{
    "service":
    {
        "name": "service-front",
        "tags": ["jar"],
        "address": "10.200.110.97",
        "port": 8001,
        "checks": [
        {
            "http": "http://10.200.110.97:8001/health",
            "interval": "10s"
        }]
    }
}
如果有多个服务时,
{
    "services": [{
        "id":"front1",
        "name": "service-front",
        "tags": ["local-dev"],
        "address": "10.200.110.100",
        "port": 8001,
        "checks": [{
            "http": "http://10.200.110.100:8001/health",
            "interval": "10s"
        }]
    },
     {
        "id":"front2",
        "name": "service-front",
        "tags": ["jar"],
        "address": "10.200.110.97",
        "port": 8001,
        "checks": [{
            "http": "http://10.200.110.97:8001/health",
            "interval": "10s"
        }]
    }]
}
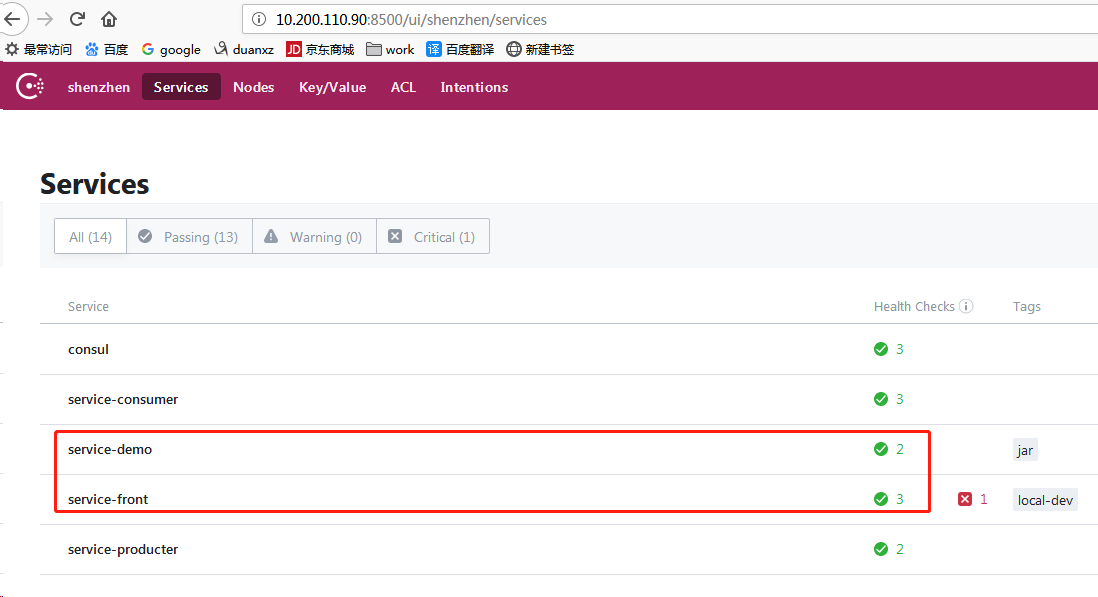
在consul的控制台上,可见服务注册成功。如下:
或者通过命令行查看验证服务是否注册成功:
[root@localhost consul-template]# curl http://10.200.110.90:8500/v1/catalog/service/service-front
[{"ID":"d1b05900-4f8f-b956-5ba6-5a3c798d93d3","Node":"10.200.110.91","Address":"10.200.110.91","Datacenter":"shenzhen","TaggedAddresses":{"lan":"10.200.110.91","wan":"10.200.110.91"},"NodeMeta":{"consul-network-segment":""},"ServiceKind":"","ServiceID":"service-front-10-200-110-100-8001","ServiceName":"service-front","ServiceTags":["front-dev,这是个前置应用,网关层","duan"],"ServiceAddress":"10.200.110.100","ServiceWeights":{"Passing":1,"Warning":1},"ServiceMeta":{},"ServicePort":8001,"ServiceEnableTagOverride":false,"ServiceProxyDestination":"","ServiceProxy":{},"ServiceConnect":{},"CreateIndex":11382,"ModifyIndex":11382},{"ID":"382f88c2-4482-e1f7-1453-28f94ff65108","Node":"10.200.110.97","Address":"10.200.110.97","Datacenter":"shenzhen","TaggedAddresses":{"lan":"10.200.110.97","wan":"10.200.110.97"},"NodeMeta":{"consul-network-segment":""},"ServiceKind":"","ServiceID":"front1","ServiceName":"service-front","ServiceTags":["local-dev"],"ServiceAddress":"","ServiceWeights":{"Passing":1,"Warning":1},"ServiceMeta":{},"ServicePort":8001,"ServiceEnableTagOverride":false,"ServiceProxyDestination":"","ServiceProxy":{},"ServiceConnect":{},"CreateIndex":11976,"ModifyIndex":11976}][root@localhost consul-template]#
方式2:通过consul api方式
spring.cloud.consul.discovery.enabled: true
spring.cloud.consul.discovery.healthCheckInterval: 10s
spring.cloud.consul.discovery.instanceId: ${spring.application.name}:${spring.cloud.consul.discovery.hostname}:${server.port}
spring.cloud.consul.enabled: true
spring.cloud.consul.host: 10.200.110.100
spring.cloud.consul.port: 8500
spring.zipkin.base-url: http://10.200.110.4:9411

management.security.enabled: false

server:
  port: 8001
spring:
  application:
    name: service-front
    author: duanxz
    description: service-front
  cloud:
    consul:
      discovery:
        hostname: 127.0.0.1
        tags:
        - front-dev,这是个前置应用,网关层
        - duan
待解决的问题
我组成的2个服务:
[root@localhost config]# cat apps.json

{
    "services": [{
        "id":"front1",
        "name": "service-front",
        "tags": ["local-dev"],
        "port": 8001,
        "checks": [{
            "http": "http://10.200.110.97:8001/health",
            "interval": "10s"
        }]
    },
     {
        "id":"demo",
        "name": "service-demo",
        "tags": ["jar"],
        "address": "10.200.110.97",
        "port": 8071,
        "checks": [{
            "http": "http://10.200.110.97:8071/health",
            "interval": "10s"
        }]
    }]
}
[root@localhost config]#
通过json配置文件的方式,注册到consul上的服务间无法通过Feign调用,
我的demo里,是service-front调用service-demo,打开swagger调用出现如下错误:
{
  "timestamp": 1553161721543,
  "status": 500,
  "error": "Internal Server Error",
  "exception": "java.lang.RuntimeException",
  "message": "Request processing failed; nested exception is java.lang.RuntimeException: com.netflix.client.ClientException: Load balancer does not have available server for client: service-demo",
  "path": "/book/show6/1"
}