目录:
《Java NIO系列教程(三) Channel之Socket通道》
在《Java NIO系列教程(二) Channel》介绍了FileChannel,本章节介绍socket通道类。
一、Socket通道
新的socket通道类可以运行非阻塞模式并且是可选择的。这两个性能可以激活大程序(如网络服务器和中间件组件)巨大的可伸缩性和灵活性。本节中我们会看到,再也没有为每个socket连接使用一个线程的必要了,也避免了管理大量线程所需的上下文交换总开销。借助新的NIO类,一个或几个线程就可以管理成百上千的活动socket连接了并且只有很少甚至可能没有性能损失。所有的socket通道类(DatagramChannel、SocketChannel和ServerSocketChannel)都继承了位于java.nio.channels.spi包中的AbstractSelectableChannel。这意味着我们可以用一个Selector对象来执行socket通道的就绪选择(readiness selection)。
请注意DatagramChannel和SocketChannel实现定义读和写功能的接口而ServerSocketChannel不实现。ServerSocketChannel负责监听传入的连接和创建新的SocketChannel对象,它本身从不传输数据。
在我们具体讨论每一种socket通道前,您应该了解socket和socket通道之间的关系。之前的章节中有写道,通道是一个连接I/O服务导管并提供与该服务交互的方法。就某个socket而言,它不会再次实现与之对应的socket通道类中的socket协议API,而java.net中已经存在的socket通道都可以被大多数协议操作重复使用。
全部socket通道类(DatagramChannel、SocketChannel和ServerSocketChannel)在被实例化时都会创建一个对等socket对象。这些是我们所熟悉的来自java.net的类(Socket、ServerSocket和DatagramSocket),它们已经被更新以识别通道。对等socket可以通过调用socket( )方法从一个通道上获取。此外,这三个java.net类现在都有getChannel( )方法。
Socket通道将与通信协议相关的操作委托给相应的socket对象。socket的方法看起来好像在通道类中重复了一遍,但实际上通道类上的方法会有一些新的或者不同的行为。
要把一个socket通道置于非阻塞模式,我们要依靠所有socket通道类的公有超级类:SelectableChannel。就绪选择(readiness selection)是一种可以用来查询通道的机制,该查询可以判断通道是否准备好执行一个目标操作,如读或写。非阻塞I/O和可选择性是紧密相连的,那也正是管理阻塞模式的API代码要在SelectableChannel超级类中定义的原因。
设置或重新设置一个通道的阻塞模式是很简单的,只要调用configureBlocking( )方法即可,传递参数值为true则设为阻塞模式,参数值为false值设为非阻塞模式。真的,就这么简单!您可以通过调用isBlocking( )方法来判断某个socket通道当前处于哪种模式。
AbstractSelectableChannel.java中实现的configureBlocking()方法如下:
    public final SelectableChannel configureBlocking(boolean block)
        throws IOException
    {
        synchronized (regLock) {
            if (!isOpen())
                throw new ClosedChannelException();
            if (blocking == block)
                return this;
            if (block && haveValidKeys())
                throw new IllegalBlockingModeException();
            implConfigureBlocking(block);
            blocking = block;
        }
        return this;
    }
非阻塞socket通常被认为是服务端使用的,因为它们使同时管理很多socket通道变得更容易。但是,在客户端使用一个或几个非阻塞模式的socket通道也是有益处的,例如,借助非阻塞socket通道,GUI程序可以专注于用户请求并且同时维护与一个或多个服务器的会话。在很多程序上,非阻塞模式都是有用的。
偶尔地,我们也会需要防止socket通道的阻塞模式被更改。API中有一个blockingLock( )方法,该方法会返回一个非透明的对象引用。返回的对象是通道实现修改阻塞模式时内部使用的。只有拥有此对象的锁的线程才能更改通道的阻塞模式。
下面分别介绍这3个通道。
二、 ServerSocketChannel
让我们从最简单的ServerSocketChannel来开始对socket通道类的讨论。以下是ServerSocketChannel的完整API:
public abstract class ServerSocketChannel extends AbstractSelectableChannel
  {
      public static ServerSocketChannel open() throws IOException;
      public abstract ServerSocket socket();
      public abstract ServerSocket accept()throws IOException;
      public final int validOps();
  }
ServerSocketChannel是一个基于通道的socket监听器。它同我们所熟悉的java.net.ServerSocket执行相同的基本任务,不过它增加了通道语义,因此能够在非阻塞模式下运行。
由于ServerSocketChannel没有bind()方法,因此有必要取出对等的socket并使用它来绑定到一个端口以开始监听连接。我们也是使用对等ServerSocket的API来根据需要设置其他的socket选项。
同它的对等体java.net.ServerSocket一样,ServerSocketChannel也有accept( )方法。一旦您创建了一个ServerSocketChannel并用对等socket绑定了它,然后您就可以在其中一个上调用accept()。如果您选择在ServerSocket上调用accept( )方法,那么它会同任何其他的ServerSocket表现一样的行为:总是阻塞并返回一个java.net.Socket对象。如果您选择在ServerSocketChannel上调用accept( )方法则会返回SocketChannel类型的对象,返回的对象能够在非阻塞模式下运行。
换句话说:
- ServerSocketChannel的accept()方法会返回SocketChannel类型对象,SocketChannel可以在非阻塞模式下运行。
- 其它Socket的accept()方法会阻塞返回一个Socket对象。
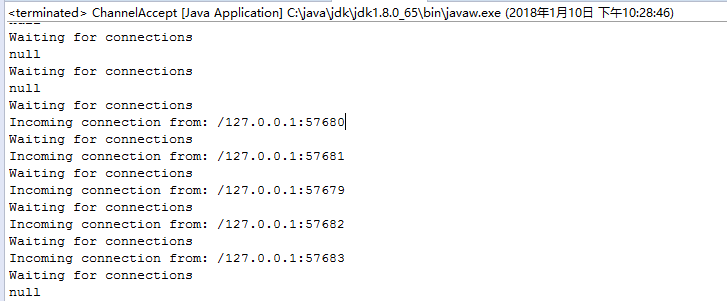
如果ServerSocketChannel以非阻塞模式被调用,当没有传入连接在等待时,ServerSocketChannel.accept( )会立即返回null。正是这种检查连接而不阻塞的能力实现了可伸缩性并降低了复杂性。可选择性也因此得到实现。我们可以使用一个选择器实例来注册一个ServerSocketChannel对象以实现新连接到达时自动通知的功能。以下代码演示了如何使用一个非阻塞的accept( )方法:
package com.dxz.springsession.nio.demo2;

import java.nio.ByteBuffer;
import java.nio.channels.ServerSocketChannel;
import java.nio.channels.SocketChannel;
import java.net.InetSocketAddress;

public class ChannelAccept {
    public static final String GREETING = "Hello I must be going.
";

    public static void main(String[] argv) throws Exception {
        int port = 1234; // default
        if (argv.length > 0) {
            port = Integer.parseInt(argv[0]);
        }
        ByteBuffer buffer = ByteBuffer.wrap(GREETING.getBytes());
        ServerSocketChannel ssc = ServerSocketChannel.open();
        ssc.socket().bind(new InetSocketAddress(port));
        ssc.configureBlocking(false);
        while (true) {
            System.out.println("Waiting for connections");
            SocketChannel sc = ssc.accept();
            if (sc == null) {
                System.out.println("null");
                Thread.sleep(2000);
            } else {
                System.out.println("Incoming connection from: " + sc.socket().getRemoteSocketAddress());
                buffer.rewind();
                sc.write(buffer);
                sc.close();
            }
        }
    }
}
日志:
2.1、打开 ServerSocketChannel
通过调用 ServerSocketChannel.open() 方法来打开ServerSocketChannel.如:
ServerSocketChannel serverSocketChannel = ServerSocketChannel.open();
2.2、关闭 ServerSocketChannel
通过调用ServerSocketChannel.close() 方法来关闭ServerSocketChannel. 如:
serverSocketChannel.close();
2.3、监听新进来的连接
通过 ServerSocketChannel.accept() 方法监听新进来的连接。当 accept()方法返回的时候,它返回一个包含新进来的连接的 SocketChannel。因此, accept()方法会一直阻塞到有新连接到达。
通常不会仅仅只监听一个连接,在while循环中调用 accept()方法. 如下面的例子:
        while(true){
            SocketChannel socketChannel = serverSocketChannel.accept();
            //...
        }
2.4、阻塞模式

会在SocketChannel sc = ssc.accept();这里阻塞住进程。
2.5、非阻塞模式
ServerSocketChannel可以设置成非阻塞模式。在非阻塞模式下,accept() 方法会立刻返回,如果还没有新进来的连接,返回的将是null。 因此,需要检查返回的SocketChannel是否是null.如:
        ServerSocketChannel ssc = ServerSocketChannel.open();
        ssc.socket().bind(new InetSocketAddress(port));
        ssc.configureBlocking(false);
        while (true) {
            System.out.println("Waiting for connections");
            SocketChannel sc = ssc.accept();
            if(sc != null) {

            }
三、SocketChannel
下面开始学习SocketChannel,它是使用最多的socket通道类:
Java NIO中的SocketChannel是一个连接到TCP网络套接字的通道。可以通过以下2种方式创建SocketChannel:
- 打开一个SocketChannel并连接到互联网上的某台服务器。
- 一个新连接到达ServerSocketChannel时,会创建一个SocketChannel。
3.1、打开 SocketChannel
下面是SocketChannel的打开方式:
SocketChannel socketChannel = SocketChannel.open();
socketChannel.connect(new InetSocketAddress("http://jenkov.com", 80));
3.2、关闭 SocketChannel
当用完SocketChannel之后调用SocketChannel.close()关闭SocketChannel:
socketChannel.close();
3.3、从 SocketChannel 读取数据
要从SocketChannel中读取数据,调用一个read()的方法之一。以下是例子:
ByteBuffer buf = ByteBuffer.allocate(48);
int bytesRead = socketChannel.read(buf);
首先,分配一个Buffer。从SocketChannel读取到的数据将会放到这个Buffer中。然后,调用SocketChannel.read()。该方法将数据从SocketChannel 读到Buffer中。read()方法返回的int值表示读了多少字节进Buffer里。如果返回的是-1,表示已经读到了流的末尾(连接关闭了)。
3.4、写入 SocketChannel
写数据到SocketChannel用的是SocketChannel.write()方法,该方法以一个Buffer作为参数。示例如下:
String newData = "New String to write to file..." + System.currentTimeMillis();

ByteBuffer buf = ByteBuffer.allocate(48);
buf.clear();
buf.put(newData.getBytes());

buf.flip();

while(buf.hasRemaining()) {
    channel.write(buf);
}
注意SocketChannel.write()方法的调用是在一个while循环中的。Write()方法无法保证能写多少字节到SocketChannel。所以,我们重复调用write()直到Buffer没有要写的字节为止。
3.5、非阻塞模式
可以设置 SocketChannel 为非阻塞模式(non-blocking mode).设置之后,就可以在异步模式下调用connect(), read() 和write()了。
3.5.1、connect()
如果SocketChannel在非阻塞模式下,此时调用connect(),该方法可能在连接建立之前就返回了。为了确定连接是否建立,可以调用finishConnect()的方法。像这样:
socketChannel.configureBlocking(false);
socketChannel.connect(new InetSocketAddress("http://jenkov.com", 80));

while(! socketChannel.finishConnect() ){
    //wait, or do something else...
}
3.5.2、write()
非阻塞模式下,write()方法在尚未写出任何内容时可能就返回了。所以需要在循环中调用write()。前面已经有例子了,这里就不赘述了。
3.5.3、read()
非阻塞模式下,read()方法在尚未读取到任何数据时可能就返回了。所以需要关注它的int返回值,它会告诉你读取了多少字节。
3.6、非阻塞模式与选择器
非阻塞模式与选择器搭配会工作的更好,通过将一或多个SocketChannel注册到Selector,可以询问选择器哪个通道已经准备好了读取,写入等。Selector与SocketChannel的搭配使用会在后面详讲。
四、DatagramChannel
最后一个socket通道是DatagramChannel。正如SocketChannel对应Socket,ServerSocketChannel对应ServerSocket,每一个DatagramChannel对象也有一个关联的DatagramSocket对象。不过原命名模式在此并未适用:“DatagramSocketChannel”显得有点笨拙,因此采用了简洁的“DatagramChannel”名称。
正如SocketChannel模拟连接导向的流协议(如TCP/IP),DatagramChannel则模拟包导向的无连接协议(如UDP/IP)。
DatagramChannel是无连接的。每个数据报(datagram)都是一个自包含的实体,拥有它自己的目的地址及不依赖其他数据报的数据负载。与面向流的的socket不同,DatagramChannel可以发送单独的数据报给不同的目的地址。同样,DatagramChannel对象也可以接收来自任意地址的数据包。每个到达的数据报都含有关于它来自何处的信息(源地址)。
4.1、打开 DatagramChannel
下面是 DatagramChannel 的打开方式:
    DatagramChannel channel = DatagramChannel.open();
    channel.socket().bind(new InetSocketAddress(9999));
这个例子打开的 DatagramChannel可以在UDP端口9999上接收数据包。
4.2、接收数据
通过receive()方法从DatagramChannel接收数据,如:
    ByteBuffer buf = ByteBuffer.allocate(48);
    buf.clear();
    channel.receive(buf);
receive()方法会将接收到的数据包内容复制到指定的Buffer. 如果Buffer容不下收到的数据,多出的数据将被丢弃。
4.3、发送数据
通过send()方法从DatagramChannel发送数据,如:
String newData = "New String to write to file..." + System.currentTimeMillis();

    ByteBuffer buf = ByteBuffer.allocate(48);
    buf.clear();
    buf.put(newData.getBytes());
    buf.flip();

    int bytesSent = channel.send(buf, new   InetSocketAddress("jenkov.com", 80));
这个例子发送一串字符到”jenkov.com”服务器的UDP端口80。 因为服务端并没有监控这个端口,所以什么也不会发生。也不会通知你发出的数据包是否已收到,因为UDP在数据传送方面没有任何保证。
4.4、连接到特定的地址
可以将DatagramChannel“连接”到网络中的特定地址的。由于UDP是无连接的,连接到特定地址并不会像TCP通道那样创建一个真正的连接。而是锁住DatagramChannel ,让其只能从特定地址收发数据。
这里有个例子:
channel.connect(new InetSocketAddress("jenkov.com", 80));
当连接后,也可以使用read()和write()方法,就像在用传统的通道一样。只是在数据传送方面没有任何保证。这里有几个例子:
    int bytesRead = channel.read(buf);
    int bytesWritten = channel.write(but);
完整示例:
package com.dxz.springsession.nio.demo3;

import java.nio.channels.*;
import java.nio.charset.*;
import java.net.*;
import java.io.*;
import java.util.*;
import java.nio.*;

public class DatagramChannelServerDemo {
    // UDP协议服务端
    private int port = 9975;
    DatagramChannel channel;
    private Charset charset = Charset.forName("UTF-8");
    private Selector selector = null;

    public DatagramChannelServerDemo() throws IOException {
        try {
            selector = Selector.open();
            channel = DatagramChannel.open();
        } catch (Exception e) {
            selector = null;
            channel = null;
            System.out.println("超时");
        }
        System.out.println("服务器启动");
    }

    /* 编码过程 */
    public ByteBuffer encode(String str) {
        return charset.encode(str);
    }

    /* 解码过程 */
    public String decode(ByteBuffer bb) {
        return charset.decode(bb).toString();
    }

    /* 服务器服务方法 */
    public void service() throws IOException {
        if (channel == null || selector == null)
            return;
        channel.configureBlocking(false);
        channel.socket().bind(new InetSocketAddress(port));
        // channel.write(ByteBuffer.wrap(new String("aaaa").getBytes()));
        channel.register(selector, SelectionKey.OP_READ);
        /** 外循环,已经发生了SelectionKey数目 */
        while (selector.select() > 0) {
            System.out.println("有新channel加入");
            /* 得到已经被捕获了的SelectionKey的集合 */
            Iterator iterator = selector.selectedKeys().iterator();
            while (iterator.hasNext()) {
                SelectionKey key = null;
                try {
                    key = (SelectionKey) iterator.next();
                    iterator.remove();

                    if (key.isReadable()) {
                        reveice(key);
                    }
                    if (key.isWritable()) {
                        // send(key);
                    }
                } catch (IOException e) {
                    e.printStackTrace();
                    try {
                        if (key != null) {
                            key.cancel();
                            key.channel().close();
                        }
                    } catch (ClosedChannelException cex) {
                        e.printStackTrace();
                    }
                }
            }
            /* 内循环完 */
        }
        /* 外循环完 */
    }

    /*
     * 接收 用receive()读IO 作为服务端一般不需要调用connect(),如果未调用<span style=
     * "font-family: Arial, Helvetica, sans-serif;">connect()时调</span><span
     * style="font-family: Arial, Helvetica, sans-serif;"
     * >用read()write()读写,会报java.nio.channels</span> .NotYetConnectedException
     * 只有调用connect()之后,才能使用read和write.
     */
    synchronized public void reveice(SelectionKey key) throws IOException {
        if (key == null)
            return;
        // ***用channel.receive()获取客户端消息***//
        // :接收时需要考虑字节长度
        DatagramChannel sc = (DatagramChannel) key.channel();
        String content = "";
        // create buffer with capacity of 48 bytes
        ByteBuffer buf = ByteBuffer.allocate(1024);// java里一个(utf-8)中文3字节,gbk中文占2个字节
        buf.clear();
        SocketAddress address = sc.receive(buf); // read into buffer. 返回客户端的地址信息
        String clientAddress = address.toString().replace("/", "").split(":")[0];
        String clientPost = address.toString().replace("/", "").split(":")[1];

        buf.flip(); // make buffer ready for read
        while (buf.hasRemaining()) {
            buf.get(new byte[buf.limit()]);// read 1 byte at a time
            content += new String(buf.array());
        }
        buf.clear(); // make buffer ready for writing
        System.out.println("接收:" + content.trim());
        // 第一次发;udp采用数据报模式,发送多少次,接收多少次
        ByteBuffer buf2 = ByteBuffer.allocate(65507);
        buf2.clear();
        buf2.put(
                "消息推送内容 abc..UDP是一个非连接的协议,传输数据之前源端和终端不建立连接,当它想传送时就简单地去抓取来自应用程序的数据,并尽可能快地把它扔到网络上。在发送端UDP是一个非连接的协议,传输数据之前源端和终端不建立连接,当它想传送时就简单地去抓取来自应用程序的数据,并尽可能快地把它扔到网络上。在发送端UDP是一个非连接的协议,传输数据之前源端和终端不建立连接,当它想传送时就简单地去抓取来自应用程序的数据,并尽可能快地把它扔到网络上。在发送端@Q"
                        .getBytes());
        buf2.flip();
        channel.send(buf2, new InetSocketAddress(clientAddress, Integer.parseInt(clientPost))); // 将消息回送给客户端

        // 第二次发
        ByteBuffer buf3 = ByteBuffer.allocate(65507);
        buf3.clear();
        buf3.put("任务完成".getBytes());
        buf3.flip();
        channel.send(buf3, new InetSocketAddress(clientAddress, Integer.parseInt(clientPost))); // 将消息回送给客户端
    }

    int y = 0;

    public void send(SelectionKey key) {
        if (key == null)
            return;
        // ByteBuffer buff = (ByteBuffer) key.attachment();
        DatagramChannel sc = (DatagramChannel) key.channel();
        try {
            sc.write(ByteBuffer.wrap(new String("aaaa").getBytes()));
        } catch (IOException e1) {
            e1.printStackTrace();
        }
        System.out.println("send2() " + (++y));
    }

    /* 发送文件 */
    public void sendFile(SelectionKey key) {
        if (key == null)
            return;
        ByteBuffer buff = (ByteBuffer) key.attachment();
        SocketChannel sc = (SocketChannel) key.channel();
        String data = decode(buff);
        if (data.indexOf("get") == -1)
            return;
        String subStr = data.substring(data.indexOf(" "), data.length());
        System.out.println("截取之后的字符串是 " + subStr);
        FileInputStream fileInput = null;
        try {
            fileInput = new FileInputStream(subStr);
            FileChannel fileChannel = fileInput.getChannel();
            fileChannel.transferTo(0, fileChannel.size(), sc);
            fileChannel.close();
        } catch (IOException e) {
            e.printStackTrace();
        } finally {
            try {
                fileInput.close();
            } catch (IOException ex) {
                ex.printStackTrace();
            }
        }
    }

    public static void main(String[] args) throws IOException {
        new DatagramChannelServerDemo().service();
    }
}

//客户端
package com.dxz.springsession.nio.demo3;

import java.nio.channels.*;
import java.nio.charset.*;
import java.net.*;
import java.io.*;
import java.util.*;
import java.nio.*;

public class DatagramChannelClientDemo {
    // UDP协议客户端
    private String serverIp = "127.0.0.1";
    private int port = 9975;
    // private ServerSocketChannel serverSocketChannel;
    DatagramChannel channel;
    private Charset charset = Charset.forName("UTF-8");
    private Selector selector = null;

    public DatagramChannelClientDemo() throws IOException {
        try {
            selector = Selector.open();
            channel = DatagramChannel.open();
        } catch (Exception e) {
            selector = null;
            channel = null;
            System.out.println("超时");
        }
        System.out.println("客户器启动");
    }

    /* 编码过程 */
    public ByteBuffer encode(String str) {
        return charset.encode(str);
    }

    /* 解码过程 */
    public String decode(ByteBuffer bb) {
        return charset.decode(bb).toString();
    }

    /* 服务器服务方法 */
    public void service() throws IOException {
        if (channel == null || selector == null)
            return;
        channel.configureBlocking(false);
        channel.connect(new InetSocketAddress(serverIp, port));// 连接服务端
        channel.write(ByteBuffer.wrap(new String("客户端请求获取消息").getBytes()));
        channel.register(selector, SelectionKey.OP_READ);
        /** 外循环,已经发生了SelectionKey数目 */
        while (selector.select() > 0) {
            /* 得到已经被捕获了的SelectionKey的集合 */
            Iterator iterator = selector.selectedKeys().iterator();
            while (iterator.hasNext()) {
                SelectionKey key = null;
                try {
                    key = (SelectionKey) iterator.next();
                    iterator.remove();
                    if (key.isReadable()) {
                        reveice(key);
                    }
                    if (key.isWritable()) {
                        // send(key);
                    }
                } catch (IOException e) {
                    e.printStackTrace();
                    try {
                        if (key != null) {
                            key.cancel();
                            key.channel().close();
                        }
                    } catch (ClosedChannelException cex) {
                        e.printStackTrace();
                    }
                }
            }
            /* 内循环完 */
        }
        /* 外循环完 */
    }

    // /*
    // * 接收 用read()读IO
    // * */
    // synchronized public void reveice2(SelectionKey key) throws IOException {
    // if (key == null)
    // return;
    // // ***用channel.read()获取消息***//
    // // :接收时需要考虑字节长度
    // DatagramChannel sc = (DatagramChannel) key.channel();
    // String content = "";
    // // create buffer with capacity of 48 bytes
    // ByteBuffer buf = ByteBuffer.allocate(3);// java里一个(utf-8)中文3字节,gbk中文占2个字节
    // int bytesRead = sc.read(buf); //read into buffer.
    //
    // while (bytesRead >0) {
    // buf.flip(); //make buffer ready for read
    // while(buf.hasRemaining()){
    // buf.get(new byte[buf.limit()]); // read 1 byte at a time
    // content += new String(buf.array());
    // }
    // buf.clear(); //make buffer ready for writing
    // bytesRead = sc.read(buf);
    // }
    // System.out.println("接收:" + content);
    // }

    /* 接收 */
    synchronized public void reveice(SelectionKey key) throws IOException {
        String threadName = Thread.currentThread().getName();
        if (key == null)
            return;
        try {
            // ***用channel.receive()获取消息***//
            // :接收时需要考虑字节长度
            DatagramChannel sc = (DatagramChannel) key.channel();
            String content = "";
            // 第一次接;udp采用数据报模式,发送多少次,接收多少次
            ByteBuffer buf = ByteBuffer.allocate(65507);// java里一个(utf-8)中文3字节,gbk中文占2个字节
            buf.clear();
            SocketAddress address = sc.receive(buf); // read into buffer.
            String clientAddress = address.toString().replace("/", "").split(":")[0];
            String clientPost = address.toString().replace("/", "").split(":")[1];
            System.out.println(threadName + "	" + address.toString());
            buf.flip(); // make buffer ready for read
            while (buf.hasRemaining()) {
                buf.get(new byte[buf.limit()]);// read 1 byte at a time
                byte[] tmp = buf.array();
                content += new String(tmp);
            }
            buf.clear(); // make buffer ready for writing次
            System.out.println(threadName + "接收:" + content.trim());
            // 第二次接
            content = "";
            ByteBuffer buf2 = ByteBuffer.allocate(65507);// java里一个(utf-8)中文3字节,gbk中文占2个字节
            buf2.clear();
            SocketAddress address2 = sc.receive(buf2); // read into buffer.
            buf2.flip(); // make buffer ready for read
            while (buf2.hasRemaining()) {
                buf2.get(new byte[buf2.limit()]);// read 1 byte at a time
                byte[] tmp = buf2.array();
                content += new String(tmp);
            }
            buf2.clear(); // make buffer ready for writing次
            System.out.println(threadName + "接收2:" + content.trim());

        } catch (PortUnreachableException ex) {
            System.out.println(threadName + "服务端端口未找到!");
        }
        send(2);
    }

    boolean flag = false;

    public void send(int i) {
        if (flag)
            return;
        try {
            // channel.write(ByteBuffer.wrap(new
            // String("客户端请求获取消息(第"+i+"次)").getBytes()));
            // channel.register(selector, SelectionKey.OP_READ );
            ByteBuffer buf2 = ByteBuffer.allocate(48);
            buf2.clear();
            buf2.put(("客户端请求获取消息(第" + i + "次)").getBytes());
            buf2.flip();
            channel.write(buf2);
            channel.register(selector, SelectionKey.OP_READ);
            // int bytesSent = channel.send(buf2, new
            // InetSocketAddress(serverIp,port)); // 将消息回送给服务端
        } catch (IOException e) {
            e.printStackTrace();
        }
        flag = true;
    }

    int y = 0;

    public void send(SelectionKey key) {
        if (key == null)
            return;
        // ByteBuffer buff = (ByteBuffer) key.attachment();
        DatagramChannel sc = (DatagramChannel) key.channel();
        try {
            sc.write(ByteBuffer.wrap(new String("aaaa").getBytes()));
        } catch (IOException e1) {
            e1.printStackTrace();
        }
        System.out.println("send2() " + (++y));
    }

    /* 发送文件 */
    public void sendFile(SelectionKey key) {
        if (key == null)
            return;
        ByteBuffer buff = (ByteBuffer) key.attachment();
        SocketChannel sc = (SocketChannel) key.channel();
        String data = decode(buff);
        if (data.indexOf("get") == -1)
            return;
        String subStr = data.substring(data.indexOf(" "), data.length());
        System.out.println("截取之后的字符串是 " + subStr);
        FileInputStream fileInput = null;
        try {
            fileInput = new FileInputStream(subStr);
            FileChannel fileChannel = fileInput.getChannel();
            fileChannel.transferTo(0, fileChannel.size(), sc);
            fileChannel.close();
        } catch (IOException e) {
            e.printStackTrace();
        } finally {
            try {
                fileInput.close();
            } catch (IOException ex) {
                ex.printStackTrace();
            }
        }
    }

    public static void main(String[] args) throws IOException {
        new Thread(new Runnable() {
            public void run() {
                try {
                    new DatagramChannelClientDemo().service();
                } catch (IOException e) {
                    e.printStackTrace();
                }
            }
        }).start();

        // new Thread(new Runnable() {
        // public void run() {
        // try {
        // new DatagramChannelClientDemo().service();
        // } catch (IOException e) {
        // e.printStackTrace();
        // }
        // }
        // }).start();

    }
}
Java NIO中的Buffer用于和NIO通道进行交互。如你所知,数据是从通道读入缓冲区,从缓冲区写入到通道中的。交互图如下:
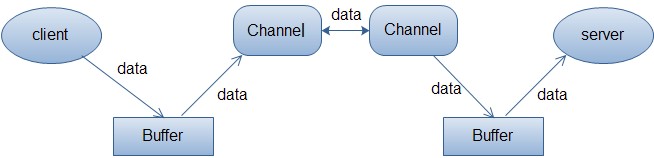
缓冲区本质上是一块可以写入数据,然后可以从中读取数据的内存。这块内存被包装成NIO Buffer对象,并提供了一组方法,用来方便的访问该块内存。缓冲区实际上是一个容器对象,更直接的说,其实就是一个数组,在NIO库中,所有数据都是用缓冲区处理的。在读取数据时,它是直接读到缓冲区中的; 在写入数据时,它也是写入到缓冲区中的;任何时候访问 NIO 中的数据,都是将它放到缓冲区中。而在面向流I/O系统中,所有数据都是直接写入或者直接将数据读取到Stream对象中。
在NIO中,所有的缓冲区类型都继承于抽象类Buffer,最常用的就是ByteBuffer,对于Java中的基本类型,基本都有一个具体Buffer类型与之相对应,它们之间的继承关系如下图所示:

下面是NIO Buffer相关的话题列表:
- Buffer的基本用法
- Buffer的capacity,position和limit
- Buffer的类型
- Buffer的分配
- 向Buffer中写数据
- flip()方法
- 从Buffer中读取数据
- clear()与compact()方法
- mark()与reset()方法
- equals()与compareTo()方法
Buffer的基本用法
使用Buffer读写数据一般遵循以下四个步骤:
- 写入数据到Buffer
- 调用
flip()方法 - 从Buffer中读取数据
- 调用
clear()方法或者compact()方法
当向buffer写入数据时,buffer会记录下写了多少数据。一旦要读取数据,需要通过flip()方法将Buffer从写模式切换到读模式。在读模式下,可以读取之前写入到buffer的所有数据。
一旦读完了所有的数据,就需要清空缓冲区,让它可以再次被写入。有两种方式能清空缓冲区:调用clear()或compact()方法。clear()方法会清空整个缓冲区。compact()方法只会清除已经读过的数据。任何未读的数据都被移到缓冲区的起始处,新写入的数据将放到缓冲区未读数据的后面。
下面是一个使用Buffer的例子:
01 |
RandomAccessFile aFile = new RandomAccessFile("data/nio-data.txt", "rw"); |
02 |
FileChannel inChannel = aFile.getChannel(); |
03 |
04 |
//create buffer with capacity of 48 bytes |
05 |
ByteBuffer buf = ByteBuffer.allocate(48); |
06 |
07 |
int bytesRead = inChannel.read(buf); //read into buffer. |
08 |
while (bytesRead != -1) { |
09 |
10 |
buf.flip(); //make buffer ready for read |
11 |
12 |
while(buf.hasRemaining()){ |
13 |
System.out.print((char) buf.get()); // read 1 byte at a time |
14 |
} |
15 |
16 |
buf.clear(); //make buffer ready for writing |
17 |
bytesRead = inChannel.read(buf); |
18 |
} |
19 |
aFile.close(); |
示例2:
下面是一个简单的使用IntBuffer的例子:
package com.dxz.nio;

import java.nio.IntBuffer;

public class TestIntBuffer {
    public static void main(String[] args) {
        // 分配新的int缓冲区,参数为缓冲区容量
        // 新缓冲区的当前位置将为零,其界限(限制位置)将为其容量。它将具有一个底层实现数组,其数组偏移量将为零。
        IntBuffer buffer = IntBuffer.allocate(8);

        for (int i = 0; i < buffer.capacity(); ++i) {
            int j = 2 * (i + 1);
            // 将给定整数写入此缓冲区的当前位置,当前位置递增
            buffer.put(j);
        }

        // 重设此缓冲区,将限制设置为当前位置,然后将当前位置设置为0
        buffer.flip();

        // 查看在当前位置和限制位置之间是否有元素
        while (buffer.hasRemaining()) {
            // 读取此缓冲区当前位置的整数,然后当前位置递增
            int j = buffer.get();
            System.out.print(j + "  ");
        }

    }

}
结果:
2 4 6 8 10 12 14 16
Buffer的capacity,position和limit
缓冲区本质上是一块可以写入数据,然后可以从中读取数据的内存。这块内存被包装成NIO Buffer对象,并提供了一组方法,用来方便的访问该块内存。
为了理解Buffer的工作原理,需要熟悉它的三个属性:
- capacity
- position
- limit
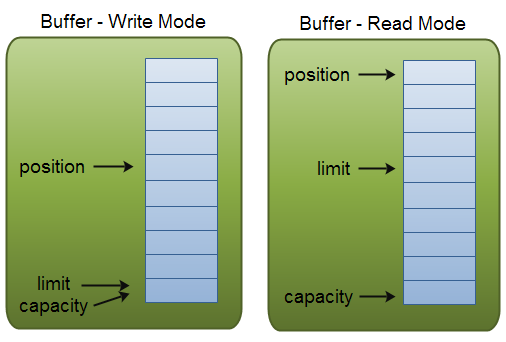
position和limit的含义取决于Buffer处在读模式还是写模式。不管Buffer处在什么模式,capacity的含义总是一样的。
这里有一个关于capacity,position和limit在读写模式中的说明,详细的解释在插图后面。
capacity
作为一个内存块,Buffer有一个固定的大小值,也叫“capacity”.你只能往里写capacity个byte、long,char等类型。一旦Buffer满了,需要将其清空(通过读数据或者清除数据)才能继续写数据往里写数据。
position
当你写数据到Buffer中时,position表示当前的位置。初始的position值为0.当一个byte、long等数据写到Buffer后, position会向前移动到下一个可插入数据的Buffer单元。position最大可为capacity – 1.
当读取数据时,也是从某个特定位置读。当将Buffer从写模式切换到读模式,position会被重置为0. 当从Buffer的position处读取数据时,position向前移动到下一个可读的位置。
limit
在写模式下,Buffer的limit表示你最多能往Buffer里写多少数据。 写模式下,limit等于Buffer的capacity。
当切换Buffer到读模式时, limit表示你最多能读到多少数据。因此,当切换Buffer到读模式时,limit会被设置成写模式下的position值。换句话说,你能读到之前写入的所有数据(limit被设置成已写数据的数量,这个值在写模式下就是position)
Buffer的类型
Java NIO 有以下Buffer类型
- ByteBuffer
- MappedByteBuffer
- CharBuffer
- DoubleBuffer
- FloatBuffer
- IntBuffer
- LongBuffer
- ShortBuffer
p<>
如你所见,这些Buffer类型代表了不同的数据类型。换句话说,就是可以通过char,short,int,long,float 或 double类型来操作缓冲区中的字节。
MappedByteBuffer 有些特别,在涉及它的专门章节中再讲。
Buffer的分配
要想获得一个Buffer对象首先要进行分配。 每一个Buffer类都有一个allocate方法。下面是一个分配48字节capacity的ByteBuffer的例子。
1 |
ByteBuffer buf = ByteBuffer.allocate(48); |
这是分配一个可存储1024个字符的CharBuffer:
1 |
CharBuffer buf = CharBuffer.allocate(1024); |
向Buffer中写数据
写数据到Buffer有两种方式:
- 从Channel写到Buffer。
- 通过Buffer的put()方法写到Buffer里。
从Channel写到Buffer的例子
1 |
int bytesRead = inChannel.read(buf); //read into buffer. |
通过put方法写Buffer的例子:
1 |
buf.put(127); |
put方法有很多版本,允许你以不同的方式把数据写入到Buffer中。例如, 写到一个指定的位置,或者把一个字节数组写入到Buffer。 更多Buffer实现的细节参考JavaDoc。
flip()方法
flip英 [flɪp] 美 [flɪp] 及物动词 轻弹,轻击; 按(开关); 快速翻转; 急挥
flip方法将Buffer从写模式切换到读模式。调用flip()方法会将position设回0,并将limit设置成之前position的值。
换句话说,position现在用于标记读的位置,limit表示之前写进了多少个byte、char等 —— 现在能读取多少个byte、char等。
从Buffer中读取数据
从Buffer中读取数据有两种方式:
- 从Buffer读取数据到Channel。
- 使用get()方法从Buffer中读取数据。
从Buffer读取数据到Channel的例子:
//read from buffer into channel.
int bytesWritten = inChannel.write(buf);
使用get()方法从Buffer中读取数据的例子
byte aByte = buf.get();
get方法有很多版本,允许你以不同的方式从Buffer中读取数据。例如,从指定position读取,或者从Buffer中读取数据到字节数组。更多Buffer实现的细节参考JavaDoc。
rewind()方法
Buffer.rewind()将position设回0,所以你可以重读Buffer中的所有数据。limit保持不变,仍然表示能从Buffer中读取多少个元素(byte、char等)。
clear()与compact()方法
一旦读完Buffer中的数据,需要让Buffer准备好再次被写入。可以通过clear()或compact()方法来完成。
如果调用的是clear()方法,position将被设回0,limit被设置成 capacity的值。换句话说,Buffer 被清空了。Buffer中的数据并未清除,只是这些标记告诉我们可以从哪里开始往Buffer里写数据。
如果Buffer中有一些未读的数据,调用clear()方法,数据将“被遗忘”,意味着不再有任何标记会告诉你哪些数据被读过,哪些还没有。
如果Buffer中仍有未读的数据,且后续还需要这些数据,但是此时想要先先写些数据,那么使用compact()方法。
compact()方法将所有未读的数据拷贝到Buffer起始处。然后将position设到最后一个未读元素正后面。limit属性依然像clear()方法一样,设置成capacity。现在Buffer准备好写数据了,但是不会覆盖未读的数据。
mark()与reset()方法
通过调用Buffer.mark()方法,可以标记Buffer中的一个特定position。之后可以通过调用Buffer.reset()方法恢复到这个position。例如:
1 |
buffer.mark(); |
2 |
3 |
//call buffer.get() a couple of times, e.g. during parsing. |
4 |
5 |
buffer.reset(); //set position back to mark. |
equals()与compareTo()方法
可以使用equals()和compareTo()方法两个Buffer。
equals()
当满足下列条件时,表示两个Buffer相等:
- 有相同的类型(byte、char、int等)。
- Buffer中剩余的byte、char等的个数相等。
- Buffer中所有剩余的byte、char等都相同。
如你所见,equals只是比较Buffer的一部分,不是每一个在它里面的元素都比较。实际上,它只比较Buffer中的剩余元素。
compareTo()方法
compareTo()方法比较两个Buffer的剩余元素(byte、char等), 如果满足下列条件,则认为一个Buffer“小于”另一个Buffer:
- 第一个不相等的元素小于另一个Buffer中对应的元素 。
- 所有元素都相等,但第一个Buffer比另一个先耗尽(第一个Buffer的元素个数比另一个少)。
缓冲区分片
在NIO中,除了可以分配或者包装一个缓冲区对象外,还可以根据现有的缓冲区对象来创建一个子缓冲区,即在现有缓冲区上切出一片来作为一个新的缓冲区,但现有的缓冲区与创建的子缓冲区在底层数组层面上是数据共享的,也就是说,子缓冲区相当于是现有缓冲区的一个视图窗口。调用slice()方法可以创建一个子缓冲区,让我们通过例子来看一下:
package com.dxz.nio;

import java.nio.ByteBuffer;

public class BufferDemo1 {
    static public void main(String args[]) throws Exception {
        ByteBuffer buffer = ByteBuffer.allocate(10);

        // 缓冲区中的数据0-9
        for (int i = 0; i < buffer.capacity(); ++i) {
            buffer.put((byte) i);
        }

        // 创建子缓冲区
        buffer.position(3);
        buffer.limit(7);
        ByteBuffer slice = buffer.slice();

        // 改变子缓冲区的内容
        for (int i = 0; i < slice.capacity(); ++i) {
            byte b = slice.get(i);
            b *= 10;
            slice.put(i, b);
        }

        buffer.position(0);
        buffer.limit(buffer.capacity());

        while (buffer.remaining() > 0) {
            System.out.println(buffer.get());
        }
    }
}
结果:
0
1
2
30
40
50
60
7
8
9
只读缓冲区
只读缓冲区非常简单,可以读取它们,但是不能向它们写入数据。可以通过调用缓冲区的asReadOnlyBuffer()方法,将任何常规缓冲区转 换为只读缓冲区,这个方法返回一个与原缓冲区完全相同的缓冲区,并与原缓冲区共享数据,只不过它是只读的。如果原缓冲区的内容发生了变化,只读缓冲区的内容也随之发生变化:
package com.dxz.nio;

import java.nio.ByteBuffer;

public class BufferDemo2 {
    static public void main(String args[]) throws Exception {
        ByteBuffer buffer = ByteBuffer.allocate(10);

        // 缓冲区中的数据0-9
        for (int i = 0; i < buffer.capacity(); ++i) {
            buffer.put((byte) i);
        }

        // 创建只读缓冲区
        ByteBuffer readonly = buffer.asReadOnlyBuffer();

        // 改变原缓冲区的内容
        for (int i = 0; i < buffer.capacity(); ++i) {
            byte b = buffer.get(i);
            b *= 10;
            buffer.put(i, b);
        }

        readonly.position(0);
        readonly.limit(buffer.capacity());

        // 只读缓冲区的内容也随之改变
        while (readonly.remaining() > 0) {
            System.out.println(readonly.get());
        }
    }
}
结果:
0
10
20
30
40
50
60
70
80
90
如果尝试修改只读缓冲区的内容,则会报ReadOnlyBufferException异常。只读缓冲区对于保护数据很有用。在将缓冲区传递给某个 对象的方法时,无法知道这个方法是否会修改缓冲区中的数据。创建一个只读的缓冲区可以保证该缓冲区不会被修改。只可以把常规缓冲区转换为只读缓冲区,而不能将只读的缓冲区转换为可写的缓冲区。
直接缓冲区
直接缓冲区是为加快I/O速度,使用一种特殊方式为其分配内存的缓冲区,JDK文档中的描述为:给定一个直接字节缓冲区,Java虚拟机将尽最大努 力直接对它执行本机I/O操作。也就是说,它会在每一次调用底层操作系统的本机I/O操作之前(或之后),尝试避免将缓冲区的内容拷贝到一个中间缓冲区中 或者从一个中间缓冲区中拷贝数据。要分配直接缓冲区,需要调用allocateDirect()方法,而不是allocate()方法,使用方式与普通缓冲区并无区别,如下面的拷贝文件示例:
package com.dxz.nio;

import java.io.FileInputStream;
import java.io.FileOutputStream;
import java.nio.ByteBuffer;
import java.nio.channels.*;

public class BufferDemo3 {
    static public void main(String args[]) throws Exception {
        String infile = "e:\logs\test.txt";
        FileInputStream fin = new FileInputStream(infile);
        FileChannel fcin = fin.getChannel();

        String outfile = String.format("e:\logs\testcopy.txt");
        FileOutputStream fout = new FileOutputStream(outfile);
        FileChannel fcout = fout.getChannel();

        // 使用allocateDirect,而不是allocate
        ByteBuffer buffer = ByteBuffer.allocateDirect(1024);

        while (true) {
            buffer.clear();
            int r = fcin.read(buffer);
            if (r == -1) {
                break;
            }
            buffer.flip();
            fcout.write(buffer);
        }
    }
}
内存映射文件I/O
内存映射文件I/O是一种读和写文件数据的方法,它可以比常规的基于流或者基于通道的I/O快的多。内存映射文件I/O是通过使文件中的数据出现为 内存数组的内容来完成的,这其初听起来似乎不过就是将整个文件读到内存中,但是事实上并不是这样。一般来说,只有文件中实际读取或者写入的部分才会映射到内存中。如下面的示例代码:
package com.dxz.nio;

import java.io.RandomAccessFile;
import java.nio.MappedByteBuffer;
import java.nio.channels.*;

public class BufferDemo4 {
    static private final int start = 0;
    static private final int size = 1024;

    static public void main(String args[]) throws Exception {
        RandomAccessFile raf = new RandomAccessFile("e:\logs\test.txt", "rw");
        FileChannel fc = raf.getChannel();

        MappedByteBuffer mbb = fc.map(FileChannel.MapMode.READ_WRITE, start, size);

        mbb.put(0, (byte) 97);
        mbb.put(1023, (byte) 122);

        raf.close();
    }
}
参考:http://blog.csdn.net/wuxianglong/article/details/6612263