安装elasticsearch:
1.使用helm 查找安装包
前提准备 创建 命名空间 和 创建 5个pv(3个master和2个data: master PV申请不小于5Gi,data pv申请不小于30Gi)
es镜像版本:docker.elastic.co/elasticsearch/elasticsearch:6.7.0
kubectl create ns elk-logging
查找安装包
helm search elasticsearch
2.下载安装包
cd ~/.helm/cache/archive/
helm fetch stable/elasticsearch
3.修改默认值文件
tar -zxvf elasticsearch-1.30.0.tgz

vim elasticsearch/values.yaml
修改values.yaml配置文件
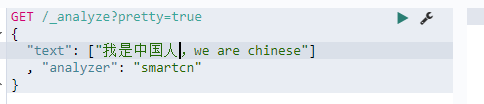
配置中文分析器:
这里使用官方推荐的: ICU分析器和smartcn分析器
plugins:
    - analysis-icu
    - analysis-smartcn测试
{
  "tokens" : [
    {
      "token" : "我",
      "start_offset" : 0,
      "end_offset" : 1,
      "type" : "word",
      "position" : 0
    },
    {
      "token" : "是",
      "start_offset" : 1,
      "end_offset" : 2,
      "type" : "word",
      "position" : 1
    },
    {
      "token" : "中国",
      "start_offset" : 2,
      "end_offset" : 4,
      "type" : "word",
      "position" : 2
    },
    {
      "token" : "人",
      "start_offset" : 4,
      "end_offset" : 5,
      "type" : "word",
      "position" : 3
    },
    {
      "token" : "we",
      "start_offset" : 6,
      "end_offset" : 8,
      "type" : "word",
      "position" : 5
    },
    {
      "token" : "ar",
      "start_offset" : 9,
      "end_offset" : 12,
      "type" : "word",
      "position" : 6
    },
    {
      "token" : "chines",
      "start_offset" : 13,
      "end_offset" : 20,
      "type" : "word",
      "position" : 7
    }
  ]
}

{
  "tokens" : [
    {
      "token" : "我是",
      "start_offset" : 0,
      "end_offset" : 2,
      "type" : "<IDEOGRAPHIC>",
      "position" : 0
    },
    {
      "token" : "中国人",
      "start_offset" : 2,
      "end_offset" : 5,
      "type" : "<IDEOGRAPHIC>",
      "position" : 1
    },
    {
      "token" : "并且",
      "start_offset" : 5,
      "end_offset" : 7,
      "type" : "<IDEOGRAPHIC>",
      "position" : 2
    },
    {
      "token" : "爱",
      "start_offset" : 7,
      "end_offset" : 8,
      "type" : "<IDEOGRAPHIC>",
      "position" : 3
    },
    {
      "token" : "吃",
      "start_offset" : 8,
      "end_offset" : 9,
      "type" : "<IDEOGRAPHIC>",
      "position" : 4
    },
    {
      "token" : "苹果",
      "start_offset" : 9,
      "end_offset" : 11,
      "type" : "<IDEOGRAPHIC>",
      "position" : 5
    },
    {
      "token" : "we",
      "start_offset" : 12,
      "end_offset" : 14,
      "type" : "<ALPHANUM>",
      "position" : 6
    },
    {
      "token" : "are",
      "start_offset" : 15,
      "end_offset" : 18,
      "type" : "<ALPHANUM>",
      "position" : 7
    },
    {
      "token" : "chinese",
      "start_offset" : 19,
      "end_offset" : 26,
      "type" : "<ALPHANUM>",
      "position" : 8
    }
  ]
}
启动es内部监控:
image.repository: docker.elastic.co/elasticsearch/elasticsearch
cluster.xpackEnable: true
cluster.env.XPACK_MONITORING_ENABLED: true
kibana repo image.repository: docker.elastic.co/kibana/kibana而不是oss版本
客户端服务HTTP NodePort端口号。如果client.serviceType不是,则无效NodePort(设置访问端口)
110 client:
111 name: client
112 replicas: 1
113 serviceType: NodePort
114 ## If coupled with serviceType = "NodePort", this will set a specific nodePort to the client HTTP port
115 httpNodePort: 30920
4.安装应用包
helm install stable/elasticsearch -n efk-es --namespace elk-logging -f elasticsearch/values.yaml
浏览器查看:http://192.1.80.39:30920/
5.测试:
[root@k8s-master ~/.helm/cache/archive]# kubectl get svc -n elk-logging
NAME TYPE CLUSTER-IP EXTERNAL-IP PORT(S) AGE
efk-es-elasticsearch-client NodePort 10.102.193.144 <none> 9200:30920/TCP 3m30s
efk-es-elasticsearch-discovery ClusterIP None <none> 9300/TCP 3m29s
[root@k8s-master ~/.helm/cache/archive]# kubectl get pod -n elk-logging
NAME READY STATUS RESTARTS AGE
efk-es-elasticsearch-client-6cb7f4b864-57kx7 1/1 Running 0 33h
efk-es-elasticsearch-client-6cb7f4b864-svmtz 1/1 Running 0 33h
efk-es-elasticsearch-data-0 1/1 Running 0 33h
efk-es-elasticsearch-data-1 1/1 Running 0 11h
efk-es-elasticsearch-master-0 1/1 Running 0 33h
efk-es-elasticsearch-master-1 1/1 Running 0 33h
efk-es-elasticsearch-master-2 1/1 Running 0 29h
[root@k8s-master ~/.helm/cache/archive]#
通过请求一个 REST API 来检查 Elasticsearch 集群是否正常运行
[root@k8s-master ~/.helm/cache/archive]# kubectl port-forward efk-es-elasticsearch-master-0  9200:9200 --namespace=elk-logging
Forwarding from 127.0.0.1:9200 -> 9200
Forwarding from [::1]:9200 -> 9200
通过部署cirros镜像并进入启动后的容器中来尝试访问ES服务是否正常,通过以下可测试ES是否部署成功
[root@k8s-master ~/.helm/cache/archive]# kubectl port-forward efk-es-elasticsearch-master-0 9200:9200 --namespace=elk-logging
Forwarding from 127.0.0.1:9200 -> 9200
Forwarding from [::1]:9200 -> 9200
^C[root@k8s-master ~/.helm/cache/archive]# kubectl run -it --rm cirror-$RANDOM --image=cirros -- /bin/sh
kubectl run --generator=deployment/apps.v1 is DEPRECATED and will be removed in a future version. Use kubectl run --generator=run-pod/v1 or kubectl create instead.
If you don't see a command prompt, try pressing enter.
/ # nslookup efk-es-elasticsearch-client.elk-logging.svc.cluster.local
Server: 10.96.0.10
Address 1: 10.96.0.10 kube-dns.kube-system.svc.cluster.local
Name: efk-es-elasticsearch-client.elk-logging.svc.cluster.local
Address 1: 10.102.193.144 efk-es-elasticsearch-client.elk-logging.svc.cluster.local
/ # curl efk-es-elasticsearch-client.elk-logging.svc.cluster.local:9200
{
"name" : "efk-es-elasticsearch-client-b5694c87-n9kqx",
"cluster_name" : "elasticsearch",
"cluster_uuid" : "JZf_DIIMTxan7KblnRmZEg",
"version" : {
"number" : "6.7.0",
"build_flavor" : "oss",
"build_type" : "docker",
"build_hash" : "8453f77",
"build_date" : "2019-03-21T15:32:29.844721Z",
"build_snapshot" : false,
"lucene_version" : "7.7.0",
"minimum_wire_compatibility_version" : "5.6.0",
"minimum_index_compatibility_version" : "5.0.0"
},
"tagline" : "You Know, for Search"
}
/ # curl efk-es-elasticsearch-client.elk-logging.svc.cluster.local:9200/_cat
/_cat/allocation
/_cat/shards
/_cat/shards/{index}
/_cat/master
#######
检查是否能解析ES服务名
nslookup efk-es-elasticsearch-client.efk.svc.cluster.local
##访问ES服务是否正常
curl efk-es-elasticsearch-client.efk.svc.cluster.local:9200
##查看ES库
curl efk-es-elasticsearch-client.efk.svc.cluster.local:9200/_cat
##查看ES中节点
curl efk-es-elasticsearch-client.efk.svc.cluster.local:9200/_cat/nodes
##查看ES中的索引
curl efk-es-elasticsearch-client.efk.svc.cluster.local:9200/_cat/indices
安装部署Fluentd
前提:测试使用stable/fluentd-elasticsearch部署环境产生组件问题,暂未解决办法,这里使用其他源:
fluent镜像:quay.io/fluentd_elasticsearch/fluentd:v2.6.0
-
安装 kiwigrid 源
-
helm repo add kiwigrid https://kiwigrid.github.io
1.查找安装包
helm search fluentd-elasticsearch
2.下载
cd ~/.helm/cache/archive
helm fetch kiwigrid/fluentd-elasticsearch
3.修改配置文件
tar -zxvf fluentd-elasticsearch-0.7.2.tgz
ls
vim fluentd-elasticsearch/values.yaml
-
编辑修改 values.yaml,指定 elasticsearch 集群的位置
elasticsearch:
  host: 'efk-es-elasticsearch-client.elk-logging.svc.cluster.local'
  port: 9200
-
如果使用 prometheus 监控应该打开 prometheusRole 规则
podAnnotations:
  prometheus.io/scrape: "true"
  prometheus.io/port: "24231"

service:
  type: ClusterIP
  ports:
    - name: "monitor-agent"
      port: 24231
4.部署
helm install kiwigrid/fluentd-elasticsearch --name efk-flu --namespace elk-logging -f fluentd-elasticsearch/values.yaml
查看
-
是否生成了索引,直接使用访问 elasticsearch 的 RESTfull API 接口。
$ kubectl run cirros1 --rm -it --image=cirros -- /bin/sh
/ # curl efk-cs-elasticsearch-client.elk-logging.svc.cluster.local:9200/_cat/indices
green open logstash-2019.05.10 a2b-GyKsSLOZPqGKbCpyJw 5 1 158 0 84.2kb 460b
green open logstash-2019.05.09 CwYylNhdRf-A5UELhrzHow 5 1 71418 0 34.3mb 17.4mb
green open logstash-2019.05.12 5qRFpV46RGG_bWC4xbsyVA 5 1 34496 0 26.1mb 13.2mb
fluentd 安装 https://github.com/nttcom/fluent-plugin-rabbitmq
安装部署kibana
kibana镜像:docker.elastic.co/kibana/kibana:6.7.0
1.下载kibana
helm fetch stable/kibana
2.修改配置文件values.yaml
-
编辑 values.yaml,修改 elasticsearch 指向 elasticsearch 集群的地址
elasticsearch.hosts: http://efk-es-elasticsearch-client.elk-logging.svc.cluster.local:9200
-
修改 service 的工作模式,使得可以从集群外部访问
service:
  type: NodePort
  nodePort:30049
备注:kibana汉化: i18n.locale: "zh-CN"
files:
  kibana.yml:
    ## Default Kibana configuration from kibana-docker.
    server.name: kibana
    server.host: "0"
    ## For kibana < 6.6, use elasticsearch.url instead
    elasticsearch.hosts: http://efk-es-elasticsearch-client.elk-logging.svc.cluster.local:9200
    i18n.locale: "zh-CN"
3.部署
helm install stable/kibana -n efk-kibana --namespace elk-logging -f kibana/values.yaml
4.获取service端口
[root@k8s-master ~/.helm/cache/archive]# kubectl get svc -n elk-logging
NAME TYPE CLUSTER-IP EXTERNAL-IP PORT(S) AGE
efk-es-elasticsearch-client NodePort 10.102.193.144 <none> 9200:30920/TCP 3h46m
efk-es-elasticsearch-discovery ClusterIP None <none> 9300/TCP 3h46m
efk-flu-fluentd-elasticsearch ClusterIP 10.110.89.85 <none> 24231/TCP 54m
kibana NodePort 10.101.94.164 <none> 443:30049/TCP 39m
5.测试
-
由于 service 工作在 NodePort 模式下,所以可以在集群外部访问了
安装部署logstash
logstash镜像:docker.elastic.co/logstash/logstash:6.7.0
提前创建PV,最小分配5Gi
1.下载logstash镜像包
helm fetch stable/logstash
2.修改配置文件values.yaml
修改镜像:
image:
  repository: docker.elastic.co/logstash/logstash
  tag: 6.7.0
设置X-Pack monitoring in Logstash (config:)
xpack.monitoring.enabled: true
  xpack.monitoring.elasticsearch.url: "http://efk-es-elasticsearch-client.elk-logging.svc.cluster.local:9200"
设置elasticsearch输出
elasticsearch:
  host: efk-es-elasticsearch-client.elk-logging.svc.cluster.local
  port: 9200
数据输入为filebeat数据
beats { port => 5044 }
数据过滤设置:
filters:
数据输出设置:此处设置输出es
elasticsearch { hosts => ["ELASTICSEARCH_HOST"}:${ELASTICSEARCH_PORT}"] manage_template => false index => "%{@metadata}-%{+YYYY.MM.dd}" }
3.部署
helm install stable/logstash -n logstash --namespace elk-logging -f logstash/values.yaml
4.测试
root@:~/.helm/cache/archive# kubectl get pods -n elk-logging
NAME READY STATUS RESTARTS AGE
efk-es-elasticsearch-client-7d6f8bf48f-h7zql 1/1 Running 0 3d
efk-es-elasticsearch-client-7d6f8bf48f-pmdf4 1/1 Running 0 3d
efk-es-elasticsearch-data-0 1/1 Running 0 3d
efk-es-elasticsearch-data-1 1/1 Running 0 3d
efk-es-elasticsearch-master-0 1/1 Running 0 3d
efk-es-elasticsearch-master-1 1/1 Running 0 3d
efk-es-elasticsearch-master-2 1/1 Running 0 3d
efk-flu-fluentd-elasticsearch-545vn 1/1 Running 0 3d
efk-kibana-5488995d-w7n7m 1/1 Running 0 2d6h
filebeat-6b97c4f688-kd2l9 1/1 Running 0 6h45m
logstash-0 1/1 Running 0 19m
备注:host: logstash.elk-logging.svc.cluster.local
port: 5044
安装部署filebeat
备注:使用镜像:docker.elastic.co/beats/filebeat:6.7.0
1.下载helm源
helm fetch stable/filebeat
2.修改配置文件values.yaml
先解压下载的helm安装包
filebeat.modules:
    - module: system
  processors:
    - add_cloud_metadata:

  filebeat.inputs:
    - type: log
      enabled: true
      paths:
        - /var/log/*.log
        - /var/log/messages
        - /var/log/syslog
    - type: docker
      containers.ids:
      - "*"
      processors:
        - add_kubernetes_metadata:
            in_cluster: true
        - drop_event:
            when:
              equals:
                kubernetes.container.name: "filebeat"
  xpack.monitoring.enabled: true
  #xpack.monitoring.elasticsearch:
    #hosts: ["efk-es-elasticsearch-client.elk-logging.svc.cluster.local:9200"]
  output.elasticsearch:
    hosts: ['efk-es-elasticsearch-client.elk-logging.svc.cluster.local:9200']
  #output.logstash:
    #hosts: ['logstash.elk-logging.svc.cluster.local:5044']
  output.file:
    enabled: false
  logging.level: info
  # When a key contains a period, use this format for setting values on the command line:
  # --set config."http.enabled"=true
  http.enabled: true
  http.port: 5066
备注:
filebeat.modules: 配置使用默认模块,参考:https://www.elastic.co/guide/en/beats/filebeat/6.7/filebeat-modules.html
filebeat.inputs:配置输入规则logging.level: info
xpack.monitoring.enabled: true =》配置kibana监控
output.elasticsearch.hosts: ['efk-es-elasticsearch-client.elk-logging.svc.cluster.local:9200'] :配置输出为es
output.logstash.hosts: ['logstash.elk-logging.svc.cluster.local:5044'] :配置输出为logstash
output.file. enabled: false : 关闭默认输出,配置其他的输出,不然会报错
logging.level: info : 日志等级
3.部署
helm install stable/filebeat -n filebeat --namespace elk-logging -f filebeat/values.yaml
4.是否部署成功
root@:~/.helm/cache/archive# kubectl get pods -n elk-logging
NAME                                           READY   STATUS             RESTARTS   AGE
efk-es-elasticsearch-client-7d6f8bf48f-6l62s   1/1     Running            0          32d
efk-es-elasticsearch-client-7d6f8bf48f-qtfm7   1/1     Running            0          32d
efk-es-elasticsearch-data-0                    1/1     Running            0          32d
efk-es-elasticsearch-data-1                    1/1     Running            0          32d
efk-es-elasticsearch-master-0                  1/1     Running            0          32d
efk-es-elasticsearch-master-1                  1/1     Running            0          32d
efk-es-elasticsearch-master-2                  1/1     Running            0          32d
efk-kibana-b57fd4c6d-nvfms                     1/1     Running            0          29d
elastalert-6977858ccf-r68pz                    0/1     CrashLoopBackOff   1269       15d
elastalert-elastalert-7c7957c9c6-cdkfv         1/1     Running            0          10d
filebeat-z9njz                                 2/2     Running            0          16d
metricbeat-ststg                               1/1     Running            0          14d
root@:~/.helm/cache/archive# kubectl get svc -n elk-logging
NAME                             TYPE        CLUSTER-IP       EXTERNAL-IP   PORT(S)          AGE
efk-es-elasticsearch-client      NodePort    10.100.114.154   <none>        9200:30920/TCP   32d
efk-es-elasticsearch-discovery   ClusterIP   None             <none>        9300/TCP         32d
efk-kibana                       NodePort    10.97.169.99     <none>        443:30049/TCP    29d
elastalert                       NodePort    10.108.55.119    <none>        3030:30078/TCP   15d
filebeat-metrics                 ClusterIP   10.109.202.198   <none>        9479/TCP         16d