项目 ssm 来进行 jsp页面 对数据库数据的增删改查
struts2
struts2 的触发过程 ---------------------------------一般用于请求层 (其本质是拦截器 不依赖servlet)
1 : jsp发出action
2:Struts2 拦截请求 ,调用后台的action
3:action返回结果由不同的 的jsp展示数据
基本流程:
客户端网页(发出请求给)-----------Filter中央控制器(进行过滤)------------系统为Action创建代理类(ActionProxy)后(将服务放在)------------Interceptor(拦截器)------------后对拦截器进行执行-------------执行完后对action(执行)--------------action用(service)----------调用dao{dao既是数据访问对象一种面向对象的数据库接口}-----------(得到)结果字符串-------------后创建(result对象)-----------(转向)相应视图
数据库的数据流的处理
----------------------------------OGNL语言(快速查询数据的语言 或 对象图形导航语言):将多个对象的关系使用一种树形的结构展现出底层的反射实现。
----------------------------------值栈技术: (容器)valueStack 一种数据结构 先进先出
SPRING -------------------------
spring---------持久层:负责数据的访问和操作
--------------------控制反转 Ioc (依赖注入) 由容器来管理对象的调用 --------》spring的核心
---------------------Aop 面相切面编程
类包的规划
------------dao : 对数据库与java链接需要Dao层实现 (JDBC的范畴或用orm框架)----(orm框架:对象映射关系是一种程序技术 作用:把对象模型表示的对象映射到基于SQL的关系模型数据库结构中去,在具体操作对象的时候便不再需要复杂的SQL语句打交道)
-----------service 业务层 业务逻辑的实现
-----------web controller 响应需求并在后台自动运行(springmvc)
序列化 :将对象的状态信息转换为可以存储或传输的形式过程
springMVC
Spring MVC属于SpringFrameWork的后续产品,已经融合在Spring Web Flow里面。Spring 框架提供了构建 Web 应用程序的全功能 MVC 模块。使用 Spring 可插入的 MVC 架构,可以选择是使用内置的 Spring Web 框架还可以是 Struts 这样的 Web 框架
M 是指model 也可以理解为 spring容器
v 是指 视图 也就是说 用户界面
c controller 也就是控制器
maven
是构建工具
ant和svn结合的一种服务器
集合了ant功能将编译成的jar和调用的jar都存在maven服务器上
在运行 maven 项目 的 时
记住 用 run as 中的 maven install 进行安装 然后 在juit测试单元通过的 前提下 --- 会在 target文件里 出现
war包
将 war包 放在 tomcat 的 webapp文件下 后 运行 tomcat 并在 浏览器 网址上输入 lohast:/8080/war包的名字
maven 加入依赖包 的方法
利用 pom。xml 文件里的
Dependencies 里来添加
说实话 但你填写完 pom.xml文件之后 会自动下载 相应的依赖包
还需记住一点 利用项目右键的 maven 里 的 update 来更新 pom.xml
来解决 pom。xml红叉的问题 。
Intellil IDEA
有钱的话就把这买了吧 一个比esclisp跟好的IDE集成开发环境。
ibatis 持久层
包括语言
--------------------1 数据库定义语言(DDL)------用于定义数据库数据及其设计
-------------------2 数据库操作语句(DML)
存储过程
----------------三层(three-tier)
---------------N层(N-tire)
内联SQL
将sql从数据库移入了应用程序代码使sql语句可直接与语言进行交互
动态SQL
o/RM (对像/关系映射)
特性
------------外部化SQL
-----------封装化 SQL
表现层----------(使用或依赖)业务对象模型
1 1 1
1 1 1
业务逻辑层 1 1
1 1
1 1
持久层 1
1
1
数据库
上图 画的很烂 大家还是无视了吧 还有我知道 没人看 所以 哎 ...........
El表达式
在进行数据传输时
记住 #{ } 的el表达式 里面不能放java的关键字 说实话 还不如用 ajax 那
例如 #{gender }这就是 无法运行的 这里gender 属于 java里的一个包的 一个类 所以不可用
进入正题 项目 选自zhangguo的博客 在这里借鉴一下 非我自创
http://www.cnblogs.com/best/p/5648740.html 相应的链接
该项目思路 1. 持久层出发新建数据库表的 对应的几个对像并进行初始化
2 。添加映射 并且添加该项目所要对数据库的操作
3 添加类型为orm框架辅助文件Mapper.xml 这里来对数据库的操作的具体代码
4 然后是 spring和 myibates的配置整合 这里就是业务层 和 持久层的连接 。
5 之后进入服务层 在这里的我们写一个service类 中陈列我们要实现项目需求的方法 。
6 之后在完成这些后 编写 juint测试单元 来进行 测试方法的书写
7 然后 由springMVC 我们来实现 model 既是 spring 容器( web 容器 )
8在这之后 进行控制器的封装 和控制器 (实现项目需求的方法的具体代码 )
9 视图的设计
新建POJO实体层
这里 pojo可以视为一个简单的javaBean但却不是javaBean
我的理解 在这里 去新建对像 来将 所对应的的数据信息
为了实现与数据库中的books表进行关系映射新建一个Book类,具体代码如下:
package com.zhangguo.bookstore.entities;

import java.util.Date;

/**
 * 图书实体
 */
public class Book {
    /**
     * 编号
     */
    private int id;
    /**
     * 书名
     */
    private String title;
    /**
     * 价格
     */
    private double price;
    /**
     * 出版日期
     */
    private Date publishDate;

    public Book(int id, String title, double price, Date publishDate) {
        this.id = id;
        this.title = title;
        this.price = price;
        this.publishDate = publishDate;
    }

    public Book() {
    }

    public int getId() {
        return id;
    }

    public void setId(int id) {
        this.id = id;
    }

    public String getTitle() {
        return title;
    }

    public void setTitle(String title) {
        this.title = title;
    }

    public double getPrice() {
        return price;
    }

    public void setPrice(double price) {
        this.price = price;
    }

    public Date getPublishDate() {
        return publishDate;
    }

    public void setPublishDate(Date publishDate) {
        this.publishDate = publishDate;
    }
}
新建MyBatis SQL映射层
这个项目中我们采用接口与xml结束的形式完成关系与对象间的映射,在接口中定义一些数据访问的方法,在xml文件中定义实现数据访问需要的sql脚本。图书数据访问映射接口如下:
我的理解 在上的pojo实体层后 这里要把我们刚刚新建的对像在这里向数据库实现映射 来使他们产生关系 并且实现数据库的要操作的功能

package com.zhangguo.bookstore.mapper;

import java.util.List;

import org.apache.ibatis.annotations.Param;

import com.zhangguo.bookstore.entities.Book;

/**
 * 图书数据访问接口
 */
public interface BookDAO {
    /**
     * 获得所有图书
     */
    public List<Book> getAllBooks();
    /**
     * 根据图书编号获得图书对象
     */
    public Book getBookById(@Param("id") int id);
    /**
     * 添加图书
     */
    public int add(Book entity);
    /**
     * 根据图书编号删除图书
     */
    public int delete(int id);
    /**
     * 更新图书
     */
    public int update(Book entity);
}
为MyBatis ORM创建的映射文件BookMapper.xml(命名尽量都遵循一个规则,便于扫描,这里约定以实体名+Mapper)如下:
orm框架和数据联系的一种对像关系映射技术 为了简化操作对像 即可不用再去和复杂的sql语句打交道。 其实是和面的文件(实现对象与数据关系)的辅助文件 这里利用了
orm框架 。
<?xml version="1.0" encoding="UTF-8"?>
<!DOCTYPE mapper PUBLIC "-//mybatis.org//DTD Mapper 3.0//EN" "http://mybatis.org/dtd/mybatis-3-mapper.dtd">
<!--命名空间应该是对应接口的包名+接口名 -->
<mapper namespace="com.zhangguo.bookstore.mapper.BookDAO">
    <!--id应该是接口中的方法,结果类型如没有配置别名则应该使用全名称 -->
    <!--获得所有图书 -->
    <select id="getAllBooks" resultType="Book">
        select id,title,price,publishDate from books
    </select>
    <!--获得图书对象通过编号 -->
    <select id="getBookById" resultType="Book">
        select id,title,price,publishDate from books where id=#{id}
    </select>
    <!-- 增加 -->
    <insert id="add">
        insert into books(title,price,publishDate)
        values(#{title},#{price},#{publishDate})
    </insert>
    <!-- 删除 -->
    <delete id="delete">
        delete from books where id=#{id}
    </delete>
    <!-- 更新 -->
    <update id="update">
        update books set title=#{title},price=#{price},publishDate=#{publishDate}
        where id=#{id}
    </update>
</mapper>
完成Spring整合MyBatis配置
6.1、在源代码的根目录下新建 db.properties文件,用于存放数据库连接信息,文件内容如下:
我的理解 :在这里是持久层和业务层(服务层的连接)
#mysql jdbc
jdbc.driver=com.mysql.jdbc.Driver
jdbc.url=jdbc:mysql://localhost:3306/db1?useUnicode=true&characterEncoding=UTF-8
jdbc.uid=root
jdbc.pwd=root
6.2、在源代码的根目录下新建 applicationContext.xml文件,用于整合MyBatis与Spring,该文件是整个项目的控制中心,非常关键,具体的内容如下:
<?xml version="1.0" encoding="UTF-8"?>
<beans xmlns="http://www.springframework.org/schema/beans"
    xmlns:xsi="http://www.w3.org/2001/XMLSchema-instance"
    xmlns:p="http://www.springframework.org/schema/p"
    xmlns:aop="http://www.springframework.org/schema/aop"
    xmlns:context="http://www.springframework.org/schema/context"
    xmlns:tx="http://www.springframework.org/schema/tx"
    xsi:schemaLocation="http://www.springframework.org/schema/beans
        http://www.springframework.org/schema/beans/spring-beans.xsd
        http://www.springframework.org/schema/context
        http://www.springframework.org/schema/context/spring-context-4.3.xsd
        http://www.springframework.org/schema/aop
        http://www.springframework.org/schema/aop/spring-aop-4.3.xsd
        http://www.springframework.org/schema/tx
        http://www.springframework.org/schema/tx/spring-tx-4.3.xsd">

    <!--1 引入属性文件,在配置中占位使用 -->
    <context:property-placeholder location="classpath*:db.properties" />

    <!--2 配置C3P0数据源 -->
    <bean id="datasource" class="com.mchange.v2.c3p0.ComboPooledDataSource" destroy-method="close">
        <!--驱动类名 -->
        <property name="driverClass" value="${jdbc.driver}" />
        <!-- url -->
        <property name="jdbcUrl" value="${jdbc.url}" />
        <!-- 用户名 -->
        <property name="user" value="${jdbc.uid}" />
        <!-- 密码 -->
        <property name="password" value="${jdbc.pwd}" />
        <!-- 当连接池中的连接耗尽的时候c3p0一次同时获取的连接数  -->
        <property name="acquireIncrement" value="5"></property>
        <!-- 初始连接池大小 -->
        <property name="initialPoolSize" value="10"></property>
        <!-- 连接池中连接最小个数 -->
        <property name="minPoolSize" value="5"></property>
        <!-- 连接池中连接最大个数 -->
        <property name="maxPoolSize" value="20"></property>
    </bean>

    <!--3 会话工厂bean sqlSessionFactoryBean -->
    <bean id="sqlSessionFactory" class="org.mybatis.spring.SqlSessionFactoryBean">
        <!-- 数据源 -->
        <property name="dataSource" ref="datasource"></property>
        <!-- 别名 -->
        <property name="typeAliasesPackage" value="com.zhangguo.bookstore.entities"></property>
        <!-- sql映射文件路径 -->
        <property name="mapperLocations" value="classpath*:com/zhangguo/bookstore/mapper/*Mapper.xml"></property>
    </bean>

    <!--4 自动扫描对象关系映射 -->
    <bean class="org.mybatis.spring.mapper.MapperScannerConfigurer">
        <!--指定会话工厂,如果当前上下文中只定义了一个则该属性可省去 -->
        <property name="sqlSessionFactoryBeanName" value="sqlSessionFactory"></property>
        <!-- 指定要自动扫描接口的基础包,实现接口 -->
        <property name="basePackage" value="com.zhangguo.bookstore.mapper"></property>
    </bean>

    <!--5 声明式事务管理 -->
    <!--定义事物管理器,由spring管理事务 -->
    <bean id="transactionManager" class="org.springframework.jdbc.datasource.DataSourceTransactionManager">
        <property name="dataSource" ref="datasource"></property>
    </bean>
    <!--支持注解驱动的事务管理,指定事务管理器 -->
    <tx:annotation-driven transaction-manager="transactionManager"/>

    <!--6 容器自动扫描IOC组件  -->
    <context:component-scan base-package="com.zhangguo.bookstore"></context:component-scan>

    <!--7 aspectj支持自动代理实现AOP功能 -->
    <aop:aspectj-autoproxy proxy-target-class="true"></aop:aspectj-autoproxy>
</beans>
共有7处配置,第7处配置非必要,另外关于事务管理可以选择AOP拦截式事务管理。
创建服务层
创建BookService服务类,完成图书管理业务,有些项目中也叫业务层,这里我们叫服务层,具体实现如下:
package com.zhangguo.bookstore.service;

import java.util.List;
import javax.annotation.Resource;

import org.apache.ibatis.annotations.Param;
import org.springframework.stereotype.Service;
import org.springframework.transaction.annotation.Transactional;

import com.zhangguo.bookstore.entities.Book;
import com.zhangguo.bookstore.mapper.BookDAO;
//在这里实现业务的逻辑判断 来实现项目的需求

@Service
public class BookService{

    @Resource
    BookDAO bookdao;

    public List<Book> getAllBooks() {
        return bookdao.getAllBooks();
    }

    public Book getBookById(int id){
        return bookdao.getBookById(id);
    }

    public int add(Book entity) throws Exception {
        if(entity.getTitle()==null||entity.getTitle().equals("")){
            throw new Exception("书名必须不为空");
        }
        return bookdao.add(entity);
    }

    @Transactional
    public int add(Book entity1,Book entityBak){
        int rows=0;
        rows=bookdao.add(entity1);
        rows=bookdao.add(entityBak);
        return rows;
    }

    public int delete(int id) {
        return bookdao.delete(id);
    }

    /**
     * 多删除
     */
    public int delete(String[] ids){
        int rows=0;
        for (String idStr : ids) {
            int id=Integer.parseInt(idStr);
            rows+=delete(id);
        }
        return rows;
    }

    public int update(Book entity) {
        return bookdao.update(entity);
    }

}
服务层不只是一个dao的接力棒,认为他可有可无,其实是因为我们现在的的示例中没有涉及到更多的复杂业务,所以显得比较空,实现开发可能有更多的业务逻辑要在这里处理。另外给bookdao成员变量注解为自动装配,service类注解为IOC组件。
JUnit测试服务类
为了确保服务类中的每个方法正确,先使用JUnit进行单元测试,测试代码如下:
package com.zhangguo.bookstore.test;

import static org.junit.Assert.*;
import java.util.Date;
import java.util.List;
import org.junit.BeforeClass;
import org.junit.Test;
import org.springframework.context.ApplicationContext;
import org.springframework.context.support.ClassPathXmlApplicationContext;
import com.zhangguo.bookstore.entities.Book;
import com.zhangguo.bookstore.service.BookService;

public class TestBookService {

    static BookService bookservice;

    @BeforeClass
    public static void before(){
        ApplicationContext ctx=new ClassPathXmlApplicationContext("applicationContext.xml");
        bookservice=ctx.getBean(BookService.class);
    }

    @Test
    public void testGetAllBooks() {
        List<Book> books=bookservice.getAllBooks();
        assertNotNull(books);
    }

    @Test
    public void testAdd() {
        Book entity=new Book(0, "Hibernate 第七版", 78.1, new Date());
        try {
            assertEquals(1, bookservice.add(entity));
        } catch (Exception e) {
            e.printStackTrace();
        }
    }

    @Test
    public void testDeleteInt() {
        assertEquals(1, bookservice.delete(9));
    }

    @Test
    public void testDeleteStringArray() {
        String[] ids={"7","11","12"};
        assertEquals(3, bookservice.delete(ids));
    }

    @Test
    public void testUpdate() {
        Book entity=new Book(7, "Hibernate 第二版", 79.1, new Date());
        try {
            assertEquals(1, bookservice.update(entity));
        } catch (Exception e) {
            e.printStackTrace();
        }
    }

    @Test
    public void testGetBookById()
    {
        assertNotNull(bookservice.getBookById(1));
    }

    @Test
    public void testAddDouble(){
        //因为书名相同,添加第二本会失败,用于测试事务
        Book entity1=new Book(0, "Hibernate 第八版", 78.1, new Date());
        Book entity2=new Book(0, "Hibernate 第八版", 78.1, new Date());
        assertEquals(2, bookservice.add(entity1, entity2));
    }
}
所有的测试均通过,有一个想法就是能否测试完成后数据库还原,如删除的数据在测试后不被真正删除。
加载Spring容器与获得容器对象
、修改web.xml文件,添加加载Spring容器用的监听器,修改后的结果如下:
<?xml version="1.0" encoding="UTF-8"?>
<web-app xmlns:xsi="http://www.w3.org/2001/XMLSchema-instance"
    xmlns="http://java.sun.com/xml/ns/javaee"
    xsi:schemaLocation="http://java.sun.com/xml/ns/javaee http://java.sun.com/xml/ns/javaee/web-app_3_0.xsd"
    id="WebApp_ID" version="3.0" >
    <welcome-file-list>
        <welcome-file>index.jsp</welcome-file>
    </welcome-file-list>

    <listener>
        <description>Spring容器加载监听器</description>
        <listener-class>org.springframework.web.context.ContextLoaderListener</listener-class>
    </listener>
    <context-param>
        <description>设置Spring加载时的配置文件位置,默认位置在web-inf/lib下</description>
        <param-name>contextConfigLocation</param-name>
        <param-value>classpath*:applicationContext.xml</param-value>
    </context-param>
</web-app>
类org.springframework.web.context.ContextLoaderListener处在Spring-web.jar包中,要记得在pom.xml中添加依赖,测试是否加载成功的简单办法是:重新启动tomcat查看控制信息。
9.2、为了方便获得Spring容器实例,定义一个CtxUtil工具类,工具类的代码如下:
package com.zhangguo.bookstore.action;

import org.springframework.beans.BeansException;
import org.springframework.context.ApplicationContext;
import org.springframework.context.ApplicationContextAware;
import org.springframework.stereotype.Component;

/**
 * Spring容器上下文工具类,用于获取当前的Spring容器
 * 实现了接口ApplicationContextAware且该类被Spring管理
 *则会自动调用setApplicationContext方法获取Spring容器对象
 */
@Component
public class CtxUtil implements ApplicationContextAware {

    public static ApplicationContext ctx;

    @Override
    public void setApplicationContext(ApplicationContext applicationContext) throws BeansException {
        ctx=applicationContext;
    }
    /**
     * 根据类型获得bean
     */
    public static <T> T getBean(Class<T> clazz){
        return ctx.getBean(clazz);
    }
    /**
     * 根据名称名称获得bean
     */
    public static Object getBean(String name){
        return ctx.getBean(name);
    }

}
简单MVC控制器封装
为了实现一个简单的MVC基础控制器,定义了一个叫BaseController的Servlet,可以让其它的Servlet继承该Servlet获得部分MVC功能,具体代码如下:
package com.zhangguo.bookstore.action;

import java.io.IOException;
import java.lang.reflect.*;

import javax.servlet.ServletException;
import javax.servlet.http.HttpServlet;
import javax.servlet.http.HttpServletRequest;
import javax.servlet.http.HttpServletResponse;

/**
 * Servlet基类
 * 自定义控制器基类
 */
public class BaseController extends HttpServlet {
    private static final long serialVersionUID = 1L;

    protected void service(HttpServletRequest request, HttpServletResponse response)
            throws ServletException, IOException {
        request.setCharacterEncoding("UTF-8");
        response.setCharacterEncoding("UTF-8");
        response.setContentType("text/html;charset=utf-8");

        // 获得要执行的方法名
        String act = request.getParameter("act");

        // 如果用户没有提供方法名
        if (act == null || act.equals("")) {
            // 默认方法
            act = "execute";
        }

        // 根据方法名获得方法信息获得方法信息
        Method method;
        try {
            // 在对象中获得类型信息,在类型中获得方法通过方法名,与参数类型
            method = this.getClass().getMethod(act, HttpServletRequest.class, HttpServletResponse.class);
            // 调用方法,在当前对象中调用,传递参数request与response,获得返回结果
            String targetUri = method.invoke(this, request, response) + "";
            // 如果返回的url是以redirect开始,则是重定向
            if (targetUri.startsWith("redirect:")) {
                response.sendRedirect(targetUri.substring(9, targetUri.length()));
            } else {
                // 转发
                request.getRequestDispatcher(targetUri).forward(request, response);
            }
        } catch (Exception e) {
            response.sendError(400, e.getMessage());
            e.printStackTrace();
        }
    }

    public void execute(HttpServletRequest request, HttpServletResponse response) throws IOException {
        response.sendError(400, "请使用参数act指定您要访问的方法");
    }
}
完成图书管理功能
11.1、定义BookController控制器
该控制器继承BaseController,中间每一个参数为(HttpServletRequest request,HttpServletResponse response)的方法都充当一个Action,代码如下:
package com.zhangguo.bookstore.action;

import java.io.IOException;
import java.text.ParseException;
import java.text.SimpleDateFormat;
import java.util.Date;

import javax.servlet.ServletException;
import javax.servlet.annotation.WebServlet;
import javax.servlet.http.HttpServlet;
import javax.servlet.http.HttpServletRequest;
import javax.servlet.http.HttpServletResponse;

import com.zhangguo.bookstore.entities.Book;
import com.zhangguo.bookstore.service.BookService;

@WebServlet("/BookController.do")
public class BookController extends BaseController {
    private static final long serialVersionUID = 1L;

    BookService bookservice;

    @Override
    public void init() throws ServletException {
        bookservice = CtxUtil.getBean(BookService.class);
    }

    // 图书列表Action
    public String ListBook(HttpServletRequest request, HttpServletResponse response) {
        request.setAttribute("books", bookservice.getAllBooks());
        return "ListBook.jsp";
    }

    // 删除图书Action
    public String Delete(HttpServletRequest request, HttpServletResponse response) {
        int id = Integer.parseInt(request.getParameter("id"));
        request.setAttribute("message", bookservice.delete(id) > 0 ? "删除成功!" : "删除失败!");
        request.setAttribute("books", bookservice.getAllBooks());
        return "ListBook.jsp";
    }

    // 多删除图书Action
    public String Deletes(HttpServletRequest request, HttpServletResponse response) {
        String[] ids = request.getParameterValues("ids");
        if (ids!=null&&ids.length > 0) {
            request.setAttribute("message", bookservice.delete(ids) > 0 ? "删除成功!" : "删除失败!");
        } else {
            request.setAttribute("message", "请选择删除项!");
        }
        request.setAttribute("books", bookservice.getAllBooks());
        return "ListBook.jsp";
    }

    // 添加图书Action
    public String AddBook(HttpServletRequest request, HttpServletResponse response) {
        return "AddBook.jsp";
    }

    // 保存添加图书Action
    public String AddBookPost(HttpServletRequest request, HttpServletResponse response) {
        try {
            String title = request.getParameter("title");
            double price = Double.parseDouble(request.getParameter("price"));

            SimpleDateFormat simpleDateFormat = new SimpleDateFormat("yyyy-MM-dd");
            Date publishDate = simpleDateFormat.parse(request.getParameter("publishDate"));

            Book entity = new Book(0, title, price, publishDate);
            if (bookservice.add(entity) > 0) {
                request.setAttribute("model", new Book());
                request.setAttribute("message", "添加成功!");
            } else {
                request.setAttribute("model", entity);
                request.setAttribute("message", "添加失败!");
            }
        } catch (Exception exp) {
            request.setAttribute("message", exp.getMessage());
            exp.printStackTrace();
        }
        return "AddBook.jsp";
    }

        //编辑图书Action
        public String EditBook(HttpServletRequest request, HttpServletResponse response) {
            int id = Integer.parseInt(request.getParameter("id"));
            Book model=bookservice.getBookById(id);
            request.setAttribute("model", model);
            return "EditBook.jsp";
        }

        // 保存编辑图书Action
        public String EditBookPost(HttpServletRequest request, HttpServletResponse response) {
            try {
                int id=Integer.parseInt(request.getParameter("id"));

                String title = request.getParameter("title");
                double price = Double.parseDouble(request.getParameter("price"));

                SimpleDateFormat simpleDateFormat = new SimpleDateFormat("yyyy-MM-dd");
                Date publishDate = simpleDateFormat.parse(request.getParameter("publishDate"));

                Book entity = new Book(id, title, price, publishDate);
                request.setAttribute("message", bookservice.update(entity) > 0 ? "更新成功!" : "更新失败!");
                request.setAttribute("model", entity);
            } catch (Exception exp) {
                request.setAttribute("message", exp.getMessage());
                exp.printStackTrace();
            }
            return "EditBook.jsp";
        }

}
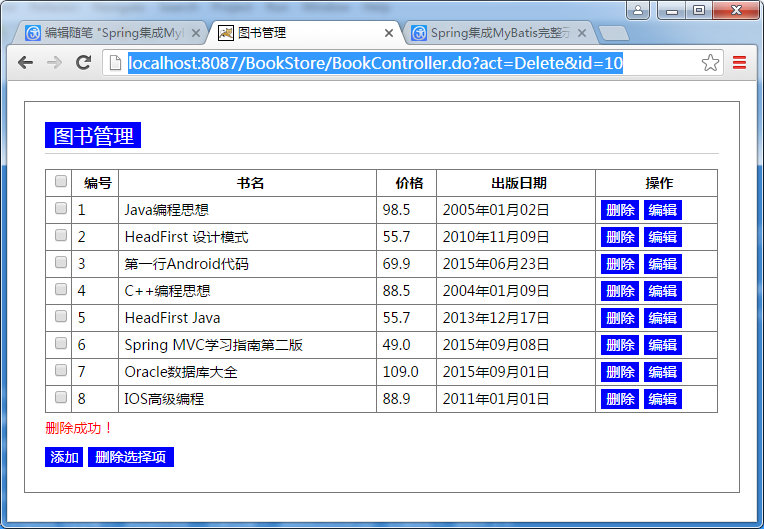
1.2、图书列表与删除
定义视图ListBook.jsp,用于完成图书管理,实现图书的列表、删除与多删除功能,页面脚本如下:
<%@ page language="java" contentType="text/html; charset=UTF-8"
    pageEncoding="UTF-8"%>
<%@taglib prefix="c" uri="http://java.sun.com/jsp/jstl/core"%>
<%@taglib prefix="fmt" uri="http://java.sun.com/jsp/jstl/fmt" %>
<!DOCTYPE html>
<html>
<head>
<meta http-equiv="Content-Type" content="text/html; charset=UTF-8">
<link href="styles/main.css" type="text/css" rel="stylesheet" />
<title>图书管理</title>
</head>
<body>
    <div class="main">
        <h2 class="title"><span>图书管理</span></h2>
        <form action="BookController.do?act=Deletes" method="post">
        <table border="1" width="100%" class="tab">
            <tr>
                <th><input type="checkbox" id="chbAll"></th>
                <th>编号</th>
                <th>书名</th>
                <th>价格</th>
                <th>出版日期</th>
                <th>操作</th>
            </tr>
            <c:forEach var="book" items="${books}">
                <tr>
                    <th><input type="checkbox" name="ids" value="${book.id}"></th>
                    <td>${book.id}</td>
                    <td>${book.title}</td>
                    <td>${book.price}</td>
                    <td><fmt:formatDate value="${book.publishDate}" pattern="yyyy年MM月dd日"/></td>
                    <td>
                    <a href="BookController.do?act=Delete&id=${book.id}" class="abtn">删除</a>
                    <a href="BookController.do?act=EditBook&id=${book.id}" class="abtn">编辑</a>
                    </td>
                </tr>
            </c:forEach>
        </table>
        <p style="color: red">${message}</p>
        <p>
            <a href="BookController.do?act=AddBook" class="abtn">添加</a>
            <input type="submit"  value="删除选择项" class="btn"/>
        </p>
    </form>
    </div>
</body>
</html>
运行时效果如下图所示:
11.3、新增图书功能
定义页面AddBook.jsp完成添加图书功能,在控制器中有两个Action对应新增功能,一个是AddBook,完成页面展示;另一个是AddBookPost处理保存事件,页面脚本如下:
<%@ page language="java" contentType="text/html; charset=UTF-8"
    pageEncoding="UTF-8"%>
<%@taglib prefix="c" uri="http://java.sun.com/jsp/jstl/core"%>
<!DOCTYPE html>
<html>
<head>
<meta http-equiv="Content-Type" content="text/html; charset=UTF-8">
<link href="styles/main.css" type="text/css" rel="stylesheet" />
<title>新增图书</title>
</head>
<body>
    <div class="main">
        <h2 class="title"><span>新增图书</span></h2>
        <form action="BookController.do?act=AddBookPost" method="post">
        <fieldset>
            <legend>图书</legend>
            <p>
                <label for="title">图书名称:</label>
                <input type="text" id="title" name="title"  value="${model.title}"/>
            </p>
            <p>
                <label for="title">图书价格:</label>
                <input type="text" id="price" name="price" value="${model.price}"/>
            </p>
            <p>
                <label for="title">出版日期:</label>
                <input type="text" id="publishDate" name="publishDate"  value="${model.publishDate}"/>
            </p>
            <p>
              <input type="submit" value="保存" class="btn">
            </p>
        </fieldset>
        </form>
        <p style="color: red">${message}</p>
        <p>
            <a href="BookController.do?act=ListBook" class="abtn">返回列表</a>
        </p>
    </div>
</body>
</html>
运行成功时的状态如下:

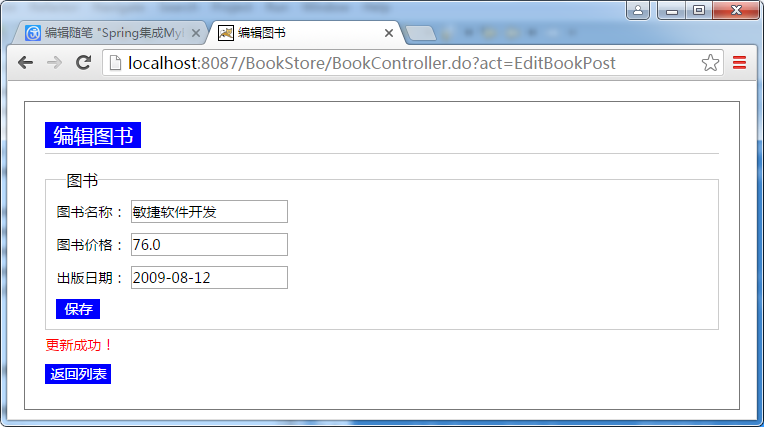
11.4、编辑图书功能
定义页面EditBook.jsp完成更新图书功能,在控制器中有两个Action对应更新功能,一个是EditBook,完成页面展示与加载要编辑图书实体的信息;另一个是EditBookPost处理保存事件,页面脚本如下:
<%@ page language="java" contentType="text/html; charset=UTF-8"
    pageEncoding="UTF-8"%>
<%@taglib prefix="c" uri="http://java.sun.com/jsp/jstl/core"%>
<%@taglib prefix="fmt" uri="http://java.sun.com/jsp/jstl/fmt"%>
<!DOCTYPE html>
<html>
<head>
<meta http-equiv="Content-Type" content="text/html; charset=UTF-8">
<link href="styles/main.css" type="text/css" rel="stylesheet" />
<title>编辑图书</title>
</head>
<body>
    <div class="main">
        <h2 class="title"><span>编辑图书</span></h2>
        <form action="BookController.do?act=EditBookPost" method="post">
        <fieldset>
            <legend>图书</legend>
            <p>
                <label for="title">图书名称:</label>
                <input type="text" id="title" name="title"  value="${model.title}"/>
            </p>
            <p>
                <label for="title">图书价格:</label>
                <input type="text" id="price" name="price" value="${model.price}"/>
            </p>
            <p>
                <label for="title">出版日期:</label>
                <input type="text" id="publishDate" name="publishDate"  value="<fmt:formatDate value="${model.publishDate}" pattern="yyyy-MM-dd"/>"/>
            </p>
            <p>
               <input type="hidden" id="id" name="id" value="${model.id}"/>
              <input type="submit" value="保存" class="btn">
            </p>
        </fieldset>
        </form>
        <p style="color: red">${message}</p>
        <p>
            <a href="BookController.do?act=ListBook" class="abtn">返回列表</a>
        </p>
    </div>
</body>
</html>
运行时的状态如下所示:
11.5、首页与样式
定义index.jsp页面,让其转发到指定的控制器(有点类似路由功能了),页面代码如下:
<%@ page language="java" contentType="text/html; charset=UTF-8"
    pageEncoding="UTF-8"%>
<jsp:forward page="BookController.do?act=ListBook"></jsp:forward>
定义了一个简陋的样式main.css,样式表脚本如下:
@CHARSET "UTF-8";

* {
    margin: 0;
    padding: 0;
    font-family: microsoft yahei;
    font-size: 14px;
}

body {
    padding-top: 20px;
}

.main {
     90%;
    margin: 0 auto;
    border: 1px solid #777;
    padding: 20px;
}

.main .title {
    font-size: 20px;
    font-weight: normal;
    border-bottom: 1px solid #ccc;
    margin-bottom: 15px;
    padding-bottom: 5px;
    color: blue;
}

.main .title span {
    display: inline-block;
    font-size: 20px;
    background : blue;
    color: #fff;
    padding: 0 8px;
    background: blue;
}

a {
    color: blue;
    text-decoration: none;
}

a:hover {
    color: orangered;
}

.tab td, .tab, .tab th {
    border: 1px solid #777;
    border-collapse: collapse;
}

.tab td, .tab th {
    line-height: 26px;
    height: 26px;
    padding-left: 5px;
}

.abtn {
    display: inline-block;
    height: 20px;
    line-height: 20px;
    background: blue;
    color: #fff;
    padding: 0 5px;
}
.btn {
    height: 20px;
    line-height: 20px;
    background: blue;
    color: #fff;
    padding: 0 8px;
    border:0;
}

.abtn:hover,.btn:hover{
    background: orangered;
    color: #fff;
}
p{
    padding:5px 0;
}
fieldset{
        border: 1px solid #ccc;
        padding:5px 10px;
}
fieldset legend{
    margin-left:10px;
    font-size:16px;
}