一、1、jTemplate简介
jTemplates是一个基于Jquery的js模板引擎插件。该引擎全部代码由JS实现,可以配合AJAX,JSON一起协同工作,模板内容可以用JS代码,实现了活动更新,可以自动从服务器更新模板生成的内容。 </p><p><span style="white-space:pre"></span>使用jTemplates,<span style="font-family:arial; font-size:13px; line-height:18px">服务端只需要把对象集合序列化成json格式并传入客户端,客户端再把json对象填充模版生成列表,这样一服务端传输的只是json格式的字符串,传输的数据量可是大大减少了,二遍历绑定的工作转移到了客户端,大大减轻了服务端的压力。
jTemplates能免费应用于商业和非商业。下载地址:http://jtemplates.tpython.com,实例介绍:
- <script type="text/javascript" src="jquery-1.2.6.pack.js"></script>
- <script type="text/javascript" src="jquery-jtemplates.js"></script>
-
- <script type="text/javascript">
- $(document).ready(function() {
-
- var data = {
- name: '用户列表',
- list_id: '编号89757',
- table: [
- {id: 1, name: 'Rain', age: 22, mail: 'cssrain@domain.com'},
- {id: 2, name: '皮特', age: 24, mail: 'cssrain@domain.com'},
- {id: 3, name: '卡卡', age: 20, mail: 'cssrain@domain.com'},
- {id: 4, name: '戏戏', age: 26, mail: 'cssrain@domain.com'},
- {id: 5, name: '一揪', age: 25, mail: 'cssrain@domain.com'}
- ]
- };
-
- $("#result1").setTemplateElement("template");
-
- $("#result1").processTemplate(data);
- });
- </script>
<!-- 模板内容 -->
<textarea id="template" style="display:none">
<strong>{$T.name} : {$T.list_id}</strong>
<th>姓
<table>
<tr>
<th>编号</th>
名</th>
<th>年龄</th>
<th>邮箱</th>
</tr>
{#foreach $T.table as record}
<tr>
<td>{$T.record.id}</td>
<td>{$T.record.name}</td>
<td>{$T.record.age}</td>
      <td>{$T.record.mail}</td>
    </tr>
    {#/for}
   </table>
</textarea
>
<!-- 输出元素 -->
<div id="result1" ></div>
具体步骤:
1、要使用jtemplate首先要引入两个js脚本文件:
<script type="text/javascript" src="Scripts/jquery.js"></script>
<script type="text/javascript" src="Scripts/jquery-jtemplates.js"></script>
需要注意的是,jtemplate是在jquery的基础上实现的,所以脚本的引入顺序不能颠倒,否则会报错
2、. 然后建模版:
<!-- 结果容器 -->
<div id="result_container"></div>
<!-- 模版内容 -->
<textarea id="template-items" style="display:none">
<table border="1" style="border-collapse:collapse">
<tr><th>姓名</th><th>邮箱</th><th>生日</th></tr>
{#foreach $T as item}
<tr>
<td>{$T.item.name}</td>
<td>{$T.item.mail}</td>
<td>{$T.item.birthday}</td>
</tr>
{#/for}
</table>
</textarea>
这就是jtemplate模版的格式,模版内容是放在textarea里的,而关键字和数据是用大括号包起来的,并且以$T表示数据,关键字以#作为开始标记。
3、 用json数据填充模板并展示:
<script type="text/javascript">
// 设置模版
$("#result_container").setTemplateElement("template-items");
// 填充数据并展示
$("#result_container").processTemplate(data);
//这里也可以写成$("#result_container").setTemplateElement("template-items").processTemplate(data);
</script>
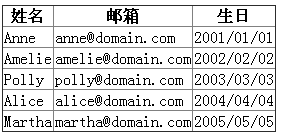
4、结果显示:

5、其他形式:调用JavaScript
在{}里你是可以随意写javascript脚本的,如生日我想换种格式显示,显示成2001/01/01,那么我们可以把模版中的{$T.item.birthday}改成{$T.item.birthday.replace(/-/g,'/')},然后刷新下效果如下:
当然也可以把它包装成方法来调用,如先定义js方法:
function formatDate(date) {
return date.replace(/-/g,'/');
}
再把模版改成{formatDate($T.item.birthday)}就可以达到一样的效果了。
6、在模版中包含textarea输入框
jtemplate的模版内容是放在textarea里面的,可是有时我们要在模版里包含textarea, 有两种方法可以实现:
1)注释模版中的内容,如模版改成:
<!-- 模版内容 -->
<textarea id="template-items" style="display:none">
<!--
<table border="1" style="border-collapse:collapse">
<tr><th>姓名</th><th>邮箱</th><th>生日</th><th></th></tr>
{#foreach $T as item}
<tr>
<td>{$T.item.name}</td>
<td>{$T.item.mail}</td>
<td>{$T.item.birthday}</td>
<td><textarea rows="2" cols="10"></textarea></td>
</tr>
{#/for}
</table>
-->
</textarea>
在IE下的效果如下图:
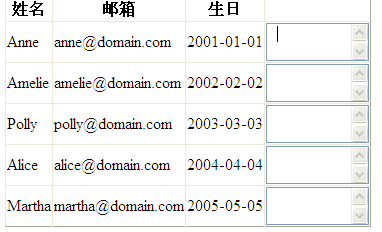
但在其它浏览器下(本人测试过的浏览器有360,谷歌,火狐)却显示不出来。
2)移除注释并使用特殊符号的编码表示包含的textarea中的特殊标签
如把<textarea rows="2" cols="10"></textarea>替换成<textarea rows="2" cols="10"> </textarea>
这样这些主流浏览器都能正常显示了。
jemplate支持大于号>和小于号<的编码,但却不支持大括号{}的编码,比如想在模版中使用my97datepicker日期控件,
<input id="d11" type="text" onclick="WdatePicker({el:$dp.$('d12')})" />
它的参数是一个json对象是有大括号的,如果直接这样放入模版中是得不到想要的效果的,但也有变通的方式,如把onclick事件写到模版外面去
2、语法分析:
jTemplates包含三个预定全局变量,分别是$T、$P、$Q。$T为模板提供数据调用功能,$P为模板提供参数变量调用功能,$Q.version提供当前jTemplate的版本
jTemplates还支持#if、#for、#cycle、#foreach、#include、#param标签,帮助你处理实现复杂的业务情形。
 #if 语法
{#if |COND|}..{#elseif |COND|}..{#else}..{#/if}
#if 示例:
{#if $T.hello} hello world. {#/if}
{#if 2*8==16} good {#else} fail {#/if}
{#if $T.age>=18)} 成人了 {#else} 未成年 {#/if}
{#if $T.list_id == 3} System list {#elseif $T.list_id == 4} Users List {#elseif $T.list_id == 5} Errors list {#/if}
#for 语法
{#for |VAR| = |CODE| to |CODE| [step=|CODE|]}..{#else}..{#/for}
或
{#for |variable| = |start| to |end| [step=|stepBy|]}..{#else}..{#/for}
#for 示例:
默认步长:{#for index = 1 to 10} {$T.index} {#/for}
正向步长:{#for index = 1 to 10 step=3} {$T.index} {#/for}
负向步长及空循环:{#for index = 1 to 10 step=-3} {$T.index} {#else} nothing {#/for}
也可以在循环中使用变量:{#for index = $T.start to $T.end step=$T.step} {$T.index} {#/for}
说明:{#else}是在{#for...}未能执行的时的输出内容。
#foreach 语法
{#foreach |VAR| as |NAME| [begin=|CODE|] [count=|CODE|] [step=|CODE|]}..{#else}..{#/for}
#foreach 示例:
默认:{#foreach $T.table as record} {$T.record.name} {#/for}
指定起始位置:{#foreach $T.table as record begin=1} {$T.record.name} {#/for}
指定起始和循环次数:{#foreach $T.table as record begin=1 count=2} {$T.record.name} {#/for}
指定步长:{#foreach $T.table as record step=2} {$T.record.name} {#/for}
#foreach 内定环境变量:
$index - index of element in table
$iteration - id of iteration (next number begin from 0)
$first - is first iteration?
$last - is last iteration?
$total - total number of iterations
$key - key in object (name of element) (0.6.0+)
$typeof - type of element (0.6.0+)
#foreach 示例所需要的数据:
var data = {
name: 'User list',
list_id: 4,
table: [
{id: 1, name: 'Anne', age: 22, mail: 'anne@domain.com'},
{id: 2, name: 'Amelie', age: 24, mail: 'amelie@domain.com'},
{id: 3, name: 'Polly', age: 18, mail: 'polly@domain.com'},
{id: 4, name: 'Alice', age: 26, mail: 'alice@domain.com'},
{id: 5, name: 'Martha', age: 25, mail: 'martha@domain.com'}
]
(
}
;0.7.0+)版以后新增的功能,支持待循环集合用函数代替:
{#foreach |FUNC| as |NAME| [begin=|CODE|] [end=|CODE|] [count=|CODE|] [step=|CODE|]}..{#else}..{#/for}
例:
f = function(step) {
if(step > 100) return null; // stop if loop is too long
return "Step " + step;
};
"#result").setTemplate("{#foreach f as funcValue begin=10 end=20} {$T.funcValue}<br/> {#/for}");
$
(
("#result").processTemplate();
$
foreach在每次循环时请求的就是f函数,然后传递参数给f使用,并返回结果给funcValue变量
#
#cycle 语法
{#cycle values=|ARRAY|}
功能:提供周期性的调用,在循环中实现交替样式功能时可用到
示例:
cle values=[1,2,3,4]}
{#c
y
面模板在执行循环时,就会周期性的调用#cycle数组中的值,这样就能实现行交替的效果:
下<table width="200">
{#foreach $T.table as row}
<tr bgcolor="{#cycle values=['#AAAAAA','#CCCCCC']}">
<td>{$T.row.name.link('mailto:'+$T.row.mail)}</td>
</tr>
{#/for}
</table>
#include 语法
{#include |NAME| [root=|VAR|]}
功能:提供子模板调用
示例:
mplate MAIN} {
{#t
e* this is comment *}
{$T} {* $T == $T.toSource() *}
<table>
{#foreach $T.table as record}
{#include ROW root=$T.record}
{#/for}
</table>
{#/template MAIN}
{#template ROW}
<tr class="values=['bcEEC','bcCEE']} {#cycle">
<td>{$T.name}</td>
<td>{$T.mail}</td>
</tr>
{#/template ROW}
说明:{#template MAIN} 是指定模板的主要部分,必不可少。
{#template ROW}是定义一个名为“ROW”的子模板。
=$T.record}是主模板调用“ROW”子模板,并传递参数$T.record
{#include ROW roo
t
#param 语法
{#param name=|NAME| value=|CODE|}
功能:定义模板内的局部变量参数,使用$P调用。
示例:
"#result").setTemplate("{#param name=x value=888}{$P.x}");
$
(
("#result").processTemplate();
$
出结果:888
输
例:
示$("#result").setTemplate("{#param name=x value=$P.x+1}{$P.x}");
$("#result").setParam('x', 777);
$("#result").processTemplate();
输出结果:778
示例:
$("#result").setTemplate("<ul>{#foreach $T.table as row}<li>{$P.x} {$T.row.name}</li>{#param name=x value=$P.x+3}{#/for}<ul>");
$("#result").setParam('x', 1);
$("#result").processTemplate(data);
需要数据:
var data = {
name: 'User list',
list_id: 4,
table: [
{id: 1, name: 'Anne', age: 22, mail: 'anne@domain.com'},
{id: 2, name: 'Amelie', age: 24, mail: 'amelie@domain.com'},
{id: 3, name: 'Polly', age: 18, mail: 'polly@domain.com'},
{id: 4, name: 'Alice', age: 26, mail: 'alice@domain.com'},
{id: 5, name: 'Martha', age: 25, mail: 'martha@domain.com'}
]
输
}
;出结果:
# 1 Anne
# 4 Amelia
# 7 Polly
# 10 Alice
# 13 Martha
jTemplate适用于少量数据,数据量较大时建议使用XML。
技术历程(参考:http://www.cnblogs.com/leixiao/p/3280804.html、http://www.cnblogs.com/gotoschool/archive/2013/03/11/2954135.html)