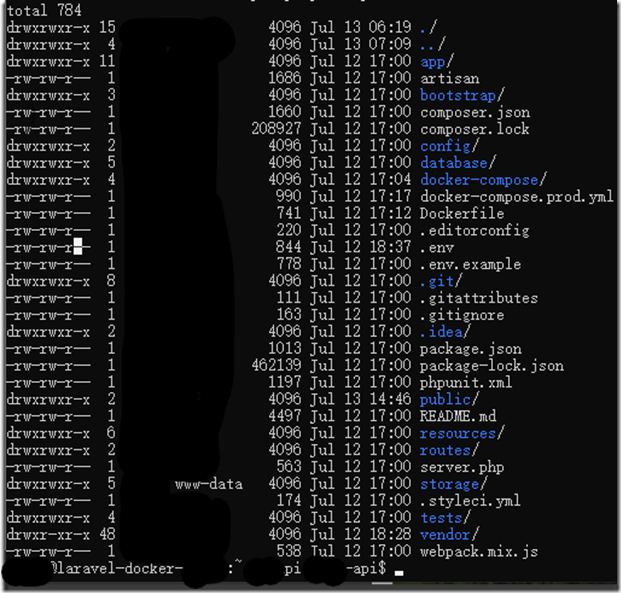
执行
docker-compose -f docker-compose.prod.yml exec app php artisan storage:link
The [/var/www/public/storage] link has been connected to [/var/www/storage/app/public].
The links have been created.
执行【参考https://medium.com/@sreejithezhakkad/how-i-set-up-laravel-in-docker-container-f80987559bc6】
sudo chmod 775 -R storage/
sudo chmod 775 -R bootstrap/cache/
sudo chgrp -R www-data storage bootstrap/cachesudo chmod -R ug+rwx storage bootstrap/cache/
执行
docker-compose -f docker-compose.prod.yml exec app php artisan optimize
Configuration cache cleared!                                                                                        Configuration cached successfully!
Route cache cleared!
Routes cached successfully!
Files cached successfully!
摘抄一部分 https://laracasts.com/discuss/channels/general-discussion/laravel-framework-file-permission-security
也可以参考 https://medium.com/@thesinghharpreet/how-to-set-up-file-permissions-for-laravel-5-a855036a1bd2
或 https://medium.com/@thesinghharpreet/how-to-set-up-file-permissions-for-laravel-5-a855036a1bd2
原因阐释:
Just to state the obvious for anyone viewing this discussion.... if you give any of your folders 777 permissions, you are allowing ANYONE to read, write and execute any file in that directory.... what this means is you have given ANYONE (any hacker or malicious person in the entire world) permission to upload ANY file, virus or any other file, and THEN execute that file...
IF YOU ARE SETTING YOUR FOLDER PERMISSIONS TO 777 YOU HAVE OPENED YOUR SERVER TO ANYONE THAT CAN FIND THAT DIRECTORY. Clear enough??? :)
What bashy says above is absolutely correct, although not totally complete.
The NORMAL way to set permissions is to have your files owned by the webserver:
sudo chown -R www-data:www-data /path/to/your/root/directory
if you do that, the webserver owns all the files, and is also the group, and you will have some problems uploading files or working with files via FTP, because your FTP client will be logged in as you, not your webserver, so add your user to the webserver user group:
sudo usermod -a -G www-data ubuntu这个在Dockefile里面通过
RUN useradd -G www-data,root -u $uid -d /home/$user $user
RUN mkdir -p /home/$user/.composer &&
    chown -R $user:$user /home/$user
实现了
Of course, this assumes your webserver is running as www-data (the Homestead default), and your user is ubuntu (it's vagrant if you are using Homestead.Then you set all your directories to 755 and your files to 644... SET file permissions
sudo find /path/to/your/root/directory -type f -exec chmod 644 {} ;
SET directory permissions
sudo find /path/to/your/root/directory -type d -exec chmod 755 {} ;下面是建议操作:
I prefer to own all the directories and files (it makes working with everything much easier), so I do:sudo chown -R www-data:www-data /path/to/your/root/directory
Then I give both myself and the webserver permissions:
sudo find /path/to/your/root/directory -type f -exec chmod 664 {} ;
sudo find /path/to/your/root/directory -type d -exec chmod 775 {} ;
Whichever way you set it up, then you need to give read and write permissions to the webserver for storage, cache and any other directories the webserver needs to upload or write too (depending on your situation), so run the commands from bashy above :sudo chgrp -R www-data storage bootstrap/cache sudo chmod -R ug+rwx storage bootstrap/cache
Now, you're secure and your website works, AND you can work with the files fairly easily
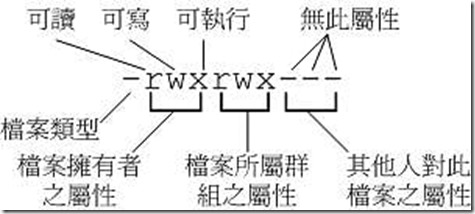
文件类型代码:[ d ]--目录、[ - ]--文件、[ l ]--链接、[ b ]--可储存周边设备、[ c ]--序列设备。
文件权限属性:[ r ]--可读、[ w ]--可写、[ x ]--可执行。
rwx r=4; w=2; x=1; r+w+x=7; r+w=6;r+x=5;
chgrp :改变所属群组
语法:
chgrp 群组名 文件或目录如:
[root@test root]# chgrp users tmp
[root@test root]# ls –l
drwx------ 2 root root 4096 Oct 19 11:43 drakx/
drwx------ 2 root users 4096 Oct 19 21:24 tmp/
[root@test root]# chgrp testing tmp
chgrp: invalid group name `testing' <==出错信息!chown :改变作者
[ -R ] :同时对目录下的所有子目录或文件的作者进行修改
*用户名必须已存在系统中,也就是在 /etc/passwd 中存在的用户名。
*chown 可直接修改所属群組
语法:
chown [ -R ] 用户名 文件或目录
chown [ -R ] 用户名:群组名 文件或目录如:
[root@test root]# chown test tmp
[root@test root]# ls -l
total 28
drwx------ 2 root root 4096 Oct 19 11:43 drakx/
drwx------ 2 test users 4096 Oct 19 21:24 tmp/
[root@test root]# chown –R root:root tmp
[root@test root]# ls –l
drwx------ 2 root root 4096 Oct 19 11:43 drakx/
drwx------ 2 root root 4096 Oct 19 21:24 tmp/chmod :改变权限属性
语法:
chmod [-R] xyz 文件或目录三个基本属性:r、w、x的数字类型代表:r:4、w:2 、x:1
xyz 为三組 rwx 属性数值的相加同一组的数字是相加!如属性为 [ -rwxrwx--- ] ,则:
owner = rwx = 4+2+1 = 7
group = rwx = 4+2+1 = 7
others = --- = 0+0+0 = 0[root@test root]# ls –al .bashrc
-rw-r--r-- 1 root root 226 Feb 16 2002 .bashrc
[root@test root]# chmod 777 .bashrc
[root@test root]# ls –al .bashrc
也可以参考https://learnku.com/laravel/t/38690
直接在app的Dockerfile中添加后面的:
FROM shakyshane/laravel-php:latest

COPY composer.lock composer.json /var/www/

COPY database /var/www/database

WORKDIR /var/www

RUN php -r "copy('https://getcomposer.org/installer', 'composer-setup.php');"
    && php -r "if (hash_file('SHA384', 'composer-setup.php') === '55d6ead61b29c7bdee5cccfb50076874187bd9f21f65d8991d46ec5cc90518f447387fb9f76ebae1fbbacf329e583e30') { echo 'Installer verified'; } else { echo 'Installer corrupt'; unlink('composer-setup.php'); } echo PHP_EOL;"
    && php composer-setup.php
    && php -r "unlink('composer-setup.php');"
    && php composer.phar install --no-dev --no-scripts
    && rm composer.phar

COPY . /var/www

RUN chown -R www-data:www-data
        /var/www/storage
        /var/www/bootstrap/cache

RUN php artisan optimize

