一、Atlas简介
Atlas是由 Qihoo 360公司Web平台部基础架构团队开发维护的一个基于MySQL协议的数据中间层项目。它在MySQL官方推出的MySQL-Proxy 0.8.2版本的基础上,修改了大量bug,添加了很多功能特性。目前该项目在360公司内部得到了广泛应用,很多MySQL业务已经接入了Atlas平台,每天承载的读写请求数达几十亿条。同时,有超过50家公司在生产环境中部署了Atlas,超过800人已加入了我们的开发者交流群,并且这些数字还在不断增加。
mysql-proxy是一个轻量级的二进制应用程序,位于一个或多个MySQL客户端与服务器之间。客户端使用通常的凭据连接到代理,而不是连接到服务器。代理充当客户端和服务器之间的中间人。
在其基本形式中,代理只是重定向器。它从客户端获取一个空存储桶(一个查询),将其带到服务器,用数据填充存储桶,然后将其传递回客户端。
主要功能:
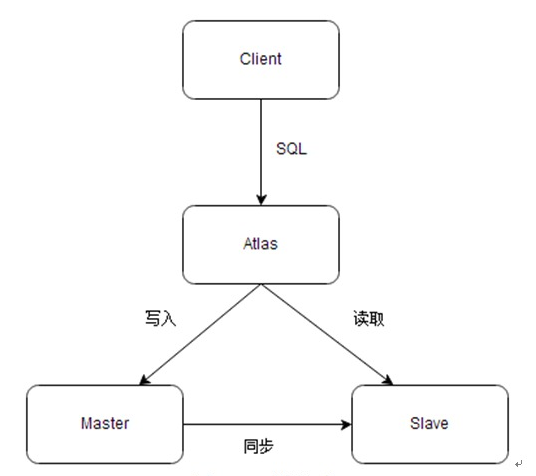
- 读写分离
- 从库负载均衡
- IP过滤
- 自动分表
- DBA可平滑上下线DB
- 自动摘除宕机的DB

二、安装配置
2.1 atlas下载
- 下载地址:https://github.com/Qihoo360/Atlas/releases
- 本次使用版本:Atlas-2.2.1.el6.x86_64.rpm
注意: - 1、Atlas只能安装运行在64位的系统上
- 2、Centos 5.X安装 Atlas-XX.el5.x86_64.rpm,Centos6.X安装Atlas-XX.el6.x86_64.rpm。
- 3、后端mysql版本应大于5.1,建议使用Mysql 5.6以上
- 4、8.0以上版本建议使用MySQL官方MySQL-Router
2.2 atlas安装及配置
yum localinstall -y Atlas-2.2.1.el6.x86_64.rpm
cd /usr/local/mysql-proxy/conf/
mv test.cnf test.cnf.default

vi test.cnf
[mysql-proxy]
admin-username = user
admin-password = pwd
proxy-backend-addresses = 192.168.80.54:3307
proxy-read-only-backend-addresses = 192.168.80.54:3308,192.168.80.54:3309
pwds = root:/iZxz+0GRoA=
daemon = true
keepalive = true
event-threads = 8
log-level = message
log-path = /usr/local/mysql-proxy/log
sql-log=ON
proxy-address = 0.0.0.0:33060
admin-address = 0.0.0.0:2345
charset=utf8mb4
2.3 atlas启动
/usr/local/mysql-proxy/bin/mysql-proxyd test start
ps -ef | grep mysql-proxy
2.4 atlas读写功能测试
登陆:
mysql -uroot -p123456 -h192.168.80.54 -P33060

测试读操作:
select @@server_id;

测试写操作:
begin;select @@server_id;commit;
2.5 添加一个用户操作
创建一个dev用户(select  update  insert delete)密码123456,要通过80网段登录
1. 在主库中,先要创建用户
mysql -uroot -p -h192.168.80.54 -P3307
grant select, update, insert, delete on *.* to dev@'192.168.80.%' identified by '123456';

2. 在atlas中添加生产用户
/usr/local/mysql-proxy/bin/encrypt  123456      ---->制作加密密码

vi test.cnf
pwds = root:/iZxz+0GRoA=,dev:/iZxz+0GRoA=       ---->添加用户密码

/usr/local/mysql-proxy/bin/mysql-proxyd test restart    ---->重启atlas

mysql -udev -p123456  -h192.168.80.54 -P33060       ---->连接
三、Atlas基本管理
3.1 连接管理接口
[root@db03 ~]# mysql -uuser -ppwd -h127.0.0.1 -P2345
mysql: [Warning] Using a password on the command line interface can be insecure.
Welcome to the MySQL monitor.  Commands end with ; or \g.
Your MySQL connection id is 1
Server version: 5.0.99-agent-admin

Copyright (c) 2000, 2020, Oracle and/or its affiliates. All rights reserved.

Oracle is a registered trademark of Oracle Corporation and/or its
affiliates. Other names may be trademarks of their respective
owners.

Type 'help;' or '\h' for help. Type '\c' to clear the current input statement.
3.2 打印帮助
mysql> select * from help;
+----------------------------+---------------------------------------------------------+
| command                    | description                                             |
+----------------------------+---------------------------------------------------------+
| SELECT * FROM help         | shows this help                                         |
| SELECT * FROM backends     | lists the backends and their state                      |
| SET OFFLINE $backend_id    | offline backend server, $backend_id is backend_ndx's id |
| SET ONLINE $backend_id     | online backend server, ...                              |
| ADD MASTER $backend        | example: "add master 127.0.0.1:3306", ...               |
| ADD SLAVE $backend         | example: "add slave 127.0.0.1:3306", ...                |
| REMOVE BACKEND $backend_id | example: "remove backend 1", ...                        |
| SELECT * FROM clients      | lists the clients                                       |
| ADD CLIENT $client         | example: "add client 192.168.1.2", ...                  |
| REMOVE CLIENT $client      | example: "remove client 192.168.1.2", ...               |
| SELECT * FROM pwds         | lists the pwds                                          |
| ADD PWD $pwd               | example: "add pwd user:raw_password", ...               |
| ADD ENPWD $pwd             | example: "add enpwd user:encrypted_password", ...       |
| REMOVE PWD $pwd            | example: "remove pwd user", ...                         |
| SAVE CONFIG                | save the backends to config file                        |
| SELECT VERSION             | display the version of Atlas                            |
+----------------------------+---------------------------------------------------------+
16 rows in set (0.00 sec)
3.3 查询后端mysql节点状态
mysql> select * from backends;
+-------------+--------------------+-------+------+
| backend_ndx | address            | state | type |
+-------------+--------------------+-------+------+
|           1 | 192.168.80.54:3307 | up    | rw   |
|           2 | 192.168.80.54:3308 | up    | ro   |
|           3 | 192.168.80.54:3309 | up    | ro   |
+-------------+--------------------+-------+------+
4 rows in set (0.00 sec)
3.4 动态删除节点
mysql> remove backend 3;
Empty set (0.00 sec)
3.5 动态添加节点
mysql> add slave 192.168.80.54:3309;
Empty set (0.00 sec)
3.6 保存修改到配置文件
mysql> save config;
Empty set (0.01 sec)
四、其它读写分离建议
MySQL-Router    ---> MySQL官方
ProxySQL         --->Percona公司开发
Maxscale         ---> MariaDB开发