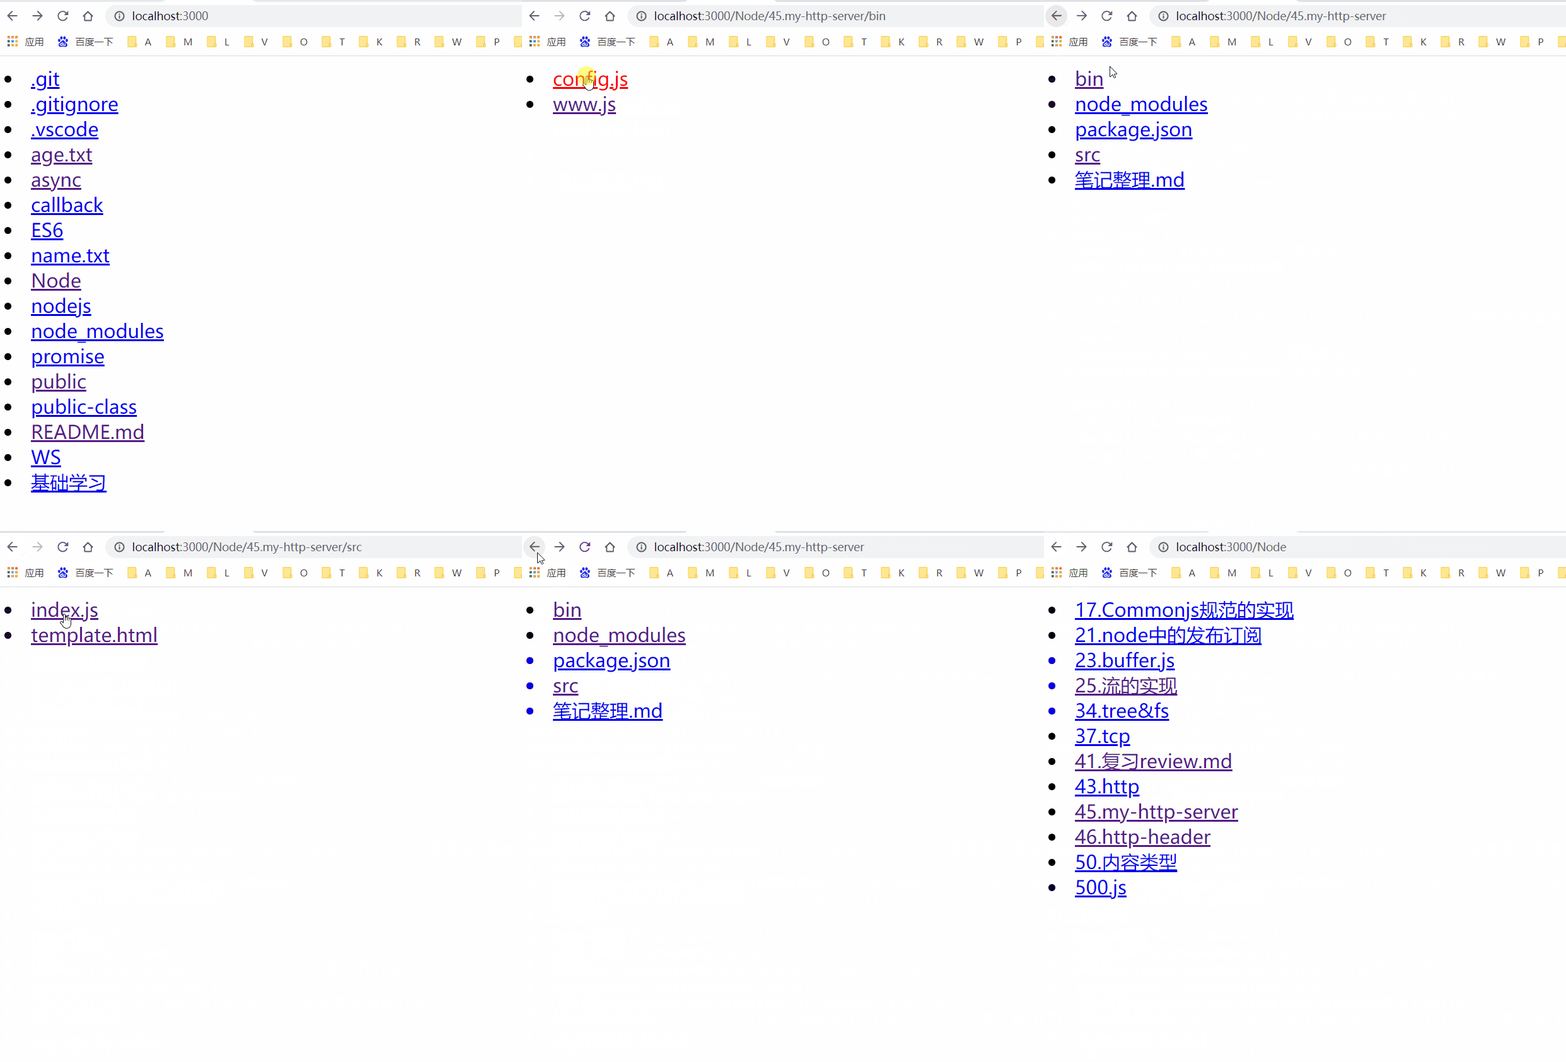
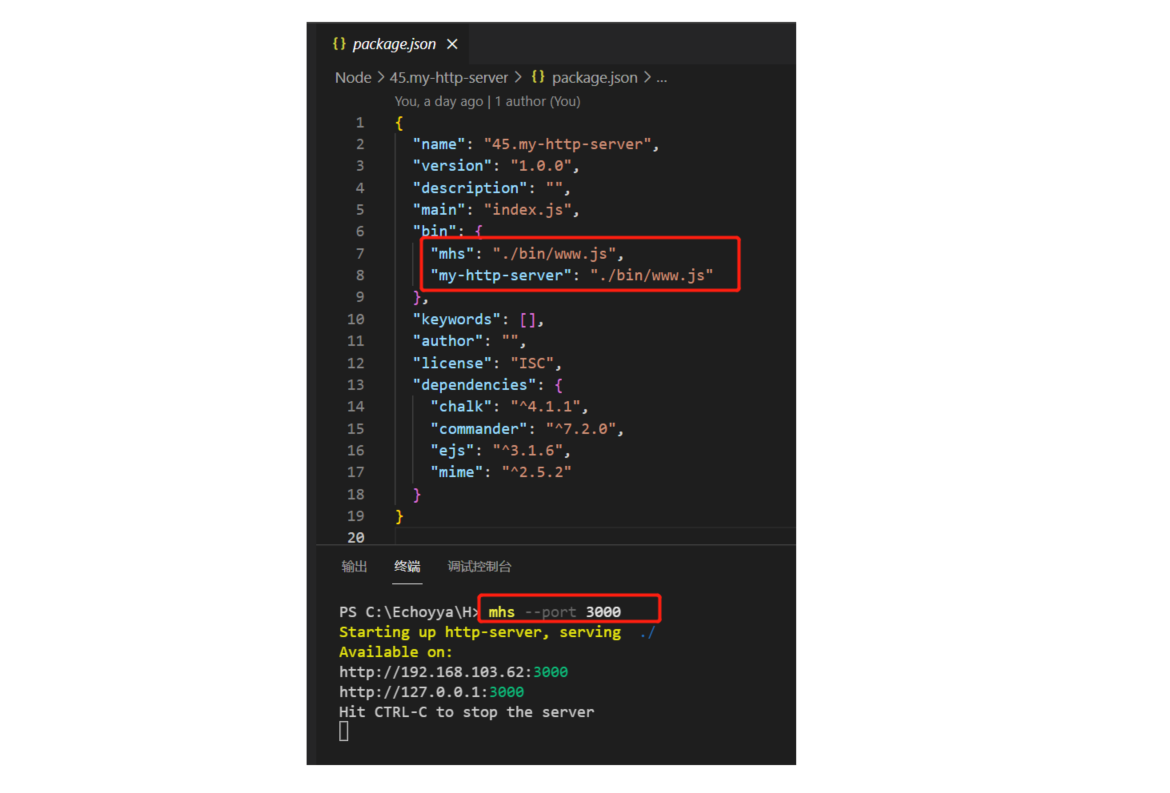
一、准备工作及流程说明
一看这标题,大家可能一下子没有反应过来,到底是要干什么?那么就先看一下实现效果吧~


项目目录结构:
.
│
└─my-http-server
    ├─node_modules
    ├─bin
        ├─config.js      // 命令行配置文件
        ├─www.js         // 可执行文件
    ├─src
        ├─index.js         // 主要代码实现
        ├─template.html    // 模板文件
初始化package.json文件,npm init -y
-
声明想要发包的名称
-
执行命令行工具,需要配置
bin及需要执行的文件路径,并放在全局下(长命令和短命令){ "name": "my-http-server", "version": "1.0.0", "description": "", "main": "index.js", "bin":{ "mhs":"./bin/www.js", "my-http-server":"./bin/www.js" }, "scripts": { "test": "echo "Error: no test specified" && exit 1" }, "keywords": [], "author": "", "license": "ISC" } -
创建并编写执行文件
www.js:
#! /usr/bin/env node // 以上代码为声明该文件的运行方式,使用node环境去运行 console.log('ok'); -
在当前目录下执行
npm link,就会在全局下产生一个对应的软链 -
终端输入命令测试是否成功:
mhs,若演示代码和我的一样,打印出ok即成功 -
源码实现使用到了一些第三方的模块,就现在准备工作时安装了,代码实现时,就直接用了
commanderchalkmimeejs
-
配置命令行工具,也就是我们常用的命令行指令的帮助文档及一些参数信息。所用模块:
commander -
配置命令行的参数的默认值
-
最后去实现创建服务及启动
二、配置命令行
-
将配置命令行的参数的默认值单独抽离,写入至
config.js中config.js
const options = { 'port':{ // 端口 option:'-p, --port <n>', default: 8080, usage:'mhs --port 3000', description:'set mhs port' }, 'gizp':{ // 压缩 option:'-g, --gizp <n>', default: 1, usage:'mhs --gizp 0', // 禁用压缩 description:'set mhs gizp' }, 'cache':{ // 缓存 option:'-c, --cache <n>', default: 1, usage:'mhs --cache 0', // 禁用缓存 description:'set mhs cache' }, 'directory':{ // 设置服务启动目录 option:'-d, --directory <d>', default: process.cwd(), // 表示当前的工作目录 usage:'mhs --directory C:', description:'set mhs directory' } } module.exports = options -
命令行的帮助文档,处理用户输入指令参数
www.js
#! /usr/bin/env node
 // 以上代码为声明该文件的运行方式,使用node环境去运行

// console.log('ok');    //  可先行 测试

// 命令行的帮助文档
const program = require('commander')
const options = require('./config')
program.name('mhs')
program.usage('[option]')

// 解析 当前运行进程 传递的参数
const examples = new Set();
const defaultMapping = {};
Object.entries(options).forEach(([key, value]) => { // 参数是个数组,需要解构
  examples.add(value.usage)
  defaultMapping[key] = value.default
  program.option(value.option, value.description)
})
program.on('--help', function () {
  console.log('
Examples:');
  examples.forEach(item => {
    console.log(`  ${item}`);
  })
})

program.parse(process.argv)

// 获取用户输入的参数
let userArges = program.opts()

// console.log(defaultMapping);  // 自定义的默认值

// 合并用户传递的参数及默认值,且默认值优先级最低
let serverOptions = Object.assign(defaultMapping,userArges)

// 启动服务  此时只是入口,实际文件还并未编写,莫着急哈
const Server = require('../src/index');
let server = new Server(serverOptions);
server.start()
三、设置入口文件和渲染模板
template.html
<!DOCTYPE html>
<html lang="en">
<head>
  <meta charset="UTF-8">
  <meta http-equiv="X-UA-Compatible" content="IE=edge">
  <meta name="viewport" content="width=device-width, initial-scale=1.0">
  <title>Document</title>
</head>
<body>
  <%dirs.forEach(dir=>{%>
    <li><a href="<%=dir.url%>"><%=dir.name%></a></li>
  <%})%>
</body>
</html>
四、my-http-server源码
- 根据用户输入的参数,创建一个服务,获取本机IP地址,输出服务启动信息。
- 监听对应的端口,并处理端口被占用问题
- 获取请求路径,以当前目录为基准查找文件,解析路径 ,存在中文路径找不到问题,需要转义
- 请求路径不存在,设置响应状态码
404,提示信息 - 若是文件夹:根据数据和模板渲染页面(纯服务端渲染),并且可点击查看详情,设置a 链接的跳转路径为相对路径,对资源发送请求,每点一次都会请求服务器
- 若是文件:则判断是否有缓存,是否需要压缩返回
- 由于缓存相关涉及内容较多,我单独整理了一篇博文,讲的比较详细,此处相关不在赘述
- http强制缓存、协商缓存、指纹ETag详解
const http = require('http');
const os = require('os');
const url = require('url');
const path = require('path');
const fs = require('fs').promises; // 将fs中的方法 全部转为promise 的形式
const crypto = require('crypto')
const zlib = require('zlib');

const chalk = require('chalk'); // 粉笔
const mime = require('mime');   // 头信息
const ejs = require('ejs');     // 模板解析

const { createReadStream, readFileSync } = require('fs')
const template = readFileSync(path.resolve(__dirname, 'template.html'), 'utf8');

class Server {
  constructor(serverOptions) {
    this.port = serverOptions.port;
    this.gzip = serverOptions.gzip;
    this.cache = serverOptions.cache;
    this.directory = serverOptions.directory;
    this.handleRequest = this.handleRequest.bind(this); // 第一种 指正this 指向
    this.template = template;
  }
  async handleRequest(req, res) {
    // 1. 获取请求路径,以当前目录为基准查找文件,如果文件存在,且不是文件夹则直接返回
    let { pathname } = url.parse(req.url); // 获取解析路径
    // 存在中文路径找不到问题,需要转义
    pathname = decodeURIComponent(pathname)
    let requestFile = path.join(this.directory, pathname);
    try {
      let statObj = await fs.stat(requestFile)
      if (statObj.isDirectory()) {
        const dirs = await fs.readdir(requestFile)
        // 根据数据和模板渲染页面(纯服务端渲染),并且可点击查看详情,设置a 链接的跳转路径为相对路径
        // 对资源发送请求,每点一次都会请求服务器
        let fileContent = await ejs.render(this.template, {
          dirs: dirs.map(dir => ({
            name: dir,
            url: path.join(pathname, dir)
          }))
        })
        res.setHeader('Content-Type', 'text/html;charset=utf-8');
        res.end(fileContent)
      } else {
        this.sendFile(req, res, requestFile, statObj)
      }
    } catch (e) {
      console.log(e);
      this.sendError(req, res, e);
    }
  }
  cacheFile(req, res, requestFile, statObj) {
    // 第一次发送文件,先设置强制缓存,在执行强制缓存时,默认不会执行对比缓存,因为不走服务器
    res.setHeader('Cache-Control', 'max-age=10');
    res.setHeader('Expires', new Date(Date.now() + 10 * 1000).toGMTString());

    // 每次强制缓存时间到了,就会走对比缓存,然后在变成强制缓存、
    const lastModified = statObj.ctime.toGMTString();
    const etag = crypto.createHash('md5').update(readFileSync(requestFile)).digest('base64');

    res.setHeader('Last-Modified', lastModified);
    res.setHeader('Etag', etag);

    let ifModifiedSince = req.headers['if-modified-since']
    let ifNoneMatch = req.headers['if-none-match']
    // 如果文件修改时间不一样,就直接返回最新的
    if (lastModified !== ifModifiedSince) { // 有可能时间一样,但是内容不一样
      return false;
    }
    if (etag !== ifNoneMatch) { // 一般情况下,指纹生成不会是根据文件全量生成,有可能只是根据文件大小
      return false;
    }
    return true;
  }
  gzipFile(req, res, requestFile, statObj) {
    // 浏览器会携带一个accept-encoding 字段,表示浏览器支持的压缩格式
    let encodings = req.headers['accept-encoding'];
    if (encodings) { // 浏览器支持压缩
      if (encodings.includes('gzip')) {
        res.setHeader('Content-Encoding', 'gzip') // 浏览器要知道服务器的压缩类型
        return zlib.createGzip()
      } else if (encodings.includes('deflate')) {
        res.setHeader('Content-Encoding', 'deflate')
        return zlib.createDeflate()
      }
    }
    return false;
  }
  sendFile(req, res, requestFile, statObj) {
    // 返回文件,需要给浏览器 提供内容类型及内容的编码格式
    res.setHeader('Content-Type', mime.getType(requestFile) + ';charset=utf-8');

    // 判断有没有缓存,如果有缓存,就使用对比缓存
    if (this.cacheFile(req, res, requestFile, statObj)) {
      res.statusCode = 304;
      return res.end();
    }

    // 判断是否支持压缩,如果支持返回一个压缩流
    let createGzip;
    if (createGzip = this.gzipFile(req, res, requestFile, statObj)) {
      return createReadStream(requestFile).pipe(createGzip).pipe(res); // 转化流
    }
    // 根据文件生成一个可读流,而res 是可写流
    createReadStream(requestFile).pipe(res);
  }
  sendError(req, res, e) {
    res.statusCode = 404;
    res.end('Not Found');
  }
  start() {
    // const server = http.createServer(this.handleRequest.bind(this))     // 第二种 指正this 指向
    // const server = http.createServer((req, res)=>this.handleRequest(req, res))  // 第三种 指正this 指向
    const server = http.createServer(this.handleRequest)
    server.listen(this.port, () => { // 订阅方法,监听成功后会触发
      let WLAN = os.networkInterfaces().WLAN;
      let IP = WLAN[1].address;
      console.log(chalk.yellow(`Starting up http-server, serving`) + chalk.blue('  ./'));
      console.log(chalk.yellow(`Available on:`));
      console.log(`http://${IP}:${chalk.green(this.port)}`);
      console.log(`http://127.0.0.1:${chalk.green(this.port)}`);
      console.log(`Hit CTRL-C to stop the server`);
    })
    server.on('error', err => {
      if (err.code = 'EADDRINUSE') { // 解决端口被占用的问题,被占用 累加1
        server.listen(++this.port);
      }
    })
  }
}

module.exports = Server

