一、写在之前的
1.1 回顾Map阶段四大步骤
首先,我们回顾一下在MapReduce中,排序和分组在哪里被执行:
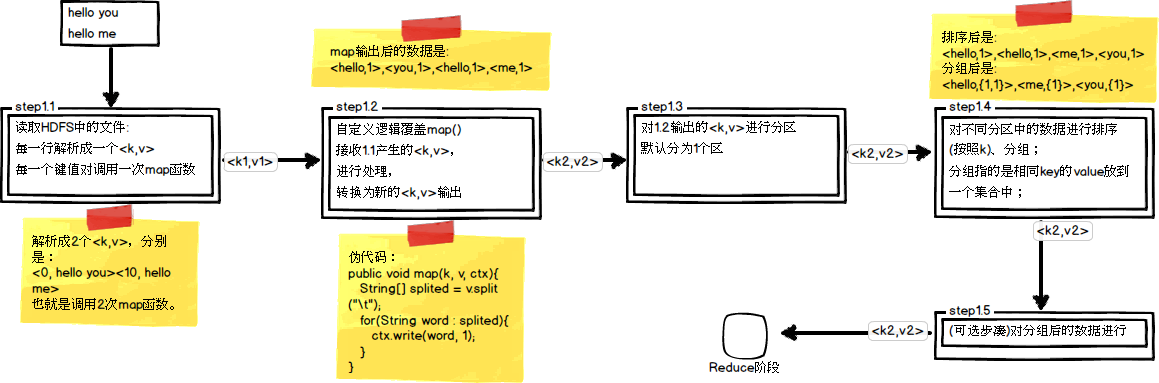
从上图中可以清楚地看出,在Step1.4也就是第四步中,需要对不同分区中的数据进行排序和分组,默认情况下,是按照key进行排序和分组。
1.2 实验场景数据文件
在一些特定的数据文件中,不一定都是类似于WordCount单次统计这种规范的数据,比如下面这类数据,它虽然只有两列,但是却有一定的实践意义。
3    3
3    2
3    1
2    2
2    1
1    1
(1)如果按照第一列升序排列,当第一列相同时,第二列升序排列,结果如下所示
1    1
2    1
2    2
3    1
3    2
3    3
(2)如果当第一列相同时,求出第二列的最小值,结果如下所示
3    1
2    1
1    1
接着,我们会针对这个数据文件,进行排序和分组的实践尝试,以求达到结果所示的效果。
二、初步探索排序
2.1 默认的排序
在Hadoop默认的排序算法中,只会针对key值进行排序,我们最初的代码如下(这里只展示了map和reduce函数):
public class MySortJob extends Configured implements Tool {

    public static class MyMapper extends
            Mapper<LongWritable, Text, LongWritable, LongWritable> {
        protected void map(
                LongWritable key,
                Text value,
                Mapper<LongWritable, Text, LongWritable, LongWritable>.Context context)
                throws java.io.IOException, InterruptedException {
            String[] spilted = value.toString().split("	");
            long firstNum = Long.parseLong(spilted[0]);
            long secondNum = Long.parseLong(spilted[1]);

            context.write(new LongWritable(firstNum), new LongWritable(
                    secondNum));
        };
    }

    public static class MyReducer extends
            Reducer<Text, LongWritable, Text, LongWritable> {
        protected void reduce(
                LongWritable key,
                java.lang.Iterable<LongWritable> values,
                Reducer<LongWritable, LongWritable, LongWritable, LongWritable>.Context context)
                throws java.io.IOException, InterruptedException {
            for (LongWritable value : values) {
                context.write(key, value);
            }
        };
    }

}
这里我们将第一列作为了key,第二列作为了value。
可以查看一下运行后的结果,如下所示:
1    1
2    2
2    1
3    3
3    2
3    1
从运行结果来看,并没有达到我们最初的目的,于是,我们需要抛弃默认的排序规则,因此我们要自定义排序。
2.2 自定义排序
(1)封装一个自定义类型作为key的新类型:将第一列与第二列都作为key
    private static class MyNewKey implements WritableComparable<MyNewKey> {
        long firstNum;
        long secondNum;

        public MyNewKey() {
        }

        public MyNewKey(long first, long second) {
            firstNum = first;
            secondNum = second;
        }

        @Override
        public void write(DataOutput out) throws IOException {
            out.writeLong(firstNum);
            out.writeLong(secondNum);
        }

        @Override
        public void readFields(DataInput in) throws IOException {
            firstNum = in.readLong();
            secondNum = in.readLong();
        }

        /*
         * 当key进行排序时会调用以下这个compreTo方法
         */
        @Override
        public int compareTo(MyNewKey anotherKey) {
            long min = firstNum - anotherKey.firstNum;
            if (min != 0) {
                // 说明第一列不相等,则返回两数之间小的数
                return (int) min;
            } else {
                return (int) (secondNum - anotherKey.secondNum);
            }
        }
    }
PS:这里为什么需要封装一个新类型呢?因为原来只有key参与排序,现在将第一个数和第二个数都参与排序,作为一个新的key。
(2)改写最初的MapReduce方法函数代码:(只展示了map和reduce函数,还需要修改map和reduce输出的类型设置)
        public static class MyMapper extends
            Mapper<LongWritable, Text, MyNewKey, LongWritable> {
        protected void map(
                LongWritable key,
                Text value,
                Mapper<LongWritable, Text, MyNewKey, LongWritable>.Context context)
                throws java.io.IOException, InterruptedException {
            String[] spilted = value.toString().split("	");
            long firstNum = Long.parseLong(spilted[0]);
            long secondNum = Long.parseLong(spilted[1]);
            // 使用新的类型作为key参与排序
            MyNewKey newKey = new MyNewKey(firstNum, secondNum);

            context.write(newKey, new LongWritable(secondNum));
        };
    }

    public static class MyReducer extends
            Reducer<MyNewKey, LongWritable, LongWritable, LongWritable> {
        protected void reduce(
                MyNewKey key,
                java.lang.Iterable<LongWritable> values,
                Reducer<MyNewKey, LongWritable, LongWritable, LongWritable>.Context context)
                throws java.io.IOException, InterruptedException {
            context.write(new LongWritable(key.firstNum), new LongWritable(
                    key.secondNum));
        };
    }
从上面的代码中我们可以发现,新类型MyNewKey实现了一个叫做WritableComparable的接口,该接口中有一个compareTo()方法,当对key进行比较时会调用该方法,而我们将其改为了我们自己定义的比较规则,从而实现我们想要的效果。
其实,这个WritableComparable还实现了两个接口,我们看看其定义:
public interface WritableComparable<T> extends Writable, Comparable<T> {
}
Writable接口是为了实现序列化,而Comparable则是为了实现比较。
(3)现在看看运行结果:
1    1
2    1
2    2
3    1
3    2
3    3
运行结果与预期的已经一致,自定义排序生效!
三、初步探索分组
3.1 默认的分组
在Hadoop中的默认分组规则中,也是基于Key进行的,会将相同key的value放到一个集合中去。这里以上面的例子继续看看分组,因为我们自定义了一个新的key,它是以两列数据作为key的,因此这6行数据中每个key都不相同,也就是说会产生6组,它们是:1 1,2 1,2 2,3 1,3 2,3 3。而实际上只可以分为3组,分别是1,2,3。
现在首先改写一下reduce函数代码,目的是求出第一列相同时第二列的最小值,看看它会有怎么样的分组:
    public static class MyReducer extends
            Reducer<MyNewKey, LongWritable, LongWritable, LongWritable> {
        protected void reduce(
                MyNewKey key,
                java.lang.Iterable<LongWritable> values,
                Reducer<MyNewKey, LongWritable, LongWritable, LongWritable>.Context context)
                throws java.io.IOException, InterruptedException {
            long min = Long.MAX_VALUE;
            for (LongWritable number : values) {
                long temp = number.get();
                if (temp < min) {
                    min = temp;
                }
            }

            context.write(new LongWritable(key.firstNum), new LongWritable(min));
        };
    }
其运行结果为:
1    1
2    1
2    2
3    1
3    2
3    3
但是我们预期的结果为:
#当第一列相同时,求出第二列的最小值
3    3
3    2
3    1
2    2
2    1
1    1
-------------------
#预期结果应该是
3    1
2    1
1    1
3.2 自定义分组
为了针对新的key类型作分组,我们也需要自定义一下分组规则:
(1)编写一个新的分组比较类型用于我们的分组:
    private static class MyGroupingComparator implements
            RawComparator<MyNewKey> {

        /*
         * 基本分组规则:按第一列firstNum进行分组
         */
        @Override
        public int compare(MyNewKey key1, MyNewKey key2) {
            return (int) (key1.firstNum - key2.firstNum);
        }

        /*
         * @param b1 表示第一个参与比较的字节数组
         *
         * @param s1 表示第一个参与比较的字节数组的起始位置
         *
         * @param l1 表示第一个参与比较的字节数组的偏移量
         *
         * @param b2 表示第二个参与比较的字节数组
         *
         * @param s2 表示第二个参与比较的字节数组的起始位置
         *
         * @param l2 表示第二个参与比较的字节数组的偏移量
         */
        @Override
        public int compare(byte[] b1, int s1, int l1, byte[] b2, int s2, int l2) {
            return WritableComparator.compareBytes(b1, s1, 8, b2, s2, 8);
        }

    }
从代码中我们可以知道,我们自定义了一个分组比较器MyGroupingComparator,该类实现了RawComparator接口,而RawComparator接口又实现了Comparator接口,下面看看这两个接口的定义:
首先是RawComparator接口的定义:
public interface RawComparator<T> extends Comparator<T> {
  public int compare(byte[] b1, int s1, int l1, byte[] b2, int s2, int l2);
}
其次是Comparator接口的定义:
public interface Comparator<T> {
    int compare(T o1, T o2);
    boolean equals(Object obj);
}
在MyGroupingComparator中分别对这两个接口中的定义进行了实现,RawComparator中的compare()方法是基于字节的比较,Comparator中的compare()方法是基于对象的比较。
在基于字节的比较方法中,有六个参数,一下子眼花了:
Params:
* @param arg0 表示第一个参与比较的字节数组
* @param arg1 表示第一个参与比较的字节数组的起始位置
* @param arg2 表示第一个参与比较的字节数组的偏移量
*
* @param arg3 表示第二个参与比较的字节数组
* @param arg4 表示第二个参与比较的字节数组的起始位置
* @param arg5 表示第二个参与比较的字节数组的偏移量
由于在MyNewKey中有两个long类型,每个long类型又占8个字节。这里因为比较的是第一列数字,所以读取的偏移量为8字节。
(2)添加对分组规则的设置:
  // 设置自定义分组规则
   job.setGroupingComparatorClass(MyGroupingComparator.class);
(3)现在看看运行结果:

参考资料
(1)吴超,《深入浅出Hadoop》:http://www.superwu.cn/
(2)Suddenly,《Hadoop日记Day18-MapReduce排序和分组》:http://www.cnblogs.com/sunddenly/p/4009751.html