【前面的话】书接上文SpringCloud之Config,如果没有看过可以先移步去看一下。在上一篇文章中提到了配置刷新的问题,如果需要刷新配置就需要客户端执行refresh,我们可以利用webhook的机制每次提交代码发送请求来刷新客户端,当客户端越来越多的时候,需要每个客户端都执行一遍,这种方案就不太适合了。使用Spring Cloud Bus可以完美解决这一问题。
壹、Spring Cloud Bus的简介
Spring cloud bus通过轻量消息代理连接各个分布的节点。这会用在广播状态的变化(例如配置变化)或者其他的消息指令。Spring bus的一个核心思想是通过分布式的启动器对spring boot应用进行扩展,也可以用来建立一个多个应用之间的通信频道。目前唯一实现的方式是用AMQP消息代理作为通道,同样特性的设置(有些取决于通道的设置)在更多通道的文档中。
贰、解决方案
方案一:
- Spring cloud bus被国内很多都翻译为消息总线,也挺形象的。大家可以将它理解为管理和传播所有分布式项目中的消息既可,其实本质是利用了MQ的广播机制在分布式的系统中传播消息,目前常用的有Kafka和RabbitMQ。利用bus的机制可以做很多的事情,其中配置中心客户端刷新就是典型的应用场景之一,我们用一张图来描述bus在配置中心使用的机制。
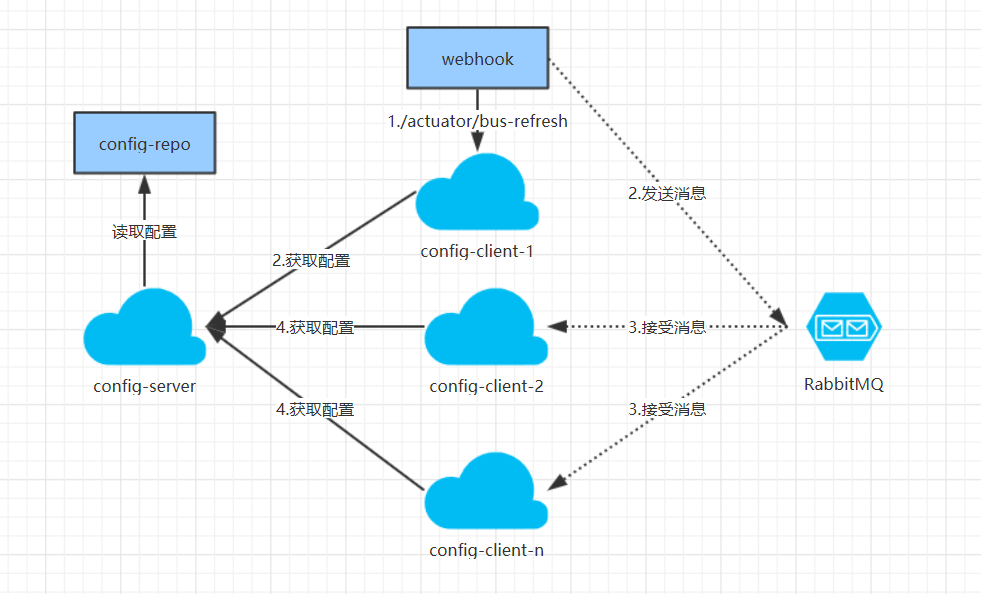
根据此图我们可以看出利用Spring Cloud Bus做配置更新的步骤:
    1、提交代码触发post给客户端A发送/actuator/bus-refresh
    2、客户端A接收到请求从Server端更新配置并且发送给Spring Cloud Bus
    3、Spring Cloud bus接到消息并通知给其它客户端
    4、其它客户端接收到通知,请求Server端获取最新配置
    5、全部客户端均获取到最新的配置
方案二:
- 在方案一中我们已经到达了利用消息总线触发一个客户端/actuator/bus-refresh,而刷新所有客户端的配置的目的。但这种方式并不优雅。原因如下:
   打破了微服务的职责单一性。微服务本身是业务模块,它本不应该承担配置刷新的职责。
   破坏了微服务各节点的对等性。
   有一定的局限性。例如,微服务在迁移时,它的网络地址常常会发生变化,此时如果想要做到自动刷新,那就不得不修改WebHook的配置。
因此我们将方案一的架构模式稍微改变一下
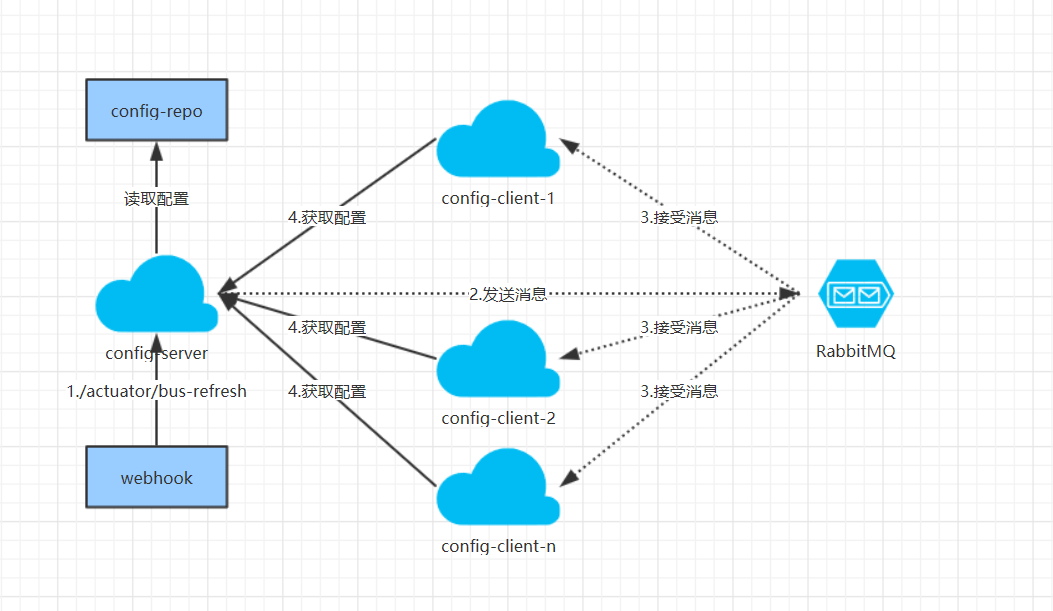
这时Spring Cloud Bus做配置更新步骤如下:
  1、提交代码触发post请求给bus/refresh
  2、server端接收到请求并发送给Spring Cloud Bus
  3、Spring Cloud bus接到消息并通知给其它客户端
  4、其它客户端接收到通知,请求Server端获取最新配置
  5、全部客户端均获取到最新的配置
下面我们就采用方案二来改造我们的工程,这样的话我们在server端的代码做一些改动,来支持bus/refresh
叁、改造服务端
- 改造上文的config的服务端子工程lovin-config-server,添加RabbitMQ的依赖。下面是改造后的主要的pom依赖:
<parent>
        <artifactId>lovincloud</artifactId>
        <groupId>com.eelve.lovincloud</groupId>
        <version>1.0-SNAPSHOT</version>
    </parent>
    <modelVersion>4.0.0</modelVersion>

    <artifactId>lovin-config-server</artifactId>
    <packaging>jar</packaging>
    <name>lovinconfigserver</name>
    <version>0.0.1</version>
    <description>配置服务端</description>

    <dependencies>
        <dependency>
            <groupId>org.springframework.cloud</groupId>
            <artifactId>spring-cloud-starter-netflix-eureka-client</artifactId>
        </dependency>
        <dependency>
            <groupId>org.springframework.boot</groupId>
            <artifactId>spring-boot-starter-security</artifactId>
        </dependency>
        <dependency>
            <groupId>org.springframework.boot</groupId>
            <artifactId>spring-boot-starter-web</artifactId>
        </dependency>
        <dependency>
            <groupId>de.codecentric</groupId>
            <artifactId>spring-boot-admin-starter-client</artifactId>
            <version>2.1.6</version>
        </dependency>
        <dependency>
            <groupId>org.springframework.cloud</groupId>
            <artifactId>spring-cloud-config-server</artifactId>
        </dependency>
        <dependency>
            <groupId>org.springframework.cloud</groupId>
            <artifactId>spring-cloud-starter-bus-amqp</artifactId>
        </dependency>
    </dependencies>

    <build>
        <plugins>
            <plugin>
                <groupId>org.springframework.boot</groupId>
                <artifactId>spring-boot-maven-plugin</artifactId>
            </plugin>
        </plugins>
    </build>
- 添加rabbitmq的连接配置
server:
  port: 8886   # 服务端口号
spring:
  application:
    name: lovinconfigserver     # 服务名称
  security:
    basic:
      enabled: true
    user:
      name: lovin
      password: ${REGISTRY_SERVER_PASSWORD:lovin}
  cloud:
    config:
      server:
        git:
          uri: https://github.com/lovinstudio/lovincloud
          search-paths: lovin-config-repo
      label: master
  rabbitmq:
    host: 127.0.0.1
    port: 5672
    username: guest
    password: guest
eureka:
  client:
    serviceUrl:
      defaultZone: http://lovin:lovin@localhost:8881/eureka/   # 注册到的eureka服务地址
肆、改造配置客户端
- 改造上文的config的服务端子工程lovin-config-client,添加RabbitMQ的依赖。下面是改造后的主要的pom依赖:
    <parent>
        <artifactId>lovincloud</artifactId>
        <groupId>com.eelve.lovincloud</groupId>
        <version>1.0-SNAPSHOT</version>
    </parent>
    <modelVersion>4.0.0</modelVersion>

    <artifactId>lovin-config-client</artifactId>
    <packaging>jar</packaging>
    <name>lovinconfigclient</name>
    <version>0.0.1</version>
    <description>配置消费端</description>

    <dependencies>
        <dependency>
            <groupId>org.springframework.cloud</groupId>
            <artifactId>spring-cloud-starter-netflix-eureka-client</artifactId>
        </dependency>
        <dependency>
            <groupId>org.springframework.boot</groupId>
            <artifactId>spring-boot-starter-security</artifactId>
        </dependency>
        <dependency>
            <groupId>org.springframework.boot</groupId>
            <artifactId>spring-boot-starter-web</artifactId>
        </dependency>
        <dependency>
            <groupId>de.codecentric</groupId>
            <artifactId>spring-boot-admin-starter-client</artifactId>
            <version>2.1.6</version>
        </dependency>
<!--        <dependency>-->
<!--            <groupId>org.springframework.cloud</groupId>-->
<!--            <artifactId>spring-cloud-config-server</artifactId>-->
<!--        </dependency>-->
        <dependency>
            <groupId>org.springframework.cloud</groupId>
            <artifactId>spring-cloud-starter-config</artifactId>
            <version>2.1.3.RELEASE</version>
        </dependency>
        <dependency>
            <groupId>org.springframework.boot</groupId>
            <artifactId>spring-boot-starter-actuator</artifactId>
        </dependency>
        <dependency>
            <groupId>org.springframework.cloud</groupId>
            <artifactId>spring-cloud-starter-bus-amqp</artifactId>
        </dependency>
    </dependencies>

    <build>
        <plugins>
            <plugin>
                <groupId>org.springframework.boot</groupId>
                <artifactId>spring-boot-maven-plugin</artifactId>
            </plugin>
        </plugins>
    </build>
- 添加连接rabbitmq的相关配置
- 修改bootstrap.yml添加连接rabbitmq的配置
server:
  port: 8807   # 服务端口号
spring:
  application:
    name: lovinconfigclient     # 服务名称
  security:
    basic:
      enabled: true
    user:
      name: lovin
      password: ${REGISTRY_SERVER_PASSWORD:lovin}
#eureka:
#  client:
#    serviceUrl:
#      defaultZone: http://lovin:lovin@localhost:8881/eureka/   # 注册到的eureka服务地址
  rabbitmq:
    host: 127.0.0.1
    port: 5672
    username: guest
    password: guest
- 修改application.yml开启消息跟踪
spring:
  cloud:
    config:
      name: lovin-config
      profile: dev
      #uri: http://localhost:8886/
      #label: master
      discovery:
        enabled: true
        service-id: lovinconfigserver
    bus:
      trace:
        enabled: true
eureka:
  client:
    serviceUrl:
      defaultZone: http://lovin:lovin@localhost:8881/eureka/   # 注意在高可用的时候需要见注册中心配置移到该文件中,在application.yml中见会读取不到配置
伍、启动测试
- 1.首先依次启动lovin-eureka-server、lovin-econfig-server、lovin-econfig-client
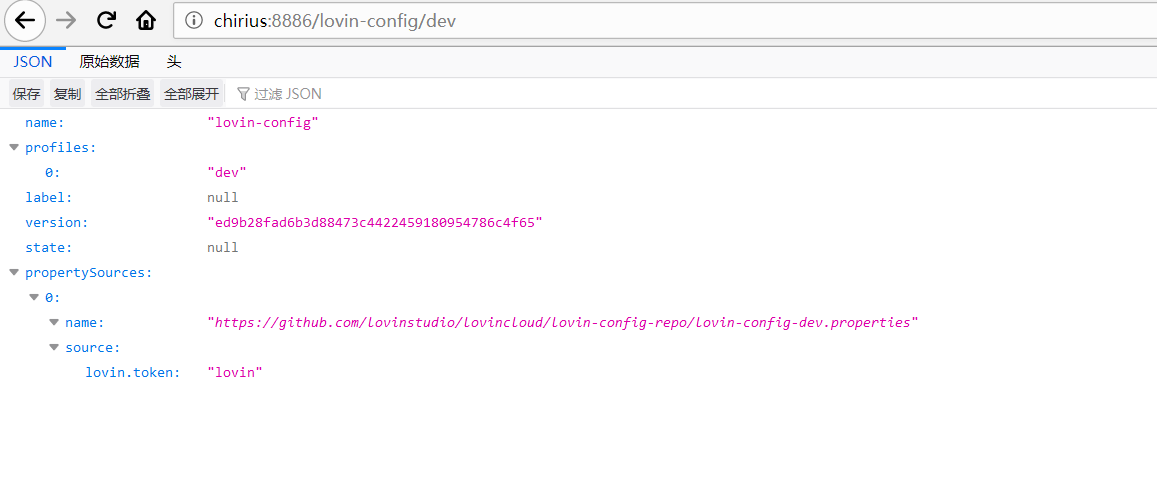
- 2.查看lovin-econfig-server查询配置
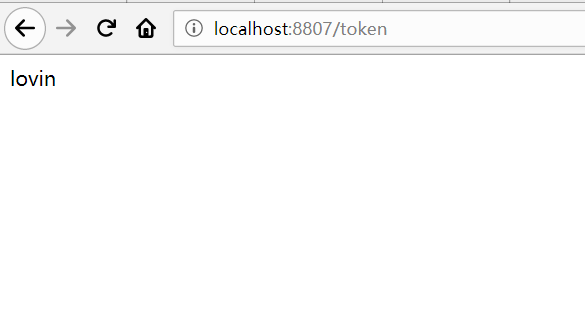
- 3.查看lovin-econfig-client查询配置
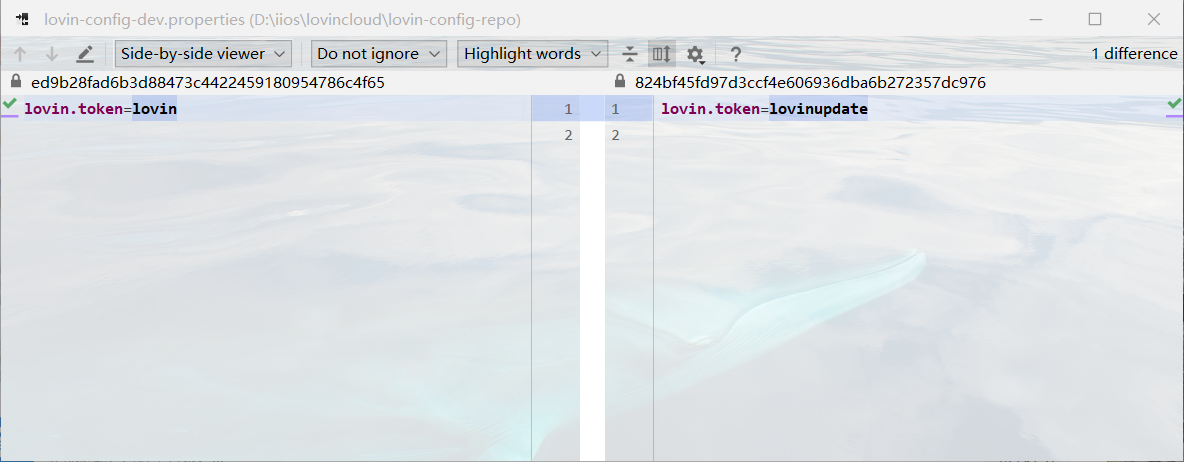
- 4.修改配置,并提交见token的值由lovin改为lovinupdate
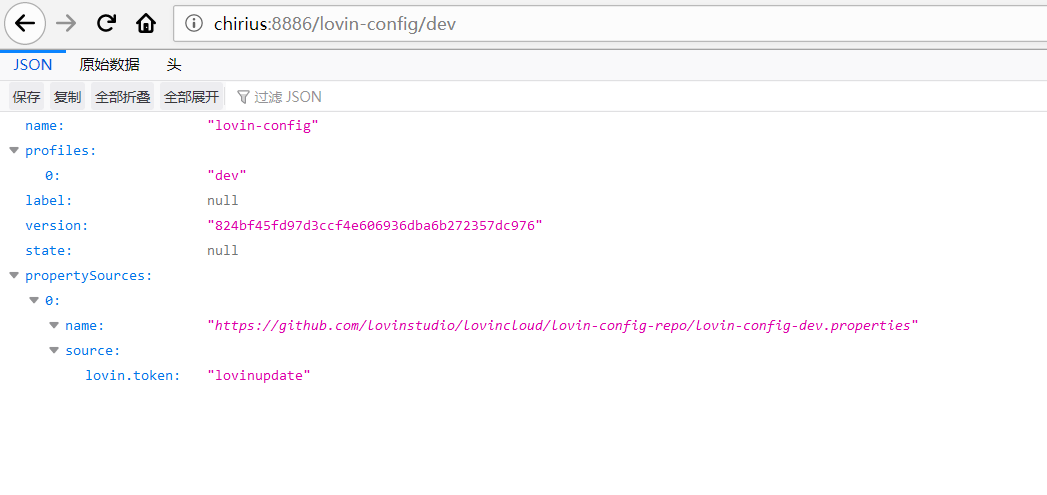
- 5.再次查看lovin-econfig-server查询配置
- 6.再次查看lovin-econfig-client查询配置
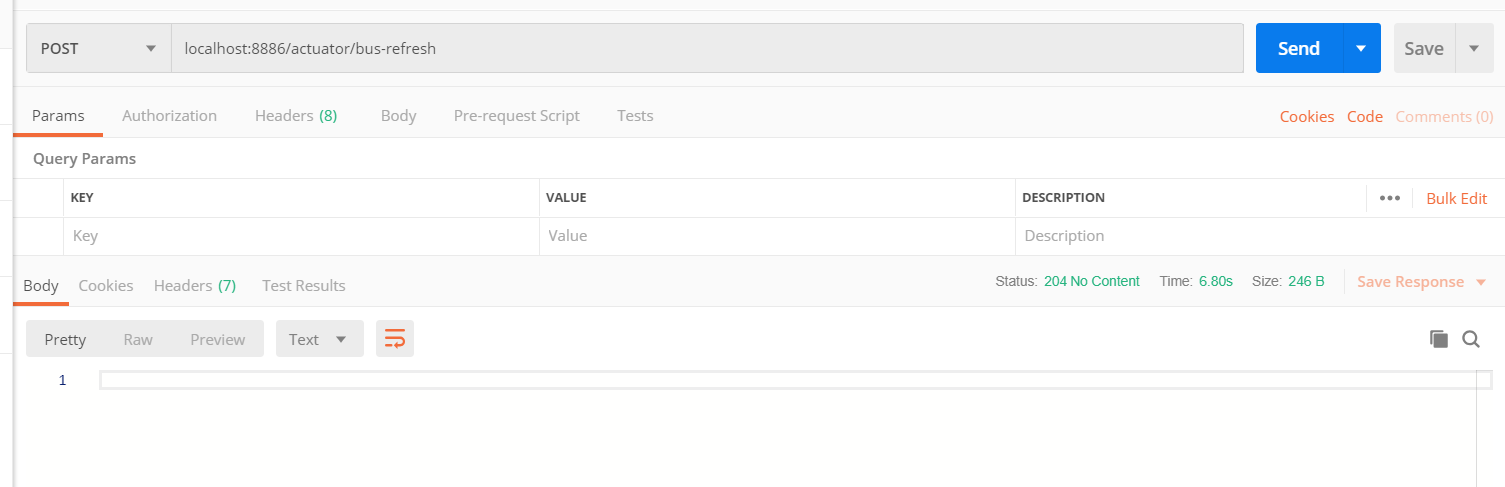
- 7.刷新消息总线
由于api变更,url由老版本的/bus/refresh变为actuator/bus-refresh
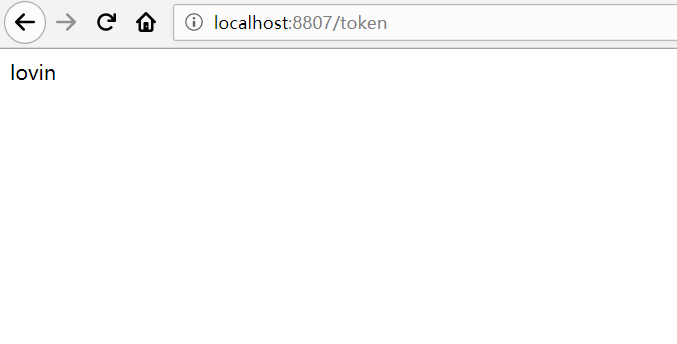
- 8.再次查看lovin-econfig-client查询配置
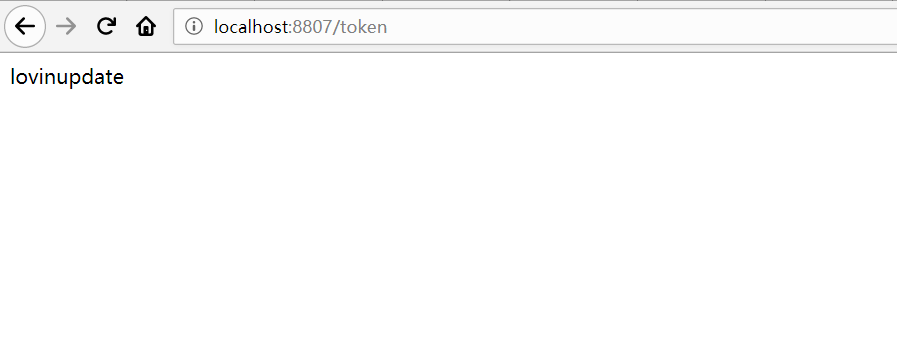
我们可以看到已经刷新成功,至此消息总线配置已经完成
陆、局部刷新
某些场景下(例如灰度发布),我们可能只想刷新部分微服务的配置,此时可通过/actuator/bus-refresh端点的destination参数来定位要刷新的应用程序。
- 例如:/actuator/bus-refresh?destination=customers:8000,这样消息总线上的微服务实例就会根据destination参数的值来判断是否需要要刷新。其中,customers:8000指的是各个微服务的ApplicationContext ID。destination参数也可以用来定位特定的微服务。
- 例如:/actuator/bus-refresh?destination=customers:**,这样就可以触发customers微服务所有实例的配置刷新。