上一篇主要是写了手动写Hibernate , 这一篇加点补充,主要是关于使用Eclipse自动 生成,好了,进入正题:
Step1:首先我们新建一个WebProject!
Step2:在src下新建一个包我取名为 fengyan.hibernate,用于存放Hibernate的配置文件
Step3:现在用MyEclipse添加Hibernate,选中fengyan.hibernate包,单击MyEclipse---->add hibernate capabilities,具体看下图
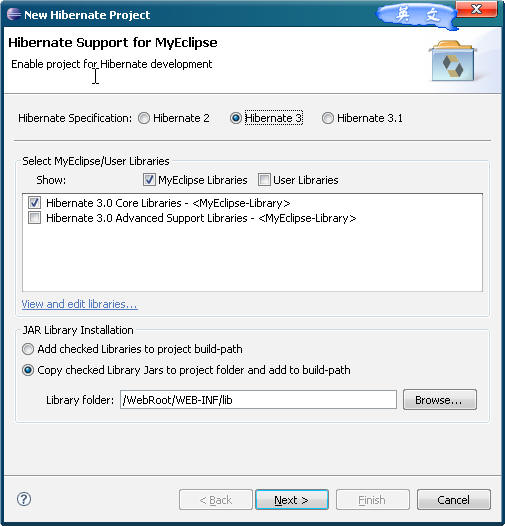

生成Session工厂类!方便我们取得会话

Step4:单击“完成”后,我们在接着出现的Hibernate.ctg.xml配置文件的视图添加一个properties属性,如下图
具体意思是Hibernate 在运行时可以在控制台输出执行的SQL语句,方便 我们监视!
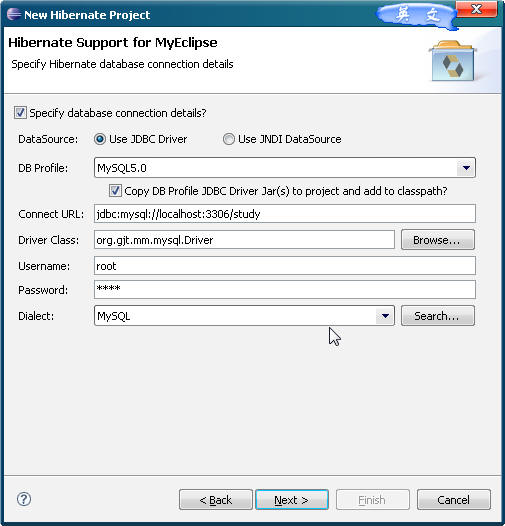
Step5:我们切换到MyEclipse Database explorer,数据库视图,因为昨天安装了MySQL,所以我配置了MySQL的连接 ,我们在study数据库下新建立一张测试表testTable,
DDL语句如下:
 create table `study`.`testtable`( `id` int not null auto_increment,--ID 自增加 在SqlServer为 Identity(1,1) `username` varchar(20), primary key (`id`) ); create unique index `PRIMARY` on `study`.`testtable`(`id`);
Step6:我们选中刚刚新建的表,如下:
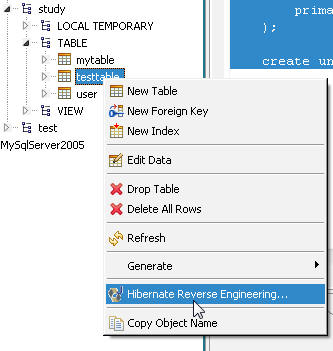
创建映射配置信息文件,以及数据Bean对象 Java Data Object
指定主键类型
在 Java src folder 我们选择刚刚新建的包 fengyan.beans,它这时会自动给我们由表生成对应的Beans以及映射信息XML文件
单击下一步 以及完成即可!我们现在看看在我们的beans包下有什么东东,多了名为Testtable.java类,这个就是MyEclipse为我们自动根据Testtable表生成的Bean.看看里面的内容
package fengyan.beans; public class Testtable implements java.io.Serializable {

 //继承Serializable接口,序列化,可以排序 private Integer id; private String username;
  public Testtable() {
 } //看见了,很智能的给我们生成了一个参数的构造函数 //因为ID为自动递增的主键,所以这里的参数为username public Testtable(String username) { this.username = username; } public Integer getId() { return this.id; } public void setId(Integer id) { this.id = id; } public String getUsername() { return this.username; } public void setUsername(String username) { this.username = username; }
 }
}思考:那这个Bean如何与我们的表关联呢,接着在fengyan.beans包下我们还发现生成了Testtable.hbm.xml 代码如下:
<?xml version="1.0" encoding="utf-8"?><!DOCTYPE hibernate-mapping PUBLIC "-//Hibernate/Hibernate Mapping DTD 3.0//EN""http://hibernate.sourceforge.net/hibernate-mapping-3.0.dtd"><!-- Mapping file autogenerated by MyEclipse - Hibernate Tools--><hibernate-mapping> <!-- Bean的全名 映射的表名 数据库名,因为我们在Hibernate.cfg.xml中配置了数据库,所以这里的catalog要删除 --> <class name="fengyan.beans.Testtable" table="testtable" catalog="study"> <!-- 主键用<id>, --> <id name="id" type="java.lang.Integer"> <column name="id" /><!-- 对应表中的字段名 --> <generator class="native" /><!-- 主键类型native支持自动增长方式 --> </id> <!-- 一般的属性用<property> --> <property name="username" type="java.lang.String"> <column name="username" length="20" /> </property> </class></hibernate-mapping>Step7:我们新加一个DAOs(dataAccessObject)包,并在其中添加一个TesttableDAO.java,负责对Bean的操作,代码如下:
package fengyan.DAOS;import org.hibernate.Session;import fengyan.beans.Testtable;import fengyan.hibernate.HibernateSessionFactory;public class TesttableDAO { public void addTesttable(Testtable user) { //创建连接 Session session = HibernateSessionFactory.getSession(); //事物 Transaction tx = session.beginTransaction(); //操作 session.save(user); //提交事物 tx.commit(); //关闭会话 session.close(); }} Step7:接下来建立一个Servlet~如下图: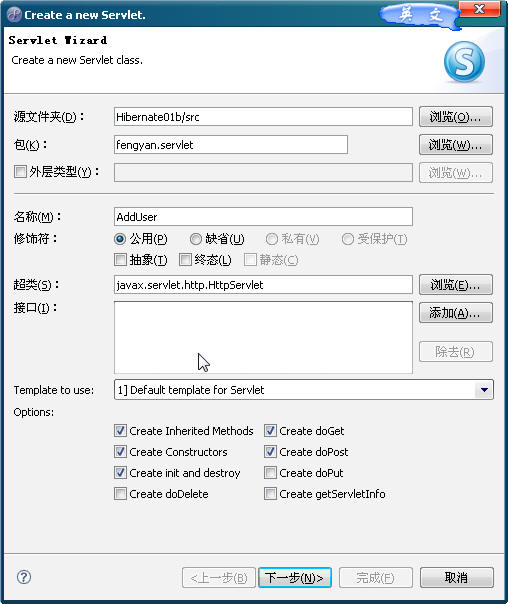
其中代码:
public void doPost(HttpServletRequest request, HttpServletResponse response) throws ServletException, IOException { response.setContentType("text/html"); request.setCharacterEncoding("GBK");//解决接收中文 //接收视图中的参数 String username = request.getParameter("username"); //声明Bean及操作对象 Testtable user = new Testtable(); TesttableDAO userdao = new TesttableDAO(); //执行业务 if(username != null && !username.equals("")) { System.out.print(username); user.setUsername(username); userdao.addTesttable(user); } else { response.sendRedirect("/Hibernate01b/adduser.jsp"); } }Step8:接下来写一个东西来测试下!新建立一个adduser.jsp文件
<%@ page language="java" pageEncoding="GBK"%><%String path = request.getContextPath();String basePath = request.getScheme()+"://"+request.getServerName()+":"+request.getServerPort()+path+"/";%><!DOCTYPE HTML PUBLIC "-//W3C//DTD HTML 4.01 Transitional//EN"><html> <head> <base href="<%=basePath%>"> <title>My JSP 'adduser.jsp' starting page</title> </head> <body> <%=basePath %><BR> <form action="<%=basePath %>servlet/AddUser" method="post"> 用户名:<input type=text name="username"/> <input type=submit> </form><br> </body></html> 另外将Hibernate及Web.xml文件代码贴下:
hibernate.cfg.xml
<?xml version='1.0' encoding='UTF-8'?><!DOCTYPE hibernate-configuration PUBLIC "-//Hibernate/Hibernate Configuration DTD 3.0//EN" "http://hibernate.sourceforge.net/hibernate-configuration-3.0.dtd"><!-- Generated by MyEclipse Hibernate Tools. --><hibernate-configuration> <session-factory> <property name="connection.username">root</property> <property name="connection.url"> jdbc:mysql://localhost:3306/study </property> <property name="dialect"> org.hibernate.dialect.MySQLDialect </property> <property name="myeclipse.connection.profile"> MySQL5.0 </property> <property name="connection.password">root</property> <property name="connection.driver_class"> org.gjt.mm.mysql.Driver </property> <property name="show_sql">true</property> <mapping resource="fengyan/beans/Testtable.hbm.xml" /> </session-factory></hibernate-configuration>web.xml
<?xml version="1.0" encoding="UTF-8"?><web-app version="2.4" xmlns="http://java.sun.com/xml/ns/j2ee" xmlns:xsi="http://www.w3.org/2001/XMLSchema-instance" xsi:schemaLocation="http://java.sun.com/xml/ns/j2ee http://java.sun.com/xml/ns/j2ee/web-app_2_4.xsd"> <welcome-file-list> <welcome-file>/adduser.jsp</welcome-file> </welcome-file-list> <servlet> <description>This is the description of my J2EE component</description> <display-name>This is the display name of my J2EE component</display-name> <servlet-name>AddUser</servlet-name> <servlet-class>fengyan.servlet.AddUser</servlet-class> </servlet> <servlet-mapping> <servlet-name>AddUser</servlet-name> <url-pattern>/servlet/AddUser</url-pattern> </servlet-mapping></web-app>HibernateSessionFactory.java代码
package fengyan.hibernate;import org.hibernate.HibernateException;import org.hibernate.Session;import org.hibernate.cfg.Configuration;public class HibernateSessionFactory { private static String CONFIG_FILE_LOCATION = "/fengyan/hibernate/hibernate.cfg.xml"; private static final ThreadLocal<Session> threadLocal = new ThreadLocal<Session>(); private static Configuration configuration = new Configuration(); private static org.hibernate.SessionFactory sessionFactory; private static String configFile = CONFIG_FILE_LOCATION; private HibernateSessionFactory() { } public static Session getSession() throws HibernateException { Session session = (Session) threadLocal.get(); if (session == null || !session.isOpen()) { if (sessionFactory == null) { rebuildSessionFactory(); } session = (sessionFactory != null) ? sessionFactory.openSession() : null; threadLocal.set(session); } return session; } public static void rebuildSessionFactory() { try { configuration.configure(configFile); sessionFactory = configuration.buildSessionFactory(); } catch (Exception e) { System.err .println("%%%% Error Creating SessionFactory %%%%"); e.printStackTrace(); } } public static void closeSession() throws HibernateException { Session session = (Session) threadLocal.get(); threadLocal.set(null); if (session != null) { session.close(); } } public static org.hibernate.SessionFactory getSessionFactory() { return sessionFactory; } public static void setConfigFile(String configFile) { HibernateSessionFactory.configFile = configFile; sessionFactory = null; } public static Configuration getConfiguration() { return configuration; }}