我们都知道,当游戏越做越大,资源越来越多的时候,加载资源会造成大量时间的浪费。为避免加载资源时游戏黑屏,导致玩家误认为游戏非正常运行,Loading界面起到至关重要的作用。今天就为大家带来用Egret制作Loading页面及分步加载资源的教程。
本文涉及以下内容:
- RES加载Loading界面所使用的资源
- 分步加载资源
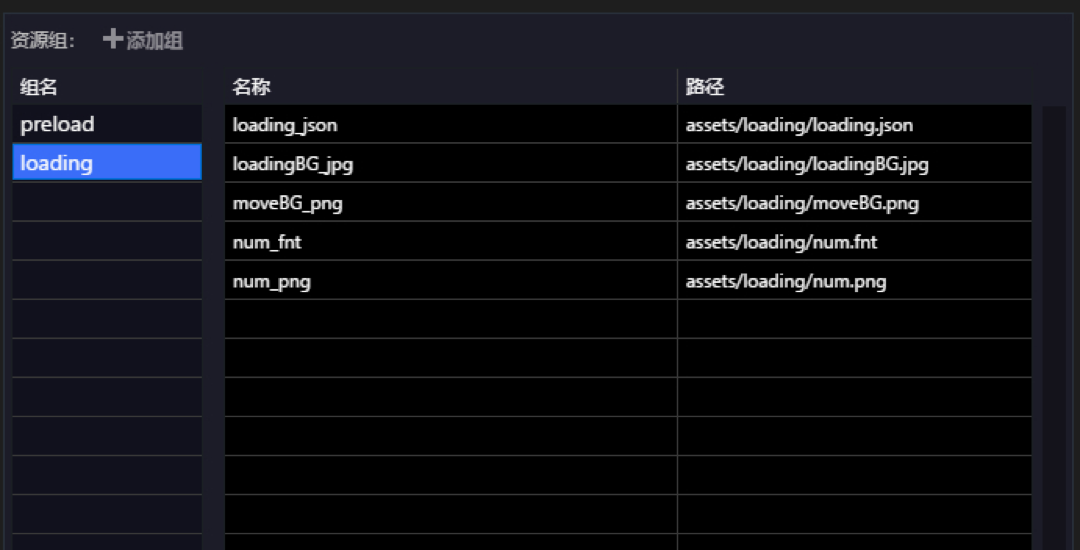
加载LoadingUI所需要的资源
把LoadingUI所需要的资源配置到default.res.json的loading组中,组名任意。如下:
在Main.ts修改loadResource()函数资源的加载顺序,先把LoadingUI所需要的资源异步加载成功,再创建LoadingUI的实例。
privateasyncloadResource() {
try{
awaitRES.loadConfig("resource/default.res.json", "resource/");//加载配置表
awaitRES.loadGroup("loading");//加载loading组
constloadingView=newLoadingUI();//创建loadingUI实例
this.stage.addChild(loadingView);
awaitRES.loadGroup("preload", 0, loadingView);//加载默认preload组资源,并执行loadingView
this.stage.removeChild(loadingView);
}
catch(e) {
console.error(e);
}
}
如此,资源配置完毕之后就可以在LoaingUI中使用了,下面制作LoaingUI界面
制作LoadingUI界面
本文事例中显示资源真实加载百分比和图片百分比,参照如下LoadingUI代码
classLoadingUIextendsegret.SpriteimplementsRES.PromiseTaskReporter{ publicconstructor() { super(); this.createView(); } /**百分比位图*/ privatetextField: egret.BitmapText; /**loadicon */ privateload:egret.Bitmap; /**百分比图片*/ privateloadBar:egret.Bitmap; /**loadBar背景*/ privateloadBar2:egret.Bitmap; privatecreateView(): void{ this.textField=newegret.BitmapText(); letfnt=RES.getRes("num_fnt");//加载字体位图 this.textField.text="0%"; this.textField.font=fnt; this.textField.textAlign="center", this.textField.x=260, this.textField.y=550, this.textField.width=130, this.textField.height=100; letbg:egret.Bitmap=newegret.Bitmap(RES.getRes("loadingBG_jpg")); this.addChild(bg); this.load=newegret.Bitmap(RES.getRes("loading_json.loading_icon_png")); this.load.anchorOffsetX=this.load.width/2; this.load.anchorOffsetY=this.load.height/2; this.load.x=640/2; this.load.y=1136/2; this.addChild(this.load); this.loadBar2=newegret.Bitmap(RES.getRes("loading_json.loading_bar1_png")); this.loadBar2.x=(640-this.loadBar2.width) /2; this.loadBar2.y=(1136-this.loadBar2.height) /2; this.addChild(this.loadBar2); this.loadBar=newegret.Bitmap(RES.getRes("loading_json.loading_bar2_png")); this.loadBar.x=(640-this.loadBar.width) /2; this.loadBar.y=(1136-this.loadBar.height) /2; this.addChild(this.loadBar); } publiconProgress(current: number, total: number): void{ /**显示百分比*/ this.textField.text=Math.ceil((current/total)*100).toString() +"%"; //遮罩 letmask=this.getSectorProgress(Math.ceil((current/total) *360)); this.addChild(mask) this.loadBar.mask=mask; this.addChild(this.textField); } /**loadBar遮罩*/ privategetSectorProgress(angle: number):egret.Shape{ varself=this; varshape:egret.Shape=newegret.Shape(); changeGraphics(angle); returnshape; //绘制shape遮罩 functionchangeGraphics(angle) { shape.graphics.clear(); shape.graphics.beginFill(16711680); shape.graphics.moveTo(self.loadBar.x, self.loadBar.y); shape.graphics.lineTo(self.loadBar.x+self.loadBar.width/2, self.loadBar.y+self.loadBar.height/2); shape.graphics.drawArc(self.loadBar.x+self.loadBar.width/2, self.loadBar.y+self.loadBar.height/2, self.loadBar.width/2, 0, angle*Math.PI/180); shape.graphics.lineTo(self.loadBar.x+self.loadBar.width/2, self.loadBar.y+self.loadBar.height/2); shape.graphics.endFill(); } } }
LoadingUI制作完毕,现在运行,即可看到效果。

分步加载资源
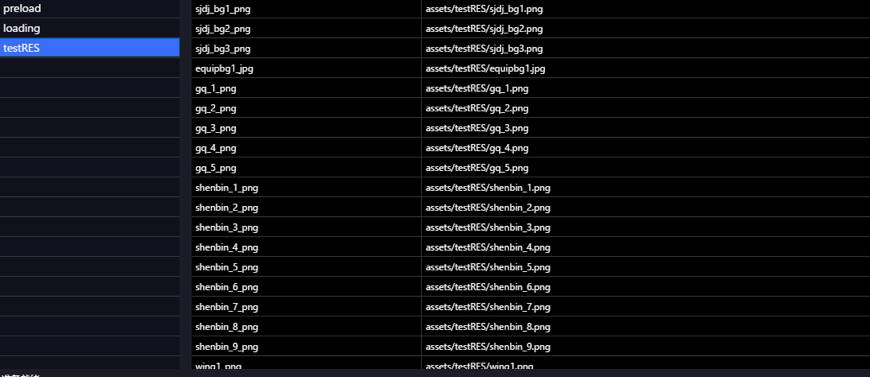
分步加载资源和LoadingUI加载方式相同,也同样是为了避免一次性加载太多的资源而造成时间的浪费,加载的同时也可以运行LoadingUI。在资源配置表中继续增加资源组testRES,多加一些preload和loading之外的资源,效果更佳明显。
在Main.ts中测试分步加载资源,原有的页面上加上一个按钮,添加加载资源事件。
//跳转场景加载资源测试 lettextBtn: egret.TextField=newegret.TextField(); textBtn.text="Click! 跳转场景"; textBtn.touchEnabled=true; textBtn.x=300; textBtn.y=500; this.addChild(textBtn); textBtn.addEventListener(egret.TouchEvent.TOUCH_TAP, this.onTextBtnClick, this); privateasynconTextBtnClick() { constloadingView=newLoadingUI();//创建loadingUI实例 this.stage.addChild(loadingView); awaitRES.loadGroup("testRES", 0, loadingView);//加载默认preload组资源,并执行loadingView this.stage.removeChild(loadingView); this.addChild(newTestPanel()); }
按钮方法关键词async,使用异步加载执行此事件。测试分步加载资源TestPanel类
classTestPanelextendsegret.Sprite{ publicconstructor() { super(); this.init(); } privateinit() { //原有资源 letbg: egret.Bitmap=newegret.Bitmap( RES.getRes("loadingBG_jpg")); this.addChild(bg); //testRES组新的资源 leticon_1: egret.Bitmap=newegret.Bitmap(RES.getRes("sjdj_bg2_png")); this.addChild(icon_1); } }
小结:
通过本文您可以学到Loading页面制作方法以及资源分步加载思想,有任何技术问题或者认为这篇文章对您有所帮助,欢迎在评论区留言与我们交流互动!
本文源码素材链接:https://github.com/shenysun/LoadingT