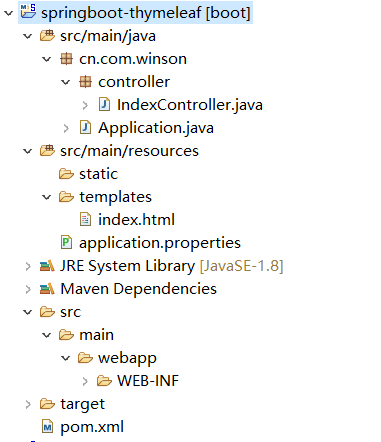
一、先上完整的目录结构:

二、在Maven中引入Thymeleaf的依赖:
<dependency>
    <groupId>org.springframework.boot</groupId>
    <artifactId>spring-boot-starter-thymeleaf</artifactId>
</dependency>
完整的pom.xml文件:

<project xmlns="http://maven.apache.org/POM/4.0.0" xmlns:xsi="http://www.w3.org/2001/XMLSchema-instance"
    xsi:schemaLocation="http://maven.apache.org/POM/4.0.0 http://maven.apache.org/maven-v4_0_0.xsd">
    <modelVersion>4.0.0</modelVersion>
    <groupId>cn.com.winson.springboot</groupId>
    <artifactId>maven-springboot</artifactId>
    <packaging>war</packaging>
    <version>0.0.1-SNAPSHOT</version>
    <parent>
        <groupId>org.springframework.boot</groupId>
        <artifactId>spring-boot-starter-parent</artifactId>
        <version>1.5.17.RELEASE</version>
        <relativePath />
    </parent>

    <properties>
        <project.build.sourceEncoding>UTF-8</project.build.sourceEncoding>
        <project.reporting.outputEncoding>UTF-8</project.reporting.outputEncoding>
        <java.version>1.8</java.version>
    </properties>

    <dependencies>
        <dependency>
            <groupId>org.springframework.boot</groupId>
            <artifactId>spring-boot-starter-thymeleaf</artifactId>
        </dependency>
        <dependency>
            <groupId>net.sourceforge.nekohtml</groupId>
            <artifactId>nekohtml</artifactId>
        </dependency>
        <dependency>
            <groupId>org.unbescape</groupId>
            <artifactId>unbescape</artifactId>
            <version>1.1.5.RELEASE</version>
        </dependency>
        <dependency>
            <groupId>org.springframework.boot</groupId>
            <artifactId>spring-boot-starter-web</artifactId>
        </dependency>

        <dependency>
            <groupId>org.springframework.boot</groupId>
            <artifactId>spring-boot-starter-test</artifactId>
            <scope>test</scope>
        </dependency>
    </dependencies>

    <build>
        <plugins>
            <plugin>
                <groupId>org.springframework.boot</groupId>
                <artifactId>spring-boot-maven-plugin</artifactId>
            </plugin>
        </plugins>
    </build>
</project>
三、核心配置文件application.properties中对Thymeleaf进行配置:(这里我们不用配置视图解析器,Spring Boot会自动配置。当应用运行时,Spring Boot将会探测到类路径中的Thymeleaf,然后会自动配置视图解析器、模板解析器以及模板引擎)
#关闭thymeleaf的缓存
spring.thymeleaf.cache=false
#去掉html的校验
spring.thymeleaf.mode=LEGACYHTML5
注意:在使用springboot的过程中,如果使用thymeleaf作为模板文件,则要求HTML格式必须为严格的html5格式,必须有结束标签,否则会报错;如果不想对标签进行严格的验证,使用spring.thymeleaf.mode=LEGACYHTML5去掉验证,去掉该验证,则需要引入如下依赖(参考上面完整pom.xml的内容),否则会报错:
<dependency>
            <groupId>net.sourceforge.nekohtml</groupId>
            <artifactId>nekohtml</artifactId>
        </dependency>
        <dependency>
            <groupId>org.unbescape</groupId>
            <artifactId>unbescape</artifactId>
            <version>1.1.5.RELEASE</version>
        </dependency>
解释:NekoHTML是一个Java语言的 HTML扫描器和标签补全器 ,这个解析器能够扫描HTML文件并“修正”HTML文档中的常见错误。NekoHTML能增补缺失的父元素、自动用结束标签关闭相应的元素,修复不匹配的内嵌元素标签等;
四、IndexController.java将请求响应映射到页面(和SpringMVC基本一致)
package cn.com.winson.controller;

import org.springframework.stereotype.Controller;
import org.springframework.ui.Model;
import org.springframework.web.bind.annotation.GetMapping;

@Controller
public class IndexController {

    @GetMapping("/index")
    public String index(Model model) {
        model.addAttribute("data", "恭喜,Spring boot集成 Thymeleaf成功!");
        // return 中就是你页面的名字(不带.html后缀)
        return "index";
    }
}
五、在resources的templates下新建一个index.html页面:(使用Thymeleaf模板引擎后,springboot默认查找类根目录下的templates文件夹下的html页面,而不是/webapp目录下,默认路径更改了,注意,这与使用jsp不同,参考以前的博文《SpringBoot中使用jsp页面的方法》,对比一下,配核心配置文件也不同)
<!DOCTYPE html>
<html xmlns:th="http://www.thymeleaf.org">
<head>
<meta charset="UTF-8"/>
<title>Spring boot集成 Thymeleaf</title>
</head>
<body>
<p th:text="${data}">Spring boot集成 Thymeleaf</p>
</body>
</html>
注:在HTML页面的<html>元素中必须加入以下属性,否则无法识别Thymeleaf的标签:
<html xmlns:th="http://www.thymeleaf.org">
六、运行程序,访问结果为:

总结:
一、SpringBoot集成Thymeleaf模板引擎后,会自动配置视图解析器、模板解析器以及模板引擎,不像使用SpringMVC,需要再配置。而且,默认的视图位置为resources的templates目录下,所以如果你是使用Maven新建的SpringBoot工程,需要再resources目录下新建templates和static文件,static的作用为放置css、js文件,这些文件放到static目录中,SpringBoot默认就会去该路径下找资源。
二、注意Thymeleaf模板引擎严格遵循html5格式,即必须有结束标签,否则会报错;示例中提供了解决的办法(在核心配置文件中配置,去除html5格式验证,并需要引入两个依赖)。
三、本文未对Thymeleaf模板的使用语法进行总结,后续有时间,我再补充。
