在asp.net mvc 中, 有一个视图解析器, 可以支持Razor语法. 使用起来, 是非常的方便, 并且, 写在前台页面的后台方法, 是可调试的.
但是在java中, 目前我还没有接触到, 像.net vs 那么强大的功能.
对于mvc来说, 视图的解析, 是必不可少的. 实现的功能, 和上面是一样的, 而且, 有很多种, 例如: jsp, freemarker, thymeleaf 等.
这里, 我主要记录 thymeleaf 的一些学习笔记. 这里不牵涉原理, 只记录使用方法.
一. 添加依赖
<dependency>
    <groupId>org.springframework.boot</groupId>
    <artifactId>spring-boot-starter-thymeleaf</artifactId>
</dependency>
这里如果只添加到这里, 引用的版本, 是比较低的, 如果要使用自己特定的版本, 只需要在 pom.xml 的properties 中指定版本就行了.
<thymeleaf.version>3.0.5.RELEASE</thymeleaf.version>
<thymeleaf-layout-dialect.version>2.0.0</thymeleaf-layout-dialect.version>
二. spring boot 中, thymeleaf 的默认配置
这里首先看一下, 默认配置接收的类
/*
 * Copyright 2012-2017 the original author or authors.
 *
 * Licensed under the Apache License, Version 2.0 (the "License");
 * you may not use this file except in compliance with the License.
 * You may obtain a copy of the License at
 *
 *      http://www.apache.org/licenses/LICENSE-2.0
 *
 * Unless required by applicable law or agreed to in writing, software
 * distributed under the License is distributed on an "AS IS" BASIS,
 * WITHOUT WARRANTIES OR CONDITIONS OF ANY KIND, either express or implied.
 * See the License for the specific language governing permissions and
 * limitations under the License.
 */

package org.springframework.boot.autoconfigure.thymeleaf;

import java.nio.charset.Charset;

import org.springframework.boot.context.properties.ConfigurationProperties;
import org.springframework.util.MimeType;

/**
 * Properties for Thymeleaf.
 *
 * @author Stephane Nicoll
 * @since 1.2.0
 */
@ConfigurationProperties(prefix = "spring.thymeleaf")
public class ThymeleafProperties {

    private static final Charset DEFAULT_ENCODING = Charset.forName("UTF-8");

    private static final MimeType DEFAULT_CONTENT_TYPE = MimeType.valueOf("text/html");

    public static final String DEFAULT_PREFIX = "classpath:/templates/";

    public static final String DEFAULT_SUFFIX = ".html";

    /**
     * Check that the template exists before rendering it (Thymeleaf 3+).
     */
    private boolean checkTemplate = true;

    /**
     * Check that the templates location exists.
     */
    private boolean checkTemplateLocation = true;

    /**
     * Prefix that gets prepended to view names when building a URL.
     */
    private String prefix = DEFAULT_PREFIX;

    /**
     * Suffix that gets appended to view names when building a URL.
     */
    private String suffix = DEFAULT_SUFFIX;

    /**
     * Template mode to be applied to templates. See also StandardTemplateModeHandlers.
     */
    private String mode = "HTML5";

    /**
     * Template encoding.
     */
    private Charset encoding = DEFAULT_ENCODING;

    /**
     * Content-Type value.
     */
    private MimeType contentType = DEFAULT_CONTENT_TYPE;

    /**
     * Enable template caching.
     */
    private boolean cache = true;

    /**
     * Order of the template resolver in the chain. By default, the template resolver is
     * first in the chain. Order start at 1 and should only be set if you have defined
     * additional "TemplateResolver" beans.
     */
    private Integer templateResolverOrder;

    /**
     * Comma-separated list of view names that can be resolved.
     */
    private String[] viewNames;

    /**
     * Comma-separated list of view names that should be excluded from resolution.
     */
    private String[] excludedViewNames;

    /**
     * Enable MVC Thymeleaf view resolution.
     */
    private boolean enabled = true;

    ......
}
从这里可以看到, 默认的是 html 格式的, 且放在 classpath:/templates/ 目录下. 一般情况下, 我们不需要再对thymeleaf进行配置, 但是在开发的过程中, 可能要屏蔽缓存功能. 最后我们要做的, 只是将路径拼接进去就行了.
application.yml文件中, 可以禁用缓存.
spring:
  thymeleaf:
    cache: false
三. 基本使用
1. 表达式
变量表达式: ${...}
选择变量表达式: *{...}
URL表达式: @{...}
消息表达式: #{...}
片段表达式: ~{...}
2. 文字
文本: '123', 'abc'
数字: 1,2,0.5
布尔: true, false
空: null
3. 文本操作
字符串连接: +
文本替换: |双竖线隔起来 ${name}|
4. 算数运算符
二进制运算法(加减乘除,取模): + - * / %
5. 负号: -
6. 布尔运算符
and or not !
7. 比较和相等运算符
比较运算符(这里建议使用英文字符代替 > >= < <=) gt ge lt le
相等运算符: == !=
8. 条件运算符
三元运算符: if(...)? 'then' : 'else'
if(...)? 'then' 这里没有else, 因为else默认为 ''
为空判断 (aaa)?:bbb 如果aaa为空, 则使用bbb的值, 否则使用aaa
9. 哑操作符 _ (一个下划线)
接下来对以上部分进行测试.
controller:
package org.elvin.learn.springboot.controller;

import org.elvin.learn.springboot.pojo.Book;
import org.joda.time.DateTime;
import org.springframework.stereotype.Controller;
import org.springframework.ui.Model;
import org.springframework.web.bind.annotation.GetMapping;
import org.springframework.web.bind.annotation.RequestMapping;
import org.thymeleaf.util.MapUtils;

import java.util.*;

@Controller
@RequestMapping("thy")
public class ThyController {

    @GetMapping("index")
    public String index(Model model) {
        model.addAttribute("book0", null);

        Book book = new Book("springmvc", new DateTime().toString("yyyy-MM-dd"), 10000L);
        model.addAttribute("book", book);

        Book book1 = new Book("springboot", new DateTime().toString("yyyy-MM-dd"), 21000L);
        model.addAttribute("book1", book1);

        model.addAttribute("color", "red");
        model.addAttribute("msg", "welcome");
        model.addAttribute("nowTime", new Date());

        return "thy/index";
    }
}
html:
大体框架
<!DOCTYPE html>
<html xmlns:th="http://www.thymeleaf.org">
<head>
    <meta http-equiv="Content-Type" content="text/html; charset=UTF-8"/>
    <title>Title</title>
    <!--@ { } 链接网址表达式, 会自动加入虚拟路径-->
    <link th:href="@{/bootstrap-3.3.7/css/bootstrap.css}" rel="stylesheet"/>
    <link th:href="@{/bootstrap-3.3.7/css/bootstrap-theme.css}" rel="stylesheet"/>
    <style th:inline="css">
        /*通过[ [ $ { }]]的方式访问model中的属性*/
        .bgcolor {
            background-color: [[${color}]]
        }
    </style>
</head>
<body>


<script th:src="@{/js/jquery1.11.1/jquery-1.11.1.js}" type="text/javascript"></script>
<script th:src="@{/bootstrap-3.3.7/js/bootstrap.js}" type="text/javascript"></script>
<script th:inline="javascript">
    $(function () {
        var book = [[${book}]];
        console.log(book.name);
    });
</script>
</body>
</html>
数据准备:
在messages.properties中加入以下数据:
welcome=welcome here! {0}
hello={0} say hello to {1}
startWorkd=start from here
在templates中新建文件夹 common, 在下面建两个文件 footer.html, header.html
<!DOCTYPE html>
<html  xmlns:th="http://www.thymeleaf.org">
<head>
    <meta charset="UTF-8" />
    <title>Title</title>
</head>
<body>
    <div th:fragment="footerDiv">
        <p>common.footer 底部菜单</p>
    </div>
</body>
</html>

<!DOCTYPE html>
<html  xmlns:th="http://www.thymeleaf.org">
<head>
    <meta charset="UTF-8" />
    <title>Title</title>
</head>
<body>
    <div id="headerDiv">
        <p>common.header 头部菜单</p>
    </div>
</body>
</html>
接下来, 就是在里面添加内容了.
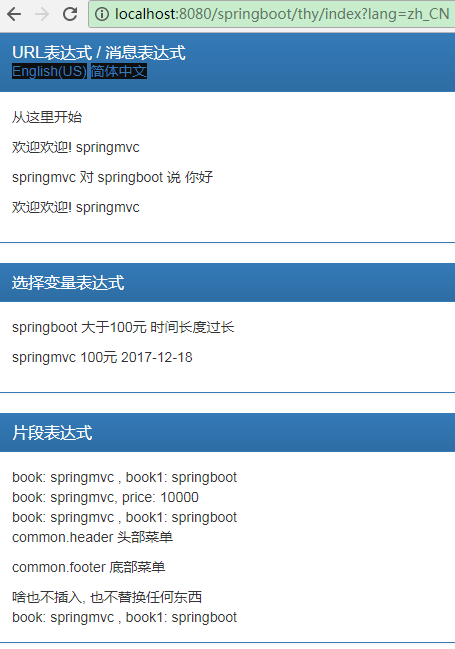
<div class="panel panel-primary">
    <div class="panel-heading">
        <h3 class="panel-title">URL表达式 / 消息表达式</h3>
        <!--
            URL 表达式
        -->
        <a style="background-color: #0f0f0f" th:href="@{/thy/index(lang='en_US')}">English(US)</a>
        <a style="background-color: #0f0f0f"
           th:href="@{http://localhost:8080/springboot/thy/index?lang=zh_CN}">简体中文</a>
    </div>
    <div class="panel-body">
        <!--
       1. # { }消息表达式 : 替换文本
       1.1 文本中, 预留参数
       1.2 消息key用变量替换
   -->
        <!--1.1 在消息中加入参数, 多个参数, 在传值的时候用逗号隔开-->
        <p th:text="#{startWorkd}"></p>
        <p th:utext="#{welcome(${book.name})}">hahaha</p>
        <p th:utext="#{hello(${book.name}, ${bookList[1].name})}">hahaha</p>
        <!--1.2 消息用变量替换-->
        <p th:utext="#{${msg}(${book.name})}">hahaha</p>
    </div>
</div>

<div class="panel panel-primary">
    <div class="panel-heading">
        <h3 class="panel-title">选择变量表达式</h3>
    </div>
    <div class="panel-body">
        <!-- 选择变量表达式 * { } -->
        <p th:object="${book0 ?: book1}">
            <span th:text="*{name}"></span>
            <span th:text="*{price gt 10000}?'大于100元':'小于等于100元'"></span>
            <span th:text="*{publishTime.length() ge 10}?'时间长度过长'"></span>
        </p>

        <p>
            <!--星号语法计算所选对象而不是整个上下文的表达式,
            所以, 只要没有选定的对象, $ 和 * 语法就完全相同-->
            <span th:text="*{book.name}"></span>
            <span th:text="*{book.price} / 100 + '元'"></span>
            <span th:text="*{book.publishTime}"></span>
        </p>
    </div>
</div>

<div class="panel panel-primary">
    <div class="panel-heading">
        <h3 class="panel-title">选择变量表达式</h3>
    </div>
    <div class="panel-body">
        <div style="display:none">
            <!--assert 都成立才会执行, 否则抛出异常
             th:assert="${!#strings.isEmpty(onevar)},${!#strings.isEmpty(twovar)}"
            -->
            <!--这里将模板定义成了函数的方式,
            temp1表示函数名, name1, name2 表示参数, 不同的是, 可以不写在这里, 直接在下面用的时候会写也可以-->
            <div th:fragment="temp1(name1, name2)">
                <span th:utext="|book: ${name1} , book1: ${name2}|"></span>
            </div>
            <!--th:assert="${price > 100}, ${!#strings.isEmpty(name)}"-->
            <div th:fragment="temp2">
                <span th:utext="'book: ' + ${name} + ', price: ' + ${price}"></span>
            </div>
        </div>

        <!--replace可以替换能成insert,但是他们之间是有区别的, insert会保留当前标签-->
        <div th:replace=":: temp1(${book.name}, ${book1.name})"></div>
        <div th:insert="~{:: temp2(name=${book.name}, price=${book.price})}"></div>
        <!--include官方3.0后不推荐使用-->
        <div th:include=":: temp1(name1=${book.name}, name2=${book1.name})"></div>

        <!--引入外部的文件中的某一部分内容-->
        <div th:insert="~{common/header :: #headerDiv}"></div>
        <div th:insert="~{common/footer :: footerDiv}"></div>

        <!--这里可以通过判断表达式来控制插入什么, 或者什么也不插入-->
        <div th:insert="_">啥也不插入, 也不替换任何东西</div>
        <div th:insert="${book0 == null}? ~{:: temp1(${book.name}, ${book1.name})}:~{}"></div>
    </div>
</div>
结果: