前言
前面redis弄了那么多, 就是为了在项目中使用.
那这里, 就分别来看一下, 单机版和集群版在springboot中的使用吧. 在里面, 我会同时贴出Jedis版, 作为比较.
单机版
1. pom.xml
<!-- https://mvnrepository.com/artifact/org.springframework.boot/spring-boot-starter-data-redis -->
<dependency>
    <groupId>org.springframework.boot</groupId>
    <artifactId>spring-boot-starter-data-redis</artifactId>
    <version>1.5.9.RELEASE</version>
</dependency>
2. application.yml
spring:
  redis:
    port: 6379
    host: 127.0.0.1
    password: redis
这里为redis设置了一个密码, 可以在 redis.conf 文件中设置: requirepass 密码
3. controller
@RestController
@RequestMapping("simple")
public class SimpleController {

    @Autowired
    private StringRedisTemplate stringRedisTemplate;

    @GetMapping("set")
    public void set(){

        ValueOperations<String, String> operations = stringRedisTemplate.opsForValue();
        operations.set("1", "1a");
        operations.set("2", "2b");
        operations.set("3", "3c");
        operations.set("4", "4d");
        operations.set("5", "5e");
        operations.set("elvin", "elvin");
        operations.set("abc", "abc");
        operations.set("xingming", "xingming");
    }
}
4. Jedis
来看一下单机版redis下, Jedis是怎么玩的.
  @Test
    public void testJedisPool() throws Exception {
        // 第一步:创建一个JedisPool对象。需要指定服务端的ip及端口。
        JedisPool jedisPool = new JedisPool("127.0.0.1", 6379);
        // 第二步:从JedisPool中获得Jedis对象。
        Jedis jedis = jedisPool.getResource();
        jedis.auth("redis");
        // 第三步:使用Jedis操作redis服务器。
        String result = jedis.get("abc");
        System.out.println(result);
        // 第四步:操作完毕后关闭jedis对象,连接池回收资源。
        jedis.close();
        // 第五步:关闭JedisPool对象。
        jedisPool.close();
    }
结果我就不展示了, 通过以上步骤, 能把controller存入的数据, 读取出来.
这里有一点要注意以下, 如果步骤3用的不是StringRedisTemplate, 而是RedisTemplate, 那么通过步骤4是读取不出来的.
如果你装了 redis desktop manager , 可以使用这个去看一下, 就会知道为啥读不出来.
具体为啥会产生这样的情况呢?
可以看一下RedisTemplate的源码:

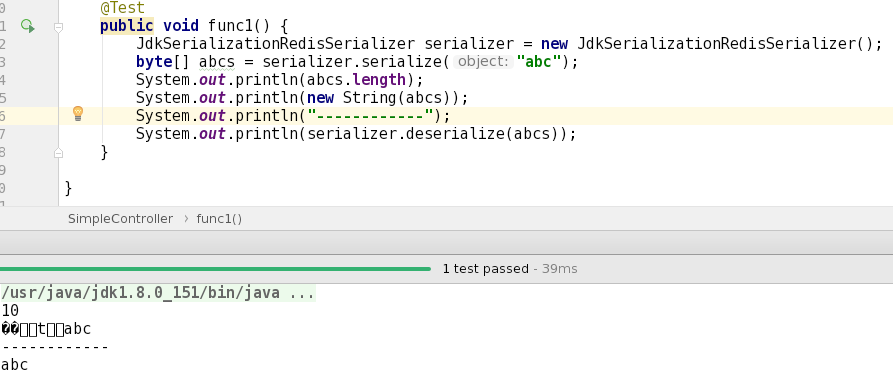
看得出来, 这里使用了 JdkSerializationRedisSerializer 来序列化 key 和 value.
直观点的话, 可以看下图:

so, 这里就能看出来, 为啥用abc直接去查, 是查不到想要的结果的.
集群版
在集群里面, 如果你使用的是 spring-boot-starter-data-redis 的话, 就会发现, 超方便, 只要改一下配置文件就可以了, 其他的都可以不改.
1. application.yml
spring:
  redis:
    cluster:
      nodes:
       - 127.0.0.1:7001
       - 127.0.0.1:7002
       - 127.0.0.1:7003
       - 127.0.0.1:7004
       - 127.0.0.1:7005
       - 127.0.0.1:7006
    password: 123456
在application里面配置集群节点.
2. controller
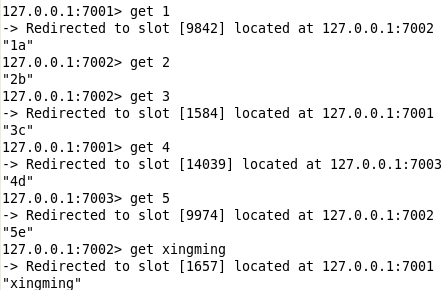
controller里面的方法不变, 还是用那个. 直接用 Terminal 操作查看:

确实存进去了.
3. Jedis
  @Test
    public void testJedisCluster() throws Exception {
        // 第一步:使用JedisCluster对象。需要一个Set<HostAndPort>参数。Redis节点的列表。
        Set<HostAndPort> nodes = new HashSet<>();
        nodes.add(new HostAndPort("127.0.0.1", 7001));
        nodes.add(new HostAndPort("127.0.0.1", 7002));
        nodes.add(new HostAndPort("127.0.0.1", 7003));
        nodes.add(new HostAndPort("127.0.0.1", 7004));
        nodes.add(new HostAndPort("127.0.0.1", 7005));
        nodes.add(new HostAndPort("127.0.0.1", 7006));
        JedisCluster jedisCluster = new JedisCluster(nodes, 2000, 5, 8, "123456", new GenericObjectPoolConfig());
        // 第二步:直接使用JedisCluster对象操作redis。在系统中单例存在。
        String result = jedisCluster.get("abc");
        // 第三步:打印结果
        System.out.println(result);
        // 第四步:系统关闭前,关闭JedisCluster对象。
        jedisCluster.close();
    }
这里有个比较蛋疼的事情就是, 如果集群设置了密码, 并不能通过jedisCluster.auth()方式来输入密码

刚开始, 我还以为这是不推荐使用的, 谁知道, 这tm是不能用啊. 过分了, 简直.
通过Jedis的代码, 可以发现, 单机版和集群版, 操作的对象是不一样的, 那么在开发的过程中, 怎么来统一呢?(开发的时候, 不需要使用redis集群, 上线的时候, 直接切换过去就可以了)
那么想要解决这个问题, 可以通过策略模式来解决, 定义一个操作接口, 在接口中定义方法, 我管你单机还是集群, 都要来实现这个接口. 那么在操作的过程中, 就统一到接口了. 剩下来的就是赋值和切换了.
而使用 spring-boot-starter-data-redis 就不需要考虑那么多了, 确实方便许多.