一.服务发现
服务发现组件记录了(大规模)分布式系统中所有服务的信息,其它服务可以据此找到这些服务。DNS 就是一个简单的例子。当然,复杂系统的服务发现组件要提供更多的功能,例如,服务元数据存储、健康监控、多种查询和实时更新等。
服务发现是支撑大规模 SOA 的核心服务。
为什么需要服务发现呢?
假设我们写的代码会调用WebService、Rest Api、 Thrift API 的服务。在调用过程中,为了完成一次请求,代码需要知道服务实例的网络位置(IP 地址和端口)。
整个过程,对于基于云端的、现代化的微服务应用而言,这却是一大难题。
1.1 单体应用
假设你是项目经理或者公司的架构师,正准备组织团队开发一款产品,类似滴滴与Uber的出租车调度软件。其中系统的核心业务有:客户端、司机端、定位、通知、支付。
传统的架构图为:六边形架构(即模块化的单体是应用),也称单体式应用,如下图
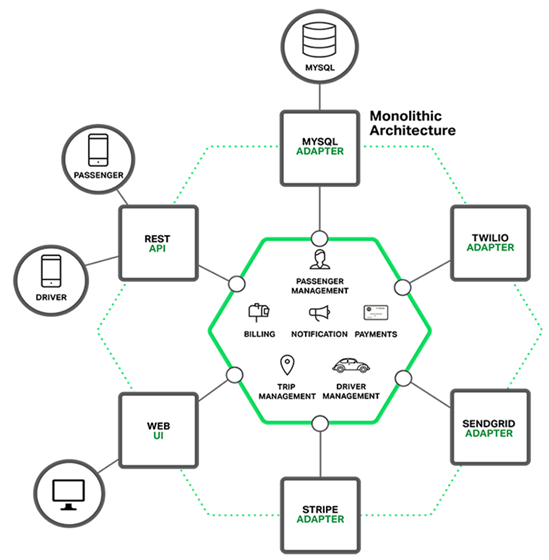
单体应用的不足
这种简单方法却有很大的局限性。
一个简单的应用会随着时间推移逐渐变大。在每次的迭代中,开发团队都会面对新“故事”(需求),然后开发许多新代码。几年后,这个小而简单的应用会变成了一个巨大的怪物。如果有经验的管理者都知道,一旦你的应用变成一个又大又复杂的怪物,那开发团队肯定很痛苦。
敏捷开发和部署举步维艰,其中最主要问题就是这个应用太复杂,以至于任何单个开发者都不可能搞懂它。
降低开发速度
不利于持续性开发
模块相互冲突
可靠性低
重构困难
1.2微服务
随着时间的发展和项目的发展,业务团队越来越庞大,业务越来越复杂,单体应用架构已经无法满足项目需求,所以微服务就腾空出世了。许多公司,比如Amazon、eBay,通过采用微处理结构模式解决了单体应用出现的问题。
其思路不是开发一个巨大的单体式的应用,而是将应用分解为小的、互相连接的微服务。
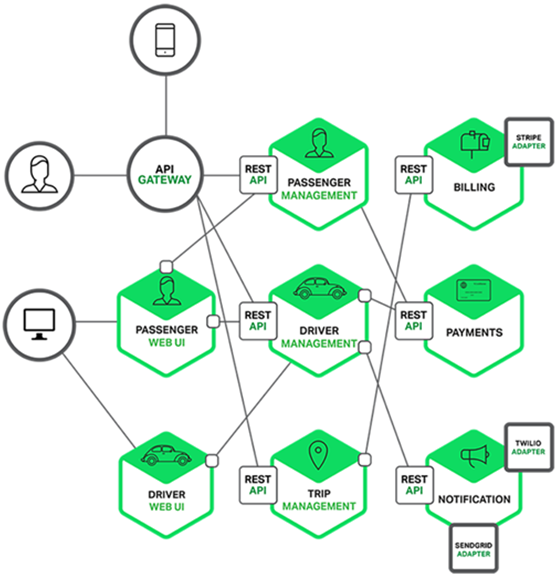
微服务架构的好处
单个服务很容易开发、理解和维护。
这种架构使得每个服务都可以有专门开发团队来开发。
微服务架构模式是每个微服务独立的部署。
微服务架构模式使得每个服务独立扩展。
微服务架构的不足
微服务应用是分布式系统,由此会带来固有的复杂性。
服务地址目录,服务健康度,部署困难,服务依赖问题,数据库分区问题。
如何解决微服务出现的这些问题呢?服务发现框架在这时就闪亮登场了。
常用服务发现框架consul、zookeeper及etcd比较:

ZooKeeper是这种类型的项目中历史最悠久的之一,它起源于Hadoop。它非常成熟、可靠,被许多大公司(YouTube、eBay、雅虎等)使用。
etcd是一个采用HTTP协议的健/值对存储系统,它是一个分布式和功能层次配置系统,可用于构建服务发现系统。其很容易部署、安装和使用,提供了可靠的数据持久化特性。它是安全的并且文档也十分齐全。
二.consul概述
Consul是HashiCorp公司推出的开源工具,用于实现分布式系统的服务发现与配置。与其他分布式服务注册与发现的方案相比,Consul的方案更“一站式”,内置了服务注册与发现框架、分布一致性协议实现、健康检查、Key/Value存储、多数据中心方案,不再需要依赖其他工具(比如ZooKeeper等),使用起来也较为简单。
Consul用Golang实现,因此具有天然可移植性,安装包仅包含一个可执行文件,方便部署,与Docker等轻量级容器可无缝配合。
要想利用Consul提供的服务实现服务的注册与发现,我们需要建立Consul Cluster。在Consul方案中,每个提供服务的节点上都要部署和运行Consul的Client Agent,所有运行Consul Agent节点的集合构成Consul Cluster。Consul Agent有两种运行模式:Server和Client。这里的Server和Client只是Consul集群层面的区分,与搭建在Cluster之上的应用服务无关。以Server模式运行的Consul Agent节点用于维护Consul集群的状态,官方建议每个Consul Cluster至少有3个或以上的运行在Server Mode的Agent,Client节点不限。
每个被注册到consul中的node上,都部署一个consul agent,这个agent负责对本地的服务进行监控检查,以及将查询请求转发给consul server。consul server负责存放、备份数据(使用raft协议保证一致性),通常要有多台形成集群,选举出一个leader。查询服务地址的时候,可以直接向consul server发起查询,也可以通过consul agent查询,后者将转发给consul server。如果是多数据中心,每个数据中心部署一组consul server。跨数据中心查询通过本数据中心的consul server进行。注意:多数据中心的时候,不同数据中心的consul server之间不会同步key-value数据。
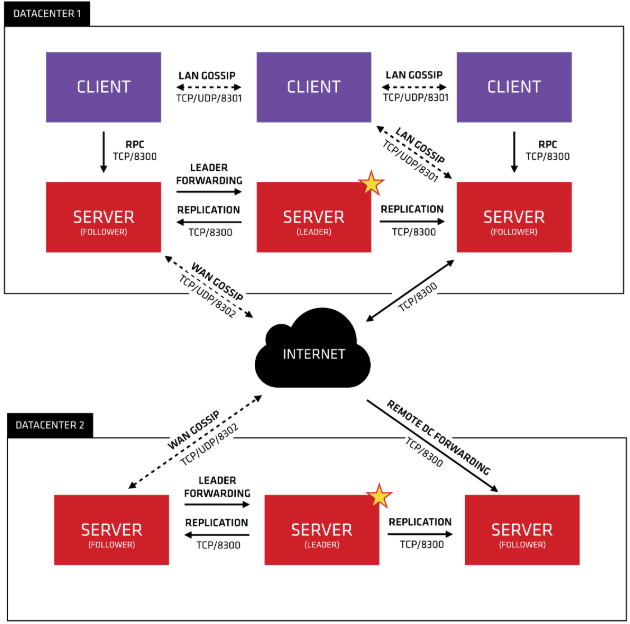
@client
CLIENT表示consul的client模式,就是客户端模式。是consul节点的一种模式,这种模式下,所有注册到当前节点的服务会被转发到SERVER,本身是不持久化这些信息。
@server
SERVER表示consul的server模式,表明这个consul是个server,这种模式下,功能和CLIENT都一样,唯一不同的是,它会把所有的信息持久化的本地,这样遇到故障,信息是可以被保留的。
@server-leader
中间那个SERVER下面有LEADER的字眼,表明这个SERVER是它们的老大,它和其它SERVER不一样的一点是,它需要负责同步注册的信息给其它的SERVER,同时也要负责各个节点的健康监测。
@raft
server节点之间的数据一致性保证,一致性协议使用的是raft,而zookeeper用的paxos,etcd采用的也是raft。
@服务发现协议
consul采用http和dns协议,etcd只支持http
@服务注册
consul支持两种方式实现服务注册,一种是通过consul的服务注册http API,由服务自己调用API实现注册,另一种方式是通过json个是的配置文件实现注册,将需要注册的服务以json格式的配置文件给出。consul官方建议使用第二种方式。
@服务发现
consul支持两种方式实现服务发现,一种是通过http API来查询有哪些服务,另外一种是通过consul agent 自带的DNS(8600端口),域名是以NAME.service.consul的形式给出,NAME即在定义的服务配置文件中,服务的名称。DNS方式可以通过check的方式检查服务。
@服务间的通信协议
Consul使用gossip协议管理成员关系、广播消息到整个集群,他有两个gossip pool(LAN pool和WAN pool),LAN pool是同一个数据中心内部通信的,WAN pool是多个数据中心通信的,LAN pool有多个,WAN pool只有一个。
三.consul应用
consul的三个主要应用场景:服务发现、服务隔离、服务配置。
服务发现场景中,consul作为注册中心,服务地址被注册到consul中以后,可以使用consul提供的dns、http接口查询,consul支持health check。
服务隔离场景中,consul支持以服务为单位设置访问策略,能同时支持经典的平台和新兴的平台,支持tls证书分发,service-to-service加密。
服务配置场景中,consul提供key-value数据存储功能,并且能将变动迅速地通知出去,通过工具consul-template可以更方便地实时渲染配置文件。
consul是一个二进制文件,可独立运行,直接从官网下载解压后保存到/usr/local/bin下即可:https://www.consul.io/downloads.html。
#consul -h
Usage: consul [--version] [--help] <command> [<args>]

Available commands are:
acl            Interact with Consul's ACLs
    agent          Runs a Consul agent
    catalog        Interact with the catalog
    connect        Interact with Consul Connect
    debug          Records a debugging archive for operators
    event          Fire a new event
    exec           Executes a command on Consul nodes
    force-leave    Forces a member of the cluster to enter the "left" state
    info           Provides debugging information for operators.
    intention      Interact with Connect service intentions
    join           Tell Consul agent to join cluster
    keygen         Generates a new encryption key
    keyring        Manages gossip layer encryption keys
kv             Interact with the key-value store
    leave          Gracefully leaves the Consul cluster and shuts down
    lock           Execute a command holding a lock
maint          Controls node or service maintenance mode
    members        Lists the members of a Consul cluster
    monitor        Stream logs from a Consul agent
    operator       Provides cluster-level tools for Consul operators
    reload         Triggers the agent to reload configuration files
rtt            Estimates network round trip time between nodes
    services       Interact with services
    snapshot       Saves, restores and inspects snapshots of Consul server state
tlsBuiltin helpers for creating CAs and certificates
    validate       Validate config files/directories
    version        Prints the Consul version
    watch          Watch for changes in Consul
consul必须启动agent才能使用,有两种启动模式server和client,还有官方自带的ui。
#consul agent  -bootstrap-expect 1  -server   -data-dir /data/consul0 -node=cn1 -bind=192.168.1.202 -config-dir /etc/consul.d -enable-script-checks=true  -datacenter=dc1
#consul agent  -ui  -data-dir /data/consul0 -node=cn4 -bind=192.168.1.198  -client 192.168.1.198   -config-dir /etc/consul.d -enable-script-checks=true  -datacenter=dc1  -join 192.168.1.202
参数解释:
-bootstrap-expect=<value>:集群期望的节点数,只有节点数量达到这个值才会选举leader。
-server: 运行在server模式
-client=<value>:consul服务侦听地址,这个地址提供HTTP、DNS、RPC等服务,默认是127.0.0.1所以不对外提供服务,如果你要对外提供服务改成0.0.0.0
-data-dir=<value>:指定数据目录,其他的节点对于这个目录必须有读的权限
-node=<value>:指定节点的名称
-bind=<value>:为该节点绑定一个地址,默认为0.0.0.0,即主机IP
-config-dir=<value>:指定配置文件,定义服务,默认所有.json结尾的文件都会被载入。
-enable-script-checks=true:设置检查服务为可用
-datacenter=<value>: 数据中心名称,
-join=<value>:加入到已有的集群中
-ui:使能内置的静态web UI服务器
-ui-dir=<value>:指向web UI资源的路径,此路径必须可读。
-retry-join=<value>:要join的server IP
-retry-interval=<value>:尝试join网络的时间间隔
-rejoin:忽略leave重新join
-log-level=<value>:agent log level
常用命令如下:
1)information
#consul info
可以在raft:stat看到此节点的状态是Fllower或者leader
2)列出集群成员
#consul members
3)新加入一个节点有几种方式;
这种方式,重启后不会自动加入集群
#consul join 192.168.1.202
在启动的时候使用-join指定一个集群
#consul agent -ui -data-dir /data/consul0 -node=cn4 -bind=192.168.1.198 -config-dir /etc/consul.d -enable-script-checks=true -datacenter=dc1 -join 192.168.1.202
使用-startjoin或-rejoin
#consul agent -ui -data-dir /data/consul0 -node=cn4 -bind=192.168.1.198 -config-dir /etc/consul.d -enable-script-checks=true -datacenter=dc1 -rejoin
4)consul默认绑定的端口
8300:Server RPC address
8301:lan gossip,the Serf LAN port
8302:wan gossip,the Serf WAN port
8500:http api端口
8501:httpsapi端口,默认disabled
8502:gRPCapi端口,默认disabled
8600:DNS服务端口
21000:Sidecar Proxy Min: Inclusive min port number to use for automatically assigned sidecar service registrations.
21255:Sidecar Proxy Max: Inclusive max port number to use for automatically assigned sidecar service registrations.
5)健康检查
check使用来做服务的健康检查的,可以拥有多个,也可以不使用支持多种方式检查。check必须是script或者TTL类型的,如果是script类型则script和interval变量必须被提供,如果是TTL类型则ttl变量必须被提供。script是consul主动去检查服务的健康状况,ttl是服务主动向consul报告自己的状况。
script check:
{
  "check":{
      "id": mutil-memory,
      "name": "memory utilization",
      "tags": ["system"],
      "script": "/etc/init.d/check_memory.py",
      "interval": "10s",
      "timeout": "1s"
     }
}
http check:
{
  "check": {
       "id": "api",
       "name": "HTTP API  500",
       "http": "http://loclhost:500/health",
        "interval": "10s",
        "timeout": "1s"
    }
}
tcp check:
{
  "check": {
      "id": "ssh",
      "name": "ssh TCP 26622",
      "tcp": "localhost:26622",
      "interval": "10s",
      "timeout": "1s"
     }
}
ttl check:
{
   "check": {
       "id": "web-app",
       "name": "Web APP status",
       "notes": "Web APP does a curl  internally every 10 seconds",
       "ttl": "30s"
    }
}
6)服务注册
注册服务有三种方式。
通过配置文件的方式静态注册
保存json配置文件到consul配置目录,重启consul,并将配置文件的路径给consul。
通过HTTP API接口来动态注册
直接调用/v1/agent/service/register接口注册即可,需要注意的是:http method为PUT提交方式,如:
curl -X PUT -d '{"id": "jetty","name": "jetty","address": "192.168.1.200","port": 8080,"tags": ["dev"],"checks": [{"http": "http://192.168.1.104:9020/health","interval": "5s"}]}' http://192.168.1.100:8500/v1/agent/service/register
注意:这种方式,和上面的注册方式有一点不一样,body的参数,是上面service的值。
使用程序实现服务的注册和发现(Java)
7)查询服务
#consul catalog services
consul
edgex-core-command
edgex-core-data
edgex-core-metadata
edgex-export-client
edgex-export-distro
edgex-mongo
edgex-support-logging
edgex-support-notifications
edgex-support-rulesengine
edgex-support-scheduler
或者通过httpapi查询:
#curl 127.0.0.1:8500/v1/catalog/services
#curl 127.0.0.1:8500/v1/catalog/service/edgex-mongo
查询agent上所有服务:
#curl 127.0.0.1:8500/v1/agent/services
8)删除服务
curl --request PUT http://127.0.0.1:8500/v1/agent/service/deregister/edgex-mongo
四.集群搭建
在一台主机上通过docker容器方式分别运行1个server和3个client,docker容器基于ubuntu:16.04,在此基础上安装ifconfig(net-tools),ping工具包用于基础应用和consul,并提交为新镜像:
docker commit -m="ubuntu16.04_ifconfig_ping_consul" ubuntu16.04_ifconfig_ping_consul
然后server容器执行下列命令:
docker run -it -v /consul/config:/consul/config -v /consul/data:/consul/data -p 8300:8300 -p 8400:8400 -p 8500:8500 --name=u2 ubuntu16.04_ifconfig_ping_consul /bin/bash
consul agent  -ui -bootstrap-expect 1  -server -data-dir /consul/data -node=cn1 -config-dir /consul/config -enable-script-checks=true  -datacenter=dc1 -client=0.0.0.0
三个client容器创建命令:
docker run -it -v /consul/config1:/consul/config -v /consul/data1:/consul/data --name=u21 ubuntu16.04_ifconfig_ping_consul /bin/bash
docker run -it -v /consul/config2:/consul/config -v /consul/data2:/consul/data --name=u22 ubuntu16.04_ifconfig_ping_consul /bin/bash
docker run -it -v /consul/config3:/consul/config -v /consul/data3:/consul/data --name=u23 ubuntu16.04_ifconfig_ping_consul /bin/bash
三个client运行consul agent:
consul agent  -data-dir /consul/data -node=cn12  -config-dir /consul/config -enable-script-checks=true  -datacenter=dc1  -join 192.168.111.2
consul agent  -data-dir /consul/data -node=cn13  -config-dir /consul/config -enable-script-checks=true  -datacenter=dc1  -join 192.168.111.2
consul agent  -data-dir /consul/data -node=cn14  -config-dir /consul/config -enable-script-checks=true  -datacenter=dc1  -join 192.168.111.2
注:4个容器模拟4台主机,共享文件名不可相同(否则创建错误),只有server配置WebUI并暴露端口。
# consul members
Node  Address             Status  Type    Build  Protocol  DC   Segment
cn1   192.168.111.2:8301  alive   server  1.4.4  2         dc1  <all>
cn12  192.168.111.3:8301  alive   client  1.4.4  2         dc1  <default>
cn13  192.168.111.4:8301  alive   client  1.4.4  2         dc1  <default>
cn14  192.168.111.5:8301  alive   client  1.4.4  2         dc1  <default>
可通过此访问consul:http://192.168.134.144:8500。
在一个client上运行web服务(如cn12),web.json内容(启动consul时check错误,可先去掉check):
{
    "service":{
        "name":"web",
        "tags":[
            "rails"
        ],
        "port":9090,
        "check":{
            "name":"ping",
            "script":"curl -s localhost:9090",
            "interval":"3s"
        }
    }
}
web服务采用go,即web.go:
package main
import (
    "io"
    "log"
    "net/http"
    "strconv"
    "fmt"
)
var iCnt  int = 0;

funchelloHandler(w http.ResponseWriter, r *http.Request)  {
iCnt++;
str :="Hell world ! friend("+ strconv.Itoa(iCnt)+")"
io.WriteString(w,str)
fmt.Println(str)
}

funcmain(){
http.HandleFunc("/", helloHandler)
err := http.ListenAndServe(":9090",nil)
    if err != nil{
log.Fatal("ListenAndserve:",err.Error())
    }
}
go build -o web web.go
在cn1上运行web并重启consul,可在其他主机上(如cn13)运行如下命令探测到相关服务,或通过ui查看到web service。
# dig @127.0.0.1 -p 8600 web.service.consul SRV

; <<>>DiG 9.10.3-P4-Ubuntu <<>> @127.0.0.1 -p 8600 web.service.consul SRV
; (1 server found)
;; global options: +cmd
;; Got answer:
;; ->>HEADER<<- opcode: QUERY, status: NOERROR, id: 43630
;; flags: qr aa rd; QUERY: 1, ANSWER: 1, AUTHORITY: 0, ADDITIONAL: 3
;; WARNING: recursion requested but not available

;; OPT PSEUDOSECTION:
; EDNS: version: 0, flags:;udp: 4096
;; QUESTION SECTION:
;web.service.consul.        IN    SRV

;; ANSWER SECTION:
web.service.consul.    0    IN    SRV    1 1 9090 cn12.node.dc1.consul.

;; ADDITIONAL SECTION:
cn12.node.dc1.consul.    0    IN    A    192.168.111.3
cn12.node.dc1.consul.    0    IN    TXT    "consul-network-segment="

;; Query time: 2 msec
;; SERVER: 127.0.0.1#8600(127.0.0.1)
;; WHEN: Mon May 06 09:26:18 UTC 2019
;; MSG SIZE  rcvd: 139
参考:
1. https://www.consul.io/intro/index.html
3. Zookeeper vs etcd vs Consul
4. 基于Consul的数据库高可用架构利用consul实现Redis和mysql高可用具体方案
9. https://docs.edgexfoundry.org/Ch-APICoreServiceConfiguration.html