由于之前已经在Ubuntu 14.04 x64上面安装cuda7.0+caffe, 并且已经配置好,caffe也已经跑通。
但是最近需要使用Torch,而Torch对cuda的要求是8.0,因此决定对cuda的版本进行升级,以满足Torch平台的需求。
而最新版的caffe也已经支持cuda8.0。
话不多说,开始安装cuda8.0。
1. 电脑配置
显卡:GeForce GTX TITAN X
系统:Ubuntu 14.04(x_64)
CUDA:cuda_8.0.61_375.26_linux.run
cuDNN:cudnn-8.0-linux-x64-v5.1.tgz
2. CUDA 8.0安装
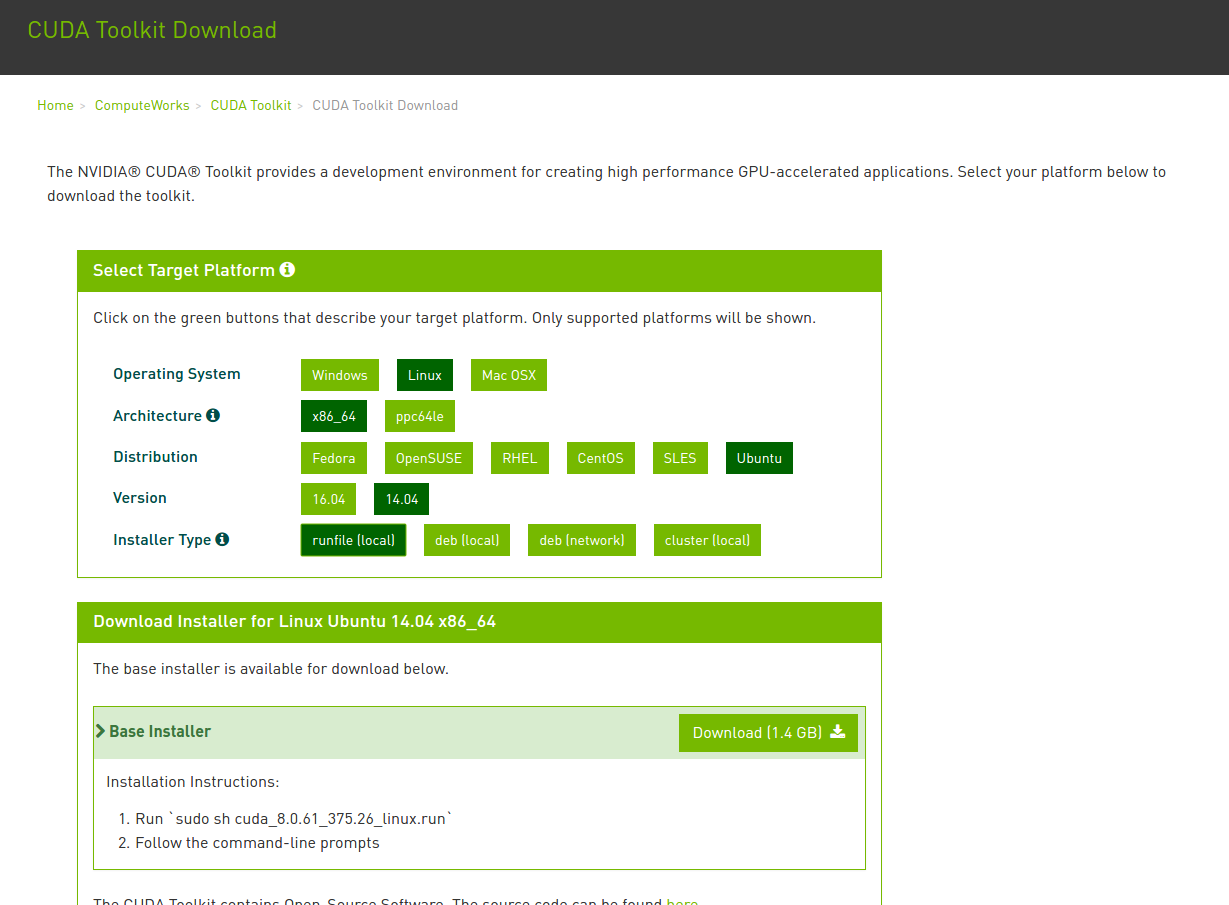
1. GeForce GTX TITAN X显卡必须用CUDA 8.0版本。CUDA从此处下载。切记,千万不要下载 deb 包,否则后方无数坑在等着你。
sudo sh cuda_8.0.61_375.26_linux.run
GTX1080显卡必须用cuDNN-8.0-V5.1版本,不然用 caffe 跑模型,用 CPU或GPU显卡跑精度正常,一旦开启cuDNN模式,精度(acc)立刻下降到 0.1 左右,loss 非常大。cuDNN在此处下载。下载需注册。最好注册一个账号,选择对应的版本,不要用网上其他教程给的现成的包,出问题的概率非常大。

注:此时安装过程中提示是否要安装NVIDIA驱动时选择no。其他选择yes或默认即可。
Do you accept the previously read EULA?
accept/decline/quit: accept
Install NVIDIA Accelerated Graphics Driver for Linux-x86_64 375.26?
(y)es/(n)o/(q)uit: n
Install the CUDA 8.0 Toolkit?
(y)es/(n)o/(q)uit: y
Enter Toolkit Location
[ default is /usr/local/cuda-8.0 ]:
Do you want to install a symbolic link at /usr/local/cuda?
(y)es/(n)o/(q)uit: y
Install the CUDA 8.0 Samples?
(y)es/(n)o/(q)uit: y
Enter CUDA Samples Location
[ default is /home/startag]: Installing the CUDA Toolkit in /usr/local/cuda-8.0 …
完成后可以看到以下提示信息:
Driver: Not Selected
Toolkit: Installed in /usr/local/cuda-8.0
Samples: Installed in /home/startag, but missing recommended libraries
3. 安装过程中问题解决
3.1 显卡驱动冲突
如果在安装过程中安装了cuda8.0的显卡驱动,这时候在重启过程中,会与原先安装的Nvidia显卡驱动冲突,开机时会一直有一个图标闪动。
这时候ctrl + Alt +F1~7 均没有反应,这是因为两个版本的显卡驱动不符,冲突导致。
解决方案为:
重启(reboot)-> Esc 键 -> Ubuntu Recovery 模式
在等待一段时间之后,会进入一个选择界面,选择 root 模式,进入命令行模式之后,使用下面命令卸载Nvidia显卡驱动:
sudo apt-get purge nvidia-*
把nvidia全卸了,再reboot就能进去了。
如果在使用上面命令过程中出现apt-get不能使用的情况,那么需要使用fix 模式来对broken package进行修复,待修复完成之后再进入root 模式下卸载Nvidia显卡驱动。
解决方案见:Ubuntu GNOME 16.04,安装NVIDIA驱动后无法开机,怎么解决?
重启之后即可正常运行 cuda 程序。
Cuda 8.0 以及 Sample 安装检查:
在安装完成之后,需要检查cuda程序是否安装成功:
进入/usr/local/cuda/samples, 执行下列命令来build samples
sudo make all -j8
全部编译完成后, 进入 ./bin/x86_64/linux/release, 运行deviceQuery
./deviceQuery
如果出现下面信息,
CUDA Device Query (Runtime API) version (CUDART static linking)
cudaGetDeviceCount returned 30
-> unknown error
Result = FAIL
则需要使用chmod 777 -R deviceQuery 方法来给deviceQuery文件sudo 权限,解决方案见:CUDA deviceQuery returned 30 error After upgrade to nvidia 334.21-1
出现下面信息,则说明cuda 以及 cuda sample安装成功:
CUDA Device Query (Runtime API) version (CUDART static linking)

Detected 1 CUDA Capable device(s)

Device 0: "GeForce GTX TITAN X"
  CUDA Driver Version / Runtime Version          8.0 / 8.0
  CUDA Capability Major/Minor version number:    5.2
  Total amount of global memory:                 12199 MBytes (12791185408 bytes)
  (24) Multiprocessors, (128) CUDA Cores/MP:     3072 CUDA Cores
  GPU Max Clock rate:                            1076 MHz (1.08 GHz)
  Memory Clock rate:                             3505 Mhz
  Memory Bus Width:                              384-bit
  L2 Cache Size:                                 3145728 bytes
  Maximum Texture Dimension Size (x,y,z)         1D=(65536), 2D=(65536, 65536), 3D=(4096, 4096, 4096)
  Maximum Layered 1D Texture Size, (num) layers  1D=(16384), 2048 layers
  Maximum Layered 2D Texture Size, (num) layers  2D=(16384, 16384), 2048 layers
  Total amount of constant memory:               65536 bytes
  Total amount of shared memory per block:       49152 bytes
  Total number of registers available per block: 65536
  Warp size:                                     32
  Maximum number of threads per multiprocessor:  2048
  Maximum number of threads per block:           1024
  Max dimension size of a thread block (x,y,z): (1024, 1024, 64)
  Max dimension size of a grid size    (x,y,z): (2147483647, 65535, 65535)
  Maximum memory pitch:                          2147483647 bytes
  Texture alignment:                             512 bytes
  Concurrent copy and kernel execution:          Yes with 2 copy engine(s)
  Run time limit on kernels:                     Yes
  Integrated GPU sharing Host Memory:            No
  Support host page-locked memory mapping:       Yes
  Alignment requirement for Surfaces:            Yes
  Device has ECC support:                        Disabled
  Device supports Unified Addressing (UVA):      Yes
  Device PCI Domain ID / Bus ID / location ID:   0 / 1 / 0
  Compute Mode:
     < Default (multiple host threads can use ::cudaSetDevice() with device simultaneously) >

deviceQuery, CUDA Driver = CUDART, CUDA Driver Version = 8.0, CUDA Runtime Version = 8.0, NumDevs = 1, Device0 = GeForce GTX TITAN X
Result = PASS
也可以使用下面命令测试是否安装成功:
nvidia-smi
输出信息:
Thu May 25 20:33:01 2017
+-----------------------------------------------------------------------------+
| NVIDIA-SMI 375.26                 Driver Version: 375.26                    |
|-------------------------------+----------------------+----------------------+
| GPU  Name        Persistence-M| Bus-Id        Disp.A | Volatile Uncorr. ECC |
| Fan  Temp  Perf  Pwr:Usage/Cap|         Memory-Usage | GPU-Util  Compute M. |
|===============================+======================+======================|
|   0  GeForce GTX TIT...  Off  | 0000:01:00.0      On |                  N/A |
| 22%   40C    P8    17W / 250W |    500MiB / 12198MiB |      0%      Default |
+-------------------------------+----------------------+----------------------+

+-----------------------------------------------------------------------------+
| Processes:                                                       GPU Memory |
|  GPU       PID  Type  Process name                               Usage      |
|=============================================================================|
|    0      1275    G   /usr/lib/xorg/Xorg                             267MiB |
|    0      2416    G   compiz                                         106MiB |
|    0      2978    G   ...el-token=EFAC54A3CB4FC0DBAF418394276E4C3B   124MiB |
+-----------------------------------------------------------------------------+
3.2 caffe编译警告问题
在对caffe进行编译时,出现以下问题:
使用make all -j16 时,出现以下警告信息:
NVCC src/caffe/layers/sigmoid_layer.cu
nvcc warning : The 'compute_20', 'sm_20', and 'sm_21' architectures are deprecated, and may be removed in a future release (Use -Wno-deprecated-gpu-targets to suppress warning).
解决方案:
3.3 caffe编译libcudart.so 连接问题
make runtest -j16时,出现以下警告信息:
.build_release/tools/caffe
.build_release/tools/caffe: error while loading shared libraries: libcudart.so.7.0: cannot open shared object file: No such file or directory
解决方案:
这是由于cuda安装成功后,还需要将对应的opencv版本使用新安装的cuda进行编译。
安装完成cuda8.0之后,caffe所需要的opencv版本也需要和cuda相适应,需要使用新的cuda版本对opencv进行编译。
因为原先安装的cuda版本为cuda7.0, 而opencv的版本为3.0, 因此电脑中的libopencv 相关库是使用cuda7.0编译,依赖于cuda7.0,因此我们需要对opencv进行重新编译。
而由于opencv 3.0暂时还不支持cuda8.0,使用cuda8.0编译opencv方法见:GraphCut deprecated in CUDA 7.5 and removed in 8.0

如果对opencv3.0.0修改之后还是不能成功编译,那么推荐caffe官方的opencv 版本进行编译。opencv3.1.0下载:https://github.com/opencv/opencv
opencv 3.1.0 使用cuda8.0编译方法见: OpenCV 3.1 Installation Guide on Ubuntu 16.04
进入下载好的opencv3.1.0文件夹,执行下面命令进行编译:
mkdir build
cd build/
cmake -D CMAKE_BUILD_TYPE=RELEASE -D CMAKE_INSTALL_PREFIX=/usr/local -D WITH_TBB=ON -D WITH_V4L=ON -D WITH_QT=ON -D WITH_OPENGL=ON -D WITH_CUBLAS=ON -DCUDA_NVCC_FLAGS="-D_FORCE_INLINES" ..
make -j $(($(nproc) + 1))
在使用cuda 编译opencv 过程中,可能会提示以下警告信息:
nvcc warning : The 'compute_20', 'sm_20', and 'sm_21' architectures are deprecated, and may be removed in a future release (Use -Wno-deprecated-gpu-targets to suppress warning).
解决方案:cuda环境下安装opencv出现nvcc warning : The 'compute_11'
找到cmake后build文件夹中产生的OpencvConfig.cmake文件,找到如下代码:
# Version Compute Capability from which OpenCV has been compiled is remembered
set(OpenCV_COMPUTE_CAPABILITIES "-gencode;arch=compute_20,code=sm_20;-gencode;arch=compute_30,code=sm_30;
-gencode;arch=compute_35,code=sm_35;-gencode;arch=compute_37,code=sm_37;
-gencode;arch=compute_50,code=sm_50;-gencode;arch=compute_52,code=sm_52;
-gencode;arch=compute_60,code=sm_60;-gencode;arch=compute_61,code=sm_61;-D_FORCE_INLINES")
删除 -gencode;arch=compute_20,code=sm_20; 主要因为此架构在CUDA过时,将来也将不支持。
接下来,使用make安装opencv:
sudo make install
sudo /bin/bash -c 'echo "/usr/local/lib" > /etc/ld.so.conf.d/opencv.conf'
sudo ldconfig
sudo apt-get update
上面是将opencv编译成功,但是并没有安装到我们的系统中,有很多的设置都没有写入到系统中,因此还要进行install。
sudo make install
sudo /bin/bash -c 'echo "/usr/local/lib" > /etc/ld.so.conf.d/opencv.conf'
sudo ldconfig
sudo apt-get update
使用 checkinstall 工具来对opencv进行管理,因为当系统安装多个opencv版本时,管理会非常麻烦和混乱,因此使用该工具对已经安装的opencv进行管理,方便卸载等其他操作。
进入build 文件夹中,执行下面命令操作:
sudo apt-get install checkinstall
sudo checkinstall
使用checkinstall的目的是为了更好的管理我安装的opencv,因为opencv的安装很麻烦,卸载更麻烦,其安装的时候修改了一大堆的文件,当我想使用别的版本的opencv时,将当前版本的opencv卸载就是一件头疼的事情,因此需要使用checkinstall来管理我的安装。执行了checkinstall后,会在build文件下生成一个以backup开头的.tgz的备份文件和一个以build开头的.deb安装文件,当你想卸载当前的opencv时,直接执行dpkg -r build即可。
opencv编译和安装详细解释见: Ubuntu16.04 +cuda8.0+cudnn+opencv+caffe+theano+tensorflow配置明细
OpenCV 3.1 Installation Guide on Ubuntu 16.04
编译完opencv之后,对caffe进行编译错误信息:
E0526 11:22:48.580889  5618 common.cpp:114] Cannot create Cublas handle. Cublas won't be available.
E0526 11:22:48.582368  5618 common.cpp:121] Cannot create Curand generator. Curand won't be available.
F0526 11:22:48.582435  5618 syncedmem.hpp:22] Check failed: error == cudaSuccess (30 vs. 0)  unknown error
*** Check failure stack trace: ***
    @     0x2afa0d8eddaa  (unknown)
    @     0x2afa0d8edce4  (unknown)
    @     0x2afa0d8ed6e6  (unknown)
    @     0x2afa0d8f0687  (unknown)
    @     0x2afa143f0fd8  caffe::SyncedMemory::mutable_cpu_data()
    @     0x2afa142e508c  caffe::Blob<>::Reshape()
    @     0x2afa142e54f9  caffe::Blob<>::Reshape()
    @     0x2afa142e558c  caffe::Blob<>::Blob()
    @           0x50a24b  caffe::ReshapeLayerTest<>::ReshapeLayerTest()
    @           0x50a65b  testing::internal::TestFactoryImpl<>::CreateTest()
    @           0x8ff163  testing::internal::HandleExceptionsInMethodIfSupported<>()
    @           0x8f5d65  testing::TestInfo::Run()
    @           0x8f5e85  testing::TestCase::Run()
    @           0x8f91c8  testing::internal::UnitTestImpl::RunAllTests()
    @           0x8f9457  testing::UnitTest::Run()
    @           0x46ca2f  main
    @     0x2afa14f6cf45  (unknown)
    @           0x474739  (unknown)
    @              (nil)  (unknown)
make: *** [runtest] Aborted (core dumped)
解决方案:caffe配置问题与解决方法集锦
而最主要的原因在于Nvidia的显卡未启动,所以cuda不能正常使用。
解决方案见: CUDA/caffe ERROR:cudaGetDeviceCount returned 30/35,Check failed: error == cudaSuccess (30/35 vs. 0)
我在这里找到了答案,安装个东西就可以了:
sudo apt-get install nvidia-modprobe

之后,再make runtest -j,搞定!
进入 /usr/local/cuda-8.0/samples/bin/x86_64/linux/release 文件夹下,使用
sudo ./deviceQuery
来测试cuda是否正常启动,如结果是PASS,这时候才能跑通caffe的test以及其他训练程序。
如果还不成功,试着将Makefile.config文件中的编译方式进行替换:
Here, fix it by (a) installing CUDA 8.0 and (b) change the caffe makefile.config
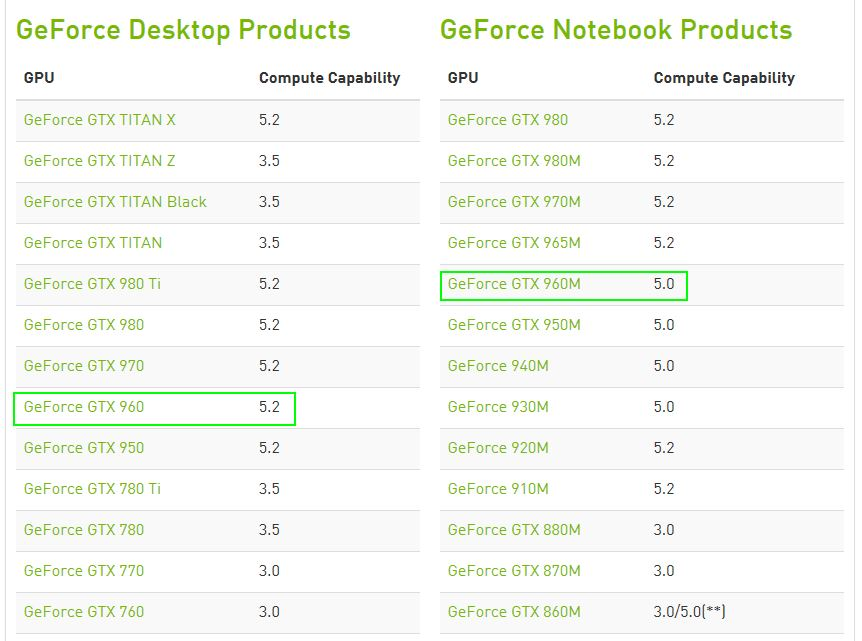
由于我的是Nvidia TITAN X显卡,所以需要调整,解决方案见:cudaSuccess (30 vs. 0) unknown error
-gencode arch=compute_52,code=sm_52
-gencode arch=compute_52,code=compute_52
至此,cuda8.0升级工作完成。