四、下载
1、简单下载
打开IB,拖入一个Progress View,在源文件中声明为IBOutlet,然后进行连接。
-( IBAction )goURL{
NSString * path=[ NSSearchPathForDirectoriesInDomains ( NSDocumentDirectory , NSUserDomainMask , YES ) objectAtIndex : 0 ];
path=[path stringByAppendingPathComponent : @"plsqldev714.rar" ];
NSURL *url = [ NSURL URLWithString : @"http://localhost/upload/plsqldev714.rar" ];
ASIHTTPRequest *request = [ ASIHTTPRequest requestWithURL :url];
[request setDownloadDestinationPath :path];
[request setDownloadProgressDelegate : progressView ];
[request startSynchronous ];
}
运行程序,下载进度会在progress view中显示。下载进度显示当前完成的大约比例。
2、使用队列下载并显示进度条
队列是指 NSOperationQueue 对象,其实是一种多线程操作,可以同时执行多个下载任务,甚至多线程下载同一任务(当然需要服务器支持,把同一个文件资源分成多个线程同时下载,最后再合并为一个文件)。下面的例子里我们使用了 NSOperationQueue 同时进行多个下载任务,同时,Progress View显示精确进度。
这个例子需要对界面进行一些设计。为简便,我们使用 IB 设计界面。
新建一个ViewController类。Add->New File,选择UIViewController subclass,并勾上“With XIB for user interface”,命名为 QueueViewController。
用 IB 打开 Xib 文件,在其中拖入6个UILable、1个UIButton和3个UIProgressView:

在Xcode中声明必要的变量和 IBOutlet/IBAction:
#import <UIKit/UIKit.h>
#import "ASIHTTPRequest.h"
#import "ASINetworkQueue.h"
@interface QueueViewController : UIViewController {
ASINetworkQueue * networkQueue ;
UILabel * status_total ,* status_file1 ,* status_file2 ;
UIButton * button ;
UIProgressView * progress_total ,* progress_file1 ,* progress_file2 ;
bool failed ;
NSFileManager * fm ;
}
@property ( nonatomic , retain ) IBOutlet UILabel *status_file2,*status_file1,*status_total;
@property ( nonatomic , retain ) IBOutlet UIButton *button;
@property ( nonatomic , retain ) IBOutlet UIProgressView *progress_file1,*progress_file2,*progress_total;
-( IBAction )go:( id )sender;
@end
将所有出口正确地连接到 QueueViewController.xib 中,保存。
打开MainWindow.xib,拖一个UIViewController进去并将其Identifier改为QueueViewController,再将它连接到Window对象的的rootViewController。
编写 UIButton 的 Touch up inside 事件代码如下:
-( IBAction )go:( id )sender{
if ( fm == nil ) {
fm =[ NSFileManager defaultManager ];
}
NSString * userDocPath=[ NSSearchPathForDirectoriesInDomains ( NSDocumentDirectory , NSUserDomainMask , YES ) objectAtIndex : 0 ];
// 文件 1
NSString * file1= @"image.png" ;
NSURL *url1 = [ NSURL URLWithString : @"http://220.163.103.23/interface/GetAttach?Accounts=sa&Password=ydtf@95598&AttachID=26" ];
// 先创建文件 file1 ,再用 NSFileHandle 打开它
NSString *path1=[userDocPath stringByAppendingPathComponent :file1];
bool b=[ fm createFileAtPath :path1 contents : nil attributes : nil ];
NSFileHandle *fh1;
__block uint fSize1= 0 ; // 以 B 为单位,记录已下载的文件大小 , 需要声明为块可写
if (b){
fh1=[ NSFileHandle fileHandleForWritingAtPath :path1];
}
// 文件 2
NSString * file2= @"plsqldev714.rar" ;
NSURL *url2 = [ NSURL URLWithString : @"http://220.163.103.23/upload/plsqldev714.rar" ];
// 先创建文件 file2 ,再用 NSFileHandle 打开它
NSString *path2=[userDocPath stringByAppendingPathComponent :file2];
b=[ fm createFileAtPath :path2 contents : nil attributes : nil ];
NSFileHandle *fh2;
__block uint fSize2= 0 ; // 以 B 为单位,记录已下载的文件大小 , 需要声明为块可写
if (b){
fh2=[ NSFileHandle fileHandleForWritingAtPath :path2];
}
//////////////////////////// 任务队列 /////////////////////////////
if (! networkQueue ) {
networkQueue = [[ ASINetworkQueue alloc ] init ];
}
failed = NO ;
[ networkQueue reset ]; // 队列清零
[ networkQueue setDownloadProgressDelegate : progress_total ]; // 设置 queue 进度条
[ networkQueue setShowAccurateProgress : YES ]; // 进度精确显示
[ networkQueue setDelegate : self ]; // 设置队列的代理对象
ASIHTTPRequest *request;
///////////////// request for file1 //////////////////////
request = [ ASIHTTPRequest requestWithURL :url1]; // 设置文件 1 的 url
[request setDownloadProgressDelegate : progress_file1 ]; // 文件 1 的下载进度条
// 设置 userInfo ,可用于识别不同的 request 对象
[request setUserInfo :[ NSDictionary dictionaryWithObject :file1 forKey : @"TargetPath" ]];
// 使用 complete 块,在下载完时做一些事情
[request setCompletionBlock :^( void ){
NSLog ( @"%@ complete !" ,file1);
assert (fh1);
// 关闭 file1
[fh1 closeFile ];
}];
// 使用 failed 块,在下载失败时做一些事情
[request setFailedBlock :^( void ){
NSLog ( @"%@ download failed !" ,file1);}
];
// 使用 received 块,在接受到数据时做一些事情
[request setDataReceivedBlock :^( NSData * data){
fSize1+=data. length ;
[ status_file1 setText :[ NSString stringWithFormat : @"%.1f K" ,fSize1/ 1000.0 ]];
[ status_total setText :[ NSString stringWithFormat : @"%.0f %%" , progress_total . progress * 100 ]];
if (fh1!= nil ) {
[fh1 seekToEndOfFile ];
[fh1 writeData :data];
}
NSLog ( @"%@:%u" ,file1,data. length );
}];
[ networkQueue addOperation :request];
///////////// request for file2 //////////////////
request = [[[ ASIHTTPRequest alloc ] initWithURL :url2] autorelease ]; // 设置文件 2 的 url
[request setDownloadProgressDelegate : progress_file2 ]; // 文件 2 的下载进度条
[request setUserInfo :[ NSDictionary dictionaryWithObject :file2 forKey : @"TargetPath" ]];
// 使用 complete 块,在下载完时做一些事情
[request setCompletionBlock :^( void ){
NSLog ( @"%@ complete !" ,file2);
assert (fh2);
// 关闭 file2
[fh2 closeFile ];
}];
// 使用 failed 块,在下载失败时做一些事情
[request setFailedBlock :^( void ){
NSLog ( @"%@ download failed !" ,file2);
}];
// 使用 received 块,在接受到数据时做一些事情
[request setDataReceivedBlock :^( NSData * data){
fSize2+=data. length ;
[ status_file2 setText :[ NSString stringWithFormat : @"%.1f K" ,fSize2/ 1000.0 ]];
[ status_total setText :[ NSString stringWithFormat : @"%.0f %%" , progress_total . progress * 100 ]];
if (fh2!= nil ) {
[fh2 seekToEndOfFile ];
[fh2 writeData :data];
}
}];
[ networkQueue addOperation :request];
[ networkQueue go ]; // 队列任务开始
}
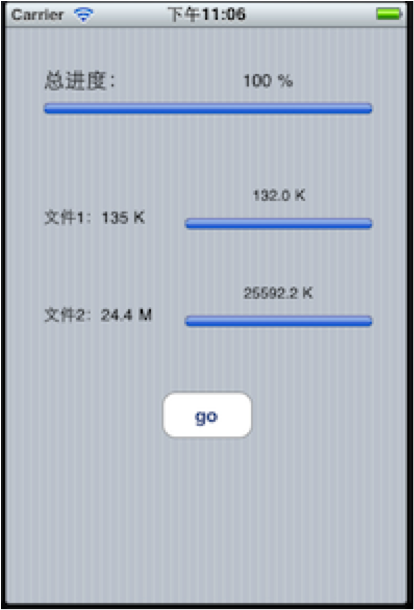
运行效果如下: