Spring4参考手册中文版
前言
https://github.com/b2gats/stone-docs/blob/master/spring-4-beans.md
Part III. 核心技术
本部分参考手册完全覆盖了Srping 框架的全部技术
首先是Spring IoC控制反转。深入彻底的IoC讲解之后,紧随其后的是全面解说Spring AOP。Spring有自己的AOP框架,该框架概念简单易于理解,能解决Java企业应用中80%的需求
Spring也集成了AspectJ,AspectJ是现今java领域功能最丰富、最成熟的AOP实现。
最后面的部分是tdd测试驱动开发,也是Spring 开发团队最为推崇的开发方法,主要内容有单元测试和spirng对集成测试的支持。Spring 团队发现,正确的使用Ioc,会使单元测试和集成测试更加简单(因为类中使用Setter和构造函数,将使它们更容易的配合,而无需使用set up组装)。同时,为测试弄了专门的单独章节,希望你能领悟这一点
- Chapter 4, The IoC container
- Chapter 5, Resources
- Chapter 6, Validation, Data Binding, and Type Conversion
- Chapter 7, Spring Expression Language (SpEL)
- Chapter 8, Aspect Oriented Programming with Spring
- Chapter 9, Spring AOP APIs
- Chapter 10, Testing
IoC容器
springIOC容器和beans简介
本章讲解spring的控制反转(IoC)的spring 框架实现 [1] 原理. IoC 又名 依赖注入 (DI). 它是一个由对象定义依赖的处理手法,也就是如何与其他对象协同工作, 可以通过以下途径定义依赖:构造参数注入、工厂方法的参数注入、属性注入(是指对象实例化后或者从工厂方法返回一个实例后设置其属性)。容器创建bean时候, 注入 依赖。 这个控制倒转了, 因此得名控制反转 (IoC)。反转了哪些控制,不再是由bean自己控制依赖类的实例化和定位, 而是使用了类似于 服务定位 模式的机制来控制。
org.springframework.beans 和 org.springframework.context 这两个包是spring IOC容器的基础包. BeanFactory 接口 提供了各种配置,用于管理任何对象. ApplicationContext 是 BeanFactory的子接口. 它提供以下功能,使集成Spring’s AOP功能 更容易; 消息资源处理(用于国际化);事件发布;应用层指定上下文环境,像用于web应用的WebApplicationContext.
简而言之, BeanFactory 提供了配置框架和基础功能, ApplicationContext 增加了更多的企业应用用能. ApplicationContext是 BeanFactory的超集, 是本章的spring IOC示例中的指定容器. 用BeanFactory 替代 ApplicationContext, 更多的信息请参看 Section 4.17, “The BeanFactory”.
应用中的对象并且是由spring 容器 管理的,被称为beans.就是对象,由spring容器管理的诸如实例化、组装等等操作. bean可以由应用中的多个对象组成。Bean通过容器和配置元数据 ,使用反射技术,去组装依赖对象。
容器概述
接口`org.springframework.context.ApplicationContext`代表了srping IoC 容器,负责实例化、配置和组装前面提到的beans。容器依据配置配置元数据去实例化、配置、组装。配置元数据可以用XML、Java 注解、或者Java编码表示。在配置元数据中,可以定义组成应用的对象,以及对象之间的依赖关系。
Spring 提供了一些开箱即用的ApplicationContext接口的实现。在单独的应用中,通常使用ClassPathXmlApplicationContext或者FileSystemXmlApplicationContext。当使用XML定义配置元数据时,可通过一小段xml配置使容器支持其他格式的配置元数据,比如Java 注解、Java Code。
大多数的应用场景中,不需要硬编码来实例化一个Spring IoC 的容器。举个栗子,web应用中,在web.xml中大概8行左右的配置就可以实例化一个Spring Ioc容器(see Section 4.16.4, “Convenient ApplicationContext instantiation for web applications”)。若再有STS(Spring eclipse 套件),简单的钩钩点点即可完成此配置。
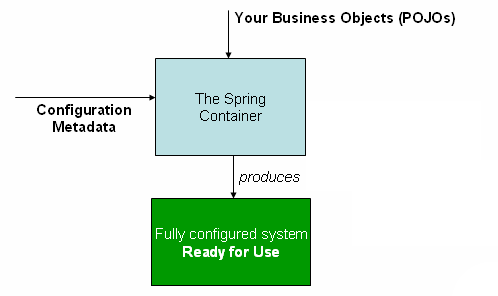
下面的示意图是spring工作原理。ApplicationContext将应用中的类与配置元数据相结合,实例化后,即可得到一个可配置、可执行的系统或应用。
The Spring IoC container
配置元数据
如上图所示,Spring IoC容器使用某种格式的配置元数据;配置元数据,就是告诉Ioc容器如何将对象实例化、配置、组装。
配置元数据是默认使用简单直观的xml格式,也是本章样例中使用最多的,这些样例程序用以说明spring Ioc 容器的核心概念和功能

基于XML的元数据并不是唯一的格式。Spring IoC容器已经和提及到的元数据格式完全解耦了。目前,很多码农都选择Java-based configuration
欲了解其他元数据格式的使用,请参看:
- Annotation-based configuration: Spring 2.5 引进的支持java 注解配置元数据
- Java-based configuration: Spring3.0时,将Spring JavaConfig project的很多功能集成到核心Spring框架中。Thus you can define beans external to your application classes by using Java rather than XML files.你可以使用java配置类定义bean,无需xml,该配置类与应用类无关。想要尝鲜的话,请参看
@Configuration,@Bean,@Import,@DependsOn注解
Spring配置由Spring bean的定义组成,这些bean必须被容器管理,至少1个,通常会有多个。基于XML的配置元数据,大概这么配置,根节点<beans>中配置子节点<bean>。Java configuration使用是这样的,一个带有@Configuration类注解的类中,方法上使用@Bean方法注解。
bean的定义要与应用中实际的类相一致。可以定义service 层的对象、Dao对象、类似Struts的表现成的对象、像Hibernate SessionFactories这样的基础对象,JMS队列等等。通常不会去定义细粒度域对象,因为它们由DAO或者Service负责创建、加载。然而,通过集成AspectJ,可以配置非Srping容器创建的对象。参看Using AspectJ to dependency-inject domain objects with Spring
下面的样例展示了基于XML配置元数据的基本格式:
<?xml version="1.0" encoding="UTF-8"?>
<beans xmlns="http://www.springframework.org/schema/beans"
xmlns:xsi="http://www.w3.org/2001/XMLSchema-instance"
xsi:schemaLocation="http://www.springframework.org/schema/beans
http://www.springframework.org/schema/beans/spring-beans.xsd">

    <bean id="..." class="...">
    <!-- bean的详细配置 -->
    </bean>

    <bean id="..." class="...">
    <!-- bean的详细配置 -->
    </bean>

    <!-- 其他bean -->

</beans>
id属性是个字串,是bean的唯一标示符。class属性定义了bean的类型,要使用类的全限定类名(含有包路径)。id属性的值,可以作为合作bean的引用标示符。上面未展示如何引用其他对象;详情参看Dependencies
容器实例化
Spring IoC的实例化易如反掌。`ApplicationContext`构造函数支持定位路径,定位路径也可以是多个,它是标识实际资源的字串,容器使用该标识加载配置元数据,支持多种资源,比如:本地文件系统、CLASSPATH等等。 ```java ApplicationContext context = new ClassPathXmlApplicationContext(new String[] {"services.xml", "daos.xml"}); ```  在学习了Spring IoC容器之后,也许你想了解更多的Spring的资源,如前所述在第6章,资源使用URI语法定位输入流,Spring提供了方便的机制读取输入流。在第6.7章[“Application contexts and Resource paths”](#resources-app-ctx),专门讲述5用 资源路径构造应用上下文,资源路径也是惯用手法。 接下来的样例展示了配置service层对象: ```xml
<!-- services -->

<bean id="petStore" class="org.springframework.samples.jpetstore.services.PetStoreServiceImpl">
<property name="accountDao" ref="accountDao"/>
<property name="itemDao" ref="itemDao"/>
<!-- 有关属性配置 -->
</bean>

<!--更多的Service bean -->
```
下面的样例展示了数据访问对象dao.xml配置:
<?xml version="1.0" encoding="UTF-8"?>
<beans xmlns="http://www.springframework.org/schema/beans"
xmlns:xsi="http://www.w3.org/2001/XMLSchema-instance"
xsi:schemaLocation="http://www.springframework.org/schema/beans
http://www.springframework.org/schema/beans/spring-beans.xsd">

    <bean id="accountDao" class="org.springframework.samples.jpetstore.dao.jpa.JpaAccountDao">
    <!-- additional collaborators and configuration for this bean go here -->
    </bean>

    <bean id="itemDao" class="org.springframework.samples.jpetstore.dao.jpa.JpaItemDao">
    <!-- additional collaborators and configuration for this bean go here -->
    </bean>

    <!-- more bean definitions for data access objects go here -->
</beans>
上述内容中service层由PetStoreServiceImpl类、2个dao对象JpaAccountDao和JpaItemDao(基于JPA ORM标准)。属性name元素引用了JavaBean的属性,ref元素引用了其他bean定义。这个引用表示实际对象之间的引用依赖。配置一个对象的依赖,详情请参看Dependencies
引入基于xml的元数据
多个配置文件共同定义bean非常有用。通常,每个XML配置文件在你的架构中代表一个逻辑层或者一个模块。
你可以使用应用上下文(applicationContext)的构造函数去加载所有xml中定义的bean。这个构造函数使用多个资源定位,就像前面中提到的。或者,也可以用一个或者多个资源引用,即使用<import/>标签加载其他文件定义的bean。举个栗子:
	<beans>
		<import resource="services.xml"/>
		<import resource="resources/messageSource.xml"/>
		<import resource="/resources/themeSource.xml"/>

		<bean id="bean1" class="..."/>
		<bean id="bean2" class="..."/>
	</beans>
上例中,从三个外部文件加载定义的bean:services.xml,messageSource.xml,themeSource.xml 。被引入的文件的路径对于引入配置文件来说都是相对路径,所以service.xml必须在引入配置文件的相同文件路径或者相同的类路径中。而messageSource.xml和themeSource.xml必须在引入配置文件所在的文件夹下的resouce文件夹下。正如你所看到的 /开头会被忽略掉,因为这些路径是相对路径,推荐不要使用/开头的格式。导入(imported)文件内容,包含根节点<beans/>,配置中XML bean定义 必须经过Spring语法校验通过。
使用"../"表示父目录的相对路径是可以的,但是真心不推荐这样创建一个依赖应用外部文件的做法。尤其指出,使用*"classpath:"*资源类型的URLs(像这样:"classpath:../services.xml"),也是不推荐的,因为运行时处理过程会选择"最近的"根路径然后引入他的父目录配置文件。Classpath配置的改变,会导致应用选择一个不同的、错误的目录。 你可以使用全路径限定资源定位取代相对路径,比如:"file:C:/config/services.xml" 或者"classpath:/config/services.xml"。还有,你可以使用抽象路径来解耦应用和配置文件。使用一个逻辑定位更可取 ,比如:通过"${..}"占位符,使用JVM运行时计算出的路径。
使用容器
`ApplicationContext`是一个高级工厂的接口,能维护各种bean以及他们之间依赖的注册。使用方法`T getBean(String name, Class requiredType)`,就能从定义的bean中获取实例。 `ApplicationContext`能让你读取bean定义、访问他们,如下: ```java // create and configure beans ApplicationContext context = new ClassPathXmlApplicationContext(new String[] {"services.xml", "daos.xml"});
// retrieve configured instance PetStoreService service = context.getBean("petStore", PetStoreService.class);
// use configured instance List userList = service.getUsernameList();
使用`getBean()`从beans中获取实例。`ApplicationContext`接口有几种方法可以办到,但是理想的做法是不要使用他们。实际上,应用中根本就不该使用`getBean()`方法,这样就不依赖Sprig API了。比如,Spring集成了很多web框架,为各种web框架类提供了依赖注入,比如web框架的Controller和JSF-managed beans

<h3 id='beans-definition'>Bean概述</h3>
Spring IoC容器管理一个或多个bean。这些bean根据提供给容器的配置元数据创建的,比如使用XML格式`<bean/>`定义。
在容器内部,这些bean的定义用 `BeanDefinition`对象表示,`BeanDefinition`包含了下列元数据:
* 全路径(含包路径)类名:代表bean的实际实现类。
* Bean行为配置元素,它规定了bean在容器中行为(作用域,生命周期回调函数等等)
* 引用其他bean,就是为了bean能正常工作而所需的其他bean的引用。这些引用类也称为合作类或者依赖类。
* 其他配置,为实例设置的其他属性配置。比如说,管理连接池的bean的连接数,池大小的上限。

这些元数据将转换成bean定义(`BeanDefinition`类)的属性。

**The bean definition**

**属性**  | **详情**
------------- | -------------
**class** | [Section 5.3.2, “Instantiating beans”](#beans-factory-class)
**name**  | [Section 5.3.1, “Naming beans”](#beans-beanname)
**scope** | [Section 5.5, “Bean scopes”](#beans-factory-scopes)
**constructor arguments** | [Section 5.4.1, “Dependency injection”](#beans-factory-collaborators)
**properties** | [Section 5.4.1, “Dependency injection”](#beans-factory-collaborators)
**autowiring mode** | [Section 5.4.5, “Autowiring collaborators”](#beans-factory-autowire)
**lazy-initialization mode** | [Section 5.4.4, “Lazy-initialized beans”](#beans-factory-lazy-init)
**initialization method** | [the section called “Initialization callbacks”](#beans-factory-lifecycle-initializingbean)
**destruction method** | [the section called “Destruction callbacks”](#beans-factory-lifecycle-disposablebean)

除了bean的信息以外,`BeanDefinition`也包含创建特殊bean的信息,`ApplicationContext`的实现也允许注册由用户创建而非IoC容器创建的对象。通过访问ApplicationContext’s BeanFactory的方法`getBeanFactory()`,该方法返回BeanFactory的实现`DefaultListableBeanFactory`。`DefaultListableBeanFactory`类支持这种注册,通过`registerSingleton(..)`和`registerBeanDefinition(..)`方法实现。然而,典型的应用只用元数据定义的bean就可以单独运行。


<h4 id='beans-beanname'>beans命名</h4>
bean有一个或者多个标示符。这些标示符必须是所在容器范围内必唯一的。通常情况一下,一个bean仅有一个标示符,如果有需求需要多个,多出来的将被当做别名。

在XML格式配置元数据中,使用 `id` 或者 `name` 属性来作为bean的标示符。`id`属性只能有1个。命名规范是字符数字混编(myBean,fooService,等等),但也支持特殊字符,可以包含。若想给bean起个别名,则可使用`name`属性来指定,可以是多个,用英文的逗号(`,`)分隔、分号(`;`)也行、空格也行。注意,在Spring3.1以前,`id`属性定义成了`xsd:ID`类型,该类型强制为字符*(译者心里说:估计字母+特殊字符,不支持数字的意思,有待验证,没工夫验证去了,翻译进度太慢了。再说了,现在都用4了,你再说3.0怎么着怎么着,那不跟孔乙己似的跟别人吹嘘茴香豆有四种写法)*。3.1版开始,它被定义为`xsd:string`类型。注意,bean `id`的唯一性约束依然被容器强制使用,尽管xml解析器不再支持了。*译者注:在spring3(含)以前,id是可以相同的,容器会替换相同id的bean,而在新版中,容器初始化过程中发现id相同抛出异常,停止实例化*

`id` 和`name`属性不是bean所必须的。若未明确指定`id`或者`name`属性,容器会给它生成一个唯一name属性。当然了,如果你想通过bean的`name`属性引用,使用`ref`元素方式,或者是类似于[Service Locator模式](#beans-servicelocator)方式检索bean(*译者想:应该是指调用ApplicationContext.getBean()方法获取bean,类似这种方式。Service Locator是一种设计模式,其实换个名字是不是更合适,DL(Dependency Lookup依赖查找)。虽然现在我也不明白,但是下面有专门的章节讲解,翻到时候再详细了解*),就必须给bean指定	`name`了。之所以支持无name bean特性,是为了使内部类自动装配。
Bean命名规范
bean命名规范使用java命名规范中实例属性名(也称域,Field)规范。小写字母开头的驼峰式。像这样 (不包括单引号)accountManager,accountService,userDao, loginController,等等
规范的命名使配置易读易理解。若使用Spring AOP,通过名字增强(译注:大多数Spring AOP教材中 的 通知)一坨bean时,规范的命名将带来极大的方便。
<h5 id='beans-beanname-alias'>bean定义之外设置别名</h5>
定义的bean内,可以给bean多个标识符,组合`id`属性值和任意数量的`name`属性值。这些标识符均可作为该bean的别名,对于有些场景中,别名机制非常有用,比如应用中组件对自身的引用。(*译注:一个类持有一个本类的实例作为属性,看起来应该是这样的,以下代码为推测,可以执行*)
**Bean类**

```java
public class SomeBean {
	//注意看这个属性,就是本类
	private SomeBean someBean;

	public SomeBean(){}

	public void setSomeBean(SomeBean someBean) {
		this.someBean = someBean;
	}
}
配置元数据
<?xml version="1.0" encoding="UTF-8"?>
<beans xmlns="http://www.springframework.org/schema/beans"
	xmlns:xsi="http://www.w3.org/2001/XMLSchema-instance"
	xsi:schemaLocation="http://www.springframework.org/schema/beans http://www.springframework.org/schema/beans/spring-beans.xsd">
	<!--看bean的别名,使用,/;/空格 分隔都是可以是-->
	<bean id="someBeanId" name="someBean,someBeanA;someBeanB someBeanC" class="com.example.spring.bean.SomeBean">
		<!--将别名为someBeanA 的bean 注入给 id为someBeanId 的bean的属性 'someBean'-->
		<property name="someBean" ref="someBeanA"></property>
	</bean>
</beans>
测试代码
@ContextConfiguration
@RunWith(SpringJUnit4ClassRunner.class)
public class SomeBeanTests {

	@Autowired
	@Qualifier("someBeanId")
	private SomeBean someBean;

	@Test
	public void testSimpleProperties() throws Exception {
	}

}
在bean的定义处指定所有别名有时候并不合适,然而,在其他配置文件中给bean设置别名却更为恰当。此法通常应用在大型系统的场景中,配置文件分散在各个子系统中,每个子系统都有本系统的bean定义。XML格式配置元数据,提供<alias/>元素,可以搞定此用法。
<alias name="fromName" alias="toName"/>
这种情况下,在同容器中有个叫fromName的bean,或者叫其他的阿猫阿狗之类的,再使用此别名定义之后,即可被当做toName来引用。
举个栗子,子系统A中的配置元数据也许引用了一个被命名为subsystemA-dataSource的bean。子系统B也许引用了一个subsystemB-dataSource。将这两个子系统整合到主应用中,而主应用使用了一个myApp-dataSource,为了使3个bean引用同一个对象,得在MyApp配置元数据中使用别名定义:
<alias name="subsystemA-dataSource" alias="subsystemB-dataSource"/>
<alias name="subsystemA-dataSource" alias="myApp-dataSource" />
现在,每个组件和主应用都能通过bean 名引用dataSource,而bean名都是唯一的保证不与其他定义冲突(实际上创建了一个命名空间),但他们引用的都是同一个bean。
Java-configuration
如果你使用了Java-configuration,@Bean注解也提供了别名,详见Section 5.12.3, “Using the @Bean annotation”
bean实例化
bean的定义,本质是如何创建一个或多个对象的配方。容器被请求时,会解析配置元数据中的bean定义并封装,使用封装配置创建(或者获取)对象实例。
若使用XML格式配置元数据,得为将要实例化的对象指定类型(或者说是类),使用<bean/>元素的class属性实现。class属性 映射到BeanDefinition类实例的Class属性(域),这个class属性是<bean/>元素必须的。(例外情况,参看“Instantiation using an instance factory method” 和 Section 5.7, “Bean definition inheritance”。使用Class域属性,通过以下两种方式:
- 通常,通过指定bean的
class属性,容器使用反射调用其构造函数直接创建bean,有点像Java 编码中使用new操作符。 - 指定
class实际类含有用于创建对象的静态工厂方法,这是不常使用的场景,容器会调用类的静态工厂方法创建bean。调用静态工厂方法返回的对象类型也许是相同类型,也许完全是其他类。
举例来说,现在在com.example包有个类Foo,该类有静态内部类Bar,定义Bar的Spring bean的`class`属性差不多是这样
com.example.Foo$Bar 注意$字符,用它来分隔内部类名和外围类名
用构造函数实例化
若是使用构造函数方式创建bean,所有的常规类都可以使用Spring来创建、管理。也就是说,开发的类无需实现任何特殊接口或者使用某种特殊编码风格。仅需指定bean的`class`即可。对于特殊的bean管理,取决于你使用的IoC类型,也许需要一个默认的空构造。
Spring IoC容器几乎能管理任何你需要管理的类,不局限于真正的JavaBeans。大多数Spring的用户心中,真正的JavaBean是这样的:仅有1个默认的无参构造函数、属性、setter、getter。嗯,比如,现在需要使用一个废弃连接池,它肯定不符合JavaBean规范,Spring照样能管理。
使用XML格式配置元数据 定义bean的class,如下所示:
<bean id="exampleBean" class="examples.ExampleBean"/>

<bean name="anotherExample" class="examples.ExampleBeanTwo"/>
如何为构造函数指定参数?如何在对象实力话之后设置其属性?请参看Injecting Dependencies
使用静态工厂方法实例化
定义使用使用静态工厂方法创建的bean时,得指定工厂方法类的作为`class`属性值,并且还得指定工厂方法类中用于创建bean的方法名称,作为`factory-method`属性值。工厂方法可以有参数,调用该方法即可返回对象实例,就像通过构造函数创建对象实例一样。此种bean定义是为了兼容遗留系统中的静态工厂
下面的bean定义,是使用工厂方法创建bean的方式。定义中,无需指定返回对象的类型(class),而是指定工厂方法类的class。下例中,createInstance()方法必须是一个static静态方法。
<bean id="clientService"
    class="examples.ClientService"
    factory-method="createInstance"/>
继续
public class ClientService {
    private static ClientService clientService = new ClientService();
    private ClientService() {}

    public static ClientService createInstance() {
    return clientService;
    }
}
使用实例工厂方法实例化
和[静态工厂方法](#beans-factory-class-static-factory-method)类似的还有实例工厂方法,使用实例工厂方法的方式实例化,是调用容器中已存在的bean的一个非静态方法来创建一个bean。用法是,1、`class`属性置空设置。 2、设置`factory-bean`属性,其值为当前容器(或者父容器)中bean的名字,该bean包含可供调用的创建对象的实例方法。3、设置`factory-method`属性,其值为工厂方法名。 ```xml
工厂类如下
```java
public class DefaultServiceLocator {

    private static ClientService clientService = new ClientServiceImpl();
    private DefaultServiceLocator() {}

    public ClientService createClientServiceInstance() {
    return clientService;
    }
}
工厂类可以有多个工厂方法:
<bean id="serviceLocator" class="examples.DefaultServiceLocator">
    <!-- inject any dependencies required by this locator bean -->
</bean>

<bean id="clientService"
    factory-bean="serviceLocator"
    factory-method="createClientServiceInstance"/>

<bean id="accountService"
    factory-bean="serviceLocator"
    factory-method="createAccountServiceInstance"/>
工厂类如下:
public class DefaultServiceLocator {

    private static ClientService clientService = new ClientServiceImpl();
    private static AccountService accountService = new AccountServiceImpl();

    private DefaultServiceLocator() {}

    public ClientService createClientServiceInstance() {
        return clientService;
    }

    public AccountService createAccountServiceInstance() {
        return accountService;
    }

}
上例中展示了工厂类本身也可以通过 DI 管理和配置。参看DI详情
Srping 资料中,factory bean是指一个Spring配置的bean,该bean能通过实例或者静态工厂方法创建对象。对比之下,
FactoryBean(注意大写)是指Spring术语FactoryBean。这段没太理解,解释factory bean和FactoryBean。
依赖
企业应用绝不会只有1个简单对象(或者说Spring bean)。哪怕是最简单的应用,也会包含许多对象协同工作。下一章节讲述,如何为真正的应用定义大量的、独立的bean,并让这些对象一起合作。
依赖注入
*依赖注入(DI)*,是一个有对象定义依赖的手法,也就是,如何与其他对象合作,通过构造参数、工厂方法参数、或是在对象实例化之后设置对象属性,实例化既可以构造也可以是使用工厂方法。容器在它创建bean之后注入依赖。这个过程从根本上发生了反转,因此又名控制反转(Ioc),因为Spring bean自己控制依赖类的实例化或者定位 ,Spring bean中就有依赖类的定义,容器使用依赖类构造器创建依赖类实例,使用*Service Locator*模式定位依赖类。
DI机制使代码简洁,对象提供它们的依赖,解耦更高效。对象无需自己查找依赖。同样的,类更容易测试,尤其当依赖接口或者抽象类时,测试允许在单元测试中使用stub或者mock(模拟技术)实现。
DI有2种主要方式,构造注入 和 setter注入
构造注入,容器调用构造函数并传参数,每个参数都是依赖。调用静态工厂方法并传参数方式构造bean和构造注入差不多,这里是指构造注入处理参数和静态工厂方法处理参数像类似。下例中展示了一个只能使用构造注入的类。注意,此类无任何特别之处,并未依赖容器指定的接口、基类、注解,就是一个POJO
public class SimpleMovieLister {

    // the SimpleMovieLister 依赖 a MovieFinder
    private MovieFinder movieFinder;

    //Spring容器能注入MovieFinder的构造函数
    public SimpleMovieLister(MovieFinder movieFinder) {
        this.movieFinder = movieFinder;
    }

    // 实际如何使用MovieFinder的业务逻辑省略了

}
构造函数参数解决方案
构造参数解决方案,会匹配所使用的参数类型。如果在bean的定义中,构造参数不存在歧义,那么,在bean定义中定义的构造参数的次序,在bean实例化时,就是提供给适合的构造参数的次序。看这个类: ```java package x.y;
public class Foo {
public Foo(Bar bar, Baz baz) {
    // ...
}
}
不存在歧义,假设`Bar`和`Baz`类没有集成关系,那么下面的配置是合法的,而且,不需要在`<constructor-arg/>`元素里指定构造参数的明确的`indexes`索引或者类型。
```xml
<beans>
    <bean id="foo" class="x.y.Foo">
        <constructor-arg ref="bar"/>
        <constructor-arg ref="baz"/>
    </bean>

    <bean id="bar" class="x.y.Bar"/>

    <bean id="baz" class="x.y.Baz"/>
</beans>
若需要引用另一个bean,类型已知,构造函数就可以匹配参数类型(像上面的示例)。使用简单类型时, 想<value>true</true>,Srping不能决定value类型情况,Spring就不能自己匹配类型。例如:
package examples;

public class ExampleBean {

    // Number of years to calculate the Ultimate Answer
    private int years;

    // The Answer to Life, the Universe, and Everything
    private String ultimateAnswer;

    public ExampleBean(int years, String ultimateAnswer) {
        this.years = years;
        this.ultimateAnswer = ultimateAnswer;
    }

}
上面的场景中,如果使用type属性明确指定构造参数的类型,容器就可以使用类型匹配。比如:
	<bean id="exampleBean" class="examples.ExampleBean">
	    <constructor-arg type="int" value="7500000"/>
	    <constructor-arg type="java.lang.String" value="42"/>
	</bean>
使用index属性明确指定构造参数的次序。比如
	<bean id="exampleBean" class="examples.ExampleBean">
	    <constructor-arg index="0" value="7500000"/>
	    <constructor-arg index="1" value="42"/>
	</bean>
当构造函数有2个相同类型的参数,指定次序可以解决此种情况。注意index是从0开始
	<bean id="exampleBean" class="examples.ExampleBean">
	    <constructor-arg name="years" value="7500000"/>
	    <constructor-arg name="ultimateAnswer" value="42"/>
	</bean>
记住,若要使Spring能从构造函数查找参数名字,代码在编译时必须开启调试模式。若你没有开启调试模式(或者不想),可以使用@ConstructorProperties JDK 注解明确指定构造参数的name。样例程序:
package examples;

public class ExampleBean {

    // Fields omitted

    @ConstructorProperties({"years", "ultimateAnswer"})
    public ExampleBean(int years, String ultimateAnswer) {
        this.years = years;
        this.ultimateAnswer = ultimateAnswer;
    }

}
setter注入
Setter注入是容器调用bean上的setter方法,bean是使用无参构造函数返回的实例,或者无参静态工厂方法返回的实例。 下面样例中展示了只能使用Setter注入的类。这个类是传统java类,就是个POJO,不依赖容器指定的接口、基类、注解。 ```java public class SimpleMovieLister {
// the SimpleMovieLister has a dependency on the MovieFinder
private MovieFinder movieFinder;

// a setter method so that the Spring container can inject a MovieFinder
public void setMovieFinder(MovieFinder movieFinder) {
    this.movieFinder = movieFinder;
}

// business logic that actually uses the injected MovieFinder is omitted...
}
`ApplicationContext`对它所管理的bean支持构造注入和setter注入。也支持先构造注入再setter注入。定义依赖,会转换成某种形式的<code class="scode">BeanDefinition</code>类,<code class="scode">BeanDefinition</code>类与<code class="scode">PropertyEditor</code>实例配合,即可将属性从一种格式转换成其他格式。然而,大多数程序员不会直接使用这些类(也就是编程式),更多的是使用XML、注解(也就是<code class="scode">@Component</code><code class="scode">@Controller</code>等等),或者<code class="scode">@Configuration</code>注解的类中的方法上使用 <code class="scode">@Bean</code>。这些配置数据,都会在容器内部转换成`BeanDefinition`,用于加载整个Spring Ioc 容器。

**构造注入对比setter注入**

何时使用构造注入,何时使用setter注入,经验法则是:强制依赖用构造,可选依赖用Setter。注意,在settter方法上使用<code class="scode">[@Required](#beans-required-annotation)</code>注解即可另属性强制依赖。

Spring 团队建议,构造注入的实例是不可变的,不为null的。此外,构造注入组件要将完全初始化后的实例返回给客户端代码。还有,大量参数的构造函数是非常烂的,它意味着该类有大量的职责,得重构。

setter注入主要用于可选依赖,类内部可以指定默认依赖。否则类内所有使用依赖的地方,都得进行非空校验。setter注入的有个好处就是,类可以重配置或者再注入。因此,使用`JMX MBeans`进行管理的场景中,就非常适合setter注入。

使用何种依赖注入方式,对于某些类,非常有意义。有时协同第三方类处理,没有源码,由你来决定使用何种方式。比如,第三方类未暴露任何setter方法,那么构造注入也许就是唯一的可行的注入方式了。


<h5 id="beans-dependency-resolution">依赖处理过程</h5>
容器解析bean依赖如下:
* `ApplicationContext`创建后用配置元数据中描述的所有bean进行初始化。配置元数据格式可以是XML、Java Code,或者注解。
* 每个bean的依赖,都会以下列形式表达:属性、构造参数,静态工厂方法的参数。当bean真正的创建时,这些依赖会被提供给bean。
* 每个属性或者构造函数或者以value值形式在bean处直接设置,或者引用容器中其他bean。
* 每一个属性或者构造参数都是一个值,该值将会从指定的格式转换为属性、构造参数的真正类型。Spring默认会将一个`String`类value转换成内建类型,比如`int`,`long`,`String`,`boolean`等等

Spring容器在创建bean之前会验证bean的配置。在bean创建之前,bean的属性不会赋值。当容器创建之后,会创建被设置为预先初始化的`sington-scope`单例作用域bean,非单例作用域bean,只有在请求时才会创建。作用域,在5.5章有定义,["Bean 作用域"](#beans-factory-scopes)。一个bean的创建,可能会引起许多bean的创建。因为bean的依赖以及依赖的依赖得先创建好用于引用。不涉及首先创建的bean及其依赖类bean,会稍后创建。

**循环依赖**
如果你主要使用构造注入,可能会创建一个循环依赖,该依赖不能解析。

举个栗子:类A需要类B的实例,使用了构造注入,类B需要一个类A的实例,也用了构造注入。若在配置文件中配置类A的bean和类B的bean互相注入,Spring IoC容器在运行时发现循环引用,抛出异常`BeanCurrentlyInCreationException`。

一般使用Setter注入替代构造注入,这需要修改源码改配置,来解决循环依赖。避免使用构造注入或者只使用setter,都能避免循环依赖。 换句话说,虽然不推荐循环依赖,但是你可以使用setter注入来完成循环依赖。

和大多数场景(无循环引用)不一样的是,循环引用中的类A和类B中,得强制其中一个自己能完全初始化,然后注入给另一个(经典的先有鸡现有蛋的问题)。
**循环依赖end**

对于Spring,你经管放心,它非常智能。他能在容器加载期发现配置中的问题,比如:引用了一个不存在的bean、循环依赖。Spring在bean创建后,会尽可能迟的设置bean属性并处理依赖。这意味着,spring容器正确加载之后,当你请求一个对象而该对象的创建有问题或者是该对象的依赖有问题时,也能产生一个异常。举例来说,因为属性找不到,或者属性无效, 导致bean抛出异常。这可能会延迟发现配置问题,这就是为什么`ApplicationContext`默认会预先实例化单例bean。在这些bean被实际请求之前就创建,会消耗一些时间和内存,但是在`ApplicationContext`创建后你就能发现配置问题,而不是更迟。如果你愿意 ,也可以重写该行为,让单例bean延迟初始化。


如果没有循环依赖,当一个或者多个合作bean被注入到他们的依赖类时,每一个合作bean将会比依赖类更早的实例化。也就是说,如果bean A依赖bean B,Spring Ioc容器在调用A的setter方法之前,会先实例化B。换句话说,bean先实例化(非单例),然后设置依赖,然后调用相关声明周期方法(比如配置的init方法,或者是初始化回调函数)。

<h5 id='beans-some-examples'>注入依赖样例</h5>
The following example uses XML-based configuration metadata for setter-based DI. A small part of a Spring XML configuration file specifies some bean definitions:
下面例子中使用了XML配置元数据,setter注入方式。XML 配置文件中的片段定义了bean:
```xml
<bean id="exampleBean" class="examples.ExampleBean">
    <!-- 使用内嵌的ref元素完成setter注入 -->
    <property name="beanOne">
        <ref bean="anotherExampleBean"/>
    </property>

    <!-- 使用ref属性完成setter注入 -->
    <property name="beanTwo" ref="yetAnotherBean"/>
    <property name="integerProperty" value="1"/>
</bean>

<bean id="anotherExampleBean" class="examples.AnotherBean"/>
<bean id="yetAnotherBean" class="examples.YetAnotherBean"/>
看java代码
public class ExampleBean {

    private AnotherBean beanOne;
    private YetAnotherBean beanTwo;
    private int i;

    public void setBeanOne(AnotherBean beanOne) {
        this.beanOne = beanOne;
    }

    public void setBeanTwo(YetAnotherBean beanTwo) {
        this.beanTwo = beanTwo;
    }

    public void setIntegerProperty(int i) {
        this.i = i;
    }
}
In the preceding example, setters are declared to match against the properties specified in the XML file. The following example uses constructor-based DI: 上例中,setter方法名要和XML文件中的property元素的name属性相匹配。下面演示使用构造注入 :
<bean id="exampleBean" class="examples.ExampleBean">
    <!-- constructor injection using the nested ref element -->
    <constructor-arg>
        <ref bean="anotherExampleBean"/>
    </constructor-arg>

    <!-- constructor injection using the neater ref attribute -->
    <constructor-arg ref="yetAnotherBean"/>

    <constructor-arg type="int" value="1"/>
</bean>

<bean id="anotherExampleBean" class="examples.AnotherBean"/>
<bean id="yetAnotherBean" class="examples.YetAnotherBean"/>
看java代码
public class ExampleBean {

    private AnotherBean beanOne;
    private YetAnotherBean beanTwo;
    private int i;

    public ExampleBean(
        AnotherBean anotherBean, YetAnotherBean yetAnotherBean, int i) {
        this.beanOne = anotherBean;
        this.beanTwo = yetAnotherBean;
        this.i = i;
    }
}
在bean定义中指定的构造函数参数,将会赋值给ExampleBean类的参数。
现在考虑下这个样例的变种,将使用构造器改为静态工厂方法返回对象实例:
<bean id="exampleBean" class="examples.ExampleBean" factory-method="createInstance">
    <constructor-arg ref="anotherExampleBean"/>
    <constructor-arg ref="yetAnotherBean"/>
    <constructor-arg value="1"/>
</bean>

<bean id="anotherExampleBean" class="examples.AnotherBean"/>
<bean id="yetAnotherBean" class="examples.YetAnotherBean"/>
看java代码
public class ExampleBean {

    //私有构造函数
    private ExampleBean(...) {
        ...
    }

    // 静态工厂方法; the arguments to this method can be
    // considered the dependencies of the bean that is returned,
    // regardless of how those arguments are actually used.
    public static ExampleBean createInstance (
        AnotherBean anotherBean, YetAnotherBean yetAnotherBean, int i) {

        ExampleBean eb = new ExampleBean (...);
        // some other operations...
        return eb;
    }

}
静态工厂方法的参数,应该通过constructor-arg元素产生,就像是bean的构造函数一样.工厂方法返回的类的类型无需和工厂类类型相同,虽然本例中他们是相同的。实例工厂方法(非静态)和静态工厂方法本质相同(除了使用facory-bean属性替代class属性,其他都相同),因此细节就不讨论了。
依赖和配置详解
前面章节提到的,你可以定义的bean的属性和构造参数引用其他的Spring bean(合作者),或者是使用value属性设置其值。Spring XML格式配置元数据至此``和``子元素,用以实现构造注入和属性注入。
直接赋值(原始类型、String等等)
``元素的`value`属性为对象域属性或者构造参数设置了一个可读的字串。Spring的会将其转换为实际的与属性或者参数的数据类型。 ```xml ```
下面的样例,是使用了XML配置中的p命名空间,他让XML更加简洁
<beans xmlns="http://www.springframework.org/schema/beans"
    xmlns:xsi="http://www.w3.org/2001/XMLSchema-instance"
    xmlns:p="http://www.springframework.org/schema/p"
    xsi:schemaLocation="http://www.springframework.org/schema/beans
    http://www.springframework.org/schema/beans/spring-beans.xsd">

    <bean id="myDataSource" class="org.apache.commons.dbcp.BasicDataSource"
        destroy-method="close"
        p:driverClassName="com.mysql.jdbc.Driver"
        p:url="jdbc:mysql://localhost:3306/mydb"
        p:username="root"
        p:password="masterkaoli"/>

</beans>
上面的XML更简洁;然而,错别字,要在运行期才能发现而不能再开发期发现,除非你使用IDE支持自动补全。这样的的IDE的助手真心推荐。
也可以这样配java.unit.Properties实例:
<bean id="mappings" class="org.springframework.beans.factory.config.PropertyPlaceholderConfigurer">
    <!-- typed as a java.util.Properties -->
    <property name="properties">
        <value>
            jdbc.driver.className=com.mysql.jdbc.Driver
            jdbc.url=jdbc:mysql://localhost:3306/mydb
        </value>
    </property>
</bean>
Spring 容器通过JavaBean的PropertyEditor机制将<value/>元素内的值转换到java.util.Properties实例。这是非常棒的,Spring团队最喜欢的几处好用之处之一:用内嵌<value/>元素替代 值属性风格。
元素idref
`idref`元素用来将容器内其它bean的id传给`` 或 ``元素,同时提供错误验证功能。 ```xml ``` 上面的bean定义在运行时等同于下面这一段定义:
<bean id="theTargetBean" class="..." />

<bean id="client" class="...">
    <property name="targetName" value="theTargetBean" />
</bean>
第一种格式比第二种要跟可取 ,因为使用idref标签,在开发期将允许容器校验引用bean真是存在。在第二个中,对于client bean是属性 targetName的值则没有校验执行 .client bean真正的实例化时,错别字才会被发现(可能会导致致命错)。如果client bean是一个原型bean,这个错字导致的异常也许会等到部署后才能被发现。
在4.0 beans xsd ,
idref上的local属性不在支持。因此它能提供正规bean引用 。当你升级到4.0的语法时,记得清除已经存在于idref元素上的local属性。
一个老生常谈的问题(至少是2.0以前了),<idref/>带来的好处,在使用ProxyFactorybeanbean定义AOP拦截器时,当指定拦截器名字是使用<idref/>元素将,容器会校验拦截目标是否存在。
引用其他bean(协作类)
`ref`元素是``元素和``元素内决定性元素。用它设置bean的属性以引用另一个容器管理的bean。引用的bean就是要设置属性的bean的依赖,在设置属性值之前它就要被初始化。(如果协作类是单例bean,它会在容器初始化时首先完成初始化)。差不多所有的bean都会引用其他对象。指定`id/name`的对象的作用域和依赖校验通过`bean`,`local` ,`parent`属性来配置。 指定引用bean通常使用``标签,它允许引用本容器或者父容器中任意的bean,无需配置在同一个xml文件中 。``标签中`bean`的属性值,使用的被引用bean的`id`或者`name`。 ```xml ``` 通过指定目标bean的`parent`属性来引用当前容器的父容器中的bean。`parent`属性的值可以和引用bean的`id`或者`name`(引用bean的name之一)相同,引用的bean必须存在于当前容器的父容器中。若容器存在继承的情况,并且需要封装现有父容器中的某个bean到一个代理中,就可以用此种引用机制,一个与`parent` bean重名的bean。 ```xml ``` 子容器中 ```xml class="org.springframework.aop.framework.ProxyFactoryBean"> ```  > 在4.0 beans xsd ,`ref `上的`local`属性不在支持。因次它不再支持正规bean的引用 。当你升级到到4.0时,记得清除已经存在于`ref`元素上的`local`属性。
内部bean
在``元素或者`constructor-arg/>`元素内定义``元素,就是所谓的内部类。 ```xml ```
内部bean的定义无需id或name;容器会忽略这些属性。也会忽略scope标记。内部通常是匿名的,伴随着外部类(的创建)而创建 。不能引用内部bean(ref属性不能指向内部bean),除非使用闭合bean标签。
译者注,内部bean更直观 fuck goods,上干活
public class Customer {
	private Person person;

	public Customer(Person person) {
		this.person = person;
	}

	public void setPerson(Person person) {
		this.person = person;
	}

	@Override
	public String toString() {
		return "Customer [person=" + person + "]";
	}
}
再来一段
public class Person {
	private String name;
	private String address;
	private int age;

	//getter and setter methods

	@Override
	public String toString() {
		return "Person [address=" + address + ",
                               age=" + age + ", name=" + name + "]";
	}
}
通常情况下,使用在CustomerBeanbean内设置ref属性值为Personbean的标示符,即完成注入。
<beans xmlns="http://www.springframework.org/schema/beans"
	xmlns:xsi="http://www.w3.org/2001/XMLSchema-instance"
	xsi:schemaLocation="http://www.springframework.org/schema/beans
	http://www.springframework.org/schema/beans/spring-beans-2.5.xsd">

	<bean id="CustomerBean" class="com.example.common.Customer">
		<property name="person" ref="PersonBean" />
	</bean>

	<bean id="PersonBean" class="com.example.common.Person">
		<property name="name" value="MrChen" />
		<property name="address" value="address1" />
		<property name="age" value="28" />
	</bean>

</beans>
In general, it’s fine to reference like this, but since the ‘MrChen’ person bean is only used for Customer bean only, it’s better to declare this ‘MrChen’ person as an inner bean as following : 一般情况下,这样的引用很好用。但是如果'MrChen'这个person bean只用于Customer。最好是使用内部bean来声明Person,看起来更加直观,更具有可读性.
<?xml version="1.0" encoding="UTF-8"?>
<beans xmlns="http://www.springframework.org/schema/beans"
xmlns:xsi="http://www.w3.org/2001/XMLSchema-instance"
xsi:schemaLocation="http://www.springframework.org/schema/beans
http://www.springframework.org/schema/beans/spring-beans.xsd">

	<bean id="CustomerBean" class="com.mkyong.common.Customer">
		<property name="person">
			<bean class="com.mkyong.common.Person">
				<property name="name" value="mkyong" />
				<property name="address" value="address1" />
				<property name="age" value="28" />
			</bean>
		</property>
	</bean>
</beans>
This inner bean also supported in constructor injection as following : 内部bean也支持构造注入
<?xml version="1.0" encoding="UTF-8"?>
<beans xmlns="http://www.springframework.org/schema/beans"
xmlns:xsi="http://www.w3.org/2001/XMLSchema-instance"
xsi:schemaLocation="http://www.springframework.org/schema/beans
http://www.springframework.org/schema/beans/spring-beans.xsd">

	<bean id="CustomerBean" class="com.mkyong.common.Customer">
		<constructor-arg>
			<bean class="com.mkyong.common.Person">
				<property name="name" value="mkyong" />
				<property name="address" value="address1" />
				<property name="age" value="28" />
			</bean>
		</constructor-arg>
	</bean>
</beans>
集合
``,``,``,``元素,用来设置`Java Collection`属性和参数,分别对应`List`,`Set`,`Map`,`Properties` ```xml administrator@example.org support@example.org development@example.org a list element followed by a reference just some string ```
map.key,map.value,或者set.value,以可以是以下元素
bean | ref | idref | list | set | map | props | value | null
集合合并
集合合并 Spring容器也支持集合合并。应用开发者可以定义父集合``,``,``或者``元素,该元素可以有子集合``,``,``或者``元素集成或者重写父集合中的值。也就是,子集合中的值是合并父子集合后的值,其中子集合中的值会覆盖父集合中的值。 *这一章节讨论父-子bean机制。不熟悉父子bean定义机制的,最好是先去补充下然后回来继续* 下例中展示了集合合并
<beans>
    <bean id="parent" abstract="true" class="example.ComplexObject">
        <property name="adminEmails">
            <props>
                <prop key="administrator">administrator@example.com</prop>
                <prop key="support">support@example.com</prop>
            </props>
        </property>
    </bean>
    <bean id="child" parent="parent">
        <property name="adminEmails">
            <!-- the merge is specified on the child collection definition -->
            <props merge="true">
                <prop key="sales">sales@example.com</prop>
                <prop key="support">support@example.co.uk</prop>
            </props>
        </property>
    </bean>
<beans>
注意,在bean child定义中,指定property adminEmails的<props/>元素中merge=true属性。当childbean被容器解析并且实例化时,实例有一个adminEmails的Properties集合,该集合包含了父子容器中adminEmails集合合并后的值。
administrator=administrator@example.com
sales=sales@example.com
support=support@example.co.uk
子Properties集合的将继承所有父集合中<props/>定义的值,并且重名属性值会覆盖父集合中的值.
这个合并行为,同样可以用在<list/>,<map/>,<set/>类型上。对于<list/>元素,spring合并行为与List类型的合并一样,也就是,spring合并行为维持集合有序;父集合中的元素索引位置比子集合元素索引位置靠前。对于Map,Set,Properties集合类型,不存在次序。因此,没有次序影响Map,Set,Properties,这涉及到容器内部使用的这些类型的所有实现类。 译注:这里没有提到List会不会发生覆盖 ,既然没提到,那就是List没有覆盖行为。当然了,实践才是王道,动手实验才能验证推测,研读源码才能知道原理,下面上干货
Java代码
public class CollectionMerge {
	private List<String> list;

	public List<String> getList() {
		return list;
	}

	public void setList(List<String> list) {
		this.list = list;
	}
}
XML配置
<?xml version="1.0" encoding="UTF-8"?>
<beans xmlns="http://www.springframework.org/schema/beans"
	xmlns:xsi="http://www.w3.org/2001/XMLSchema-instance"
	xsi:schemaLocation="http://www.springframework.org/schema/beans http://www.springframework.org/schema/beans/spring-beans.xsd">

	<bean id="parent" class="com.example.spring.bean.collection.CollectionMerge">
		<property name="list">
	        <list >
	            <value>1</value>
	            <value>2</value>
	        </list>
		</property>
	</bean>

	<bean id="child" parent="parent" >
		<property name="list">
	        <list merge="true">
	            <value>1</value>
	            <value>2</value>
	        </list>
		</property>
	</bean>
</beans>
测试代码
import org.junit.Test;
import org.junit.runner.RunWith;
import org.springframework.beans.factory.annotation.Autowired;
import org.springframework.beans.factory.annotation.Qualifier;
import org.springframework.test.context.ContextConfiguration;
import org.springframework.test.context.junit4.SpringJUnit4ClassRunner;

@ContextConfiguration
@RunWith(SpringJUnit4ClassRunner.class)
public class MapMergeTests {

	@Autowired
	@Qualifier("child")
	private CollectionMerge service;

	@Test
	public void testSimpleProperties() throws Exception {
		assertEquals(4, service.getList().size());
	}
}
经过动手实验,证明Spring合并对于List类型,并无覆盖。接下来,我们看看其源码实现
MutablePropertyValues.mergeIfRequired()方法
private PropertyValue mergeIfRequired(PropertyValue newPv, PropertyValue currentPv) {
	Object value = newPv.getValue();
	//属性值是否可合并类
	if (value instanceof Mergeable) {
		Mergeable mergeable = (Mergeable) value;
		//属性值是否设置了merge=true
		if (mergeable.isMergeEnabled()) {
			//合并当前属性
			Object merged = mergeable.merge(currentPv.getValue());
			return new PropertyValue(newPv.getName(), merged);
		}
	}
	return newPv;
}
上面代码中Mergeable接口共有5个实现类ManagedList,ManagedArray,ManagedMap,ManagedSet,ManagedProperties
ManagedList.merge(Object parent)方法
public List<E> merge(Object parent) {
		//防御性抛异常
		if (!this.mergeEnabled) {
			throw new IllegalStateException("Not allowed to merge when the 'mergeEnabled' property is set to 'false'");
		}
		if (parent == null) {
			return this;
		}
		//不能合并非List类型集合
		if (!(parent instanceof List)) {
			throw new IllegalArgumentException("Cannot merge with object of type [" + parent.getClass() + "]");
		}
		List<E> merged = new ManagedList<E>();
		//注意顺序,先增加父bean中的value值,所以文档中说父集合元素索引位置靠前
		merged.addAll((List) parent);
		merged.addAll(this);
		return merged;
	}
译注:我勒个去,为了找这段代码,洒家差点累吐血。由此可见,译者是非常用心的用生命去翻译文档。
合并限制 不能合并不同类型的集合,比如合并Map和List(译注:上面的源码中有这样的代码,不知聪明的小读者是否注意到了)。如果你非得这么干,那么就会抛出个异常。merge属性必须指定给父-子继承结构bean中的子bean,如果指定给了父集合则无效,不会产生预期的合并结果。
强类型集合 Java5中出现了范型,所以可以给集合使用强类型限制。比如说,声明一个只含有String类型的Collection。若使用Spring 注入一个强类型Collection给一个bean,那么就可以利用Spring的类型转换特性 ,该特性能将给定的值转换成合适的类型值,然后赋值给你的强类型Collection。
public class Foo {

    private Map<String, Float> accounts;

    public void setAccounts(Map<String, Float> accounts) {
        this.accounts = accounts;
    }
}
看,飞碟
<beans>
    <bean id="foo" class="x.y.Foo">
        <property name="accounts">
            <map>
                <entry key="one" value="9.99"/>
                <entry key="two" value="2.75"/>
                <entry key="six" value="3.99"/>
            </map>
        </property>
    </bean>
</beans>
在foobean的accounts属性注入前,强类型集合Map<String,Float>的泛型信息通过反射获取。因此Spring的类型转换机制识别出元素的value类型将会转换为Float,9.99,2.75,3.99将会转换成Float类型。
Null值和空字串
Spring treats empty arguments for properties and the like as empty Strings. The following XML-based configuration metadata snippet sets the email property to the empty String value (""). Spring对于属性的空参数转换为空字串。下面的XML片段,设置值email属性为空格字串("")
<bean class="ExampleBean">
    <property name="email" value=""/>
</bean>
上面的xml配置相当于这样的java代码
exampleBean.setEmail("")
<null/>元素处理null值:
<bean class="ExampleBean">
    <property name="email">
        <null/>
    </property>
</bean>
上面配置相当于
exampleBean.setEmail(null)
XML简写p命名空间
p-命名空间能让你使用`bean`元素属性替代内嵌`property/>`元素,用来描述属性值或者协作类。
Spirng支持命名空间扩展配置,命名空间基于XML Schema定义。本章讨论的beans配置格式定义在XML Schema文档中。然而,p命名空间并不是在XSD文件中,而是存在于Spring核心中。
下面XML片段解释了:1使用了标准XML,第2个使用p-命名空间
<beans xmlns="http://www.springframework.org/schema/beans"
    xmlns:xsi="http://www.w3.org/2001/XMLSchema-instance"
    xmlns:p="http://www.springframework.org/schema/p"
    xsi:schemaLocation="http://www.springframework.org/schema/beans
        http://www.springframework.org/schema/beans/spring-beans.xsd">

    <bean name="classic" class="com.example.ExampleBean">
        <property name="email" value="foo@bar.com"/>
    </bean>

    <bean name="p-namespace" class="com.example.ExampleBean"
        p:email="foo@bar.com"/>
</beans>
上例中解释了,在bean定义中使用p-namespace设置email 属性。它告诉Spring这里有一个property声明。前面提到过,p-namespace 并不存在schema定义,所以p可以修改为其他名字。 译注,干活都是译者自己撰写用于验证,而非参考手册原版中的内容,之所以验证,是因为原版E文有看不懂的地方、或者翻译拿不准、或者就是闲来无事、或者就是为了凑篇幅,这些事儿得通过写代码验证搞定了 up fuck goods上干货
<beans xmlns="http://www.springframework.org/schema/beans"
    xmlns:xsi="http://www.w3.org/2001/XMLSchema-instance"
    xmlns:ppp="http://www.springframework.org/schema/p"
    xsi:schemaLocation="http://www.springframework.org/schema/beans
        http://www.springframework.org/schema/beans/spring-beans.xsd">

    <bean name="p-namespace" class="com.example.spring.bean.p.PNamespaceBean"
        ppp:email="foo@email.com"/>
</beans>
注意p命名空间的用法xmlns:ppp="http://www.springframework.org/schema/p"和ppp:email="foo@email.com"
go on fuck goods继续干货
public class PNamespaceBean {
	private String email;

	public String getEmail() {
		return email;
	}

	public void setEmail(String email) {
		this.email = email;
	}


}
下面样例中,2个bean都引用了同一个bean
<beans xmlns="http://www.springframework.org/schema/beans"
    xmlns:xsi="http://www.w3.org/2001/XMLSchema-instance"
    xmlns:p="http://www.springframework.org/schema/p"
    xsi:schemaLocation="http://www.springframework.org/schema/beans
        http://www.springframework.org/schema/beans/spring-beans.xsd">

	<!--传统-->
    <bean name="john-classic" class="com.example.Person">
        <property name="name" value="John Doe"/>
        <property name="spouse" ref="jane"/>
    </bean>

	<!--时髦-->
    <bean name="john-modern"
        class="com.example.Person"
        p:name="John Doe"
        p:spouse-ref="jane"/>

	<!---->
    <bean name="jane" class="com.example.Person">
        <property name="name" value="Jane Doe"/>
    </bean>
</beans>
样例中2个p-namespace设置属性值,出现了一种新的格式声明引用。第一个bean中,使用了 <property name="spouse" ref="jane"/>应用bean jane.第二个bean中,使用了 p:spouse-ref="jane"做了相同的好事儿,此时,spouse是属性名,然而-ref表示这不是直接量而是引用另一个bean。
译注 好事儿,我小时候虽然做好事儿不留名,但是总能被发现,令我非常苦恼。我的妈妈常常揪着我的耳朵问:这又是你干的好事儿吧。
c-namespace命名空间
和p-namespace相似,c-namespace,是Spring3.1中新出的,允许行内配置构造参数,而不需使用内嵌的constructor-arg元素
用c:namespace重构构造注入
<beans xmlns="http://www.springframework.org/schema/beans"
    xmlns:xsi="http://www.w3.org/2001/XMLSchema-instance"
    xmlns:c="http://www.springframework.org/schema/c"
    xsi:schemaLocation="http://www.springframework.org/schema/beans
        http://www.springframework.org/schema/beans/spring-beans.xsd">

    <bean id="bar" class="x.y.Bar"/>
    <bean id="baz" class="x.y.Baz"/>

    <!-- traditional declaration -->
    <bean id="foo" class="x.y.Foo">
        <constructor-arg ref="bar"/>
        <constructor-arg ref="baz"/>
        <constructor-arg value="foo@bar.com"/>
    </bean>

    <!-- c-namespace declaration -->
    <bean id="foo" class="x.y.Foo" c:bar-ref="bar" c:baz-ref="baz" c:email="foo@bar.com"/>

</beans>
c:namespace和p:使用了相同机制(ref后缀表示引用),通过names设置构造参数。因为它未定义在XSD schema中(但是存在于Spring内核中),所以需要先声明。
有一些情况比较特殊,不能识别或者看到构造参数(比如无源码且编译时无调试信息),此时可以求助于参数索引:
<!-- c-namespace index declaration -->
<bean id="foo" class="x.y.Foo" c:_0-ref="bar" c:_1-ref="baz"/>
由于XML语法,索引标记需要
_开头作为XML属性名称,而不能使用数字开头(尽管某些ID支持)
在实际中,构造注入(name匹配/类型匹配/索引匹配)是非常高效的,一般情况下,推荐使用 name匹配方式配置。
复合属性
在设置bean属性时,可以使用复合或者内嵌属性,组件路径可以有多长写多长,除了最后一个属性,其他属性都不能为`null`。看下面的bean定义 ```xml ``` bean `foo`有属性`fred`,`fred`有属性`bob`,`bob`有属性`sammy`,最后的`sammy`属性赋值`"123"`。在bean`foo`构造后,`fred`属性和`bob`属性都不能为`null`否则抛异常`NullPointerException`
使用depends-on
若bean是另个bean的依赖,通常是指该bean是另个bean的属性。在XML中通过<ref/>元素配置实现。然而,bean之间并不全是直接依赖。举个栗子,类中有个静态初始化需要出发,像注册数据库驱动这样的。depends-on属性能强制这些先决条件首先完成执行初始化,然后再去使用它(比如用于注入)。 下面的样例中,展示了使用depends-on来表达bean之间的依赖关系:
<bean id="beanOne" class="ExampleBean" depends-on="manager"/>
<bean id="manager" class="ManagerBean" />
也可以依赖多个bean,为depends-on属性值提供一个bean name列表,用逗号,空白,分号分隔。
<bean id="beanOne" class="ExampleBean" depends-on="manager,accountDao">
    <property name="manager" ref="manager" />
</bean>

<bean id="manager" class="ManagerBean" />
<bean id="accountDao" class="x.y.jdbc.JdbcAccountDao" />
在单例bean中,
depends-on属性既可以设定依赖的初始化时机,也可以相应的设定依赖的销毁时机。在bean被销毁之前,bean使用depdnds-on属性定义的依赖bean会首先被销毁。因此depends-on也能控制销毁顺序。
延迟初始化
`ApplicationContext`的各种实现默认的初始化处理过程,都是尽早的创建、配置所有的单例bean。通常,这种预先实例化是非常好的,因为在配置的错误或者环境问题立刻就能暴露出来,而不是数小时甚至数天后才发现。若不需要此行为,可以通过设置`lazy-initialized`延迟加载来阻止预先初始化。`lazy-initialized`bean告诉Ioc容器,只有在第一次请求的时候采取初始化,而不是在启动容器时初始化。
在XML中,属性lazy-init控制<bean/>元素的初始化。
<bean id="lazy" class="com.foo.ExpensiveToCreateBean" lazy-init="true"/>
<bean name="not.lazy" class="com.foo.AnotherBean"/>
ApplicationContext解析上面的配置,在启动时,不会预先初始化这个标记为lazy的bean,为标记lazy的bean则会立刻初始化。
如果一个非延迟的单例bean依赖了lazy延迟bean,ApplicationContext会在启动时就创建lazy延迟bean,因为它必须满足单例bean依赖。延迟bean注入给单例bean,就意味着,它不会延迟加载的。
通过设置<beans/>元素的default-lazy-init属性,可以设置容器级别的延迟加载。看样例:
<beans default-lazy-init="true">
    <!-- no beans will be pre-instantiated... -->
</beans>
自动装配
Spring容器提供自动装配,用于组织bean之间的依赖。可以让Spring,通过检查`ApplicationContext`内容完成自动注入。自动装配有以下优点:
- 自动装配能明显减少属性和构造参数的配置。(在这方面,还有其他的机制也能达到此目的,比如bean 模板,在后面的章节里有详细的讲解)
- 自动装配可扩展性非常好。比如,给类增加了依赖,无需修改配置,依赖类就能自动注入。因此,自动装配在开发期非常有用,在代码不稳定时,无需修改编码即可完成切换。
在XML中,设置<bean/>元素的autowire属性来设定bean的自动装配模式。自动装配有5种模式。可以选择任意一种,来设置bean的装配模式。(译注,这不是废话么,有5中模式,每种都能随便用,假设有一种不能用,那就是4种模式了么)
Table 5.2. 自动装配模式
| 模式 | 解释 |
|---|---|
| no | (默认的)非自动装配。必须使用ref元素定义bean引用。对于大规模系统,推荐使用,明确的指定依赖易于控制,清楚明了。它在某种程度上说明了系统的结构。 |
| byName | 通过属性名称property name自动装配。Spring会查找与需要自动装配的属性同名bean。举个栗子,若在bean定义中设置了by name方式的自动装配,该bean有属性master(当然了,还得有个setMaster(..)写属性方法),Spring会查找一个名叫master的bean,并将它注入给master熟悉。 |
| byType | 若在容器中存在一个bean,且bean类型与设置自动装配bean的属性相同,那么将bean注入给属性。若与属性同类型的bean多于1个,则会抛出我们期待已久的致命异常,也就意味着这个bean也许不适合自动注入。若不存在匹配的bean,啥都不会发生;属性也不会设置,然后就没有然后了。 |
| constructor | Analogous to byType, but applies to constructor arguments. If there is not exactly one bean of the constructor argument type in the container, a fatal error is raised.和byType模式类似,但是应用于构造参数。若在容器中不存在与构造参数类型相同的bean,那么接下来呢,抛异常呗,还能干啥? |
byType或者constructor自动装配模式,可以装配arrays数组和范型集合。 这种个情况 下,容器内匹配类型的bean才会注入给依赖。若key类型是String,你也能自动装配强类型Maps。一个自动装配的Map,所有 匹配value类型的bean都会注入Map.value,此时,Map的key就是相应的bean的name。
可以结合自动装配和依赖检查,依赖检查会在装配完成后执行。
自动装配的局限和缺点
自动装配最好是贯穿整个项目。若不是全部或大部分使用自动装配,而仅仅自动装配一两个bean定义,可能会把开发者搞晕。(*译注,最可能的原因是,开发者对自动装配机制不熟悉,或者想不到项目中居然还使用了自动装配模式,当发生问题时,擦的,找都没地方找去,调试信息里只能看到经过横切织入事务代理的proxy*)
总结局限和缺点:
- 属性中和构造参数明确的依赖设置会覆盖自动装配。不能自动装配所谓的简单属性,比如原始类型,
Strings和Classes(简单属性数组)。这是源于Spring的设计。 - 和明确装配相比,自动装配是不确切的。正如上面的列表中提到的,Spring谨慎避免匹配模糊,若真的匹配不正确,则导致错误发生,Spring 管理的对象之间的关系记录也变的不明确了。
- 对于根据Spring容器生成文档的工具,装配信息将变的无用。
- 容器内多个bean定义可能会匹配设置为自动装配的
setter方法或者构造参数的类型。对于arrays,collections,或者maps,这不是个问题。然而对于期望单一值的依赖,这种歧义将不能随意的解决。如果发现多个类型匹配,将会抛出异常 .
在后面的场景中,给你几条建议:
- 放弃自动装配,使用明确装配
- 避免通过在bean定义中设置
autowire-candidate属性为false的方式来设置自动装配,下一章节会讲 - 通过设置
<bean/>袁术的primary属性为true来指定单个bean定义作为主候选bean。 - 使用基于注解的配置实现更细粒度的控制,参看Section 5.9, “Annotation-based container configuration”.
排除自动装配bean
在每个bean的设置中,你可以排除bean用于自动装配。XML配置中,设置``元素的`autowire-candidate`属性为`false`;容器将不使用该bean自动装配。(包括注解配置,像`@Autowired`) * 使用对bean名字进行模式匹配来对自动装配进行限制。其做法是在元素的'default-autowire-candidates'属性中进行设置。比如,将自动装配限制在名字以'Repository'结尾的bean,那么可以设置为"*Repository“。对于多个匹配模式则可以使用逗号进行分隔。注意,如果在bean定义中的'autowire-candidate'属性显式的设置为'true' 或 'false',那么该容器在自动装配的时候优先采用该属性的设置,而模式匹配将不起作用。*译注这一段翻译是从网上copy过来的,我勒个擦,得赶紧睡觉去了*
这些设置非常有用。但是这些被排除出自动注入的bean是不会自动注入到其他bean,但是它本身是可以被自动注入的。
方法注入
一般情况,容器中的大部分的bean都是[单例的](#beans-factory-scopes-singleton)。当单例bean依赖另一个单例bean,或者一个非单例bean依赖另个非单例bean是,通常是将另一个bean定义成其他bean的属性。当bean的生命周期不同时,那么问题来了。假设单例bean A依赖非单例bean(prototype) B,也许会在每个方法里都需要B。容器之创建了一个单例bean A,因此只有一次将B注入的机会。A调用B,需要很多B的实例 ,但是容器不会这么干。
解决办法是放弃一些IoC控制反转。令A实现接口ApplicationContextAware,此时A能够感知容器,即获取ApplicationContext ,每次当A调用B时,调用容器的getBean("B")方法用以创建B的实例。看样例:
// a class that uses a stateful Command-style class to perform some processing
package fiona.apple;

// Spring-API imports
import org.springframework.beans.BeansException;
import org.springframework.context.ApplicationContext;
import org.springframework.context.ApplicationContextAware;

public class CommandManager implements ApplicationContextAware {

    private ApplicationContext applicationContext;

    public Object process(Map commandState) {
        // grab a new instance of the appropriate Command
        Command command = createCommand();
        // set the state on the (hopefully brand new) Command instance
        command.setState(commandState);
        return command.execute();
    }

    protected Command createCommand() {
        // notice the Spring API dependency!
        return this.applicationContext.getBean("command", Command.class);
    }

    public void setApplicationContext(
            ApplicationContext applicationContext) throws BeansException {
        this.applicationContext = applicationContext;
    }
}
并不推荐上面的做法,因为业务代码耦合了Spring 框架。方法注入,是SpringIoc容器的高级特性,能够简洁的满足此场景。
想要了解更多的方法注入,参看此博客
查找式方法注入
查找式是指,容器为了覆盖它所管理的bean的方法,在容器范围内查找一个bean作为返回结果。通常是查找一个原型(prototype)bean,就像是上面章节中提到过的场景。Srping框架,使用`CGLIB`类库生成动态子类的字节码技术,覆盖方法。
为了能让动态子类能运行,其父类不能是
final类,被覆盖的方法也不能是final。还有,你得自己测试父类是否含有abstract方法,如果有,需要你提供默认实现。最后,被方法注入的对象不能序列化。Spring 3.2以后,不需要CGLIB的类路径了,因为CGLIB被打包入了org.springframework 包,和Spring-core 这个jar包在一起了。既是为了方便也是为了避免CGLIB包与应用中用到的CGLIB包冲突。
来看看前面提到的CommandManager类的代码片段,Spring容器会动态的覆盖createCommand()方法的实现。这样CommandManager类就不会依赖任何Spring API了。下面是修改过后的
package fiona.apple;

// 不再有 Spring imports!

public abstract class CommandManager {

    public Object process(Object commandState) {
        // grab a new instance of the appropriate Command interface
		//
        Command command = createCommand();
        // set the state on the (hopefully brand new) Command instance
        command.setState(commandState);
        return command.execute();
    }

    // okay... but where is the implementation of this method?
	//okay....但是方法实现在哪里?
    protected abstract Command createCommand();
}
在含有被注入方法的类中(像CmmandManager类),被注入方法需要使用以下签名
<public|protected> [abstract] <return-type> theMethodName(no-arguments);
动态生成子类会实现抽象方法。若该方法不是抽象的,动态生成自来则会重写在源类中的方法。配置如下:
<!-- a stateful bean deployed as a prototype (non-singleton) -->
<bean id="command" class="fiona.apple.AsyncCommand" scope="prototype">
    <!-- inject dependencies here as required -->
</bean>

<!-- commandProcessor uses statefulCommandHelper -->
<bean id="commandManager" class="fiona.apple.CommandManager">
    <lookup-method name="createCommand" bean="command"/>
</bean>
在commandManager类调用createCommand方法时,动态代理类将会被识别为commandManager返回一个command bean的实例。将commandbean设置成prototype,一定要小心处理。若被设置成了singleton,每次调用将返回同一个commandbean。
感兴趣的小读者也找找
ServiceLocatorFactoryBean类(在org.springframework.beans.factor.config包)来玩玩。使用ServiceLocatorFactoryBean类的处理手法和另一个类ObjectFactoryCreatingFactoryBean类似,但是ServiceLocatorFactoryBean类与虚拟指定你自己的lookup接口(查找接口),这与Spring指定lookup接口略有不同。详情参看这些类的javadocs
译注,今天加班晚了点,到家时23:30了,可是今天还没翻。进了家门,打开电脑,翻一小节再说,要不估计睡不着觉了。对于我自己的毅力,我还是有相当的认识的,比如:无论咳的多么严重,都能坚持抽烟,由此可见一斑。以上是玩笑。我的意志力并不强,但是意志薄弱也有意志薄弱的积极的正面的意义,比如我养成了每天翻点东西的习惯,哪怕就是再困、再饿、再累,也得翻译一下,因为要是不翻译的话,我就得跟自己的习惯作斗争了,准确的说是和自己斗争,而我却又没有与自己斗争的念想,我根本打不过我自己,就这样,我又翻了一小节
任意方法替换
还有一种方法注入方式,不如`lookup method`注入方式好用,可以用其他bean方法实现替换受管理的bean的任意方法。你可以跳过本节,当真的需要时再回来也是可以的。
在xml配置中,设置replaced-method元素,就可用其他实现来替换已经部署的bean中存在的方法实现。考虑下面的类,有一个我们要重写的方法computeValue
public class MyValueCalculator {

    public String computeValue(String input) {
        // balbalba
    }

    // 其他方法...

}
有个类实现了org.springframework.beans.factory.support.MethodReplacer接口,类中有新的方法定义
/**
 * 意味着用来重写MyValueCalculator类中computeValue(String)方法的实现
 */
public class ReplacementComputeValue implements MethodReplacer {

    public Object reimplement(Object o, Method m, Object[] args) throws Throwable {
        // get the input value, work with it, and return a computed result
        String input = (String) args[0];
        ...
        return ...;
    }
}
bean定义,用来部署的源类,要设置方法重写,大概这么搞:
<bean id="myValueCalculator" class="x.y.z.MyValueCalculator">
    <!-- arbitrary method replacement -->
    <replaced-method name="computeValue" replacer="replacementComputeValue">
        <arg-type>String</arg-type>
    </replaced-method>
</bean>

<bean id="replacementComputeValue" class="a.b.c.ReplacementComputeValue"/>
可以在<replaced-method/>元素内设置一个或多个<arg-type/>元素来指明被替换方法的参数类型。只有被覆盖的方法在类有重载,参数签名才是必要的。为了方便,String类型的参数只需要其完全限定类型名称的字串即可。比如,下面列出的均可匹配java.lang.String:
java.lang.String
String
Str
因为参数的数量基本就可以确定方法(重载的方法,基本上是参数数量有区别),此简写能大量减少打字,让你仅打几个字符就能匹配参数类型。 译注,Spring是工业品质的框架,如此细微的人性化设计,值得学习
bean作用域
Spring bean定义时,实际上是创建类实例的配方。这个观点非常重要,因为她意味着,通过一个配方,即可创建很多类的对象。
对于依据bean定义产生的bean,不仅可以控制依赖、设置对象的值,还可以对象作用域。这个手法强大而灵活,因为在配置过程中就可以可以控制的bean的作用域,无需在代码层面去控制,用代码去控制简直就是煎熬。要部署的bean可有设置1个或多个作用域:开箱即用,Spring框架支持5中作用域,其中有三种只有用web-awareApplicationContext才能使用。
下面了列出的作用域开箱即用,你也可以自定义作用域
Table 5.3. Bean scopes
| 作用域 | 描述 |
|---|---|
| 单例singleton | 默认的。一个bean定义,在一个IoC容器内只会产生一个对象。 |
| prototype原型 | 一个bean定义会产生多个对象实例 |
| request请求 | 一个bean定义产生的bean生命周期为一个HTTP请求;也就是,每一个HTTP请求都会根据bean定义产生一个对象实例。该作用域只有在Spring web上下文环境中才有效。 |
| session会话 | 产生的bean生命周期在HTTP 会话期间。该作用域只有在Spring web上下文环境中才有效 |
| gloabal session全局session | 声明周期为全局HTTP会话。通常使用portlet context时常用。该作用域只有在Spring web上下文环境中才有效。 |
| application应用 | 生命周期与ServletContext一样。该作用域只有在Spring web上下文环境中才有效 |
Spring3.0起 多了一个作用域-thred,但它默认是未注册的(不可用的意思?)。详情请参看文档去吧
SimpleThreadScope。有关如何注册该作用域和注册自定义作用域,参看本章使用自定义作用域
单例作用域
单例bean只会产生一个实例,对于所有的请求,Spring容器都只会返回一个实例。
换句话说,当定义了单例bean,Srping容器只会创建一个实例,这个实例存储在单例池中,单例池应该属于缓存,接下来所有对于该单例bean的请求和引用,都将返回缓存中的对象。
Figure 5.2.

Spring单例bean的概念,和四人帮GOF那本《设计模式》中定义的单例模式不同。GOF的单例是硬编码级的对象作用域,因此导致每一个类加载器内会产生单例类的一个实例。Spring的单例恰如其名,在容器范围内只会产生一个类实例。Spring中,bean默认的作用域都是单例作用域。使用xml 定义单例bean,像这样:
<bean id="accountService" class="com.foo.DefaultAccountService"/>

<!-- 和下面的写法相等,因为单例作用域是默认的,所以这么写有些画蛇添足,意思就是废话了 -->
<bean id="accountService" class="com.foo.DefaultAccountService" scope="singleton"/>
prototype原型作用域
设置bean作用域为`prototype`,就是非单例,对于每次请求都将返回一个该类的新实例。也就是说,原型bean注入另一个bean,或者是请求原型bean,都是通过在容器上调用`getBean()`方法产生的。一般来说 ,原型bean用于有状态bean,单例bean用于无状态bean。
下图示例了Srping原型作用域。一个数据访问对象(DAO)通常不会配置成原型作用域,因为通常DAO不会持有任何会话状态;因为作者偷懒,所以重用了上面单例示意图。

接下来看看如何在XML中定义原型bean:
<bean id="accountService" class="com.foo.DefaultAccountService" scope="prototype"/>
和其他作用域相比,Srping并不管理原型bean的完整的生命周期:容器实例化,配置或者组装原型独享,注入给其他类,然后并未进一步记录那个原型bean。因此,尽管对象的初始化回调方法会调用,不受scope影响,但是对于原型bean,销毁回调不会被调用。客户端代码必须清理原型对象并且释放原型bean持有的资源。为了让Spring容器释放原型bean持有的资源,可以用自定义的bean[post-processor](#beans-factory-extension-bpp), 它持有需要被清理bean的引用。
某种意义上,对于原型bean来说,Spring容器的角色就是替换了new 操作符。所有的生命周期管理,在经过实例化之后,都需要由客户端来处理。(Spring 容器中bean的生命周期详情,请参看本章5.6.1生命周期回调)
单例依赖原型
单例类依赖了原型类,要知道依赖在单例类初始化的时候就已经注入好了。因此,若你注入了一个原型bean给单例bean,将会是一个新的原型bean的实例注入了单例bean实例。原型bean实例将会是唯一的实例,再也不会为单例bean产生新的实例。
假若你需要单例bean在运行时重复的获取新的原型bean实例。那就不能将原型bean注入给单例bean,因为那样注入只会发生一次,就是发生在在Srping容器实例化单例bean并解析注入依赖时。如果需要多次获取新的原型bean实例,参看本章5.4.6方法注入
Request, session, and global session scopes
`request`,`session`,`global session`作用域,只有在spring web `ApplicationContext`的实现中(比如`XmlWebApplicationContext`)才会起作用,若在常规Spring IoC容器中使用,比如`ClassPathXmlApplicationContext`中,就会收到一个异常`IllegalStateException `来告诉你不能识别的bean作用域
初始化web配置
为了支持`request,sesssion,global session`这种级别bean的作用域(web作用域bean),在定义bean之前需要一些初始化的小配置。(Spring标准作用域,包括单例和原型,无需此配置。)
如何配置要根据具体的Servlet环境
若使用 Spring Web MVC访问这些作用域bean,实际上是使用Srping DispatcherServlet类或者DispatcherPortlet类处理request,则无需特别配置:DispatcherServlet 和 DispatcherPortlet已经暴露了所有的相关状态。
若使用了Servlet 2.5的web容器,使用了非Spring的DispacherServlet处理请求(比如,JSF或者Struts),则需要注册org.springframework.web.context.request.RequestContextListener ServletRequestListener。若使用的Servlet 3.0+,这些设置可以通过编程式方式使用WebApplicationInitializer接口完成。若使用的是较老的容器,增加下面配置添加到你的web应用的web.xml文件中:
<web-app>
    ...
    <listener>
        <listener-class>
            org.springframework.web.context.request.RequestContextListener
        </listener-class>
    </listener>
    ...
</web-app>
如果设置listener有问题的话,可以考虑使用RequestContextFilter。filter映射要根据web 应用配置来调整:
<web-app>
    ...
    <filter>
        <filter-name>requestContextFilter</filter-name>
        <filter-class>org.springframework.web.filter.RequestContextFilter</filter-class>
    </filter>
    <filter-mapping>
        <filter-name>requestContextFilter</filter-name>
        <url-pattern>/*</url-pattern>
    </filter-mapping>
    ...
</web-app>
DispatcherServlet,RequestContextListener,RequestContextFilter都是做相同的事儿,也就是绑定HTTPrequest对象到服务的Thread线程中,并开启接下来 用到的session-scoped功能。
Request作用域
考虑下面这种bean定义: ```xml ``` Spring 使用该bean定义为每一次HTTP 请求创建一个新的`LoginAction`bean 的实例。也就是,`loginAction`bean作用域范围在HTTP 请求级别。可以改变实例的内部状态,多少实例都可以,因为根据此`loginAciton`bean定义创建的其他bean实例并不会看到这些状态的改变;他们为各自的request拥有。当reqeust完成处理,request作用的bean就被丢弃了。
session作用域
考虑下面这种bean定义: ```xml ``` 在一个session会话期间,Spring容器使用`userPreferences`定义创建了一个`UserPreferences`bean的实例。换句话说`userPreferences`bean在HTTP Session会话期间有效。和`request-scoped`bean相类似,可以改变bean实例的内部状态,不管bean创建了多少实例都可以,要知道,使用相同的`userPreferences`定义创建的其他的bean实例看不到这些状态的改变,因为他们都是为各自的HTTP Session服务的。当HTTP Session最终被丢弃时,该session内的`session-scoped`作用域的bean实例也会被丢弃。
全局Session作用域
考虑下面这种bean定义: ```xml ``` 全局session作用域与标准HTTP [Session作用域](#beans-factory-scopes-session)类似,仅能应用于基于portlet的web应用的上下文环境中。portlet规范中定义的`global Session`概念是,在由单个portlet web应用创建的所有的的portlets中共享。全局session作用域的bean和`global portlet Session`全局portlet会话生命周期相同。 若是在标准的基于Servelt web应用中定义了全局session作用域bean,那么将会使用标准的Session作用域,不会报错。
应用作用域
考虑下面这种bean定义: ```xml ``` Spring 容器使用该定义为整个web应用创建一个`AppPreferences`bean的实例。`appPreFerences`bean作用域是`ServeletContext`级别,存储为一个常规的`ServletContext`属性。这个Spring单例作用域有几分相似,但是和单例作用域相比有两个重要不同:1、他是每一个`ServeltContext`一个实例,而不是Spring`ApplicationContext`范围。2、它是直接暴露的,作为`ServletContext`属性,因此可见。
不同级别作用域bean之间依赖
Spring IoC容器不仅管理bean的实例化,也负责组装(或者依赖)。如果想将HTTP request作用域bean注入给其他bean,就得给作用域bean(request或者session)注入一个AOP代理用来替换作用域bean。通过注入一个代理对象暴露于作用域bean相同的的接口,他是代理对象也能从相关作用域(request或者session)中检索到真正的被代理对象,并委派方法调用实际对象的方法。
不需要再单例或者原型bean内部使用
<aop:scoped-proxy/>
下面的配置虽然简单,但是重要的理解“为什么”和“如何搞”
<?xml version="1.0" encoding="UTF-8"?>
<beans xmlns="http://www.springframework.org/schema/beans"
    xmlns:xsi="http://www.w3.org/2001/XMLSchema-instance"
    xmlns:aop="http://www.springframework.org/schema/aop"
    xsi:schemaLocation="http://www.springframework.org/schema/beans
        http://www.springframework.org/schema/beans/spring-beans.xsd
        http://www.springframework.org/schema/aop
        http://www.springframework.org/schema/aop/spring-aop.xsd">

    <!-- an HTTP Session-scoped bean exposed as a proxy -->
    <bean id="userPreferences" class="com.foo.UserPreferences" scope="session">
        <!-- instructs the container to proxy the surrounding bean -->
        <aop:scoped-proxy/>
    </bean>

    <!-- a singleton-scoped bean injected with a proxy to the above bean -->
    <bean id="userService" class="com.foo.SimpleUserService">
        <!-- a reference to the proxied userPreferences bean -->
        <property name="userPreferences" ref="userPreferences"/>
    </bean>
</beans>
为了创建一个代理,得在作用域bean定义内插入子元素<aop:scoped-proxy/>。详情参看 “Choosing the type of proxy to create” 和 Chapter 34, XML Schema-based configuration.)。request, session, globalSession , custom-scope,为什么这些级别的作用域需要<aop:scoped-proxy/>元素? 下面来做个小测验,一个单例bean定义,对比一下,它如果要实现前面提到的作用域bean注入,该如何配置。(下面的userPreferencesbean,实际上并不完整)。
<bean id="userPreferences" class="com.foo.UserPreferences" scope="session"/>

<bean id="userManager" class="com.foo.UserManager">
    <property name="userPreferences" ref="userPreferences"/>
</bean>
上例中,HTTP Session作用域beanuserPreferences注入给了单例beanuserManger。注意,userManagerbean是一个单例bean:每个容器只会实例化一个,他的依赖(本例中只有一个,userPreferencesbean)也仅会注入一次。也就是说,userManagerbean只能操作相同的userPreferences对象,就是注入的那一个。
将一个短生命周期作用域bean注入给长生命周期作用域bean,比如将HTTP Session作用域bean作为依赖注入给一个单例bean。然而,你需要一个userManager对象,在HTTP Session会话期间,需要与session同生命周期的对象userPreferences。 因此,容器会创建一个对象,该对象拥有和UserPreferences完全相同的public接口并暴露所有的public接口。,该对象能根据作用域机制获取真真的UserPreferences对象。容器会将这个代理对象注入给userManagerbean,userManager类则浑然不知这货居然是个代理。样例中,当UserManager实例调用依赖UserPreferences对象上的方法时,,实际上调用的是代理对象上的方法。代理对象从 Session范围内获取真正的UserPreferences对象,并将在代理对象上方法的调用“呼叫转移”给检索到的真正的UserPreferences对象。
将一个request,session,globalSession作用域bean注入给其他作用域bean,下面是正确的、完整的配置
<bean id="userPreferences" class="com.foo.UserPreferences" scope="session">
    <aop:scoped-proxy/>
</bean>
<bean id="userManager" class="com.foo.UserManager">
    <property name="userPreferences" ref="userPreferences"/>
</bean>
选择代理类型
使用``元素为bean 创建代理时,Spring 容器默认使用`CGLIB`类型创建代理。
CGLIB代理只会拦截public方法调用。非public方法不会“呼叫转移”给实际的作用域bean。
还有个选择,通过配置,使Spring容器为这些作用域bean创建标准的JDK interface-based代理,设置<aop:scoped-proxy/>元素proxy-target-class属性的值为false即可。使用标准JDK接口代理好处是无需引入第三方jar包。然而,作用域bean 至少实现一个接口,需要注入作用域bean的类则依赖这些接口。
<!-- DefaultUserPreferences implements the UserPreferences interface -->
<bean id="userPreferences" class="com.foo.DefaultUserPreferences" scope="session">
    <aop:scoped-proxy proxy-target-class="false"/>
</bean>
<bean id="userManager" class="com.foo.UserManager">
    <property name="userPreferences" ref="userPreferences"/>
</bean>
For more detailed information about choosing class-based or interface-based proxying, see Section 9.6, “Proxying mechanisms”. 关于如何选择class-based和interface-based代理,详情参看Section 9.6, “Proxying mechanisms”.
自定义作用域
bean的作用域机制是可扩展的;可以定义自己的作用域,甚至重新定义已存在的作用域,经管后者不推荐,并且,不能重写内置单例作用域和原型作用域。
创建自定义作用域
实现`org.springframework.beans.factory.config.Scope`接口,就可以将自定义作用域集成到Srping容器中,本章主要将如何实现该接口。如何实现自定义作用域,参看Spring内置的作用域实现和`Scope`类的javadocs,javadocs中解释了有关需要实现的方法的细节。
Scope接口共有4个方法用于从作用域获取对象、从作用域删除对象、销毁对象(应该是指作用域内,英文档中未提到)
下面的方法作用是返回作用域中对象。比如,session作用域的实现,该方法返回session-scoped会话作用域bean(若不存在,方法创建该bean的实例,并绑定到session会话中,用于引用,然后返回该对象)
Object get(String name, ObjectFactory objectFactory)
下面的方法作用是从作用域中删除对象。以session作用域实现为例,方法内删除对象后,会返回该对象,但是若找不到指定对象,则会返回null
Object remove(String name)
下面的方法作用是注册销毁回调函数,销毁是指对象销毁或者是作用域内对象销毁。销毁回调的详情请参看javadocs或者Spring 作用域实现。
void registerDestructionCallback(String name, Runnable destructionCallback)
下面的方法,用于获取作用域会话标识。每个作用域的标识都不一样。比如,session作用域的实现中,标识就是session标识(应该是指sessionId吧)
String getConversationId()
使用自定义作用域
可能是HelloWorld,或者是更多的自定义的Scope实现,得让Spring知道新写的作用域。下面的方法就是如何注册新的作用域到Spring 容器的核心方法:
void registerScope(String scopeName, Scope scope);
This method is declared on the ConfigurableBeanFactory interface, which is available on most of the concrete ApplicationContext implementations that ship with Spring via the BeanFactory property. 此方法声明在ConfigurableBeanFactory接口中,该在大部分ApplicationContext具体实现中都是可用的,通过BeanFactor属性设置
registerScope(..)方法第一个参数是作用域名称,该名称具有唯一性。比如Spring容器内置的作用域singleton和prototype。第二个参数是自定义作用域实现的实例,就是你想注册的、使用的那个自定义作用域。
写好了自定义作用域的实现,就可以像下面那样注册它了:
下面的
SimpleThreadScope作用域,是Spring内置的,但是默认并未注册到容器中。 你自定义的作用域实现,应该也使用相同的代码来注册。
Scope threadScope = new SimpleThreadScope();
beanFactory.registerScope("thread", threadScope);
接下来是创建一个bean定义,该定义要遵守自定义作用域的规则
<bean id="..." class="..." scope="thread">
自定义作用域的实现,不局限于编程式注册。也可以使用CustomScopeConfigurer类声明式注册
*译注*,编程式就是指硬编码,hard-code,声明式就是指配置,可以是xml可以是注解总之无需直接使用代码去撰写相关代码。不得不说,*编程式和声明式*与*硬编码和配置*相比,更加高端大气上档次。技术人员尤其要学习这种官方的、概念性的、抽象的上档次的语言或者说式地道的表达,假若谈吐用的全是这种词汇,逼格至少提升50%,镇住其他人(入行时间不长的同行,或者面试官)的概率将大大提升。当然了,和生人谈吐要用高逼格词汇,比如*声明式*,*编程式*,然而和自己人就要用人话了,比如*硬编码*,*xml配置*,因为他们得能先听懂才能干活。
总之,**装逼用官话,聊天用人话**,闲话少絮,看如何声明式注册(因为此处要装逼,人话是看如何xml)
blablablab
<?xml version="1.0" encoding="UTF-8"?>
<beans xmlns="http://www.springframework.org/schema/beans"
    xmlns:xsi="http://www.w3.org/2001/XMLSchema-instance"
    xmlns:aop="http://www.springframework.org/schema/aop"
    xsi:schemaLocation="http://www.springframework.org/schema/beans
        http://www.springframework.org/schema/beans/spring-beans.xsd
        http://www.springframework.org/schema/aop
        http://www.springframework.org/schema/aop/spring-aop.xsd">

    <bean class="org.springframework.beans.factory.config.CustomScopeConfigurer">
        <property name="scopes">
            <map>
                <entry key="thread">
                    <bean class="org.springframework.context.support.SimpleThreadScope"/>
                </entry>
            </map>
        </property>
    </bean>

    <bean id="bar" class="x.y.Bar" scope="thread">
        <property name="name" value="Rick"/>
        <aop:scoped-proxy/>
    </bean>

    <bean id="foo" class="x.y.Foo">
        <property name="bar" ref="bar"/>
    </bean>

</beans>
When you place aop:scoped-proxy/ in a FactoryBean implementation, it is the factory bean itself that is scoped, not the object returned from getObject(). 如果在
FactoryBean实现中设置了<aop:scoped-proxy/>,表示是工厂bean他本身的作用域,并不是getObject()返回的对象的作用域。TODO
Customizing the nature of a bean自定义bean的xxx擦这个nature该怎么翻
生命周期回调函数
Spring容器可以控制bean的生命周期,通过实现Spring`InitializingBean`和`DisposableBean`接口。容器会调用`InitializingBean`接口的`afterPropertiesSet()`方法,也会调用`DisposableBean`接口的`destroy()`方法。,也就是运行bean自定义的初始化方法和销毁方法。
Tip JSR-250中,在现代Spring应用中,一般都是用
@PostConstruct和@PreDestroy注解定义生命周期回调函数。使用注解的话,你的bean就无需和Spring API耦合了。,详情参看Section 5.9.7, “@PostConstruct and @PreDestroy” 如果不想用JSR-250,但又想解耦(Spring API),可以在定义对象的配置中指定init-method和destroy-method
Spring使用BeanPostProcessor实现类处理所有的回调接口并调用相应的方法,接口由Spring 负责查找。若需要自定义功能或其他生命周期行为,Spring并未提供开箱即用的支持,但是可以自己实现BeanPostProcessor类。详情参看"Section 5.8, “Container Extension Points”
除了initialization和destruction方法,Spring bean也可以实现Lifecycle接口,这些接口可以参与Spring容器生命周期的startup和shutdown过程。
本章讲解生命周期回调接口。
初始化回调
`org.springframework.beans.factory.InitializingBean`接口类的作用是,在容器设置bean必须的属性之后,执行初始化工作。`InitializingBean`接口中只有一个方法: ```java void afterPropertiesSet() throws Exception; ```
推荐,尽量不用InitializingBean接口,因为这将导致不必要的与Spring的耦合。还有更好的办法,使用@PostConstruct注解,或者指定一个POJO的initialization方法。XML配置元数据中,使用init-method属性用来指定,其值为初始化方法名,初始化方法得是一个无参无返回值(void)方法。如果使用java Config,得在@Bean注解中使用initMehtod属性 ,详情参看 the section called “Receiving lifecycle callbacks”。看代码
<bean id="exampleInitBean" class="examples.ExampleBean" init-method="init"/>
public class ExampleBean {

    public void init() {
        // do some initialization work
    }

}
和下面的效果相同,但上面的没有耦合Spring。
<bean id="exampleInitBean" class="examples.AnotherExampleBean"/>
public class AnotherExampleBean implements InitializingBean {

    public void afterPropertiesSet() {
        // do some initialization work
    }

}
销毁回调
实现`org.springframework.beans.factory.DisposableBean`接口,作用是Spring销毁bean时调用该方法。 `DisposableBean`接口只有一个方法: ```java void destroy() throws Exception; ``` 和上面初始化函数一样,推荐你不要使用`DisposableBean`回调接口,因为会产生不必要的耦合之类的balbalbal。还是和上面一样,能使用 [`@PreDestroy`](#beans-postconstruct-and-predestroy-annotations)注解或者指定一个spring bean定义支持的方法TODO??若使用XML配置,可是使用``元素的`destroy-method`属性来完成该设置。若是使用Java config,可以使用`@Bean`注解的`destroyMethod`属性来完成销毁回调设置。[see the section called “Receiving lifecycle callbacks”](#beans-java-lifecycle-callbacks)。看样例: ```xml ``` ```java public class ExampleBean {
public void cleanup() {
    // do some destruction work (like releasing pooled connections)
}
}
和下面代码效果一样,但是上面的代码不和Spring耦合
```xml
<bean id="exampleInitBean" class="examples.AnotherExampleBean"/>
public class AnotherExampleBean implements DisposableBean {

    public void destroy() {
        // do some destruction work (like releasing pooled connections)
    }

}
<bean>元素的destroy-method属性可以指定一个特别的值,设置该值后Spring将会自动探测指定类上的publicclose或者shutdown方法。这个设置自动探测销毁方法的属性,也可以设置给<beans/>元素的default-destroy-method属性,用来设置<beans>元素内的所有的<bean>自动探测销毁方法,详情参看section called “Default initialization and destroy methods”。注意,在Java config配置元数据中,这种自动探测是默认的。
译注,现在是羊年除夕夜23:40,再过30分钟,公司服务器上的一些定时器就要开始运行了。不知道还会不会线程挂起了,多线程中使用网络输出流时如果发生断网,线程则会处于阻塞状态,然后就没有然后一直阻塞,已经修改过了。外面的烟花炮仗声逐渐的密集了起来,放炮仗,污染太重了,国家抑制的手段就和抑制烟草手段一样,重税。心乱了,不能专心翻译了。
默认的初始化函数和销毁函数
若不是使用`InitializingBean`和`DisposableBean`接口实现初始化和销毁回到方法,通常使用规范的方法名比如`init`,`initialize()`,`dispose()`等等。理论上,生命周期回调方法名的规范性,应该贯穿于整个项目中,所有的开发者都应该使用相同的方法名保持一致性。*译注,编码规范,Spring最讲究这个了*
可以配置容器查找所有bean的初始化回调和销毁回调,当应用类中的初始化回调方法命名为init(),就不需要在bean定义中配置init-method="init"属性。Spring IoC容器在bean初始化时调用init()回调。该功能强制初始化和销毁回调方法命名的规范性。
Suppose that your initialization callback methods are named init() and destroy callback methods are named destroy(). Your class will resemble the class in the following example. 假设,初始化回调方法命为init(),销毁回调方法命名为destroy()。应该和下面的样例差不多:
public class DefaultBlogService implements BlogService {

    private BlogDao blogDao;

    public void setBlogDao(BlogDao blogDao) {
        this.blogDao = blogDao;
    }

    // this is (unsurprisingly) the initialization callback method
    public void init() {
        if (this.blogDao == null) {
            throw new IllegalStateException("The [blogDao] property must be set.");
        }
    }

}
<beans default-init-method="init">

    <bean id="blogService" class="com.foo.DefaultBlogService">
        <property name="blogDao" ref="blogDao" />
    </bean>
</beans>
在顶级<bean/>元素中定义了default-init-method属性,使Spring Ioc 容器解析bean中名为init的方法为初始化回调方法。当bean创建实例并组装时,若bean类中有个一个init()方法,该初始化回调会在合适的时间调用。
联合混合使用多种生命周期回调机制
Spring2.5 以后,控制bean生命周期行为,有三种生命周期回调机制,或者说是三种方式实现:[InitializingBean](#beans-factory-lifecycle-initializingbean) 和 [DisposableBean](#beans-factory-lifecycle-disposablebean) 回调接口;自定义`init()`和`destroy()`方法;[ @PostConstruct and @PreDestroy ](#beans-postconstruct-and-predestroy-annotations)注解。这些方式可以混合使用。
如何一个bean上配置了多种生命周期回调机制,并且每种机制都使用了不同的方法,那么所有的回调方法都会按次序执行。然而,如果配置了相同的方法名,比如
init()方法作为初始化方法,该方法在多种生命周期回调机制中都有配置,但是,该方法只会执行一次。
在一个bean中,配置多种生命周期回调机制,每种机制使用了不同的初始化方法,会按照下列次序调用:
- 带
@PostConstruct注解的方法 InitializingBean回调接口中的afterPropertiesSet()方法- 自定义的
init()方法
销毁回调也使用相同的次序
- 带
@PreDestroy注解的方法 DisposableBean回调接口中的destroy()方法- 自定义的
destroy()方法
容器启动和关闭回调
`Lifecycle`接口定了对象有自己生命周期需求的必须的方法(比如启动停止某些后台处理) ```java public interface Lifecycle {
void start();

void stop();

boolean isRunning();
}
任何Spring管理的对象都可以实现此接口。当`ApplicationContext `接口启动和关闭时,它会调用本容器内所有的`Lifecycle`实现。通过`LifecycleProcessor`来调用,
```java
public interface LifecycleProcessor extends Lifecycle {

    void onRefresh();

    void onClose();

}
注意LifecycleProcessor接口继承了Lifcycle接口。同时,增加了2个方法,用于处理容器的refreshed和closed事件。
startup和shutdown方法调用次序非常重要。若两个对象有依赖关系,依赖方会在依赖启动之后启动,会在依赖停止之前停止。然而,有时依赖并不直接。也许你仅知道某些类型对象优先于另外一种类型启动。此场景中,SmartLifecycle接口也许是个好主意,该接口有个方法getPhase(),此方法是其父接口Phased中的方法:
public interface Phased {

    int getPhase();

}
public interface SmartLifecycle extends Lifecycle, Phased {

    boolean isAutoStartup();

    void stop(Runnable callback);

}
启动时,最低层次的phase最先启动,停止时,该次序逆序执行。因此,若对象实现了SmartLifecycle接口,它的getPhase()方法返回Integer.MIN_VALUE,那么该对象最先启动,最后停止。若是返回了Integer.MAX_VALUE,那么该方法最后启动最先停止(因为该对象依赖其他bean才能运行)。关于phase的值,常规的并未实现SmartLifecycle接口的Lifecycle对象,其值默认为0。因此,负phase值表示要在常规Lifecycle对象之前启动(在常规Lifecycyle对象之后停止),使用 正值则恰恰相反。
如你所见,SmartLifecycle中stop()方法有一个回调参数。所有的实现在关闭处理完成后会调用回调的run()方法。TODO 。它相当于开启了异步关闭功能,和LifecycleProcessor接口默认实现DefaultLifecycleProcessor类的异步,该类会为每个phase的回调等待超时。每个phase默认的超时是30秒。可以重写该类默认的实例,该类在容器内默认bean名称是lifecycleProcessor。如果你仅想修改超时,这么写就足够了。
<bean id="lifecycleProcessor" class="org.springframework.context.support.DefaultLifecycleProcessor">
    <!-- timeout value in milliseconds -->
    <property name="timeoutPerShutdownPhase" value="10000"/>
</bean>
As mentioned, the LifecycleProcessor interface defines callback methods for the refreshing and closing of the context as well. The latter will simply drive the shutdown process as if stop() had been called explicitly, but it will happen when the context is closing. The refresh callback on the other hand enables another feature of SmartLifecycle beans. When the context is refreshed (after all objects have been instantiated and initialized), that callback will be invoked, and at that point the default lifecycle processor will check the boolean value returned by each SmartLifecycle object’s isAutoStartup() method. If "true", then that object will be started at that point rather than waiting for an explicit invocation of the context’s or its own start() method (unlike the context refresh, the context start does not happen automatically for a standard context implementation). The "phase" value as well as any "depends-on" relationships will determine the startup order in the same way as described above.
TODO 书接前文,LifecycleProcessor接口也定义了容器的refreshing和closing事件。后者会驱动shutdown处理,就像是明确的调用了stop()方法,但是它是发生在容器关闭期间。refresh回调开启了SmartLifecyclebean的另一个功能 。当上下文环境刷新时(在所有的对象实例化和初始化之后),则会调用refresh回调,同时,默认的lifecycle processor检查每个SmartLifecycle对象的isAutoStartup()方法返回的布尔值。若为true,对象则会在那时启动,而不是等待容器显示调用之后或者是他自己的start()方法调用之后(这和容器刷新不同,标准的容器实现启动不会自动发生)。phase值和depends-on关系一样,都使用了相同的方法决定了的启动次序。
非web应用中安全的关闭Spring IoC容器
 > 本章适用于非web应用。基于Spring web的应用的`ApplicationContext`实现类,已经提供了支持,用于在应用关闭时安全的关闭Spring IoC容器。
在一个非web应用的环境中使用Spring IoC容器;比如,在一个富客户端桌面的环境中;得在JVM中注册一个shutdown钩子。这么做是为了安全的关闭,在关闭时保证所单例bean的相关的destroy方法会被调用,这样就可以释放所有的资源。当然了,你必须得正确的配置和实现销毁回调。
要注册shutdown钩子,得调用registerShutdownHood()方法,该方法在AbstractApplicationContext类中。
import org.springframework.context.support.AbstractApplicationContext;
import org.springframework.context.support.ClassPathXmlApplicationContext;

public final class Boot {

    public static void main(final String[] args) throws Exception {

        AbstractApplicationContext ctx = new ClassPathXmlApplicationContext(
                new String []{"beans.xml"});

        // add a shutdown hook for the above context...
        ctx.registerShutdownHook();

        // app runs here...

        // main method exits, hook is called prior to the app shutting down...

    }
}
ApplicationContextAware and BeanNameAware
`org.springframework.context.ApplicationContextAware`接口实现类的实例将会持有`ApplicationContext`的引用: ```java public interface ApplicationContextAware {
void setApplicationContext(ApplicationContext applicationContext) throws BeansException;
}
因此可以编程式的使用`ApplicationContext`手动的创建bean,通过`ApplicationContext`接口或者是该接口的子类,比如`ConfigurableApplicationContext`,该类还增加了方法。用途之一是编程式的检索bean,有时非常有用。然而,大多数情况下,要避免编程式检索bean,这样的话你的代码就会和Spring耦合,这不是IoC的风格,Ioc的风格是协作类作为bean的属性。`ApplicationContext`类的其他方法提供了文件资源的访问接口、发布应用事件、访问`MessageSource`消息资源。这些附加的功能请参看[Section 5.15, “Additional Capabilities of the ApplicationContext”](#context-introduction)

自Spring2.5起,可以使用自动装配获取`ApplicationContext`引用。传统的`constructor`和`byType`自动装配模式(详情参看 [Section 5.4.5, “Autowiring collaborators”](#beans-factory-autowire)能为构造参数或者`setter`方法提供一个`ApplicationContext`类的依赖注入。为了更加灵活,还增加了自动注入的注解功能,它能自动注入属性和自动注入多参数方法。使用注解,`ApplicationContext`可以自动注入到`ApplicationContext`类型的属性、构造参数、方法参数。详情参看[Section 5.9.2, “@Autowired”](#beans-autowired-annotation).

`org.springframework.beans.factory.BeanNameAware`接口的实现类,若是由`ApplicationContext`创建了该类的实例,该实例将会持有相关的对象定义的引用。
```java
public interface BeanNameAware {

    void setBeanName(string name) throws BeansException;

}
The callback is invoked after population of normal bean properties but before an initialization callback such as InitializingBean afterPropertiesSet or a custom init-method. TODO这个回调在设置属性之后调用,但是在initialization回调之前,比如InitializingBean的afterPropertiesSet或者 自定义的init-method
Other Aware interfaces
Besides ApplicationContextAware and BeanNameAware discussed above, Spring offers a range of Aware interfaces that allow beans to indicate to the container that they require a certain infrastructure dependency. The most important Aware interfaces are summarized below - as a general rule, the name is a good indication of the dependency type:
除上面讨论过的ApplicationContextAware和BeanNameAware,Spring提供了一些了Aware接口,这些接口可以提供容器中相关的基础(SpringAPI)依赖。最重要的Aware接口参看下面的摘要,命名相当规范,看名字就能知道依赖类型: Table 5.4. Aware interfaces
名称 | 注入依赖 | 详情 ---- | ---- | ------ ApplicationContextAware | ApplicationContext | Section 5.6.2, “ApplicationContextAware and BeanNameAware” ApplicationEventPublisherAware | 发布事件 | Section 5.15, “Additional Capabilities of the ApplicationContext” BeanClassLoaderAware | 加载bean的类加载器 | Section 5.3.2, “Instantiating beans”BeanFactoryAware | 声明BeanFactory | Section 5.6.2, “ApplicationContextAware and BeanNameAware” BeanNameAware | 生命bean 的名字 | Section 5.6.2, “ApplicationContextAware and BeanNameAware” BootstrapContextAware | Resource adapter BootstrapContext the container runs in. Typically available only in JCA aware ApplicationContexts | Chapter 26, JCA CCI LoadTimeWeaverAware | Defined weaver for processing class definition at load time | Section 9.8.4, “Load-time weaving with AspectJ in the Spring Framework” MessageSourceAware | Configured strategy for resolving messages (with support for parametrization and internationalization) | Section 5.15, “Additional Capabilities of the ApplicationContext”NotificationPublisherAware | Spring JMX notification publisher | Section 25.7, “Notifications” PortletConfigAware | Current PortletConfig the container runs in. Valid only in a web-aware Spring ApplicationContext | Chapter 20, Portlet MVC Framework PortletContextAware | Current PortletContext the container runs in. Valid only in a web-aware Spring ApplicationContext | Chapter 20, Portlet MVC Framework ResourceLoaderAware | Configured loader for low-level access to resources | Chapter 6, Resources ServletConfigAware | Current ServletConfig the container runs in. Valid only in a web-aware Spring ApplicationContext | Chapter 17, Web MVC framework
注意,这些接口的用法使代码与Spring API耦合,这不符合IoC风格。同样,除非有需求的基础bean才使用编程式访问容器。
Spring Bean的继承
Spring bean定义包含各种配置信息,包括构造参数,属性值,容器特定信息例如初始化方法、静态工厂方法等等。Spring子bean定义继承父bean定义配置。子bean能覆盖值,若有需要还能增加其他配置。使用继承能少打好多字。这是模板的一种形式,讲究的就是效率。
编程式的方式使用ApplicationContext场景,子bean的定义代表ChildBeanDefinition类。大多数用户不需要使用如此底层的SpringAPI,通常是使用类似ClassPathXmlApplicationContext的bean声明。若用XML配置,通过parent属性表示子bean定义,指定父bean的标识作为parent属性值。
<bean id="inheritedTestBean" abstract="true"
        class="org.springframework.beans.TestBean">
    <property name="name" value="parent"/>
    <property name="age" value="1"/>
</bean>

<bean id="inheritsWithDifferentClass"
        class="org.springframework.beans.DerivedTestBean"
        parent="inheritedTestBean" init-method="initialize">
    <property name="name" value="override"/>
    <!-- the age property value of 1 will be inherited from parent -->
</bean>
若子bean中未指定class属性,则子bean集成父bean的class属性,子bean可以重写覆盖此属性。若要覆盖重写class属性,子bean的class类型必须兼容父bean的class,也就是,子bean必须能接收父bean的属性值。
其他的属性也是通常取自子bean的配置:depends on, autowire mode, dependency check, singleton, lazy init.
前面样例中,使用abstract属性指定了父bean为抽象定义。如父bean中未指定class,则必须指定父bean为抽象bean。看代码:
<bean id="inheritedTestBeanWithoutClass" abstract="true">
    <property name="name" value="parent"/>
    <property name="age" value="1"/>
</bean>

<bean id="inheritsWithClass" class="org.springframework.beans.DerivedTestBean"
        parent="inheritedTestBeanWithoutClass" init-method="initialize">
    <property name="name" value="override"/>
    <!-- age will inherit the value of 1 from the parent bean definition-->
</bean>
上述的父bean不能实例化,因为她不完整,是抽象的bean,作为子bean的纯模板时,它是非常有用的。试试通过属性引用或者使用getBean()方法调用该bean,会抛错。容器内部的preInstantiateSingletons()方法会忽略抽象bean。
ApplicationContext类默认会预先实例化所有的单例bean。因此,如果有做模板用的父bean,父bean定义中指定了classs属性,则必须指定abstract为true,这是非常重要的,否则容器会预先实例化该bean。
容器扩展点
通常开发者无需自己实现`APplicationContext`,而是使用插件扩展Spring IoC容器,插件是某些指定的集成接口的实现。下面记账讲解这些集成接口。
使用BeanPostProcessor自定义bean
`BeanPostProcessor`接口定义了实例化逻辑、依赖逻辑等回调方法,即可以自定义也可以覆盖容器默认方法。若果要在Spring容器完成实例化、配置、初始化bean之后执行自定义逻辑,则以插件方式实现`BeanPostProcessor`。
可以配置多个BeanPostProcessor实例,可以设置BeanPostProcessors的order属性来控制其执行次序。让BeanPostProcessor实现Ordered接口,就能设置次属性。如果使用自定义BeanPostProcessor,也得考虑实现Ordered接口。更多的细节,参阅BeanPostProcessor和Ordered接口的javadocs。也可以查阅programmatic registration of BeanPostProcessors译注,SPring参考手册中这个链接确实没有
NOTE
BeanPostProcessors操作bean的实例;也就是,Spring IoC容器实例化bean的实例时BeanPostProcessors开始运行。
BeanPostProcessors在各自容器内有效。当使用容器继承时,BeanPostProcessors缺不会继承。如果在某容器内定义了BeanPostProcessor,近在本容器中生效。或句话说,一个容器中的bean不会使用另一个容器内的BeanPostProcessor处理,继承的容器也不行。要改变bean定义(也就是,bean定义的蓝图,译注蓝图应该是指各种配置元数据,比如xml、注解等),你得使用
BeanFactorPostProcessor,详情参看in Section 5.8.2, “Customizing configuration metadata with a BeanFactoryPostProcessor”
org.springframework.beans.factory.config.BeanPostProcessor接口有2个回调方法组成。当这样的类在容器内注册为post-processor,容器创建所有bean,在容器初始化方法(比如InitializingBean的afterProperieSet()方法和其他所有的声明的init方法)和所有bean 初始化回调之前,运行post-processor回调。
ApplicationContext自动探测在配置元数据中定义的BeanPostProcessor。ApplicationContext注册这些bean为post-processors,这样就可以在bean创建之前调用。Bean的post-processors可以像其他bean那样部署到容器里。
注意,在configuration类中,使用@Bean工厂方法声明BeanPostProcessor,该工厂方法的返回类型必须是该实现类或者至少得是org.springframework.beans.factory.config.BeanPostProcessor接口,清楚的标识出post-processor。否则,ApplicationContext不会开启根据类型自动探测。因为BeanPostProcessor需要尽早的实例化,这样在容器中即可用于其他bean的初始化,因此这种尽早的类型探测至关重要。
注意 编程式注册BeanPostProcessor 尽管推荐的
BeanPostProcessor的注册方式是通过ApplicationContext的自动探测机制,但是也可以使用ConfigurableBeanFactory类调用其addBeanPostProcessor实现编程式的注册。编程式注册是非常有用的,比如用于在注册之前实现等价的逻辑,再比如跨容器复制post processors。注意使用编程式注册BeanPostProcessors并不会遵守Ordered接口的次序。注册的顺序就是执行的次序。此外还得记得,编程式的注册BeanPostProcessors会在自动探测注册的BeanPostProcessors之前处理,无论自动探测注册的BeanPostProcessors指定了多么优先的次序。 注意 BeanPostProcessor和AOP的自动代理 Classes that implement the BeanPostProcessor interface are special and are treated differently by the container. All BeanPostProcessors and beans that they reference directly are instantiated on startup, as part of the special startup phase of the ApplicationContext. Next, all BeanPostProcessors are registered in a sorted fashion and applied to all further beans in the container. Because AOP auto-proxying is implemented as a BeanPostProcessor itself, neither BeanPostProcessors nor the beans they reference directly are eligible for auto-proxying, and thus do not have aspects woven into them. 容器会特殊对待BeanPostProcessor接口。所有的BeanPostProcessors及引用了BeanPostProcessors的bean会在启动时实例化,作为ApplicationContext特殊的启动阶段。接下来,所有的BeanPostProcessors都会按照次序注册到容器中,在其他bean使用BeanPostProcessors处理时也会使用此顺序。因为AOP的auto-proxying自动代理是BeanPostProcessor的默认实现,它既不引用BeanPostProcessors也不引用其他bean,不会发生auto-proxying自动代理,因此不会有切面织入。TODO对于
BeanPostProcessor类型的bean,会看到这样一条日志:"Bean foo is not eligible for getting processed by all BeanPostProcessor interfaces (for example: not eligible for auto-proxying)" 注意,如果有bean通过自动注入或者@Resource(可能会导致自动注入)注入到BeanPostProcessor,在使用类型匹配检索依赖bean时Spring也许会访问到不期望的bean,导致生成不合适的auto-proxying自动代理或者其他post-processing。举个栗子,如果使用@Resouce依赖注解,而且field/setter上注解的名字和bean中声明名字不一致时,Spring将会使用类型匹配访问其他bean。
下面 示例中讲解了在ApplicationContext中如何撰写、注册、使用BeanPostProcessors
栗子:Hello World,BeanPostProcessor风格 第一个示例,讲解基础用法。栗子展示了一个自定义BeanPostProcessor实现,功能是在容器创建bean时,调用每一个bean的toString()方法并输出到控制台。 上干活,fuck goods
package scripting;

import org.springframework.beans.factory.config.BeanPostProcessor;
import org.springframework.beans.BeansException;

public class InstantiationTracingBeanPostProcessor implements BeanPostProcessor {

    // simply return the instantiated bean as-is
    public Object postProcessBeforeInitialization(Object bean,
            String beanName) throws BeansException {
        return bean; // we could potentially return any object reference here...
    }

    public Object postProcessAfterInitialization(Object bean,
            String beanName) throws BeansException {
        System.out.println("Bean '" + beanName + "' created : " + bean.toString());
        return bean;
    }

}
<?xml version="1.0" encoding="UTF-8"?>
<beans xmlns="http://www.springframework.org/schema/beans"
    xmlns:xsi="http://www.w3.org/2001/XMLSchema-instance"
    xmlns:lang="http://www.springframework.org/schema/lang"
    xsi:schemaLocation="http://www.springframework.org/schema/beans
        http://www.springframework.org/schema/beans/spring-beans.xsd
        http://www.springframework.org/schema/lang
        http://www.springframework.org/schema/lang/spring-lang.xsd">

    <lang:groovy id="messenger"
            script-source="classpath:org/springframework/scripting/groovy/Messenger.groovy">
        <lang:property name="message" value="Fiona Apple Is Just So Dreamy."/>
    </lang:groovy>

    <!--
    when the above bean (messenger) is instantiated, this custom
    BeanPostProcessor implementation will output the fact to the system console
    -->
    <bean class="scripting.InstantiationTracingBeanPostProcessor"/>

</beans>
注意InstantiationTracingBeanPostProcessor是如何定义的。它甚至没有名字,因为它能像其他bean那样依赖注入。(上面的配置中,使用Groovy script创建了个bean。Spring动态语言支持的详细讲解参看Chapter 29, Dynamic language support
下面的java应用使用上面的配置和代码执行,
import org.springframework.context.ApplicationContext;
import org.springframework.context.support.ClassPathXmlApplicationContext;
import org.springframework.scripting.Messenger;

public final class Boot {

    public static void main(final String[] args) throws Exception {
        ApplicationContext ctx = new ClassPathXmlApplicationContext("scripting/beans.xml");
        Messenger messenger = (Messenger) ctx.getBean("messenger");
        System.out.println(messenger);
    }

}
将会输出: Bean messenger created : org.springframework.scripting.groovy.GroovyMessenger@272961 org.springframework.scripting.groovy.GroovyMessenger@272961
Example: The RequiredAnnotationBeanPostProcessor 对于扩展Spring IoC容器,使用回调函数或者注解联结一个自定义BeanPostProcessor实现类是常用的手段。例如Spring的RequiredAnnotationBeanPostProcessor,是个BeanPostProcessor实现类,spring内置,作用是确保Spring bean定义上的带注解的JavaBean属性确实被注入了值。
使用BeanFactoryPostProcessor自定义配置元数据
接下来的扩展点讲一讲`org.springframework.beans.factory.config.BeanFactoryPostProcessor`。此接口的语法和`BeanPostProcessor`类似,有一个主要的不同之处:`BeanFactoryPostProcessor`操作bean的配置元数据;也就是,Spring IoC容器允许`BeanFactoryPostProcessor`读取配置元数据并且在容器实例化bean之前可能修改配置。
可以配置多个BeanFactoryPostProcessors,通过设置order属性控制它们的执行次序。BeanFactoryPostProcessor若是实现了Ordered接口,则可设置该属性。若是自定义BeanFactorPostProcessor,同时得考虑实现Ordered接口。详情参阅BeanFactoryPostProcessor的javadocs。
NOTE 如果要改变bean实例(根据配置元数据创建的对象),那么就需要使用
BeanPostProcessor(上一章描述的in Section 5.8.1, “Customizing beans using a BeanPostProcessor”)。当使用BeanFactoryPostProcessor处理实例时(使用BeanFactory.getBean()方法),如此早的处理bean实例,违反了标准的容器生命周期。通过bean post processing也许会引起负面影响。BeanFactoryPostProcessors的作用域也是在各自的容器内。如果使用容器继承,这一点也是应该注意的。如果在某容器内定义了BeanFactoryPostProcessor,则仅应用于本容器。某容器内的bean定义,不会使用另一个容器的BeanFactoryPostProcessors处理,容器之间有继承关系也不行。
为了让配置元数据的改变应用,声明在ApplicationContext内的bean工厂post-processor都是自动执行。Spring包含一系列的预先定义的bean工厂post-processors,比如PropertyOverrideConfigurer和PropertyPlaceholderConfigurer。也可以使用自定义BeanFactoryPostProcessor,比如注册一个自定义属性编辑器。
ApplicationContext自动探测BeanFactoryPostProcessor接口的实现类。容器使用这些bean作为bean工厂post-processors。可以像其他bean那样将post-processor部署在容器内。
NOTE 若使用
BeanPostProcessors,通常不会给BeanFactoryPostProcessors配置延迟初始化。如果没有其他bean引用BeanFactoryPostProcessor,则post-processor根本不会实例化。因此设置延迟初始化将会被忽略,BeanFactoryPostProcessor将会及时实例化,甚至在<beans/>元素设置了default-lazy-init属性为true也不行。
Example: the Class name substitution PropertyPlaceholderConfigurer
可以使用`PropertyPlaceholderConfigurer`将bean的属性值使用标准的Java Properties格式定义在一个单独的文件中。这样可以将应用的自定义环境配置属性隔离出来,比如数据库URLs和密码,这样就降低了修改容器内XML配置或者Java 代码的的复杂性和风险。
考虑下面的XML配置片段,使用了placeholder值定义了DataSource。样例展示了一个外部的Properties文件的属性配置。运行时,PropertyPlaceholderConfigurer会应用到配置元数据中,替换指定格式的placeholders,格式为${property-name},这样的格式与Ant/log4j/JSP EL风格相同。
<bean class="org.springframework.beans.factory.config.PropertyPlaceholderConfigurer">
    <property name="locations" value="classpath:com/foo/jdbc.properties"/>
</bean>

<bean id="dataSource" destroy-method="close"
        class="org.apache.commons.dbcp.BasicDataSource">
    <property name="driverClassName" value="${jdbc.driverClassName}"/>
    <property name="url" value="${jdbc.url}"/>
    <property name="username" value="${jdbc.username}"/>
    <property name="password" value="${jdbc.password}"/>
</bean>
在标准java Properties格式文件中实际的值:
jdbc.driverClassName=org.hsqldb.jdbcDriver
jdbc.url=jdbc:hsqldb:hsql://production:9002
jdbc.username=sa
jdbc.password=root
因此,字串${jdbc.username}在运行时赋值为sa,其他的${key}都会被替换为文件中与key对应的值。PropertyPlaceholderConfigurer检查bean定义中大多数的placeholders占位符,placeholder的前缀和后缀都是自定义的。
使用Spring2.5引入的上下文命名空间,就可以用一个专用配置元素配置属性placeholders占位符。可以指定多个locations,多个locations使用,逗号分割。
<context:property-placeholder location="classpath:com/foo/jdbc.properties"/>
PropertyPlaceholderConfigurer不仅仅检索指定的Properties文件。默认情况,若是在指定的Properties配置文件中找不到指定的属性property,也会检查Java 的系统属性System properties。通过设置systemPropertiesMode属性的值,定义默认查找行为,该属性值有几个取值:
- never:不检查系统属性
- fallback:如果未在指定文件中解析出属性值,则检查系统属性。此项为默认行为。
- override:先检查系统属性。系统属性会覆盖其他配置文件中的属性。
PropertyPlaceholderConfigurer更多详情参看javadocs
TIP 可以使用
PropertyPlaceholderConfigurer替换类名,有时,某些类在运行时才能确定,那么这将非常有用。
<bean class="org.springframework.beans.factory.config.PropertyPlaceholderConfigurer">
    <property name="locations">
        <value>classpath:com/foo/strategy.properties</value>
    </property>
    <property name="properties">
        <value>custom.strategy.class=com.foo.DefaultStrategy</value>
    </property>
</bean>
<bean id="serviceStrategy" class="${custom.strategy.class}"/>
若类在运行时期间不能解析为合法类,
ApplicationContext创建非延迟初始化bean的preInstantiateSingletons()期间抛错误,
Example: the PropertyOverrideConfigurer
`PropertyOverrideConfigurer`,是另一个ben工厂的`post-processor`,类似于`PropertyPlaceholderConfigurer`,但是有不同之处,bean源定义可以设置默认值或者根本不设置值。若一个`overriding Properties`文件不包含某个bean属性,就使用默认的上下文定义。
注意bean定义并不知道它会被重写,所以使用了重写配置在XML配置中并不直观。如果有多个PropertyOverrideConfigurer实例为相同的bean属性配置了不同的值,最后一个实例配置生效。
Properties文件配置格式如下
beanName.property=value
举例:
dataSource.driverClassName=com.mysql.jdbc.Driver
dataSource.url=jdbc:mysql:mydb
上述文件中的配置,将会赋值给在容器中的定义的bean的相应属性 ,bean的名字是datasource,有driver属性和url属性
Compound property names are also supported, as long as every component of the path except the final property being overridden is already non-null (presumably initialized by the constructors). In this example…
同样支持复合属性,属性路径可以要多长有多长,但是属性不能为null(),看样例:
foo.fred.bob.sammy=123
bean foo有属性fred,fred有属性bob,bob有属性sammy,sammy赋值为123
Note 指定重写值都是字面值;不会解析为bean引用。就算是指定的值,在XML的bean定义中bean的名字,也不会解析为该引用,而是解析为字面值。
使用Spring 2.5中引入的上下文命名空间,可以为配置属性指定专用配置元素
<context:property-override location="classpath:override.properties"/>
使用FactoryBean自定义实例化逻辑
对象实现`org.springframework.beans.factory.FactoryBean`接口,则成为它本身的工厂。
FactoryBean接口是Spring IoC容器实例化逻辑的扩展点。假如初始化代码非常复杂,此时使用java编码比使用XML配置更容易表达。这种场景中,就可以自定义FactoryBean,在类中撰写复杂的初始化程序,并将其作为插件加入到容器中。
FactoryBean接口有3个方法:
- Object getObject():返回本工厂创建的对象实例。此实例也许是共享的,依赖于该工厂返回的是单例或者是原型。
- boolean isSingleton():如果
FactoryBean返回的是单例,该方法返回值为true,否则为false - Class getObjectType():返回对象类型。对象类型是
getObject()方法返回的对象的类型,如果不知道的类型则返回null。
FactoryBean概念和接口在Spring框架中大量使用。Spring内置的有超过50个实现。
当使用ApplicationContext的getBean()方法获取FactoryBean实例本身而不是它所产生的bean,则要使用&符号+id。比如,现有FactoryBean,它有id,在容器上调用getBean("myBean")将返回FactoryBean所产生的bean,调用getBean("&myBean")将返回FactoryBean它本身的实例。
基于注解的把配置元数据
**注解比XML好么?** ```text 注解比XML好么,简单的说得看情况。详细的说,各有优缺点。因为定义的方式,注解在声明处提供了大量的 上下文信息,所以注解配置要更简洁。然而,XML擅长在不接触源码或者无需反编译的情况下组装组件。 虽然有这样的争议:注解类不再是`POJO`,并且配置更加分散难以控制, 但是还是有人更喜欢在源码上使用注解配置。
无论选择哪一样,Spring都能很好的支持,甚至混合也行。值得指出的是, 使用[JavaConfig](#beans-java)选项,Spring能在不接触目标组件源码的情况下 无侵入的使用注解,这可以通过IDE完成 Spring Tool Suite
对于XML配置,还有另外一个选择,基于注解的配置,它是依赖于字节码元数据,替代XML组装组件。码农码畜可以使用注解替代XML描述bean的组装,开发者将配置撰写到组件类上,使用注解标注相关的类、方法、域上。就像前面提到的 [in the section called “Example: The RequiredAnnotationBeanPostProcessor”](#beans-factory-extension-bpp-examples-rabpp),使用`BeanPostProcessor`联结注解是常见的扩展Spring IoC容器的手段。举个栗子,Spring2.0引入的通过[`@Required`](#beans-required-annotation)注解强制检查必须属性值。Spring 2.5采用了类似的手法使用注解处理依赖注入。本质上,`@Autowired`注解提供了相同的能力,在这一章有详解[Section 5.4.5, “Autowiring collaborators”](#beans-factory-autowire),但是`@Autowired`提供了更细粒度的控制和更强的能力。Spirng 2.5也增加了对JSR-250注解的支持,比如`@PostConstruct`,`@PreDestory`。Srping3.0增加支持了JSR-330(JAVA依赖注入)注解,这些注解在`javax.inject`包内,例如`@Inject`和`@Named`。详情参看那些注解的[相关章节](#beans-standard-annotations)。

>**注意**
> 注解注入在XML注入*之前*执行,因此同时使用这两种方式注入时,XML配置会覆盖注解配置。
同样的Spring风格,就像特别的bean定义那样注册他们,但是也能像下面这样隐式注册(注意包含context namespace上下文命名空间)
```xml
<?xml version="1.0" encoding="UTF-8"?>
<beans xmlns="http://www.springframework.org/schema/beans"
xmlns:xsi="http://www.w3.org/2001/XMLSchema-instance"
xmlns:context="http://www.springframework.org/schema/context"
xsi:schemaLocation="http://www.springframework.org/schema/beans
http://www.springframework.org/schema/beans/spring-beans.xsd
http://www.springframework.org/schema/context
http://www.springframework.org/schema/context/spring-context.xsd">
<context:annotation-config/>
</beans>
(隐式注册的post-processors包括AutowiredAnnotationBeanPostProcessor,CommonAnnotationBeanPostProcessor,PersistenceAnnotationBeanPostProcessor,还有前面提到的RequiredAnnotationBeanPostProcessor)
注意
<context:annotation-config/>仅会检索它所在的应用context上下文中bean上的注解。也就是,如果在WebApplicationContext中为DispatcherServlet设置<context:annotation-config/>,它仅会检查controllers中@Autowired的bean,并不会检查service。详情参看Section 17.2, “The DispatcherServlet”
@Required
`@Required`注解应用于bean的setter方法,像这样: ```java public class SimpleMovieLister {
private MovieFinder movieFinder;

@Required
public void setMovieFinder(MovieFinder movieFinder) {
    this.movieFinder = movieFinder;
}

// ...
}
这个注解意思是受到影响的bean属性在配置时必须赋值,在bean定义中明确指定其属性值或者通过自动注入。若该属性未指定值,容器会抛异常。这导致及时明确的失败,避免`NullPointerExceptions`或者晚一些时候才发现。仍然推荐,你在编码过程中使用断言,举个栗子,在`init`方法,做了这些强制的必须引用的检查,但是属性值甚至不再容器范围内。

<h4 id='beans-autowired-annotation'>@Autowired</h4>
如你所料,`@Autowired`注解也是应用在"传统的"setter方法上:
```java
public class SimpleMovieLister {

    private MovieFinder movieFinder;

    @Autowired
    public void setMovieFinder(MovieFinder movieFinder) {
        this.movieFinder = movieFinder;
    }

    // ...

}
注意 在下面的样例中,使用JSR 330的
@Inject注解可以替代@autowired注解。详情参看这里
也可以将注解用于带一个或多个参数的其他方法上,看样例:
public class MovieRecommender {

    private MovieCatalog movieCatalog;

    private CustomerPreferenceDao customerPreferenceDao;

    @Autowired
    public void prepare(MovieCatalog movieCatalog,
            CustomerPreferenceDao customerPreferenceDao) {
        this.movieCatalog = movieCatalog;
        this.customerPreferenceDao = customerPreferenceDao;
    }

    // ...

}
@Autowired也可以应用于构造函数上或者属性上:
public class MovieRecommender {

    @Autowired
    private MovieCatalog movieCatalog;

    private CustomerPreferenceDao customerPreferenceDao;

    @Autowired
    public MovieRecommender(CustomerPreferenceDao customerPreferenceDao) {
        this.customerPreferenceDao = customerPreferenceDao;
    }

    // ...

}
也可以用在数组上 ,注解标注于属性或者方法上,数组的类型是ApplicationContext中定义的bean的类型。
public class MovieRecommender {

    @Autowired
    private MovieCatalog[] movieCatalogs;

    // ...

}
同样也可以应用于集合
public class MovieRecommender {

    private Set<MovieCatalog> movieCatalogs;

    @Autowired
    public void setMovieCatalogs(Set<MovieCatalog> movieCatalogs) {
        this.movieCatalogs = movieCatalogs;
    }

    // ...

}
注意 如果你想指定数组元素或者集合元素的次序,那么可以通过以下方式:bean实现
org.springframework.core.Ordered接口,或者使用Order或者使用@priority注解。
甚至Map也可以自动注入autowired,只要key的类型是String。 Map的value将会包含期待类型的所有bean,key是相应bean的name:
public class MovieRecommender {

    private Map<String, MovieCatalog> movieCatalogs;

    @Autowired
    public void setMovieCatalogs(Map<String, MovieCatalog> movieCatalogs) {
        this.movieCatalogs = movieCatalogs;
    }

    // ...

}
默认情况下,当没有候选bean可用的时候自动注入会失败;在方法上、构造函数上、域上的注解,默认是必须的。这个也是可以设置为非必须的,看样例:
public class SimpleMovieLister {

    private MovieFinder movieFinder;

    @Autowired(required=false)
    public void setMovieFinder(MovieFinder movieFinder) {
        this.movieFinder = movieFinder;
    }

    // ...

}
Only one annotated constructor per-class can be marked as required, but multiple non-required constructors can be annotated. In that case, each is considered among the candidates and Spring uses the greediest constructor whose dependencies can be satisfied, that is the constructor that has the largest number of arguments. 每个类中只有一个被注解的构造函数能被标记为
required,但是其他构造函数也能被注解。这种情况下,每个构造函数都会在候选者之间被考虑,Spring使用贪婪模式选取构造函数,也就是拥有最多数量构造参数的那一个。TODO 推荐使用@Autowired的required属性覆盖@Required注解。required属性表名那个属性对于自动注入可能不需要,如果不能被装配则属性将会被忽略。Required,另一方面,更加强调的是,强制执行设置属性值,可以通过容器提供的任何手段。
可以使用@Autowired注入常见的Spring API的依赖:BeanFactory,ApplicationContext,Environment,ResourceLoader,ApplicationEventPublisher,MessageSource。这些接口和他们的子类及实现类都可以比如,ConfigurableApplicationContext,ResourcePatternResolver都可以自动解析,无需特别设置。
public class MovieRecommender {

    @Autowired
    private ApplicationContext context;

    public MovieRecommender() {
    }

    // ...

}
@Autowired, @Inject, @Resource, and @Value注解由BeanPostProcessor接口的实现类处理,也就是说你不能使用自定义的BeanPostProcessor或者自定义BeanFactoryPostProcessor应用这些注解。这些类型的组装,必须明确的由XML或者使用Spring@Bean方法完成。
使用限定符对自动注入注解微调
因为根据类型自动注入会导致多个候选者,对于选择哪个候选者则需要更细粒的控制。其中一种方式是使用Spring的`@Qualifier`注解。可以将`qualifier`关联指定参数,让类型匹配自动注入可精准的选择所需的bean。看样例: ```java public class MovieRecommender {
@Autowired
@Qualifier("main")
private MovieCatalog movieCatalog;

// ...
}
`@Qualifier`注解也可以在构造参数或者方法参数上使用:
```java
public class MovieRecommender {

    private MovieCatalog movieCatalog;

    private CustomerPreferenceDao customerPreferenceDao;

    @Autowired
    public void prepare(@Qualifier("main")MovieCatalog movieCatalog,
            CustomerPreferenceDao customerPreferenceDao) {
        this.movieCatalog = movieCatalog;
        this.customerPreferenceDao = customerPreferenceDao;
    }

    // ...

}
下面看看相应的bean定义,也就是上例中Qualifier("main")的bean是如何定义的,也就是如何制定bean的Qualifier:
<?xml version="1.0" encoding="UTF-8"?>
<beans xmlns="http://www.springframework.org/schema/beans"
    xmlns:xsi="http://www.w3.org/2001/XMLSchema-instance"
    xmlns:context="http://www.springframework.org/schema/context"
    xsi:schemaLocation="http://www.springframework.org/schema/beans
        http://www.springframework.org/schema/beans/spring-beans.xsd
        http://www.springframework.org/schema/context
        http://www.springframework.org/schema/context/spring-context.xsd">

    <context:annotation-config/>

    <bean class="example.SimpleMovieCatalog">
        <qualifier value="main"/>

        <!-- inject any dependencies required by this bean -->
    </bean>

    <bean class="example.SimpleMovieCatalog">
        <qualifier value="action"/>

        <!-- inject any dependencies required by this bean -->
    </bean>

    <bean id="movieRecommender" class="example.MovieRecommender"/>

</beans>
bean的name会作为备用qualifier值。因此你可以定义bean的id为main替代内嵌的qualifier元素,这将同样会匹配上。然而,虽然可以使用此惯例通过name去引用,但是@Autowired是基于类型驱动注入,qualifiers只是可选项。这就意味着qualifier值,甚至是bean 的name作为备选项,只是为了缩小类型匹配的范围;他们并不能作为引用的bean的唯一标示符。好的qualifier值是main,EMEA,persistent,能表达具体的组件的特性,这些qualifier独立于bean的id,因为id可能是匿名bean自动生成的。
限定符Qualifiers也能应用于集合,就像上面讨论的那样,举个栗子,设置Set<MovieCtalog>。这个场景中,根据声明的限定符qualifiers所匹配的bean都会被注入到集合内。这意味着限定符qualifiers并不是唯一的;它们更像是简单的分类。比如,定义多个beanMovieCatalog,使用相同的限定符qulifier值action;这些bean都将被注入到带有@Qualifier("action")注解的Set<MovieCatalog>中。
若要通过name名字来驱动注解注入,首先不能使用
@Autowired,甚至不能使用@Qualifier来表示引用bean。而是,使用JSR-250的Resource注解,该注解能在语法上标识出目标组件的唯一标识,匹配时将会忽略声明bean的类型。使用此语法的导致了这样的结果,包含某类型bean的集合或者map不能通过
@Autowired注解注入,因为@Resouce并不是使用类型匹配的。这些bean使用@Resource,将会通过唯一的name引用指定的集合或者map。@Autowired应用于域field,构造函数,和多参数方法,允许在参数上使用qualifier限定符注解缩小取值范围。作为对比,@Resouce仅支持域field和bean属性的setter方法,该方法只能有一个参数。因此,如果你注入的目标是构造函数或者是多参数方法,你得使用qualifiers限定符。
You can create your own custom qualifier annotations. Simply define an annotation and provide the @Qualifier annotation within your definition: 你可以创建自定义的限定符qualifier注解。定义一个简单的的注解,在定义上提供一个@Qulifier注解:
@Target({ElementType.FIELD, ElementType.PARAMETER})
@Retention(RetentionPolicy.RUNTIME)
@Qualifier
public @interface Genre {

    String value();
}
这是,你就能在自动装配域和参数上使用自定义qualifier限定符:
public class MovieRecommender {

    @Autowired
    @Genre("Action")
    private MovieCatalog actionCatalog;
    private MovieCatalog comedyCatalog;

    @Autowired
    public void setComedyCatalog(@Genre("Comedy") MovieCatalog comedyCatalog) {
        this.comedyCatalog = comedyCatalog;
    }

    // ...

}
接下来,提供候选者bean定义的信息。可以在<bean/>标签上增加<qualifier/>标签子元素,然后指定type类型和value值来匹配自定义的qualifier注解。type是自定义注解的权限定类名(包路径+类名)。如果没有重名的注解,那么可以使用类名(不含包路径)。看样例:
<?xml version="1.0" encoding="UTF-8"?>
<beans xmlns="http://www.springframework.org/schema/beans"
    xmlns:xsi="http://www.w3.org/2001/XMLSchema-instance"
    xmlns:context="http://www.springframework.org/schema/context"
    xsi:schemaLocation="http://www.springframework.org/schema/beans
        http://www.springframework.org/schema/beans/spring-beans.xsd
        http://www.springframework.org/schema/context
        http://www.springframework.org/schema/context/spring-context.xsd">

    <context:annotation-config/>

    <bean class="example.SimpleMovieCatalog">
        <qualifier type="Genre" value="Action"/>
        <!-- inject any dependencies required by this bean -->
    </bean>

    <bean class="example.SimpleMovieCatalog">
        _<qualifier type="example.Genre" value="Comedy"/>
        <!-- inject any dependencies required by this bean -->
    </bean>

    <bean id="movieRecommender" class="example.MovieRecommender"/>

</beans>
在Section 5.10, “Classpath scanning and managed components”中,你会看到基于注解的XMLqualifier限定名元数据。详细的信息参看Section 5.10.8, “Providing qualifier metadata with annotations”.
在某些场景中,若不给注解指定value值的话可能不能满足需求。出于范型目的的注解,可以应用到不同类型的依赖。比如,你可以提供一个离线目录在无网络连接时候任然可以检索。先定义一个简单的注解:
@Target({ElementType.FIELD, ElementType.PARAMETER})
@Retention(RetentionPolicy.RUNTIME)
@Qualifier
public @interface Offline {

}
然后在自动装配的field域或者propety属性上增加该注解:
public class MovieRecommender {

    @Autowired
    @Offline
    private MovieCatalog offlineCatalog;

    // ...

}
现在,bean的定义只需要指定限定qualifier类型:
<bean class="example.SimpleMovieCatalog">
    <qualifier type="Offline"/>
    <!-- inject any dependencies required by this bean -->
</bean>
也可以为自定义限定名qualifier注解增加属性,用于替代简单的value属性。如果有多个属性值在自动装配的域field或者是参数上指定,bean的定义必须全部匹配这些属性值才能作为自动装配的候选者。举个栗子,看样例代码:
@Target({ElementType.FIELD, ElementType.PARAMETER})
@Retention(RetentionPolicy.RUNTIME)
@Qualifier
public @interface MovieQualifier {

    String genre();

    Format format();

}
Format是个枚举enum:
public enum Format {
    VHS, DVD, BLURAY
}
需要自动装配的域field都是用自定义qulifier注解,注解中都设置了2个属性:genre和format:
public class MovieRecommender {

    @Autowired
    @MovieQualifier(format=Format.VHS, genre="Action")
    private MovieCatalog actionVhsCatalog;

    @Autowired
    @MovieQualifier(format=Format.VHS, genre="Comedy")
    private MovieCatalog comedyVhsCatalog;

    @Autowired
    @MovieQualifier(format=Format.DVD, genre="Action")
    private MovieCatalog actionDvdCatalog;

    @Autowired
    @MovieQualifier(format=Format.BLURAY, genre="Comedy")
    private MovieCatalog comedyBluRayCatalog;

    // ...

}
最后,Spring bean的定义应该包含匹配qualifier的values值。这个例子中展示了beanmeta属性替代的<qualifier/>子元素。如果可以,<qualifier/>及其属性优先生效,但是若没有qualifier出现,自动装配机制会使用<meta/>标签的值,看样例,后面的2个bean定义演示了meta标签:
<?xml version="1.0" encoding="UTF-8"?>
<beans xmlns="http://www.springframework.org/schema/beans"
    xmlns:xsi="http://www.w3.org/2001/XMLSchema-instance"
    xmlns:context="http://www.springframework.org/schema/context"
    xsi:schemaLocation="http://www.springframework.org/schema/beans
        http://www.springframework.org/schema/beans/spring-beans.xsd
        http://www.springframework.org/schema/context
        http://www.springframework.org/schema/context/spring-context.xsd">

    <context:annotation-config/>

    <bean class="example.SimpleMovieCatalog">
        <qualifier type="MovieQualifier">
            <attribute key="format" value="VHS"/>
            <attribute key="genre" value="Action"/>
        </qualifier>
        <!-- inject any dependencies required by this bean -->
    </bean>

    <bean class="example.SimpleMovieCatalog">
        <qualifier type="MovieQualifier">
            <attribute key="format" value="VHS"/>
            <attribute key="genre" value="Comedy"/>
        </qualifier>
        <!-- inject any dependencies required by this bean -->
    </bean>

    <bean class="example.SimpleMovieCatalog">
        <meta key="format" value="DVD"/>
        <meta key="genre" value="Action"/>
        <!-- inject any dependencies required by this bean -->
    </bean>

    <bean class="example.SimpleMovieCatalog">
        <meta key="format" value="BLURAY"/>
        <meta key="genre" value="Comedy"/>
        <!-- inject any dependencies required by this bean -->
    </bean>

</beans>
范型作为自动装配限定符
`@Qualifier`注解,也常用于java范型作为隐式的限定符qualification。比如:假如有下列配置: ```java @Configuration public class MyConfiguration {
@Bean
public StringStore stringStore() {
    return new StringStore();
}

@Bean
public IntegerStore integerStore() {
    return new IntegerStore();
}
}
假设上面的bean实现了范型接口,也就是`Store<String>`和`Store<Integer>`,那么久可以使用`@Autowired`注解`Store`接口,范型作为限定符qualifier:
```java
@Autowired
private Store<String> s1; // <String> qualifier, injects the stringStore bean

@Autowired
private Store<Integer> s2; // <Integer> qualifier, injects the integerStore bean
范型限定符qualifiers也同样应用于自动装配Lists,Maps和Arrays:
// Inject all Store beans as long as they have an <Integer> generic
// Store<String> beans will not appear in this list
@Autowired
private List<Store<Integer>> s;
CustomAutowireConfigurer
`CustomAutowireConfigurer`是`BeanFactoryPostProcessor`,允许注册自定义限定符qualifier注解类型,无需指定`@Qualifier`注解: ```xml example.CustomQualifier ``` `AutowireCandidateResolver`是自动装配候选者而定: * 每一个bean定义中的`autowire-candidate`值 * ``元素上`default-autowire-candidates`可用的模式 * the presence of @Qualifier annotations and any custom annotations registered with the CustomAutowireConfigurer * 出现的`@Qualifier`注解和任何通过`CustomAutowireConfigurer`注册的自定义注解。
当多个bean的qualify限定符作为自动装配的候选者,“首要bean”决定于:候选者中有bean指定了primary属性值为true,那么它将陪选中(注入)。
@Resouce
Spring也支持JSR-250`@Resource`注解注入,标注在域field或者属性setter方法上。这是 Java EE 5 and 6中常用的模式,比如JSF1.2管理的bean或者JAX-WS2.0的endpoints。 Spring管理Spring对象支持这些模式。
@Resource使用name属性,Spring默认解释其value值作为注入bean的名字。看样例:
public class SimpleMovieLister {

    private MovieFinder movieFinder;

    @Resource(name="myMovieFinder")
    public void setMovieFinder(MovieFinder movieFinder) {
        this.movieFinder = movieFinder;
    }

}
如果没有明确的指定name ,默认的name取值就是域field name或者从setter方法派生。如果是域name,则原封不动的使用该域;如果是setter方法派生,将获取setter方法内设置的属性property名字(译注,应该就是field name域名字)。所以下面的样例中,会吧bean名字为"movieFinder"注入给setter方法:
public class SimpleMovieLister {

    private MovieFinder movieFinder;

    @Resource
    public void setMovieFinder(MovieFinder movieFinder) {
        this.movieFinder = movieFinder;
    }

}
ApplicationContext若使用了CommonAnnotationBeanPostProcessor,注解提供的name名字将被解析为bean的name名字。如果配置了明确的Spring的SimpleJndiBeanFactory,这些name名字将通过JNDI解析。然而,推荐你使用默认的行为,简单的使用Spring的JNDI,这样可以保持逻辑引用,而不是直接引用。
@Resource没有明确指定name时,和@Autowired相似,对于特定bean(SpringAPI内的bean),@Resource会以类型匹配方式替代bean name名字匹配方式,比如:BeanFactory, ApplicationContext, ResourceLoader, ApplicationEventPublisher, and MessageSource 接口
因此,下面的样例中,customerPreferenceDaofield域首先查找名字为customerPreferenceDao的bean,若未找到,则会使用类型匹配CustomerPreferenceDao类的实例。contextfield域将会注入ApplicationContext:
public class MovieRecommender {

    @Resource
    private CustomerPreferenceDao customerPreferenceDao;

    @Resource
    private ApplicationContext context;

    public MovieRecommender() {
    }

    // ...

}
@PostConstruct and @PreDestroy
`CommonAnnotationBeanPostProcessor`不仅能识别`@Resource`注解,也能识别JSR-250生命周期注解。Spring 2.5提供了对这些注解的支持,也提供了以下注解的支持:[initialization callbacks](#beans-factory-lifecycle-initializingbean) and [destruction callbacks](#beans-factory-lifecycle-disposablebean)。`CommonAnnotationBeanPostProcessor `提供了这些注解的支持,它是Spring `ApplicationContext`注册,它会在相应的Spring bean生命周期调用相应的方法,就像是Spring生命周期接口方法,或者是明确声明的回调函数。在下面的样例中,会根据初始化方法执行缓存,在销毁时执行清理。 ```java public class CachingMovieLister {
@PostConstruct
public void populateMovieCache() {
    // populates the movie cache upon initialization...
}

@PreDestroy
public void clearMovieCache() {
    // clears the movie cache upon destruction...
}
}

> 关于多重生命周期变量机制,详情参看[the section called “Combining lifecycle mechanisms”](#beans-factory-lifecycle-combined-effects)
<h3 id='beans-classpath-scanning'>ClassPath扫描和管理组件</h3>
本章大多数的样例都是使用XML格式配置元数据配置Spring bean,然后Spring容器根据这些配置产生`BeanDefinition`。虽然前面章节([Section 5.9, “Annotation-based container configuration”](#beans-annotation-config))展示了大量的源码级别注解配置元数据的情况,但是,注解也仅仅用于驱动依赖注入,"base"bean依然是在明确的在XML文件中定义。本章将讲解新的内容,如何通过扫描classpath ,隐式检索特殊的Spring bean,也就是后面提到的候选者组件。候选者组件是class类,这些类经过过滤匹配,由Spring容器注册注册的bean定义,成为Spring bean。这样就没有XML什么事儿了,*译注go egg,太粗鲁了吧*,也就是无需使用XML定义bean,而是使用注解(比如`@Component`),`AspectJ`表达式,或者是自定义的过滤器,使用自定义的过滤器选择那些类将会被注册到容器中。

> Spring3.0开始,`JavaConfig`项目中很多功能已经集成到Spring框架中。这就可以使用Java定义beans而不是传统的XML了。看看`@Configuration`,`@Bean`,`@Import`,`@DependsOn`的样例,即可学习如何使用这些功能。
<h4 id='beans-stereotype-annotations'>@Component和各代码层注解</h4>
`@Repository`注解注解用于DAO层。使用此注解会自动转换异常,详情参看[Section 15.2.2, “Exception translation”](#orm-exception-translation)
Spring提供了各层代码注解:`@Component, @Service, and @Controller`。`@Component`是通用的Spring bean,也即是由Spring管理的组件。`@Repository, @Service, @Controller`和`@Component`相比,更加精准的用于各个代码层,它们分别用于持久化层persistence,service服务层,和presentation layers表现层。因此,可以将类注解`@Component`,但是如果使用` @Repository, @Service, or @Controller`替代,也许更适于工具去处理,或者和`aspects`关联。比如,在某层代码上做切点。也许在Spring框架未来的版本中,` @Repository, @Service, and @Controller `会附加更多的功能,也就是易于扩展。因此,对于在service层使用`@Component`还是`@Service `的纠结,无疑`@Service`是最好的选择。同理,在持久化层要选择`@Repository`,它能自动转换异常。
<h4 id='beans-meta-annotations'>Meta-annotations元注解</h4>
*译注,元注解就是修饰注解的注解*
Spring提供的很多注解能作为“元注解”使用。元注解是简单的注解,可以应用于其他注解。比如,前面提及的`@Service`注解就是`@Component`的元注解。
```java
@Target({ElementType.TYPE})
@Retention(RetentionPolicy.RUNTIME)
@Documented
@Component // Spring will see this and treat @Service in the same way as @Component
public @interface Service {
// ....
}
多个元注解也能联合起来,成为复合注解。比如,Spring MVC中的@RestController注解就是有@Controller和@ResponseBody。 With the exception of value(), meta-annotated types may redeclare attributes from the source annotation to allow user customization. This can be particularly useful when you want to only expose a subset of the source annotation attributes. For example, here is a custom @Scope annotation that defines session scope, but still allows customization of the proxyMode. 对于value()的异常,元注解也许会重新定义源码注解中的属性。当仅需要暴露源码注解子集注解属性时,这非常有用。比如,现有自定义@Scope注解定义了session 作用域,但是仍然允许代理模式的自定义。TODO
@Target({ElementType.TYPE})
@Retention(RetentionPolicy.RUNTIME)
@Documented
@Scope("session")
public @interface SessionScope {

    ScopedProxyMode proxyMode() default ScopedProxyMode.DEFAULT

}
自动探测类和自动注册bean定义
Spring能自定探测各代码层的类并在`ApplicationContext`内注册相应的`BeanDefinitions`。比如:下面两个类就可以被自动探测 ```java @Service public class SimpleMovieLister {
private MovieFinder movieFinder;

@Autowired
public SimpleMovieLister(MovieFinder movieFinder) {
    this.movieFinder = movieFinder;
}
}
blablabal
```java
@Repository
public class JpaMovieFinder implements MovieFinder {
    // implementation elided for clarity
}
要想自动探测这些类并注册相应的Spring bean,得在@Configuration注解的类上增加@ComponentScan,其basePackages属性就是上面两个类的所在的父级包路径。(或者,可以使用两个类各自所在的包路径,用 ,逗号/;分号/ 空格分隔的)
@Configuration
@ComponentScan(basePackages = "org.example")
public class AppConfig  {
    ...
}
为了简介,上面的也会使用注解的
value替代basepackage,也就是ComponentScan("org.example")
下面是XML格式的配置
<?xml version="1.0" encoding="UTF-8"?>
<beans xmlns="http://www.springframework.org/schema/beans"
    xmlns:xsi="http://www.w3.org/2001/XMLSchema-instance"
    xmlns:context="http://www.springframework.org/schema/context"
    xsi:schemaLocation="http://www.springframework.org/schema/beans
        http://www.springframework.org/schema/beans/spring-beans.xsd
        http://www.springframework.org/schema/context
        http://www.springframework.org/schema/context/spring-context.xsd">

    <context:component-scan base-package="org.example"/>

</beans>
使用
<context:component-scan>将会隐式的启用<context:annotation-config>。当使用<context:component-scan>时,一般不需要<context:annotation-config/>元素
扫描类包需要相应的目录在
classpath内存在。使用Ant构建JAR包时,确保打包任务不要开启*仅打包文件(无需相应的目录)*选项。当然了,在某些环境装因为安全策略,classpath目录也许不能访问。比如,基于JDK1.7.0_45或更高版本的JDK的单独的应用(需要在manifests包清单中设置信任类库Trusted-Library;详情参看http://stackoverflow.com/questions/19394570/java-jre-7u45-breaks-classloader-getresources)
此外,当使用component-scan元素时,AutowiredAnnotationBeanPostProcessor和CommonAnnotationBeanPostProcessor都会隐式启用。意味着这两个组件也是自动探测和注入的--所有这些都不需要XML配置。
通过设置
annotation-config属性值为false即禁用AutowiredAnnotationBeanPostProcessor和CommonAnnotationBeanPostProcessor的注册。
使用过滤器自定义扫描
默认情况下,使用注解`@Component, @Repository, @Service, @Controller`以及基于`@Component`的元注解的类是唯一的被扫描的目标。然而,可以通过自定义过滤器轻易修改、扩展此行为。设置`@ComponentScan`注解的*includeFilters* 和*excludeFilters*参数(或者是XML中,设置`component-scan`元素的子元素include-filter or exclude-filter)。每个过滤器元素需要设置`type`和`expression`属性。下面的列表中描述的过滤器的选项:
Table 5.5. Filter Types
| Filter Type | Example Expression | Description |
|---|---|---|
| annotation (default) | org.example.SomeAnnotation |
目标组件上出现类注解 |
| assignable | org.example.SomeClass |
指定类或者接口 |
| aspectj | org.example..*Service+ |
AspectJ 类型表达式匹配目标组件 |
| regex | org.example.Default.* |
正则表达式匹配目标组件的类名 |
| custom | org.example.MyTypeFilter |
自定义的org.springframework.core.type .TypeFilter接口实现 |
下例展示了如何忽略所有@Repository注解的类,而仅使用包含字串"stub"的repositories
@Configuration
@ComponentScan(basePackages = "org.example",
        includeFilters = @Filter(type = FilterType.REGEX, pattern = ".*Stub.*Repository"),
        excludeFilters = @Filter(Repository.class))
public class AppConfig {
    ...
}
和下面的XML配置效果相同
<beans>
    <context:component-scan base-package="org.example">
        <context:include-filter type="regex"
                expression=".*Stub.*Repository"/>
        <context:exclude-filter type="annotation"
                expression="org.springframework.stereotype.Repository"/>
    </context:component-scan>
</beans>
可以关闭默认的过滤器,通过在注解上设置
useDefaultFilters=false,或者在<component-scan/>元素上设置use-default-filters="false"属性。这将会关闭@Component, @Repository, @Service, or @Controller自动探测类注解。
在组件内定义Spring bean
Spring组件也能为容器定义bean定义元数据。在`@Configuration`注解的类中使用`@Bean`注解定义bean元数据(也就是Spring bean)。看样例: ```java @Component public class FactoryMethodComponent {
@Bean
@Qualifier("public")
public TestBean publicInstance() {
    return new TestBean("publicInstance");
}

public void doWork() {
    // Component method implementation omitted
}
}
*译注,上面样例是SPring参考手册中给出的源码,待验证@Component类中使用@Bean?不是@Configuration么TODO*
这个类是一个Spring组件,有个方法`doWork()`。然而,它还有一个工厂方法`publicInstance()`,用于产生一个bean定义。`@Bean`注解了工厂方法,还设置了其他的bean定义的属性,比如使用`@Qulifier`设置了其标示符的值。此外还支持一些方法级别注解,`@Scope,@Lazy,`或者是自定义的qualifier 注解。

> 除了它本身作为组件初始化的角色,`@Lazy`注解也可以在`@Autowired`或者`@Inject`处使用。这种情况下,该注入将会变成延迟注入代理lazy-resolution proxy
前面讨论过的,`@Bean`注解的方法支持自动注入域和自动:
```java
@Component
public class FactoryMethodComponent {
private static int i;
@Bean
@Qualifier("public")
public TestBean publicInstance() {
return new TestBean("publicInstance");
}
// use of a custom qualifier and autowiring of method parameters
@Bean
protected TestBean protectedInstance(
@Qualifier("public") TestBean spouse,
@Value("#{privateInstance.age}") String country) {
TestBean tb = new TestBean("protectedInstance", 1);
tb.setSpouse(spouse);
tb.setCountry(country);
return tb;
}
@Bean
@Scope(BeanDefinition.SCOPE_SINGLETON)
private TestBean privateInstance() {
return new TestBean("privateInstance", i++);
}
@Bean
@Scope(value = WebApplicationContext.SCOPE_SESSION, proxyMode = ScopedProxyMode.TARGET_CLASS)
public TestBean requestScopedInstance() {
return new TestBean("requestScopedInstance", 3);
}
}
样例中,自动注入的方法参数,类型String,名称为country,将会被设置为另一个实例privateInstance的Age属性。Spring EL表达式语言通过#{<expression>}定义属性值。对于@Value注解,表达式解析器在解析表达式后,会查找bean的名字并设置value。
在Spring component中处理@Bean和在@Configuration中处理是不一样的。区别在于,在@Component中,不会使用CGLIB增强去拦截方法和属性的调用。在@Configuration注解的类中,@Bean注解的方法创建的bean对象的方法和属性的调用,是使用CGLIB代理。方法的调用不是常规的java语法。作为对比,@Component类中的对于@Bean注解的方法或者属性的调用,是标准的java语法。//TODO
命名自动注册组件
扫描处理过程其中一步就是自动探测组件,扫描器使用`BeanNameGenerator`对探测到的组件命名。默认情况下,各代码层注解(`@Component,@Repository,@Service,@Controller`)所包含的`name`值,将会作为相应的bean定义的名字。
如果这些注解没有name值,或者是其他一些被探测到的组件(比如使用自定义过滤器探测到的),默认的bean name生成器生成,以小写类名作为bean名字。比如,下面两个组件被探测到,bean name将会是myMovieLister和movieFinderImpl:
@Service("myMovieLister")
public class SimpleMovieLister {
    // ...
}
@Repository
public class MovieFinderImpl implements MovieFinder {
    // ...
}
若你不需要默认的bean命名策略,也可以自己实现命名策略。首先,实现
BeanNameGenerator接口,然后确保其包含默认的无参构造函数(即空构造)。然后,在配置扫描器后提供全限定类名:
@Configuration
@ComponentScan(basePackages = "org.example", nameGenerator = MyNameGenerator.class)
public class AppConfig {
    ...
}
<beans>
    <context:component-scan base-package="org.example"
        name-generator="org.example.MyNameGenerator" />
</beans>
生成规则应当如下,考虑和注解一起生成name,便于其他组件明确的引用。另一方面,当容器负责组装时,自动生成的名字要能胜任。
为自动探测组件提供作用域
通常来说,Spring管理的组件,默认的最常见的作用域是单例singleton。然而,有时候需要其他的作用域,Spring2.5提供了一个新的注解`@Scope`。只需要给他提供一个name,该注解即可设置作用域: ```java @Scope("prototype") @Repository public class MovieFinderImpl implements MovieFinder { // ... } ```  > 若不想使用基于现有注解的方式,而是提供自定义作用域策略,得实现`ScopeMetadataResolver`接口,该实现得有一个空构造(无参构造)。然后,配置扫描时提供该实现类全限定类名:
@Configuration
@ComponentScan(basePackages = "org.example", scopeResolver = MyScopeResolver.class)
public class AppConfig {
    ...
}
<beans>
    <context:component-scan base-package="org.example"
            scope-resolver="org.example.MyScopeResolver" />
</beans>
当使用某个非单例作用域时,为作用域对象生成代理也许非常必要。原因参看the section called “Scoped beans as dependencies”。component-scan元素中有一个scope-proxy属性,即可实现此目的。它的值有三个选项:no, interfaces, and targetClass,比如下面的配置会生成标准的JDK动态代理:
@Configuration
@ComponentScan(basePackages = "org.example", scopedProxy = ScopedProxyMode.INTERFACES)
public class AppConfig {
    ...
}
<beans>
    <context:component-scan base-package="org.example"
        scoped-proxy="interfaces" />
</beans>
为注解提供标示符Qualifier
有关`@Qualifier`注解的讨论在[in Section 5.9.3, “Fine-tuning annotation-based autowiring with qualifiers”](#beans-autowired-annotation-qualifiers)。那章节中的样例展示了`@Qualifier`注解和自定义标识符qualifier注解的用法,藉此用来更细粒度的控制自动注入。因为样例都是基于XML 的bean定义,所以标识符都是在XML中的bean定义上,通过设置`qualifier`或者`meta`子元素在设置的。当使用classpath扫描、自动探测组件时,得在候选者类上使用类注解来提供标识符qualifier元数据。下面的三个样例展示此技术: ```java @Component @Qualifier("Action") public class ActionMovieCatalog implements MovieCatalog { // ... } ```
@Component
@Genre("Action")
public class ActionMovieCatalog implements MovieCatalog {
    // ...
}
@Component
@Offline
public class CachingMovieCatalog implements MovieCatalog {
    // ...
}
如要使用同一个类产生多个bean定义,bean间的区别是qualifier标识符,可以使用XML替代注解定义bean,记住注解元数据是类定义本身的,因此
@Qualifier产生的标识符只能属于一个bean定义,而XML的bean定义中的qualifier标识符才是属于bean实例的。 就大多数的标注替换而言,元数据和类本身是结合在一起的;而使用xml的时候,允许同一类型的beans在qualifieer元数据中提供变量,因为元数据是依据实例而不是类来提供的。
使用JSR-330标准注解
Spring3.0开始,Spring提供了对JSR-330标准注解(依赖注入)的支持。这些注解以Spring注解相同的方式被扫描。你只需要在classpath中引入相关jar包
若使用
Maven,javax.injectartifact三围坐标在标准maven仓库中都是可用的(http://repo1.maven.org/maven2/javax/inject/javax.inject/1/),在pom.xml中增加dependency
<dependency>
    <groupId>javax.inject</groupId>
    <artifactId>javax.inject</artifactId>
    <version>1</version>
</dependency>
使用@Inject @Name依赖注入
替代`@Autowired`,`@javax.inject.Inject`这样用: ```java import javax.inject.Inject;
public class SimpleMovieLister {
private MovieFinder movieFinder;

@Inject
public void setMovieFinder(MovieFinder movieFinder) {
    this.movieFinder = movieFinder;
}

// ...
}
和`@Autowired`一样,`@Inject`可用于类注解、域注解、方法注解、构造参数注解。如果需要注入指定qualifier标识符的bean,应该使用`@Named`注解,像这样:
```java
import javax.inject.Inject;
import javax.inject.Named;

public class SimpleMovieLister {

    private MovieFinder movieFinder;

    @Inject
    public void setMovieFinder(@Named("main") MovieFinder movieFinder) {
        this.movieFinder = movieFinder;
    }

    // ...

}
@Named:相当于@Component
使用`@javax.inject.Named`替代`@Component`: ```java import javax.inject.Inject; import javax.inject.Named;
@Named("movieListener") public class SimpleMovieLister {
private MovieFinder movieFinder;

@Inject
public void setMovieFinder(MovieFinder movieFinder) {
    this.movieFinder = movieFinder;
}

// ...
}
`@Component`通常不指定组件名字。`@Named`也能这么用:
```java
import javax.inject.Inject;
import javax.inject.Named;

@Named
public class SimpleMovieLister {

    private MovieFinder movieFinder;

    @Inject
    public void setMovieFinder(MovieFinder movieFinder) {
        this.movieFinder = movieFinder;
    }

    // ...

}
使用@Named,也可以Spring注解一样的使用component-scanning组件扫描
@Configuration
@ComponentScan(basePackages = "org.example")
public class AppConfig  {
    ...
}
标准注解的限制
使用标准注解时,要知道下列重要功能不可用,这非常重要:
Table 5.6. Spring annotations vs. standard annotations
| Spring | javax.inject.* | javax.inject restrictions / comments |
|---|---|---|
| @Autowired | @Inject | @Inject 没有required属性 |
| @Component | @Named | - |
| @Scope("singleton") | @Singleton | JSR-330默认的作用域类似于Spring的prototype原型作用域。为了保持Spring的一致性,在Spring容器中的JSR-330的bean声明,默认是singleton单例。除了singleton,若要设置作用域,得使用Spring的@Scope注解。javax.inject也提供了一个@Scope注解。然而,这个注解仅仅是为了让你创建自定义注解用的译注,也就是元注解的源码注解?。 |
| @Qualifier | @Named | - |
| @Value | - | 无等价注解 |
| @Required | - | 无等价注解 |
| @Lazy | - | 无等价注解 |
基于Java的配置元数据
基本概念@Bean和@Configuration
Spring新功能Java-cofiguration支持`@Configuration`类注解和`@Bean`方法注解
@Bean注解用于表明一个方法将会实例化、配置、初始化一个新对象,该对象由Spring IoC容器管理。大家都熟悉Spring的<beans/>XML配置,@Bean注解方法和它一样。可以在任何Spring @Component中使用@Bean注解方法,当然了,大多数情况下,@Bean是配合@Configuration使用的。
@Configuration注解的类表明该类的主要目的是作为bean定义的源。此外,@Configuration类允许依赖本类中使用@Bean定义的bean。看样例:
@Configuration
public class AppConfig {

    @Bean
    public MyService myService() {
        return new MyServiceImpl();
    }

}
上面的AppConfig类等价于下面的XML
<beans>
    <bean id="myService" class="com.acme.services.MyServiceImpl"/>
</beans>
@Bean and @Configuration注解下面会深入的探讨。首先,以Java-based配置方式用各种方式创建Spring容器
**Full @Configuration vs lite @Beans mode?**
**完全@Configuration模式 VS 简易@Beans模式**
在非@Configuration 注解的类内使用@Bean的话,Spring容器使用简易模式处理@Bean。
比如,在`@Component`注解的类内,甚至是`plain old class`内使用`@Bean`都将使用简易模式。

和完全`@Configuration`模式不同,简易`@Bean·模式不能容易的使用类内依赖。
一般来说,在简易模式中,`@Bean`方法不应该引用另一个在方法上注解的`@Bean`

为了确保开启完全模式,只推荐在`@Configuration`注解的类中使用`@Bean`的手法。
使用AnnotationConfigApplicationContext实例化Spring IoC容器
Spring的`AnnotationConfigApplicationContext`部分,是Spring3.0中新增的。这是一个强大的(*译注原文中是多才多艺的versatile*)`ApplicationContext`实现,不仅能解析`@Configuration`注解类,也能解析`@Componnet`注解的类和使用`JSR-330`注解的类。
使用@Configuration注解的类作为配置元数据的时候,@Configuration类本身也会注册为一个bean定义,类内所有的@Bean注解的方法也会注册为bean定义。
使用@Component和JSR-330注解类作为配置元数据时,他们本身被注册为bean定义,并假设DI(依赖注入)元数据,像类内使用的@Autowired或者@Inject都是必须的。
简单结构
Spring以XML作为配置元数据实例化一个`ClassPathXmlApplicationContext`,以`@Configuration`类作为配置元数据时,Spring以差不多的方式,实例化一个`AnnotationConfigApplicationContext`。因此,Spring 容器可以实现零XML配置。 ```java public static void main(String[] args) { ApplicationContext ctx = new AnnotationConfigApplicationContext(AppConfig.class); MyService myService = ctx.getBean(MyService.class); myService.doStuff(); } ```
上述代码中,AnnotationConfigApplicationContext不是仅能与@Configuration注解类配合使用。任何@Component或者JSR-330注解的类都可以作为其构造函数的参数:
public static void main(String[] args) {
    ApplicationContext ctx = new AnnotationConfigApplicationContext(MyServiceImpl.class, Dependency1.class, Dependency2.class);
    MyService myService = ctx.getBean(MyService.class);
    myService.doStuff();
}
上述代码中,假设MyServiceImpl,Dependency1 ,Dependency2使用了Spring依赖注入注解,比如@Autowired。
使用 register(Class…)编程式构造Spring容器
`AnnotationConfigApplicationContext`也可以通过无参构造函数实例化,然后调用`registor()`方法配置。此法应用于编程式构造`AnnotationConfigApplicationContext` ```java public static void main(String[] args) { AnnotationConfigApplicationContext ctx = new AnnotationConfigApplicationContext(); ctx.register(AppConfig.class, OtherConfig.class); ctx.register(AdditionalConfig.class); ctx.refresh(); MyService myService = ctx.getBean(MyService.class); myService.doStuff(); } ```
开启组件扫描
要开启组件扫描,只需要像这样注解`@Configuration`类: ```java @Configuration @ComponentScan(basePackages = "com.acme") public class AppConfig { ... } ```  > Spring老炮儿可能知道它和下面的xml是等同效果的,下面的xml使用了Spring `context`命名空间 > ```xml ```
上面的栗子中,会扫描com.acme package包,检索出所有@Component-annotated类,Spring容器将会注册这些类为Spring bean定义。AnnotationConfigApplicationContext暴露的scan(String...)方法也允许扫描类,完成相同的功能:
public static void main(String[] args) {
    AnnotationConfigApplicationContext ctx = new AnnotationConfigApplicationContext();
    ctx.scan("com.acme");
    ctx.refresh();
    MyService myService = ctx.getBean(MyService.class);
}
记住,
@Configuration注解是@Component注解的元注解,所以它是component-scanning的候选者!上面栗子中,假设AppConfig在com.acme package包内生命的(或者是该包路径下的),在scan()期间,它也会被扫描,在所有@Bean方法处理并且注册为Spring bean定义之后,它也会注册到容器中,然后在执行refresh()方法。
译注,E文看的不大明白,就翻看了源码
// 先看
org.springframework.context.annotation.AnnotationConfigApplicationContext

public AnnotationConfigApplicationContext(String... basePackages) {
	scan(basePackages);
	refresh();
}
//接下来看扫描处理
org.springframework.context.annotation.ClassPathBeanDefinitionScanner

public int scan(String... basePackages) {
	int beanCountAtScanStart = this.registry.getBeanDefinitionCount();
	//扫描
	doScan(basePackages);

	//注册config
	// Register annotation config processors, if necessary.
	if (this.includeAnnotationConfig) {
		AnnotationConfigUtils.registerAnnotationConfigProcessors(this.registry);
	}

	return this.registry.getBeanDefinitionCount() - beanCountAtScanStart;
}
使用AnnotationConfigWebApplicationContext支持WEB应用
`WebApplicationContext`接口一个实现`AnnotationConfigWebApplicationContext`,是`AnnotationConfigApplicationContext`的一个变体。在配置`ContextLoaderListener`、 Spring MVC `DispatcherServlet`等等时,使用此实现类。下面这段`web.xml`片段,是典型Spring MVC的Web应用的配置。注意`contextClass`类的context-param和init-param。 ```xml contextClass org.springframework.web.context.support.AnnotationConfigWebApplicationContext
<!-- Configuration locations must consist of one or more comma- or space-delimited
    fully-qualified @Configuration classes. Fully-qualified packages may also be
    specified for component-scanning -->
<context-param>
    <param-name>contextConfigLocation</param-name>
    <param-value>com.acme.AppConfig</param-value>
</context-param>

<!-- Bootstrap the root application context as usual using ContextLoaderListener -->
<listener>
    <listener-class>org.springframework.web.context.ContextLoaderListener</listener-class>
</listener>

<!-- Declare a Spring MVC DispatcherServlet as usual -->
<servlet>
    <servlet-name>dispatcher</servlet-name>
    <servlet-class>org.springframework.web.servlet.DispatcherServlet</servlet-class>
    <!-- Configure DispatcherServlet to use AnnotationConfigWebApplicationContext
        instead of the default XmlWebApplicationContext -->
    <init-param>
        <param-name>contextClass</param-name>
        <param-value>
            org.springframework.web.context.support.AnnotationConfigWebApplicationContext
        </param-value>
    </init-param>
    <!-- Again, config locations must consist of one or more comma- or space-delimited
        and fully-qualified @Configuration classes -->
    <init-param>
        <param-name>contextConfigLocation</param-name>
        <param-value>com.acme.web.MvcConfig</param-value>
    </init-param>
</servlet>

<!-- map all requests for /app/* to the dispatcher servlet -->
<servlet-mapping>
    <servlet-name>dispatcher</servlet-name>
    <url-pattern>/app/*</url-pattern>
</servlet-mapping>
```
使用@Bean注解
`@Bean`是方法注解,和XML中的``元素十分相似。该注解支持``的一些属性,比如[init-method](#beans-factory-lifecycle-initializingbean), [destroy-method](#beans-factory-lifecycle-disposablebean), [autowiring](#beans-factory-autowire)和`name`
声明bean
要声明bean非常简单,只需要在方法上使用`@Bean`注解。使用此方法,将会在`ApplicationContext`内注册一个bean,bean的类型是方法的返回值类型。 ```java @Configuration public class AppConfig {
@Bean
public TransferService transferService() {
    return new TransferServiceImpl();
}
}
上面的配置和下面的XML配置等价:
```xml
<beans>
    <bean id="transferService" class="com.acme.TransferServiceImpl"/>
</beans>
上面两种配置,都会在ApplicationContext内产生一个bean定义,名称为transferService,该Spring bean绑定到一个类型为TransferServiceImpl的实例:
transferService -> com.acme.TransferServiceImpl
接收生命周期回调
使用`@Bean`注解的bean定义,都支持常规生命周期回调,能使用JSR-250中的`@PostConstruct`和`@PreDestroy`注解,[JSR-250详情请参看这里](#beans-postconstruct-and-predestroy-annotations)
常规Spring生命周期回调也完全支持,若bean实现了InitializingBean, DisposableBean, or Lifecycle,他们各自的方法都会被容器调用。
标准的那一套*Aware接口,像BeanFactoryAware, BeanNameAware, MessageSourceAware, ApplicationContextAware等等,也都完全支持。
@Bean注解支持初始化回调和销毁回调,很像Spring XML中<bean/>元素的init-method和destroy-method属性
public class Foo {
    public void init() {
        // initialization logic
    }
}

public class Bar {
    public void cleanup() {
        // destruction logic
    }
}

@Configuration
public class AppConfig {

    @Bean(initMethod = "init")
    public Foo foo() {
        return new Foo();
    }

    @Bean(destroyMethod = "cleanup")
    public Bar bar() {
        return new Bar();
    }

}
默认情况下,使用java config定义的bean中
close方法或者shutdown方法,会作为销毁回调自动调用。若bean中有close,shutdown方法,又不是销毁回调,通过设置@Bean(destroyMethod=""),即可关闭该默认的自动匹配销毁回调模式。 You may want to do that by default for a resource that you acquire via JNDI as its lifecycle is managed outside the application. In particular, make sure to always do it for a DataSource as it is known to be problematic. 对于某些由JNDI获取的资源,也许就要关闭自动匹配销毁回调行为了,因为该资源的生命周期并不由应用管理。尤其是,使用DataSource时一定要关闭它,不关会有问题。TODO
@Bean(destroyMethod="")
public DataSource dataSource() throws NamingException {
    return (DataSource) jndiTemplate.lookup("MyDS");
}
Of course, in the case of Foo above, it would be equally as valid to call the init() method directly during construction: 当然了,上面Foo的例子中,也可以在构造函数中调用init()方法,和上面栗子中的效果相同
@Configuration
public class AppConfig {
    @Bean
    public Foo foo() {
        Foo foo = new Foo();
        foo.init();
        return foo;
    }

    // ...

}
如果是直接使用java,对于对象,你想怎么搞就怎么搞,并不总需要依赖容器生命周期
指定bean作用域scope
使用@Scope注解
通过`@Bean`注解定义的bean也许需要指定作用域。可以使用[bean作用域](#beans-factory-scopes)章节中的任意标准作用域。 默认的作用域是`singleton`单例,但是可以使用`@Scope`注解覆盖此设置: ```java @Configuration public class MyConfiguration {
@Bean
@Scope("prototype")
public Encryptor encryptor() {
    // ...
}
}
<h6 id='#beans-java-scoped-proxy'>@Scope 和作用域代理</h6>
Spring提供了非常方便的方式,通过[scoped proxies](#beans-factory-scopes-other-injection)作用域代理完成作用域bean依赖。若使用XML配置,最简单的方式是使用`<aop:scoped-proxy/>`元素创建一个代理。若是在Java代码中配置bean,有一种等价的做法,使用`@Scope`注解并配置其`proxyMOde`属性.默认配置是没有代理`ScopedProxyMode.NO`,但是你可以设置`ScopedProxyMode.TARGET_CLASS`或者`ScopedProxyMode.INTERFACES`。
如果将XML格式的作用域代理示例转换成Java中使用`@Bean`,差不多是这样:
```java
// an HTTP Session-scoped bean exposed as a proxy
@Bean
@Scope(value = "session", proxyMode = ScopedProxyMode.TARGET_CLASS)
public UserPreferences userPreferences() {
    return new UserPreferences();
}

@Bean
public Service userService() {
    UserService service = new SimpleUserService();
    // a reference to the proxied userPreferences bean
    service.setUserPreferences(userPreferences());
    return service;
}
自定义bean名字
默认情况下,配置类中,使用`@Bean`的方法名作为返回bean的名字。通过配置可以覆盖此设置,使用`name`属性 即可。 ```java @Configuration public class AppConfig {
@Bean(name = "myFoo")
public Foo foo() {
    return new Foo();
}
}
<h5 id='beans-java-bean-aliasing'>bean别名</h5>
在之前讨论过的bean别名[Section 5.3.1, “Naming beans”](#beans-beanname),有时候需要给一个bean指定多个name。`@Bean`注解的`name`属性就是干这个用,该属性接收一个字串数组。
```java
@Configuration
public class AppConfig {

    @Bean(name = { "dataSource", "subsystemA-dataSource", "subsystemB-dataSource" })
    public DataSource dataSource() {
        // instantiate, configure and return DataSource bean...
    }

}
bean描述
有时候,给bean提供一个更具细节的描述,是非常有好处的。用于监视目的(通过JMX)的时候,非常有用。 给一个`@Bean`增加描述,可使用`@Description`注解: ```java @Configuration public class AppConfig {
@Bean
@Description("Provides a basic example of a bean")
public Foo foo() {
    return new Foo();
}
}
<h4 id='beans-java-configuration-annotation'>使用@Configuration注解</h4>
`@Configuration`是类注解,表名该类将作为bean定义的配置元数据。`@Configuration`类内只用`@Bean`注解方法。在`@Configuration`类上调用`@Bean`方法,也能用于内部bean依赖。详情参看[Section 5.12.1, “Basic concepts: @Bean and @Configuration”](#beans-java-basic-concepts)


<h5 id='beans-java-injecting-dependencies'>注入内部bean依赖</h5>
当`@Beans`依赖其他bean,依赖的表达式非常简单,仅需要调用被依赖的bean的方法:
```java
@Configuration
public class AppConfig {

    @Bean
    public Foo foo() {
        return new Foo(bar());
    }

    @Bean
    public Bar bar() {
        return new Bar();
    }

}
在上面的样例中,foo bean接收一个参数,该参数是通过构造返回的实例bar,以此完成注入。
声明内部bean依赖的做法,仅在
@Configuration类内的@Bean注解的方法上有效。@Component类不能使用此做法。
查找方法注入
早先提到过,方法注入[lookup method injection](#beans-factory-method-injection) 是一个高级功能,很少会用到。但是,在一个单例bean依赖原型作用域bean的场景中,就非常有用了。Java中,提供了很友好的api实现此模式。 ```java public abstract class CommandManager { public Object process(Object commandState) { // grab a new instance of the appropriate Command interface Command command = createCommand();
    // set the state on the (hopefully brand new) Command instance
    command.setState(commandState);
return command.execute();
}

// okay... but where is the implementation of this method?
protected abstract Command createCommand();
}
使用基于java的元注解配置,可以创建一个`CommandManager`的子类,子类重写父类抽象 方法,该方法返回一个`new`创建的对象。
```java
@Bean
@Scope("prototype")
public AsyncCommand asyncCommand() {
    AsyncCommand command = new AsyncCommand();
    // inject dependencies here as required
    return command;
}

@Bean
public CommandManager commandManager() {
    // return new anonymous implementation of CommandManager with command() overridden
    // to return a new prototype Command object
    return new CommandManager() {
        protected Command createCommand() {
            return asyncCommand();
        }
    }
}
基于java配置的内部工作原理
下面示例中,展示了`@Bean`注解的方法被调用了2次: ```java @Configuration public class AppConfig {
@Bean
public ClientService clientService1() {
    ClientServiceImpl clientService = new ClientServiceImpl();
    clientService.setClientDao(clientDao());
    return clientService;
}

@Bean
public ClientService clientService2() {
    ClientServiceImpl clientService = new ClientServiceImpl();
    clientService.setClientDao(clientDao());
    return clientService;
}

@Bean
public ClientDao clientDao() {
    return new ClientDaoImpl();
}
}
`clientDao()`被`clientService1()`调用了一次,被`clientService2()`调用了一次。因为这个方法会创建一个`ClientDaoImpl`类的实例并返回,也许你以为会有2个实例(分别返回给各个service)。这个定义会有问题:在Spring中,实例化bean默认的作用域是单例。这就是它的神奇之处:所有的`@Configuration`类在启动时,都是通过`CGLIB`创建一个子类。在调用父类的方法并创建一个新的实例之前,子类中的方法首先检查是否缓存过。注意,自Spring3.2其,不在需要将`CGLIB`加入到classpath中,因为`CGLIB`包已经被打包进`org.springframework`下,在Spring核心包中已经内置了。

> 该行为也许有些不同,这得根据具体的bean的作用域。这里讨论的是singleton单例作用域。

> 因为一些限制,导致`CLGIB`会在启动时动态增加功能
> * **Configuration**配置类不能是`final`
> * 他们应该有空构造
<h4 id='beans-java-composing-configuration-classes'>组装java配置元数据</h4>
<h5 id='beans-java-using-import'>使用@Import注解</h5>
在Spring XML配置中使用`<import/>`元素,意在模块化配置,`@Import`注解也允许从其他配置类中加载`@Bean`定义。
```java
@Configuration
public class ConfigA {
@Bean
public A a() {
return new A();
}
}
@Configuration
@Import(ConfigA.class)
public class ConfigB {
@Bean
public B b() {
return new B();
}
}
现在,实例化context时,不需要同时指定ConfigA.class和ConfigB.class,而是仅需要提供ConfigB即可:
public static void main(String[] args) {
    ApplicationContext ctx = new AnnotationConfigApplicationContext(ConfigB.class);

    // now both beans A and B will be available...
    A a = ctx.getBean(A.class);
    B b = ctx.getBean(B.class);
}
该方式简化了容器实例化,只需要一个类去处理,而不是需要开发者在构造期间记着大量的@Configuration。
在导入的bean上注入依赖
上面的栗子可以运行,但是太简单了。在大部分实际场景中,bean都会跨配置依赖。若使用XML,这不是问题,因为不包含编译器,开发者简单的声明`ref=somBean`并相信Spring在容器实例化期间会正常运行。但是,使用`@Configuration`类,配置模型替换为java编译器,为了引用另一个bean,Java编译器会校验该引用必须是有效的合法Java语法。
非常幸运,解决这个这个问题非常简单。还记得不,@Configuration类在容器中本身就是一个bean,这意味着他们能使用高级@Autowired注入元数据,就像其他bean一样。
来一个更加真实的场景,使用了多个@Configuration类,每个配置都依赖其他配置中是bean声明:
@Configuration
public class ServiceConfig {

    @Autowired
    private AccountRepository accountRepository;

    @Bean
    public TransferService transferService() {
        return new TransferServiceImpl(accountRepository);
    }

}

@Configuration
public class RepositoryConfig {

    @Autowired
    private DataSource dataSource;

    @Bean
    public AccountRepository accountRepository() {
        return new JdbcAccountRepository(dataSource);
    }

}

@Configuration
@Import({ServiceConfig.class, RepositoryConfig.class})
public class SystemTestConfig {

    @Bean
    public DataSource dataSource() {
        // return new DataSource
    }

}

public static void main(String[] args) {
    ApplicationContext ctx = new AnnotationConfigApplicationContext(SystemTestConfig.class);
    // everything wires up across configuration classes...
    TransferService transferService = ctx.getBean(TransferService.class);
    transferService.transfer(100.00, "A123", "C456");
}
在上面的场景中,@Autowired可以很好的工作,使设计更具模块化,但是自动注入的是哪个bean依然有些模糊不清。举个栗子,开发者正在查找ServiceConfig,你怎么知道一定会有@Autowired注解的AccountRepository类型bean声明?代码中并未明确指出,还好,Spring Tool Suite提供了可视化工具,用来展示bean之间是如何装配的,也许这就是你需要的。另外,你的Java IDE也很容易找到所有的有关AccountReository类型的声明和调用,并很快的定位返回该类型的@Bean方法。
万一需求不允许这种模糊的装配,并且你要在IDE内从Configuration类直接定位到依赖类bean,考虑使用硬编码,即由依赖类本身定位:
@Configuration
public class ServiceConfig {

    @Autowired
    private RepositoryConfig repositoryConfig;

    @Bean
    public TransferService transferService() {
        // navigate 'through' the config class to the @Bean method!
        return new TransferServiceImpl(repositoryConfig.accountRepository());
    }

}
上栗中,AccountRepository已经定义好了,它非常明确。然而,ServiceConfig和RepositoryConfig已经紧耦合在一起了;这是一个折中的方案。可以通过面向接口或者抽象类解耦。看这段:
@Configuration
public class ServiceConfig {

    @Autowired
    private RepositoryConfig repositoryConfig;

    @Bean
    public TransferService transferService() {
        return new TransferServiceImpl(repositoryConfig.accountRepository());
    }
}

@Configuration
public interface RepositoryConfig {

    @Bean
    AccountRepository accountRepository();

}

@Configuration
public class DefaultRepositoryConfig implements RepositoryConfig {

    @Bean
    public AccountRepository accountRepository() {
        return new JdbcAccountRepository(...);
    }

}

@Configuration
@Import({ServiceConfig.class, DefaultRepositoryConfig.class}) // import the concrete config!
public class SystemTestConfig {

    @Bean
    public DataSource dataSource() {
        // return DataSource
    }

}

public static void main(String[] args) {
    ApplicationContext ctx = new AnnotationConfigApplicationContext(SystemTestConfig.class);
    TransferService transferService = ctx.getBean(TransferService.class);
    transferService.transfer(100.00, "A123", "C456");
}
现在ServiceConfig已经和具体实现类DefaultRepositoryConfig解耦了,IDE内置的工具此时也很有用:它能很容器的获取RepositoryConfig实现的集成层级。与常规的面向接口的代码定位相比,用这种方式,导航@Configuration类和它们的依赖将毫无困难。
过滤@Configuration或者@Bean
在某些需求下,开启或者关闭一个`@Configuration`类,甚至是针对个别`@Bean`方法开启或者关闭,通常很有用。Spring环境中,通常使用`@Profile`注解,在某种条件下来激活bean,来实现此效果([see Section 5.13.1, “Bean definition profiles”](#beans-definition-profiles) for details)。
@Profile注解实现了更具弹性@Conditional注解。@Conditional注解表名,指定的org.springframework.context.annotation.Condition实现必须在@Bean注册之前运行。
Condition接口的实现只需要实现一个简单的方法, matches(...),该方法返回true或者false。举个栗子,下面是Condition的实现,用于@Profile
@Override
public boolean matches(ConditionContext context, AnnotatedTypeMetadata metadata) {
    if (context.getEnvironment() != null) {
        // Read the @Profile annotation attributes
        MultiValueMap<String, Object> attrs = metadata.getAllAnnotationAttributes(Profile.class.getName());
        if (attrs != null) {
            for (Object value : attrs.get("value")) {
                if (context.getEnvironment().acceptsProfiles(((String[]) value))) {
                    return true;
                }
            }
            return false;
        }
    }
    return true;
}
See the @Conditional javadocs for more detail.
混合java和xml配置
Spring的`@Configuration`类并非是为了完全替换Spring XML。有些工具,比如XML命名空间就是一种理想的配置方式。如果XML更方便或是必须的,你就得选择:或者选择基于XML的配置方式实例化容器,比如使用`ClassPathXmlApplicationContext`,或者选择基于Java配置风格使用`AnnotationConfigApplcationContext`加上`@ImportResource`注解导入必须的XML。
基于XML混合使用@Configuration类
ad-hoc风格也许是稍好的以XML引导Spring容器,并引入`@Configuration`类。举个栗子,已存在大量的使用了SPringXML的代码,有需求需要使用`@Configuration`类,这些配置类需要引入到现存的XML文件中,此种做法也许更容易。接下来看看此场景。
@Configuration类本身在容器内就是一个bean。下面的样例中,创建了一个@Configuration类,类名是AppConfig,引入一个配置文件system-test-config.xml。由于<context:annotation-config/>打开,容器会识别@Configuration注解,并处理AppConfig类内声明的@Bean注解的方法。
@Configuration
public class AppConfig {

    @Autowired
    private DataSource dataSource;

    @Bean
    public AccountRepository accountRepository() {
        return new JdbcAccountRepository(dataSource);
    }

    @Bean
    public TransferService transferService() {
        return new TransferService(accountRepository());
    }

}
system-test-config.xml
<beans>
    <!-- enable processing of annotations such as @Autowired and @Configuration -->
    <context:annotation-config/>
    <context:property-placeholder location="classpath:/com/acme/jdbc.properties"/>

    <bean class="com.acme.AppConfig"/>

    <bean class="org.springframework.jdbc.datasource.DriverManagerDataSource">
        <property name="url" value="${jdbc.url}"/>
        <property name="username" value="${jdbc.username}"/>
        <property name="password" value="${jdbc.password}"/>
    </bean>
</beans>
jdbc.properties jdbc.url=jdbc:hsqldb:hsql://localhost/xdb jdbc.username=sa jdbc.password=
public static void main(String[] args) {
    ApplicationContext ctx = new ClassPathXmlApplicationContext("classpath:/com/acme/system-test-config.xml");
    TransferService transferService = ctx.getBean(TransferService.class);
    // ...
}
在
system.test-config.xml中,AppConfig<bean/>没有id属性,因为没有其他bean引用,也不会根据name从容器获取,所以id不是必须指定的,同样,DataSourcebean,它只会根据类型自动装配,所以明确的id也不是必须的。
因为@Configuration是@Component的元数据注解,@Configuration注解类也会自动作为扫描组件的候选者。还是上面的场景,我们能重新定义system-test-config.xml,使之能启用高级扫描组件。注意,在此场景中,我们不需要明确的声明<context:annotation-config/>,因为<context:component-scan/>会开启所有相同的功能。
system-test-config.xml
<beans>
    <!-- picks up and registers AppConfig as a bean definition -->
    <context:component-scan base-package="com.acme"/>
    <context:property-placeholder location="classpath:/com/acme/jdbc.properties"/>

    <bean class="org.springframework.jdbc.datasource.DriverManagerDataSource">
        <property name="url" value="${jdbc.url}"/>
        <property name="username" value="${jdbc.username}"/>
        <property name="password" value="${jdbc.password}"/>
    </bean>
</beans>
基于@Configuration混合使用xml配置
在应用中,`@Configuration`类是主要的容器配置机制,但是仍然可能会需要一些XML。在这些场景中,使用`@ImportResource`,即可引用XML配置。这样配置可是实现此效果,基于java配置,尽可能少的使用XML。 ```java @Configuration @ImportResource("classpath:/com/acme/properties-config.xml") public class AppConfig {
@Value("${jdbc.url}")
private String url;

@Value("${jdbc.username}")
private String username;

@Value("${jdbc.password}")
private String password;

@Bean
public DataSource dataSource() {
    return new DriverManagerDataSource(url, username, password);
}
}
```xml
properties-config.xml
<beans>
    <context:property-placeholder location="classpath:/com/acme/jdbc.properties"/>
</beans>
jdbc.properties jdbc.url=jdbc:hsqldb:hsql://localhost/xdb jdbc.username=sa jdbc.password=
public static void main(String[] args) {
    ApplicationContext ctx = new AnnotationConfigApplicationContext(AppConfig.class);
    TransferService transferService = ctx.getBean(TransferService.class);
    // ...
}
环境抽象
`Environment`环境在容器中是一个抽象的集合,是指应用环境的2个方面: [profiles](#beans-definition-profiles) 和 [properties](#beans-property-source-abstraction).
profile配置是一个被命名的,bean定义的逻辑组,这些bean只有在给定的profile配置激活时才会注册到容器。不管是XML还是注解,Beans都有可能指派给profile配置。Environment环境对象的作用,对于profiles配置来说,它能决定当前激活的是哪个profile配置,和哪个profile是默认。
在所有的应用中,Properties属性扮演一个非常重要的角色,可能来源于一下源码变量:properties文件,JVM properties,system环境变量,JNDI,servlet servlet context parameters上下文参数,专门的Properties对象,Maps等等。Environment对象的作用,对于properties来说,是提供给用户方便的服务接口,方便撰写配置、方便解析配置。
bean定义profiles
bean定义profiles是核心容器内的一种机制,该机制能在不同环境中注册不同的bean。环境的意思是,为不同的用户做不同的事儿,该功能在很多场景中都非常有用,包括: * 开发期使用内存数据源,在QA或者产品上则使用来自JNDI的相同的数据源 * 开发期使用监控组件,当部署以后则关闭监控组件,是应用更高效 * 为用户各自注册自定义bean实现
考虑一个实际应用中的场景,现在需要一个DataSource。开测试环境中,这样配置:
@Bean
public DataSource dataSource() {
    return new EmbeddedDatabaseBuilder()
        .setType(EmbeddedDatabaseType.HSQL)
        .addScript("my-schema.sql")
        .addScript("my-test-data.sql")
        .build();
}
现在想一想,如何将应用部署到QA或者生产环境,假设生产环境中使用的JNDI。我们的dataSource bean看起来像这样:
@Bean(destroyMethod="")
public DataSource dataSource() throws Exception {
    Context ctx = new InitialContext();
    return (DataSource) ctx.lookup("java:comp/env/jdbc/datasource");
}
问题是,在当前环境中如何切换这两个配置。随着时间推移,Spring用户设计了很多种方式完成此切换,通常使用系统环境变量和XML<import/>绑定,<import/>元素包含一个${placeholder}符号,使用环境变量来设置${placeholder}符号所代表的值,从而达到切换正确配置文件的目的。bean定义profiles是核心容器功能,提供针对子问题的解决方案。
概括一下上面的场景:环境决定bean定义,最后发现,我们需要在某些上下文环境中使用某些bean,在其他环境中则不用这些bean。你也许会说,你需要在场景A中注册一组bean定义,在场景B中注册另外一组。先看看我们如何修改配置来完成此需求。
@Profile
`@Profile`注解的作用,是在一个或者多个指定profiles激活的情况下,注册某个组件。使用上面的样例,重写dataSource配置: ```java @Configuration @Profile("dev") public class StandaloneDataConfig {
@Bean
public DataSource dataSource() {
    return new EmbeddedDatabaseBuilder()
        .setType(EmbeddedDatabaseType.HSQL)
        .addScript("classpath:com/bank/config/sql/schema.sql")
        .addScript("classpath:com/bank/config/sql/test-data.sql")
        .build();
}
}
```java
@Configuration
@Profile("production")
public class JndiDataConfig {

    @Bean(destroyMethod="")
    public DataSource dataSource() throws Exception {
        Context ctx = new InitialContext();
        return (DataSource) ctx.lookup("java:comp/env/jdbc/datasource");
    }
}
@Profile可以用于元数据注解,为了组合自定义代码层注解。下面的的样例中定义了@Production自定义注解,该注解用于替换@Profile("production"):
@Target(ElementType.TYPE)
@Retention(RetentionPolicy.RUNTIME)
@Profile("production")
public @interface Production {
}
@Profile也能注解方法,用于配置一个配置类中的指定bean
@Configuration
public class AppConfig {

    @Bean
    @Profile("dev")
    public DataSource devDataSource() {
        return new EmbeddedDatabaseBuilder()
            .setType(EmbeddedDatabaseType.HSQL)
            .addScript("classpath:com/bank/config/sql/schema.sql")
            .addScript("classpath:com/bank/config/sql/test-data.sql")
            .build();
    }

    @Bean
    @Profile("production")
    public DataSource productionDataSource() throws Exception {
        Context ctx = new InitialContext();
        return (DataSource) ctx.lookup("java:comp/env/jdbc/datasource");
    }
}
如果一个
@Configuration类注解了@Profile,类中所有@Bean和@Import注解相关的类都将被忽略,除非该profile被激活。如果@Component或者@Configuration注解了@Profile({"p1","p2"}),该类将不会注册/处理,除非profiles'p1 and/or 'p2'被激活。如果给定的profile,使用了NOT操作(!)前缀,若当前profile未被激活则注解元素将会注册,等等。对于@Profile({"p1", "!p2"}),在profile 'p1'被激活或者'p2'未激活时,发生注册。
XML bean定义profile
XML中的`beans`元素有一个`profile`属性。上面的栗子重写到2个XML中 ```xml
<jdbc:embedded-database id="dataSource">
    <jdbc:script location="classpath:com/bank/config/sql/schema.sql"/>
    <jdbc:script location="classpath:com/bank/config/sql/test-data.sql"/>
</jdbc:embedded-database>
```
<beans profile="production"
    xmlns="http://www.springframework.org/schema/beans"
    xmlns:xsi="http://www.w3.org/2001/XMLSchema-instance"
    xmlns:jee="http://www.springframework.org/schema/jee"
    xsi:schemaLocation="...">

    <jee:jndi-lookup id="dataSource" jndi-name="java:comp/env/jdbc/datasource"/>
</beans>
也可以不用分开2个文件,在同一个XML中配置2个<bean/>,<bean/>元素也有profile属性:
<beans xmlns="http://www.springframework.org/schema/beans"
    xmlns:xsi="http://www.w3.org/2001/XMLSchema-instance"
    xmlns:jdbc="http://www.springframework.org/schema/jdbc"
    xmlns:jee="http://www.springframework.org/schema/jee"
    xsi:schemaLocation="...">

    <!-- other bean definitions -->

    <beans profile="dev">
        <jdbc:embedded-database id="dataSource">
            <jdbc:script location="classpath:com/bank/config/sql/schema.sql"/>
            <jdbc:script location="classpath:com/bank/config/sql/test-data.sql"/>
        </jdbc:embedded-database>
    </beans>

    <beans profile="production">
        <jee:jndi-lookup id="dataSource" jndi-name="java:comp/env/jdbc/datasource"/>
    </beans>
</beans>
TODO。The spring-bean.xsd has been constrained to allow such elements only as the last ones in the file.它是配置更加灵活,而又不造成XML文件混乱。
开启profile
要修改配置,我们仍然需要指定要激活哪个文件。如果现在运行上面的样例应用,它会抛异常`NoSuchBeanDefinitionException`,因为容器找不到`dataSource`bean。
有多种方式激活配置,但是最直接的方式是编程式的方式使用ApplicationContext API:
AnnotationConfigApplicationContext ctx = new AnnotationConfigApplicationContext();
ctx.getEnvironment().setActiveProfiles("dev");
ctx.register(SomeConfig.class, StandaloneDataConfig.class, JndiDataConfig.class);
ctx.refresh();
此外,还可以使用spring.profiles.active激活配置,该属性可以配置在系统环境变量、JVM系统属性、web.xml中JNDI中的servlet context上下文参数(see Section 5.13.3, “PropertySource Abstraction”)
注意配置文件不是单选;可能会同时激活多个配置文件,编程式的使用方法setActiveProfiles(),该方法接收String...参数,也就是多个配置文件名:
ctx.getEnvironment().setActiveProfiles("profile1", "profile2");
声明式的使用spring.profiles.active ,值可以为逗号分隔的配置文件名列表,
-Dspring.profiles.active="profile1,profile2"
默认profile配置
默认的profile配置就是默认开启的profile配置: ```java @Configuration @Profile("default") public class DefaultDataConfig {
@Bean
public DataSource dataSource() {
    return new EmbeddedDatabaseBuilder()
        .setType(EmbeddedDatabaseType.HSQL)
        .addScript("classpath:com/bank/config/sql/schema.sql")
        .build();
}
}
如果profile激活了,上面的`dataSource`数据源就被创建了;这就像是提供了默认的bean定义,如果有任何profile配置被激活,默认的的就不在应用了。
默认profile配置文件可以更改,通过环境变量的`setDefaultProfiles`方法,或者是声明的`spring.profiles.default`属性值
<h4 id='beans-property-source-abstraction'>PropertySource Abstraction</h4>
Spring的环境抽象提供了用于检索一系列的property sources属性配置文件。详细阐述,参看:
```java
ApplicationContext ctx = new GenericApplicationContext();
Environment env = ctx.getEnvironment();
boolean containsFoo = env.containsProperty("foo");
System.out.println("Does my environment contain the ''foo'' property? " + containsFoo);
在上面的片段中,通过较高层次方式检索SPring是否在当前环境中定义了fooproperty属性。为了检索该属性,环境对象在一组PropertySource对象中执行检索。PropertySource是key-value键值对配置文件的抽象,Spring的StandardEnvironment配置了2个PropertySource对象-其一是JVM系统properties(System.getProperties()),另一个是一组系统环境变量(System.getenv())。
这些默认的property源代表
StandardEnvironment,在独立的应用中使用。StandardEnvironment用默认的property配置源填充,默认配置源包括servlet配置和servlet上下文参数。StandardPortletEnvironment也可以访问portlet配置和portlet上下文参数。也可以可选的开启JndiPropertySource,详情参看Javadoc。
若在系统property中存在foo或者在环境变量中存在foo,当使用StandardEnvironment调用env.containsProperty("foo"),将会返回true。
检索是分层级的。默认情况,系统properties属性优先于环境变量,索引如果
fooproperty这两两处都配置了,此时调用env.getProperty("foo"),系统property值将会返回。
最重要的,完整的机制是可配置的。也许你需要一个自定义的properties源,并将该源整合到这个检索层级中。没有问题-只需实现和实例化你自定义的PropertySource,并在当前环境中把其加入到PropertySources中:
ConfigurableApplicationContext ctx = new GenericApplicationContext();
MutablePropertySources sources = ctx.getEnvironment().getPropertySources();
sources.addFirst(new MyPropertySource());
在上面的代码中,MyPropertySource已经增加到了最高优先级的检索层级中。如果它有fooproperty属性,它将会被探测并返回,优先于其他PropertySource中的fooproperty属性。MutablePropertySourcesAPI暴露了很多方法,允许你精准的操作property属性源。
@PropertySource
`@PropertySource`注解提供了一个方便的方式,用于增加一个`PropertySource`到Spring的环境中: 给定一个文件"app.properties"包含了key/value键值对testbean.name=myTestBean,下面的`@Configuration`类使用了`@PropertySource`,使用这种方式调用`testBean.getName()`将会返回`myTestBean`。 ```java @Configuration @PropertySource("classpath:/com/myco/app.properties") public class AppConfig { @Autowired Environment env;
@Bean
public TestBean testBean() {
TestBean testBean = new TestBean();
testBean.setName(env.getProperty("testbean.name"));
return testBean;
}
}
任何的存在于`@PropertySource`中的`${...}`占位符,将会被解析为定义在环境中的属性配置文件中的属性值:
```java
@Configuration
@PropertySource("classpath:/com/${my.placeholder:default/path}/app.properties")
public class AppConfig {
@Autowired
Environment env;
@Bean
public TestBean testBean() {
TestBean testBean = new TestBean();
testBean.setName(env.getProperty("testbean.name"));
return testBean;
}
}
假设"my.placeholder"代表一个已经注册的的property属性,比如,系统属性或者环境变量,占位符将会被解析为相应的值。如果没有,那么default/path将会作为默认值。若没有默认值指定,那么property将不能解析,IllegalArgumentException将会抛出
TOADD
Placeholder resolution in statements
以前,元素中的占位符的值只能解析JVM系统properties或者环境变量。No longer is this the case。因为`Environment`抽象通过容器集成,通过`Environment`可以非常容器的解析占位符。这意味着,你可以你喜欢的方式配置如何解析:可以改变是优先查找系统properties或者是有限查找环境变量,或者删除它们;增加自定义property源,使之成为更合适的。
下面的自定义property定义,会像Enviroment一样可用:
<beans>
<import resource="com/bank/service/${customer}-config.xml"/>
</beans>
注册LoadTimeWeaver
`LoadTimeWeaver`用于在JVM加载类时动态转换。 若要开启加载时织入,得在`@Configuration`类中增加`@EnableLoadTimeWeaving`: ```java @Configuration @EnableLoadTimeWeaving public class AppConfig {
}
或者在XML中配置,使用`context:load-time-weaver`元素:
```xml
<beans>
<context:load-time-weaver/>
</beans>
一旦为ApplicationContext做了配置。ApplicationContext内的任何bean都会实现LoadTimeWeaverAware,因此可以接收load-time weaver实例。这种用法和JPA联合使用非常赞,load-time weaving加载织入对JPA类转换非常必要。详情请参看LocalContainerEntityManagerFactoryBean。关于AspectJ load-time weaving更多的详情,请参看see Section 9.8.4, “Load-time weaving with AspectJ in the Spring Framework”
补充说明ApplicationContext的能力
就像简介章节讨论的,`org.springframework.beans.factory`包提供了管理和操作bean的基本功能,包含一种编程式的方式。`org.springframework.context`包增加了`ApplicationContext`接口,继承于`BeanFactory`接口,这也是为了继承其他的接口,并且提供*应用框架风格*。很多人使用`ApplicationContext`完全是声明式,甚至不用编程式去创建,依靠像`ContextLoader`这样的支持类自动实例化`ApplicationContext`,并把此作为Java EE web应用的启动步骤。
为了增强BeanFactory功能,context 包也支持下列功能:
- 通过
MessageSource接口,i18n-style方式访问messages。译注国际化 - 通过
ResourceLoader接口,访问资源,比如URLS网络资源定位符和Files文件系统 - 通过
ApplicationEventPublisher,给实现了ApplicationListener接口的bean发布事件, - 通过
HierarchicalBeanFactory接口,加载多级contexts,允许关注某一层级context,比如应用的web层。
TODO使用MessageSource国际化
`ApplicationContext`接口继承`MessageSource`接口,因此提供国际化 对这一章暂时不感兴趣,不翻了先。
标注事件和自定义事件
`ApplicationContext`通过`ApplicationEvent`类和`ApplicationContext`类提供了事件处理。如果某个bean实现了`ApplicationListener`接口,并注册在了context中,每当`ApplicationEvent`向`ApplicationContext`发布时间,该bean就会收到通知。其实,这是一个标准的的*观察者模式*。Spring提供了下列标准事件:
Table 5.7. Built-in Events 事件 | 解释 ---- | --- ContextRefreshedEvent | 当ApplicationContext初始化或者刷新时发布,比如,使用ConfigurableApplicationContext接口的refresh()方法。这里"初始化"的意思是指,所有的bean已经被加载、post-processor后处理bean已经被探测到并激活,单例bean已经pre-instantiated预先初始化,并且ApplicationContext对象已经可用。只要context上下文未关闭,可以多次触发刷新动作, 某些ApplicationContext支持"热"刷新。比如,XmlWebApplicationContext支持热刷新,GenericApplicationContext就不支持。 ContextStartedEvent | 当ApplicationContext启动时候发布,使用ConfiruableApplicationContext接口的start()方法。这里的“启动”意思是指,所有的Lifecycle生命周期bean接收到了明确的启动信号。通常,这个信号用来在明确的“停止”指令之后重启beans,不过也可能是使用了启动组件,该组件并未配置自动启动,比如:组件在初始化的时候并未启动。 ContextStoppedEvent | 当ApplicationContext停止时发布,使用ConfigurableApplicationContext接口的stop()方法。这里的“停止”的意思是指所有的Lifecycle生命周期bean接收到了明确的停止信号。一个停止了的context上下文可以通过start()调用来重启。ContextClosedEvent | 当ApplicationContext关闭时候发布,使用ConfigurableApplicationContext接口的close()方法。这里“关闭”的意思是所有的单例bean已经销毁。一个关闭的context上下文达到的生命周期的重点。不能刷新,不能重启。RequestHandledEvent | 是一个web专用事件,告诉所有的beans:一个HTTP request正在处理。这个时间在reqeust处理完成之后发布。该事件仅适用于使用Spring的DispatcherServlet的web应用。
你也可以创建并发布自定义事件。下面样例展示了这一点,一个简单的类继承了Spring的ApplicationEvent类:
public class BlackListEvent extends ApplicationEvent {
private final String address;
private final String test;
public BlackListEvent(Object source, String address, String test) {
super(source);
this.address = address;
this.test = test;
}
// accessor and other methods...
}
为了发布自定义ApplicationEvent,得调用ApplicationEventPublisher接口上的publishEvent()方法。通常是使用一个已经注册为Spring bean的ApplicationEventPublisherAware接口的实现类来完成的。看样例:
public class EmailService implements ApplicationEventPublisherAware {
private List<String> blackList;
private ApplicationEventPublisher publisher;
public void setBlackList(List<String> blackList) {
this.blackList = blackList;
}
public void setApplicationEventPublisher(ApplicationEventPublisher publisher) {
this.publisher = publisher;
}
public void sendEmail(String address, String text) {
if (blackList.contains(address)) {
BlackListEvent event = new BlackListEvent(this, address, text);
publisher.publishEvent(event);
return;
}
// send email...
}
}
在配置期间,spring容器发现EmailService实现了ApplicationEventPublisherAware并自动调用setApplicationEventPublisher()方法。实际上,参数就是Spring容器本身;可以通过ApplicationEventPublisher接口和应用上下文简单的交互。
为了接受自定义ApplicationEvent,得创建一个ApplicationListener的实现类并注册为spring Bean。看样例:
public class BlackListNotifier implements ApplicationListener<BlackListEvent> {
private String notificationAddress;
public void setNotificationAddress(String notificationAddress) {
this.notificationAddress = notificationAddress;
}
public void onApplicationEvent(BlackListEvent event) {
// notify appropriate parties via notificationAddress...
}
}
注意,ApplicationListener以自定义事件类BlackListEvent作为范型类。也就是说onApplicationEvent()方法是类型安全的,无需向下转型。event listener事件监听想注册多少就注册多少,但是注意默认情况下,所有的监听会同步接收到事件。也就是说publishEvent()方法会阻塞所有监听完成对事件的处理。同步的、单线程的处理的一个优势是当一个监听接收到一个事件,若该事件发布者存在可用的事务时,监听会在发布者事务内操作。如果需要其他的事件发布策略,参看Spring的ApplicationEventMulticastor接口的JavaDoc
下面的样例展示了之前提到过的类如何定义bean并注册、配置:
<bean id="emailService" class="example.EmailService">
<property name="blackList">
<list>
<value>known.spammer@example.org</value>
<value>known.hacker@example.org</value>
<value>john.doe@example.org</value>
</list>
</property>
</bean>
<bean id="blackListNotifier" class="example.BlackListNotifier">
<property name="notificationAddress" value="blacklist@example.org"/>
</bean>
将他们组装到一起,当emailServicebean的sendEmail()方法调用时,如果有email是黑名单中的的,自定义事件BlackListEvent就发布了。balckListNotifierbean注册成为ApplicationListener,因此可以接收到BlackListEvent,并能通知相关的观察者。
Spring的事件机制是为了Spirng beans和所在的应用context上下文之间做简单的交流。然而,为了满足复杂的企业级集成需求,有个单独维护的项目Spring Integration project,提供了完整的支持,可用于轻量构建、pattern-oriented,依赖Spring编程模型的事件驱动架构。
便利的访问底层资源
为了获得最佳用法和理解应用上下文,推荐大家通过Spring的Resource abstraction资源抽象熟悉他们,详情请参看[Chapter 6, Resources](#resources)
一个应用上下文是一个ResourceLoader,它能加载资源。Resource本质上是JDK的java.net.URL类的扩展,实际上,Resource的实现类中大多含有java.net.URL的实例。Resource几乎能从任何地方透明的获取底层资源,可以是classpath类路径、文件系统、标准的URL资源及变种URL资源。如果资源定位字串是简单的路径,没有任何特殊前缀,就适合于实际应用上下文类型。
可以配置一个bean部署到应用上下文中,用以实现特殊的回调接口,ResouceLoaderAware,它会在初始化期间自动回调。可以暴露Resource的type属性,这样就可以访问静态资源;静态资源可以像其他properties那样被注入Resource。可以使用简单的字串路径指定资源,这要依赖于特殊的JavaBean PropertyEditor,该类是通过context自动注册,当bean部署时候它将转换资源中的字串为实际的资源对象
The location path or paths supplied to an ApplicationContext constructor are actually resource strings, and in simple form are treated appropriately to the specific context implementation. ClassPathXmlApplicationContext treats a simple location path as a classpath location. You can also use location paths (resource strings) with special prefixes to force loading of definitions from the classpath or a URL, regardless of the actual context type. 定位符是实际的资源字串路径,作为ApplicationContext构造函数的参数,简单的形式就能得到特殊的context实现类恰当的处理。ClassPathXamlApplicationContext能解析简单的定位路径作为classpath定位,可以使用带有特殊前缀的定位路径,这样就可以强制从classpath或者URL定义加载路径,无需关注实际的context类型。
译注,啥玩意,翻的狗屁不通
易用的web应用的`ApplicationContext`实例化
可以通过声明式方式创建`ApplicationContext`实例,比如,一个`ContextLoader`。当然也可以使用编程时的方式创建`ApplicationContext`实例,得使用`ApplicationContext`实现。 使用`ContexgtLoaderListener`注册一个`ApplicationContext`,看样例: ```xml contextConfigLocation /WEB-INF/daoContext.xml /WEB-INF/applicationContext.xml org.springframework.web.context.ContextLoaderListener ```
监听检查contextConfigLocation参数。如果参数不存在,监听默认使用/WEB-INF/applicationContext.xml。如果参数存在,监听会使用分隔符(逗号,分号,空格)分割参数,应用context会查找这些分割后的定位路径。Ant风格的路径支持的非常好。比如,WEB-INF/*Context.xml,将会匹配"WEB-INF"目录下所有以"Context.xml"结尾的file文件,/WEB-INF/**/*Context.xml,将会匹配"WEB-INF"下所有层级子目录的Context.xml 结尾的文件。
将Spring ApplicationContext作为JAVA EE RAR文件部署
这章不翻了,没意思。
BeanFactory
`BeanFactory`为Spring的IoC功能提供了基础支撑,但是在集成第三方框架他只能直接使用,现在已经成为历史。`BeanFactory`和相关接口,比如`BeanFactorAware,InitializingBean,DisposableBean`,依然存在,是为了大量的集成了spirng的第三方框架向后兼容。常常有第三方组件不能使用现代风格的SPring,比如`@PostConstruct`或者`@PreDestroy`,是为了保留JDK1.4的兼容性,或者是为了避免依赖`JSR-250`。 本部分主要讲解有关`BeanFactory`和`ApplicationContext`之间的不同的背景,通过一个经典的检索单例类阐述他们如何直接的访问IoC容器。
BeanFactory or ApplicationContext
优先使用`ApplicationContext`,除非你有非常好的理由不用它。 因为`ApplicationContext `包含了`BeanFactory`所有的方法,和`BeanFactory`相比更值得推荐,除了一些特定的场景,比如,在资源受限的设备上运行的内嵌的应用,这些设备非常关注内存消耗。无论如何,对于大多数的企业级应用和系统,`ApplicationContext`都是首选。Spring使用了的大量的`BeanPostProcess`[扩展点](#beans-factory-extension-bpp),如果使用简单的`BeanFactory`,大量的功能将失效,比如:transactions 和AOP ,至少得多一些额外的处理。它会造成困扰,因为配置中所有的都不错。
下面的表格中列举了BeanFactory和ApplicationContext提供的功能: Table 5.8. Feature Matrix
| 功能 | BeanFactory | ApplicationContext |
|---|---|---|
| bean实例化和组装 | YES | YES |
自动注册BeanPostProcessor |
NO | YES |
自动注册BeanFactoryPostProcessor |
NO | YES |
| 便利的消息资源访问(用于i18n) | NO | YES |
ApplicationEvent 发布 |
NO | YES |
为了注册一个bean post-processor 给BeanFactory,得这么干:
ConfigurableBeanFactory factory = new XmlBeanFactory(...);
// now register any needed BeanPostProcessor instances
MyBeanPostProcessor postProcessor = new MyBeanPostProcessor();
factory.addBeanPostProcessor(postProcessor);
// now start using the factory
在使用Beanfactory时,注册BeanFactoryPostProcessor,得这样:
XmlBeanFactory factory = new XmlBeanFactory(new FileSystemResource("beans.xml"));
// bring in some property values from a Properties file
PropertyPlaceholderConfigurer cfg = new PropertyPlaceholderConfigurer();
cfg.setLocation(new FileSystemResource("jdbc.properties"));
// now actually do the replacement
cfg.postProcessBeanFactory(factory);
上面2个栗子,显示注册步骤非常不便,这就是为什么推荐使用ApplicationContext的原因之一,就是为了方便的使用BeanFactoryPostProcessors和BeanPostProcessors。这些机制实现了一些非常重要的功能,比如property placeholder replacement and AOP
耦合代码和邪恶的单例
在应用中,推荐使用依赖注入的方式编写,使用Spring IoC容器管理的代码,当需要创建实例时,从容器获取他的依赖关系,并且对象对容器将对其一无所知,对于一些小的借合层的代码,也许会需要与其他层、组件、bean互相协作,可以以单例(准单例)方式使用Spring IoC容器。比如,第三方组件会使用构造器创建新对象(`Class.forName()`风格),而不能使用IoC容器获取这些对象。 如果第三方组件创建的对象是stub或者proxy代理,然后这些对象以单例风格从Ioc容器获取真正的对象加以委派,此时控制反转完成主要工作(对象将脱离于容器管理)。此时,大部分代码不需知道容器、也不需知道如何访问容器,好处就是代码解耦。EJBs也可以使用这种方式,代理的方式委派给简单的java实现对象,java对象从Ioc容器检出。然而,spring Ioc容器必须得设计为单例,。。。。。。。//TODO *未翻译完,翻了完了不通顺,第五章总算是搞定了*