java EE开发的颠覆者 spring boot 实战 随书学习-1
1.学习案例都是maven项目,首先要在eclipse 中配置 maven,主要修改maven的配置文件:配置文件下载链接: https://github.com/liuch0228/springboot-wangyunfei-learn ,最主要的是修改镜像地址,这里使用阿里云的镜像:
 1 <mirrors>
 2     <!-- mirror
 3      | Specifies a repository mirror site to use instead of a given repository. The repository that
 4      | this mirror serves has an ID that matches the mirrorOf element of this mirror. IDs are used
 5      | for inheritance and direct lookup purposes, and must be unique across the set of mirrors.
 6      |
 7     <mirror>
 8       <id>mirrorId</id>
 9       <mirrorOf>repositoryId</mirrorOf>
10       <name>Human Readable Name for this Mirror.</name>
11       <url>http://my.repository.com/repo/path</url>
12     </mirror>
13      -->
14      <mirror>
15             <id>aliyun</id>
16             <name>aliyun Maven</name>
17             <mirrorOf>*</mirrorOf>
18             <url>http://maven.aliyun.com/nexus/content/groups/public/</url>
19      </mirror>
20   </mirrors>
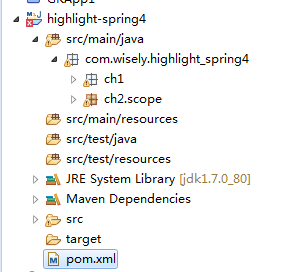
2. 新建一个maven项目


pom文件修改,添加spring相关依赖
 1 <project xmlns="http://maven.apache.org/POM/4.0.0" xmlns:xsi="http://www.w3.org/2001/XMLSchema-instance"
 2     xsi:schemaLocation="http://maven.apache.org/POM/4.0.0 http://maven.apache.org/xsd/maven-4.0.0.xsd">
 3     <modelVersion>4.0.0</modelVersion>
 4     <groupId>com.wisely</groupId>
 5     <artifactId>highlight-spring4</artifactId>
 6     <version>0.0.1-SNAPSHOT</version>
 7
 8     <!-- 在properties中定义一个名字为java.version的变量,在dependency中引用 -->
 9     <properties>
10         <java.version>1.7</java.version>
11     </properties>
12     <!-- 添加pom依赖 -->
13     <dependencies>
14     <!-- 添加spring-context依赖 -->
15         <dependency>
16             <groupId>org.springframework</groupId>
17             <artifactId>spring-context</artifactId>
18             <version>4.1.6.RELEASE</version>
19         </dependency>
20
21         <!-- 添加AOP依赖 -->
22         <dependency>
23             <groupId>org.springframework</groupId>
24             <artifactId>spring-aop</artifactId>
25             <version>4.1.6.RELEASE</version>
26         </dependency>
27         <!-- 添加AspectJ依赖 -->
28         <dependency>
29             <groupId>org.aspectj</groupId>
30             <artifactId>aspectjrt</artifactId>
31             <version>1.8.5</version>
32         </dependency>
33         <dependency>
34             <groupId>org.aspectj</groupId>
35             <artifactId>aspectjweaver</artifactId>
36             <version>1.8.5</version>
37         </dependency>
38     </dependencies>
39
40     <!-- 编译插件依赖 -->
41     <build>
42         <plugins>
43             <plugin>
44                 <groupId>org.apache.maven.plugins</groupId>
45                 <artifactId>maven-compiler-plugin</artifactId>
46                 <version>2.3.2</version>
47                 <configuration>
48                     <source>${java.version}</source> <!-- 通过变量指定编译源代码使用的jdk版本 -->
49                     <target>${java.version}</target> <!-- 通过变量指定目标代码使用的jdk版本 -->
50                 </configuration>
51             </plugin>
52         </plugins>
53     </build>
54
55 </project>
改完保存后,鼠标右键单击项目,maven update project,下载依赖jar包:

3.依赖注入示例:
3.1 FunctionService 类
 1 package com.wisely.highlight_spring4.ch1.di;
 2
 3 import org.springframework.stereotype.Service;
 4 /**
 5  * 定义功能类的bean
 6  * @Service注解声明当前FunctionService类是spring管理的一个bean
 7  * 声明bean的注解还有:
 8  * @Repository 数据访问层使用
 9  * @Controller 展现层使用
10  * @Component  声明被spring管理的组件(也就是自动注入spring容器),没有明确角色
11  * @author Administrator
12  *
13  */
14 @Service
15 public class FunctionService {
16
17     public String sayHello(String word) {
18         return "hello " + word + " !";
19     }
20
21 }
3.2 UseFunctionService 类
 1 package com.wisely.highlight_spring4.ch1.di;
 2
 3 import org.springframework.beans.factory.annotation.Autowired;
 4 import org.springframework.stereotype.Service;
 5 /**
 6  * 声明使用功能类FunctionService的bean
 7  * @Service 声明UseFunctionService类是spring管理的一个Bean
 8  * @author Administrator
 9  *
10  */
11 @Service
12 public class UseFunctionService {
13     /*@Autowired 把FunctionService的实体bean注入到UseFunctionService类中
14      * 让UseFunctionService具备FunctionService的功能 ———— 组合关系
15      * */
16     @Autowired
17     private FunctionService functionService;
18
19     public String sayHello(String word) {
20         return functionService.sayHello(word);
21     }
22
23 }
3.3 Java配置类
java配置是spring4.x推荐的配置方式,可以完全替代xml配置,也是springboot推荐的配置方式。Java 配置是通过@Configuration和@Bean来实现的。
@Configuration 声明当前类是一个配置类 ,@ComponentScan 注解自动扫描指定包下的所有使用@Service @Component @Repository 和@Controller的类,将它们注册为spring的Bean
 1 package com.wisely.highlight_spring4.ch1.di;
 2
 3 import org.springframework.context.annotation.ComponentScan;
 4 import org.springframework.context.annotation.Configuration;
 5 /**
 6  * spring配置类
 7  * @Configuration 声明当前类是一个配置类
 8  * @ComponentScan 注解自动扫描指定包下的所有使用@Service @Component @Repository
 9  * 和@Controller的类,并注册为Bean
10  * @author Administrator
11  *
12  */
13 @Configuration
14 @ComponentScan("com.wisely.highlight_spring4.ch1.di")
15 public class DiConfig {
16
17 }
主测试类:获取spring容器实例context ,然后拿context获取注册的bean, 调用bean的方法
 1 package com.wisely.highlight_spring4.ch1.di;
 2
 3 import org.springframework.context.annotation.AnnotationConfigApplicationContext;
 4
 5 public class MainTest {
 6
 7     public static void main(String[] args) {
 8         //1.使用AnnotationConfigApplicationContext最为spring容器,接受一个配置类作为参数
 9         AnnotationConfigApplicationContext context = new AnnotationConfigApplicationContext(DiConfig.class);
10         //2.获得声明配置的UseFunctionService 的bean
11         UseFunctionService useFunctionService = context.getBean(UseFunctionService.class);
12         //3.调用bean的方法
13         System.out.println(useFunctionService.sayHello("world"));
14         context.close();
15     }
16
17 }
运行结果如下:
