FrameLayout(帧布局)
这个布局的特点是简单的默认把每一个视图组件都放在边框内且放在左上角,即使添加多个视图组件,他们也都是重叠在左上角,新的视图会遮挡住旧的视图。可以根据gravity来改变他所在的位置。
android:layout_gravity="XXX" XXX可以为 bottom、center、center_horizontal、center_vertical、end、left、right…… 简单的来说就是上下左右、居中、水平、垂直居中等等等。
在布局的文件中,添加如下代码:
 1 <?xml version="1.0" encoding="utf-8"?>
 2 <FrameLayout xmlns:android="http://schemas.android.com/apk/res/android"
 3     xmlns:app="http://schemas.android.com/apk/res-auto"
 4     xmlns:tools="http://schemas.android.com/tools"
 5     android:id="@+id/activity_main"
 6     android:layout_width="match_parent"
 7     android:layout_height="match_parent"
 8     tools:context="com.doliao.helloworld.MainActivity">
 9
10     <ImageView
11         android:layout_width="300px"
12         android:layout_height="300px"
13         app:srcCompat="@android:color/holo_orange_dark"
14         android:id="@+id/imageView1" />
15
16     <ImageView
17         android:layout_width="200px"
18         android:layout_height="200px"
19         app:srcCompat="@android:color/holo_blue_dark"
20         android:id="@+id/imageView2" />
21
22     <ImageView
23         android:layout_width="100px"
24         android:layout_height="100px"
25         app:srcCompat="@android:color/holo_red_dark"
26         android:id="@+id/imageView3" />
27
28 </FrameLayout>
上面是布局的代码 ,执行的 图像如下图所示:

LinearLayout(线性布局)
LinearLayout是相对布局,其按照垂直的方向、或者是水平的方向来对其每一个视图,简单的来说,就是如果你是垂直的方向,那么你的视图就是呈竖着的方向依次排下来,如果你的是水平的方向的话,那么你的视图就会呈水平的方向一次排下来。线性布局管理器允许为每一个子视图指定一个weight属性,以控制每一个子视图在空间内的大小
在布局内文件内,添加代码:
 1 <?xml version="1.0" encoding="utf-8"?>
 2 <LinearLayout xmlns:android="http://schemas.android.com/apk/res/android"
 3     xmlns:app="http://schemas.android.com/apk/res-auto"
 4     android:layout_width="match_parent"
 5     android:layout_height="match_parent"
 6     android:orientation="vertical">
 7
 8     <ImageView
 9
10         android:id="@+id/imageView1"
11         android:layout_width="300px"
12         android:layout_height="300px"
13         app:srcCompat="@android:color/holo_orange_dark" />
14
15     <ImageView
16         android:id="@+id/imageView2"
17         android:layout_width="200px"
18         android:layout_height="200px"
19         app:srcCompat="@android:color/holo_blue_dark" />
20
21     <ImageView
22         android:id="@+id/imageView3"
23         android:layout_width="100px"
24         android:layout_height="100px"
25         app:srcCompat="@android:color/holo_red_dark" />
26 </LinearLayout>
根据上面的测试代码,运行的截图如下左所示,如果改变 android:orientation="vertical" 的属性,改成horizontal 得到的为下右边的截图
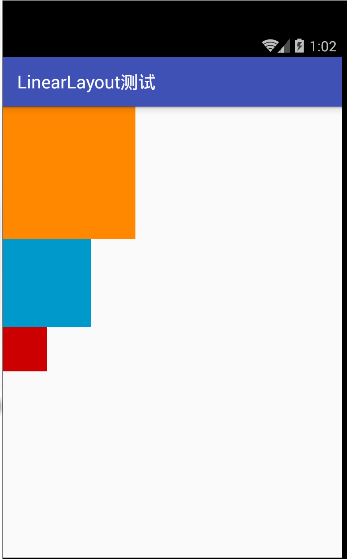
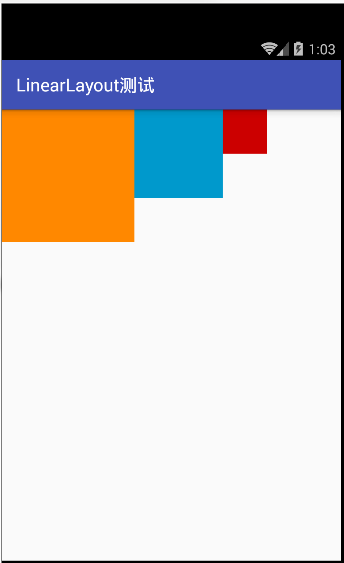
在java代码中设置垂直或者水平的布局方式是 调用 组件的 setorientation(int );方法 参数1 为垂直布局,参数0为水平布局。
RelativeLayout(相对布局)
相对布局,跟线性布局已经简单布局比较来说,是一种较灵活性的布局,简单来说就是,相对于上一个控件,或者相当于上下左右的边界的某一个位置,假如有一个视图控件的ID为A,还有一个视图控件ID为B,B可以设置为相对A的上、下、左、右的位置,相对的属性有 layout_above、layout_below、layout_toRightOf、layout_toRightOf 等等等。
 1 <?xml version="1.0" encoding="utf-8"?>
 2 <RelativeLayout xmlns:android="http://schemas.android.com/apk/res/android"
 3     xmlns:app="http://schemas.android.com/apk/res-auto"
 4     android:layout_width="match_parent"
 5     android:layout_height="match_parent">
 6
 7     <ImageView
 8         android:id="@+id/imageView1"
 9         android:layout_width="200px"
10         android:layout_height="200px"
11         android:layout_centerInParent="true"
12         app:srcCompat="@android:color/holo_blue_dark" />
13
14     <ImageView
15         android:id="@+id/imageView2"
16         android:layout_width="200px"
17         android:layout_height="200px"
18         android:layout_toRightOf="@id/imageView1"
19         app:srcCompat="@android:color/holo_orange_dark" />
20
21     <ImageView
22         android:id="@+id/imageView4"
23         android:layout_width="200px"
24         android:layout_height="200px"
25         android:layout_below="@id/imageView1"
26         app:srcCompat="@android:color/holo_purple" />
27
28     <ImageView
29         android:id="@+id/imageView3"
30         android:layout_width="200px"
31         android:layout_height="200px"
32         android:layout_toLeftOf="@id/imageView1"
33         app:srcCompat="@android:color/holo_red_dark" />
34 </RelativeLayout>
执行的截图为下图所示:


看了上面的运行截图,肯定想,运行的图片跟我想要的不一样啊、按道理如我想的 以1为中心点,2在1的右边,3在1的上方,4在1的下方,理想的应该是上面右图所示,但是为什么不是呢,那是因为视图控件1中 有 android:layout_centerInParent="true" 属性,只要在其他控件中添加这个属性就可以了。
除了有相对于已存在的视图组件,还有相对于当前的布局边框的,属性有layout_alignParentRight(相对与大边框的右边)、layout_alignParentLeft(相对与大边框的左边)、layout_alignParentBottom(相对与大边框的底部)、layout_alignParentTop="true"(相对与大边框的顶部)、layout_centerInParent="true"(相对于大边框的中间)等等等,属性也可以同时用,但是如果同时用相反的属性,比如用了left又用right,那么这个视图将会变成左右平铺。
在布局文件中,添加如下代码:
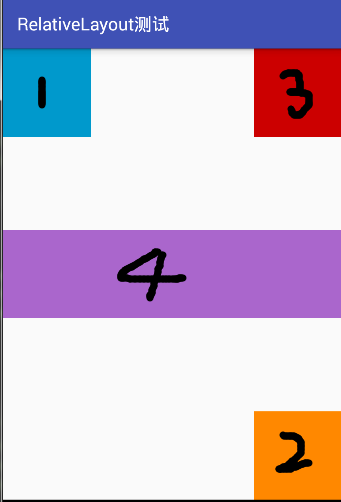
 1 <?xml version="1.0" encoding="utf-8"?>
 2 <RelativeLayout xmlns:android="http://schemas.android.com/apk/res/android"
 3     xmlns:app="http://schemas.android.com/apk/res-auto"
 4     android:layout_width="match_parent"
 5     android:layout_height="match_parent">
 6
 7     <ImageView
 8         android:id="@+id/imageView1"
 9         android:layout_width="200px"
10         android:layout_height="200px"
11         android:layout_alignParentLeft="true"
12         app:srcCompat="@android:color/holo_blue_dark" />
13
14     <ImageView
15         android:id="@+id/imageView2"
16         android:layout_width="200px"
17         android:layout_height="200px"
18         android:layout_alignParentRight="true"
19         android:layout_alignParentBottom="true"
20         app:srcCompat="@android:color/holo_orange_dark" />
21
22     <ImageView
23         android:id="@+id/imageView3"
24         android:layout_width="200px"
25         android:layout_height="200px"
26         android:layout_alignParentRight="true"
27         app:srcCompat="@android:color/holo_red_dark" />
28
29     <ImageView
30         android:id="@+id/imageView4"
31         android:layout_width="200px"
32         android:layout_height="200px"
33         android:layout_centerInParent="true"
34         android:layout_alignParentLeft="true"
35         android:layout_alignParentRight="true"
36         app:srcCompat="@android:color/holo_purple" />
37
38 </RelativeLayout>
运行的截图为下面所示,对于控件的id与数字对应。
相对布局除了上面列出来的一些属性之外,还有其他很多的属性如下所示(参照 http://www.miui.com/thread-574167-1-1.html )
相对于兄弟元素
android:layout_below="@id/aaa":在指定View的下方
android:layout_above="@id/xxx":在指定View的上方
android:layout_toLeftOf="@id/bbb":在指定View的左边
android:layout_toRightOf="@id/cccc":在指定View的右边
相对于父元素
android:layout_alignParentLeft="true":在父元素内左边
android:layout_alignParentRight="true":在父元素内右边
android:layout_alignParentTop="true":在父元素内顶部
android:layout_alignParentBottom="true":在父元素内底部
对齐方式
android:layout_centerInParent="true":居中布局
android:layout_centerVertical="true":水平居中布局
android:layout_centerHorizontal="true":垂直居中布局
android:layout_alignTop="@id/xxx":与指定View的上边界一致
android:layout_alignBottom="@id/xxx":与指定View下边界一致
android:layout_alignLeft="@id/xxx":与指定View的左边界一致
android:layout_alignRight="@id/xxx":与指定View的右边界一致
间隔
android:layout_marginBottom=""; 离某元素底边缘的距离
android:layout_marginLeft=""; 离某元素左边缘的距离
android:layout_marginRight ="";离某元素右边缘的距离
android:layout_marginTop=""; 离某元素上边缘的距离
android:layout_paddingBottom=""; 离父元素底边缘的距离
android:layout_paddingLeft=""; 离父元素左边缘的距离
android:layout_paddingRight ="";离父元素右边缘的距离
android:layout_paddingTop=""; 离父元素上边缘的距离
GridLayout(网格布局)
网格布局是在androd4.0中引入的,它是使用一个由细线构成的矩形网络,在一系列行和列中添加布局的视图。
在布局文件中,添加如下代码:
 1 <?xml version="1.0" encoding="utf-8"?>
 2 <GridLayout xmlns:android="http://schemas.android.com/apk/res/android"
 3     android:layout_width="match_parent"
 4     android:layout_height="300px"
 5     android:orientation="horizontal"
 6     android:rowCount="3"
 7     android:columnCount="3"
 8     >
 9
10     <Button
11         android:id="@+id/b1"
12         android:width="20px"
13         android:height="20px"
14         android:text="1"
15         />
16     <Button
17         android:id="@+id/b2"
18         android:width="20px"
19         android:height="20px"
20         android:text="2"
21         />
22     <Button
23         android:id="@+id/b3"
24         android:width="20px"
25         android:height="20px"
26         android:text="3"
27         />
28
29     <Button
30         android:id="@+id/b4"
31         android:layout_row="2"
32         android:layout_columnSpan="2"
33         android:width="20px"
34         android:height="20px"
35         android:text="4"
36         />
37
38     <Button
39         android:id="@+id/b5"
40         android:width="20px"
41         android:height="20px"
42         android:text="5"
43         />
44 </GridLayout>
运行的截图如下图所示:
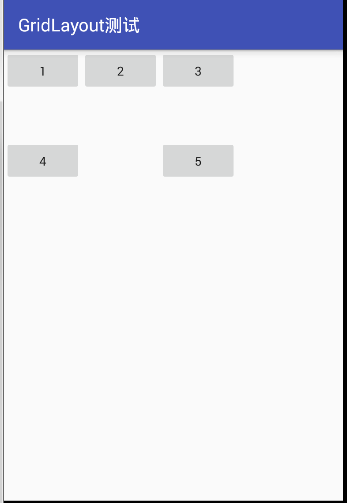
因为在gridlayout的头部设置了 android:orientation="horizontal" 即按照行的方式来依次显示控件,所以顺序为 1、2、3… 依次从左到右,其中的4占用了2个格子,因为参数 android:layout_columnSpan="2" 表示该控件占2行。它和 android:layout_columnSpan类似;而 android:layout_row="2" 表示在第3行显示该控件;android:layout_row="2",表示在第3行显示该控件。它和 android:layout_column类似,行的基数是从0开始的。
AbsoluteLayout(绝对布局)
绝对布局是给视图组件指定一个左边,就是 当前的布局内 x 、 y 轴的坐标,但是现在已经基本不用了,所以这里就不记录了。
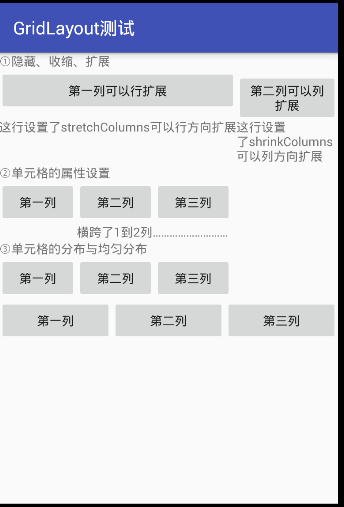
TableLayout(表格布局) 参考了 传送门
对于表格布局来说,与网格布局是有一定的相似的。属性有
android:stretchColumns
设置可伸展的列。该列可以向行方向伸展,最多可占据一整行。
android:shrinkColumns
设置可收缩的列。当该列子控件的内容太多,已经挤满所在行,那么该子控件的内容将往列方向显示。
android:collapseColumns
设置要隐藏的列。
android:layout_column
指定该单元格在第几列显示
android:layout_span
指定该单元格占据的列数(未指定时,为1)
 1 <?xml version="1.0" encoding="utf-8"?>
 2 <LinearLayout xmlns:android="http://schemas.android.com/apk/res/android"
 3     android:layout_width="match_parent"
 4     android:layout_height="match_parent"
 5     android:orientation="vertical"
 6     >
 7
 8     <TextView
 9         android:id="@+id/text1"
10         android:layout_width="wrap_content"
11         android:layout_height="wrap_content"
12         android:text="①隐藏、收缩、扩展" />
13
14     <TableLayout
15         android:layout_width="match_parent"
16         android:layout_height="wrap_content"
17         android:collapseColumns="2"
18         android:shrinkColumns="1"
19         android:stretchColumns="0">
20         <TableRow>
21             <Button
22                 android:id="@+id/b1"
23                 android:text="第一列可以行扩展" />
24             <Button
25                 android:id="@+id/b2"
26                 android:text="第二列可以列扩展" />
27             <Button
28                 android:id="@+id/b3"
29                 android:text="第三列是被隐藏的列" />
30         </TableRow>
31         <TableRow>
32             <TextView android:text="这行设置了stretchColumns可以行方向扩展"/>
33             <TextView android:text="这行设置了shrinkColumns可以列方向扩展"/>
34         </TableRow>
35     </TableLayout>
36     <TextView
37         android:id="@+id/text2"
38         android:layout_width="wrap_content"
39         android:layout_height="wrap_content"
40         android:text="②单元格的属性设置" />
41     <TableLayout
42         android:layout_width="wrap_content"
43         android:layout_height="wrap_content">
44         <TableRow>
45             <Button
46                 android:id="@+id/b11"
47                 android:text="第一列" />
48             <Button
49                 android:id="@+id/b22"
50                 android:text="第二列" />
51             <Button
52                 android:id="@+id/b33"
53                 android:text="第三列" />
54         </TableRow>
55         <TableRow>
56             <TextView android:text="横跨了1到2列………………………"
57                 android:layout_span="2"
58                 android:layout_column="1"/>
59         </TableRow>
60     </TableLayout>
61
62     <TextView
63         android:id="@+id/text3"
64         android:layout_width="wrap_content"
65         android:layout_height="wrap_content"
66         android:text="③单元格的分布与均匀分布" />
67     <TableLayout
68         android:layout_width="match_parent"
69         android:layout_height="wrap_content">
70         <TableRow>
71             <Button
72                 android:id="@+id/b111"
73                 android:text="第一列" />
74             <Button
75                 android:id="@+id/b222"
76                 android:text="第二列" />
77             <Button
78                 android:id="@+id/b333"
79                 android:text="第三列" />
80         </TableRow>
81         <TableRow>
82             <Button
83                 android:id="@+id/b1111"
84                 android:layout_weight="1"
85                 android:text="第一列" />
86             <Button
87                 android:id="@+id/b2222"
88                 android:layout_weight="1"
89                 android:text="第二列" />
90             <Button
91                 android:id="@+id/b3333"
92                 android:layout_weight="1"
93                 android:text="第三列" />
94         </TableRow>
95     </TableLayout>
96 </LinearLayout>
运行之后的截图如下:
以上布局就是常见的布局,当然还有其他的布局,等学到了在做笔记吧,从简到难,慢慢来!