27、yum安装
配置文件目录:/etc/yum.repos.d
28、软件安装
1)jdk安装(二进制安装包安装)


首先要记住:安装虚拟机 的时候,如果当时选 了desktop的时候,系统会给你自动带一个桌面版的 java,也就是说一开始你是什么都不装的,但是系统也有一个了:

[root@mini1 jdk1.8.0_181]# which java
/usr/bin/java
[root@mini1 jdk1.8.0_181]# java -version
java version "1.7.0_79"   ## 系统默认给你安装的版本
OpenJDK Runtime Environment (rhel-2.5.5.4.el6-x86_64 u79-b14)
OpenJDK 64-Bit Server VM (build 24.79-b02, mixed mode)
[root@mini1 jdk1.8.0_181]# rm -rf /usr/bin/java ## 所以首先要将系统本来安装的java给删了

1、上传jdk压缩包,我是把安装包上传到这个目

[root@hdp01 xiaofeng10]# pwd
/home/xiaofeng10
[root@hdp01 xiaofeng10]# ll
total 181300
-rw-r--r--. 1 root root 185646832 Jul 21 13:11 jdk-8u181-linux-x64.tar.gz

2、解压jdk压缩包(听说一般解压到/usr/local下面)

tar -zxvf jdk-8u181-linux-x64.tar.gz -C /usr/local

3、此时在一定的目录下面是可以运行的了

[root@hdp01 bin]# pwd
/usr/local/jdk1.8.0_181/bin
[root@hdp01 bin]# ./java -version
java version "1.8.0_181"
Java(TM) SE Runtime Environment (build 1.8.0_181-b13)
Java HotSpot(TM) 64-Bit Server VM (build 25.181-b13, mixed mode)

4、修改环境变量PATH

vi /etc/profile

5、在文件最后加两行:

export JAVA_HOME=/usr/local/jdk1.8.0_181
export PATH=$PATH:$JAVA_HOME/bin

6、让环境变量生效

source /etc/profile

即可
java -version    检测是否安装成功
2)tomcat 安装,把包拿过来,解压,启动
tar -zxvf /soft/apache-tomcat-7.0.47.tar.gz -C /usr/local/
cd /usr/local/apache-tomcat-7.0.47/bin/
./startup.sh
3)zookeeper安装
## 上传文件并解压,并删除相关文件,并把相关名字改了
tar -zxvf zookeeper-3.4.5.tar.gz -C /usr/local/zookeeper-3.4.5
[root@mini1 zookeeper-3.4.5]# ll
total 1300
drwxr-xr-x. 2 501 games    4096 Aug 19 14:19 bin
drwxr-xr-x. 2 501 games    4096 Aug 19 14:38 conf
drwxr-xr-x. 4 501 games    4096 Aug 19 13:26 lib
-rw-r--r--. 1 501 games 1315806 Nov  5  2012 zookeeper-3.4.5.jar
## 顺便把配置文件的名字也改了,得到
[root@mini1 conf]# ll
total 12
-rw-r--r--. 1 501 games  535 Oct  1  2012 configuration.xsl
-rw-r--r--. 1 501 games 2161 Oct  1  2012 log4j.properties
-rw-r--r--. 1 501 games  990 Aug 19 14:38 zoo.cfg
## 修改配置文件,主要是最下面,要三台都要改啊
[root@mini1 conf]# cat zoo.cfg
# The number of milliseconds of each tick
tickTime=2000
# The number of ticks that the initial
# synchronization phase can take
initLimit=10
# The number of ticks that can pass between
# sending a request and getting an acknowledgement
syncLimit=5
# the directory where the snapshot is stored.
# do not use /tmp for storage, /tmp here is just
# example sakes.
dataDir=/root/zkdata
# the port at which the clients will connect
clientPort=2181
#
# Be sure to read the maintenance section of the
# administrator guide before turning on autopurge.
#
# http://zookeeper.apache.org/doc/current/zookeeperAdmin.html#sc_maintenance
#
# The number of snapshots to retain in dataDir
#autopurge.snapRetainCount=3
# Purge task interval in hours
# Set to "0" to disable auto purge feature
#autopurge.purgeInterval=1
server.1=192.168.174.20:2888:3888
server.2=192.168.174.21:2888:3888
server.3=192.168.174.132:2888:3888
## 服务器 1,2,3分别对应
[root@mini1 zkdata]# pwd
/root/zkdata
[root@mini1 zkdata]# cat myid
1
## 分别启动并查看状态,注意关闭防火墙
[root@mini1 bin]# pwd
/usr/local/zookeeper-3.4.5/bin
[root@mini1 bin]# ./zkServer.sh start
[root@mini1 bin]# ./zkServer.sh status  ## 查看状态
JMX enabled by default
Using config: /usr/local/zookeeper-3.4.5/bin/../conf/zoo.cfg
Mode: follower
## 厉害的脚本,全部一起重启
[root@mini1 bin]# cat zkstart.sh
#!/bin/bash
for host in 192.168.174.20 192.168.174.21 192.168.174.132
do
echo "$host is starting......"
ssh $host "source /etc/profile; /usr/local/zookeeper-3.4.5/bin/zkServer.sh start"
done
4)maven安装
2.在Linux上安装Maven

下载Maven

wget https://mirrors.tuna.tsinghua.edu.cn/apache/maven/maven-3/3.6.3/binaries/apache-maven-3.6.3-bin.tar.gz
添加阿里云镜像

修改maven/conf目录下的settings.xml

在mirrors节点下添加

<mirror>
    <id>aliyun-maven</id>
    <mirrorOf>*</mirrorOf>
    <name>aliyun maven</name>
    <url>http://maven.aliyun.com/nexus/content/groups/public</url>
</mirror>
配置maven环境变量

修改/etc/profile

export M2_HOME=/usr/local/maven
export PATH=$PATH:$M2_HOME/bin
配置java环境变量

export JAVA_HOME="/usr/java/jdk1.8.0_181-amd64"
export CLASS_PATH="$JAVA_HOME/lib"
export PATH=".$PATH:$JAVA_HOME/bin"
环境变量修完执行source /etc/profile立即生效
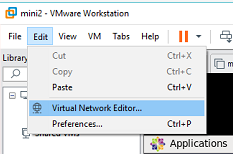
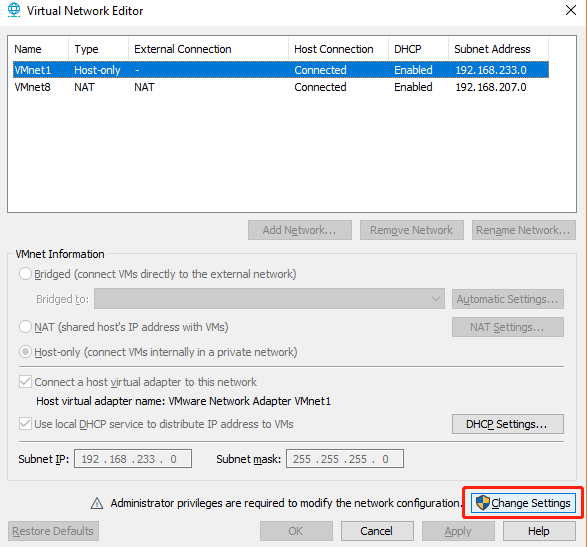
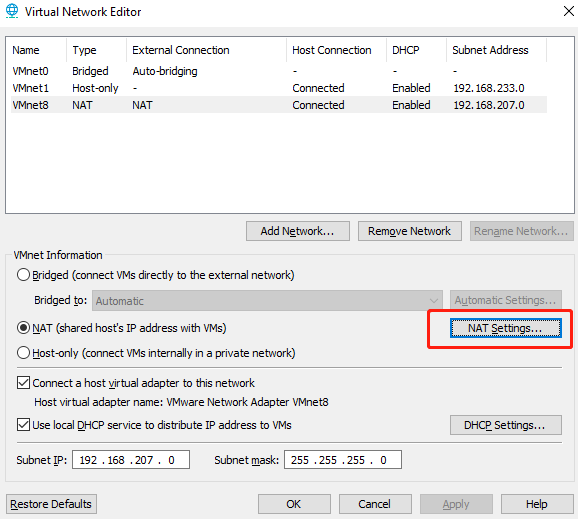
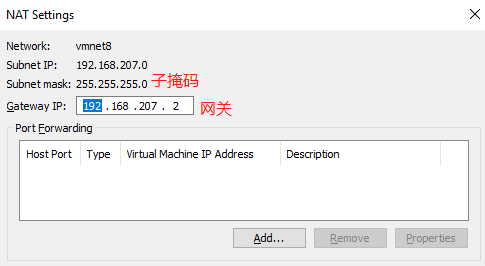
附:如何得到网关?
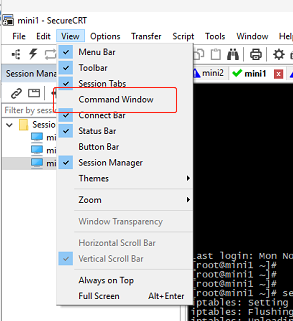
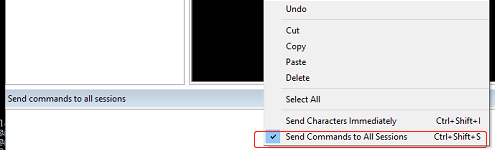
统一发送命令:
目录:
/:根目录,一般根目录下只存放目录,不要存放文件,也不要修改,或者删除目录下的内容
/mnt:测试目录
/root:root用户的家目录
/home:普通用户的家目录
/tmp:临时目录(比如文件上传时)
/var:存放经常修改的数据,比如程序运行的日志文件
/boot:存放的启动Linux 时使用的内核文件,包括连接文件以及镜像文件
/etc:系统默认放置配置文件的地方
/bin:所有用户都能执行的程序
/sbin:只有root才能执行的程序
/usr:用户自己的软件都可以放到这儿来
/dev:存放硬件设备的地方(/dev/cdrom)
/media:挂载光盘使用的
挂载光盘:mount /dev/cdrom /media
卸载光盘:umount /dev/cdrom
END!