前言
github: https://github.com/vergilyn/SpringBootDemo
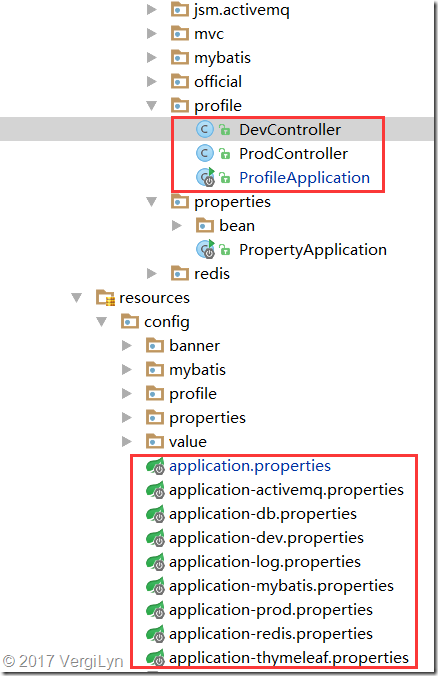
说明:我代码的结构是用profile来区分/激活要加载的配置,从而在一个project中写各种spring boot的demo。所以很多时候可能在*Application.class中指定了特殊的profile。
这种方式可能很糟糕(在细看理解application.properties的加载顺序后,感觉在*Application.class目录下写application.properties应该更好。)
代码位置:
一、application.properties
1. 1 application.properties的加载顺序 (重要)
SpringApplication将从以下位置加载application.properties文件,并把它们添加到Spring Environment中:
(1) 当前目录下的一个/config子目录;
(2) 当前目录;
(3) 一个classpath下的/config包;
(4) classpath根路径(root);
这个列表是按优先级排序的(列表中位置高的将覆盖位置低的)。
1.2 application.properties 加载目录/文件名 修改
如果不喜欢将application.properties作为配置文件名,可以通过指定spring.config.name环境属性来切换其他的名称。
也可以使用spring.config.location环境属性来引用一个明确的路径(目录位置或文件路径列表以逗号分割)。(并不是在config/application.properties中指定)
二、spring boot的profile指定
2.1 什么是profile,怎么理解profile?
Spring Profiles提供了一种隔离应用程序配置的方式,并让这些配置只能在特定的环境下生效。
任何@Component或@Configuration都能被@Profile标记,从而限制加载它的时机。
比如:开发环境与正式环境的数据库连接配置文件不一样,在开发服务器指定为开发配置文件,在正式环境时切换正式的配置文件。(多看代码去理解)
2.2 profile的加载顺序、格式
格式:application-{profile}.properties
加载顺序:与application.properties一样。
profile中的配置会覆盖默认的配置,包括application.properties中的配置。
2.3 profile在spring boot中的配置
(1) application.properties中指定属性配置
#### 特定配置profile,多个可用逗号(,),ex:spring.profiles.active=dev,prod
## 特定Profile属性从跟标准application.properties相同的路径加载,并且特定profile文件会覆盖默认的配置。
spring.profiles.active=dev
## 用来无条件的添加生效的配置。或 SpringApplication.setAdditionalProfiles(String... profiles)
## 可能在pom中依赖了部分jar,所以可能必须使用手动配置(否则spring boot会用jar中的自动配置,比如database)
spring.profiles.include=log,thymeleaf,db
(问题: active与include有什么区别?)
(2) 用SpringApplication中的API配置
(3) 代码中限制加载及demo
@Controller
//@Profile注解可以实现不同环境下配置参数的切换,任何@Component或@Configuration注解的类都可以使用@Profile注解。
@Profile("dev")
public class DevController {
	@Value("${app.name}")
	private String appName;
	@Value("${app.description}")
	private String appDesc;

	@RequestMapping("/profile")
	public String greeting(
			@RequestParam(value = "name", required = false, defaultValue = "VergiLyn") String name,
			Model model) {
		model.addAttribute("appDesc", appDesc);
		model.addAttribute("name", appName);
		return "greeting";
	}
}
@Controller
@Profile("prod")
public class ProdController {
	@Value("${app.name}")
	private String appName;
	@Value("${app.description}")
	private String appDesc;

	@RequestMapping("/profile")
	public String greeting(
			@RequestParam(value = "name", required = false, defaultValue = "VergiLyn") String name,
			Model model) {
		model.addAttribute("appDesc", appDesc);
		model.addAttribute("name", appName);
		return "greeting";
	}
}
@SpringBootApplication
public class ProfileApplication {
	public static void main(String[] args) {
		SpringApplication app = new SpringApplication(ProfileApplication.class);
		app.setAdditionalProfiles("dev");	// dev 或prod
		app.run(args);
	}

}
application-dev.properties
## 属性占位符
app.name=dev_spring_boot
application-prod.properties
## 属性占位符
app.name=prod_spring_boot
application.properties
app.name=default_spring_boot
app.description=${app.name} is a Spring Boot application
## thymeleaf 配置
spring.thymeleaf.prefix=classpath:/templates/
spring.thymeleaf.suffix=.html
spring.thymeleaf.mode=HTML5
spring.thymeleaf.encoding=UTF-8
spring.thymeleaf.content-type=text/html
# set to false for hot refresh
spring.thymeleaf.cache=false
## dev/prod,此demo在java代码中指定
# spring.profiles.active=dev
# spring.profiles.include=...
greeting.html
<!DOCTYPE HTML>
<html xmlns:th="http://www.thymeleaf.org">
<head>
    <title>Getting Started: Serving Web Content</title>
    <meta http-equiv="Content-Type" content="text/html; charset=UTF-8" />
</head>
<body>
<p th:text="'Hello, ' + ${name} + '!'" />
</body>
</html>
结果:
如果profile启用”dev”,则app.name=dev_spring_boot,访问localhost:8080/profile被加载注入的bean是DevController。


